Table of Contents
Advertisement
Quick Links
Advertisement
Chapters
Table of Contents

Related Manuals for Sony HDVF-EL70


Summary of Contents for Sony HDVF-EL70
- Page 1 HD ELECTRONIC VIEWFINDER HDVF-EL70 電気製品は、安全のための注意事項を守らないと、 火災や人身事故になることがあります。 このオペレーションマニュアルには、事故を防ぐための重要な注意事項と製品の取 り扱いかたを示してあります。このオペレーションマニュアルをよくお読みのう え、製品を安全にお使いください。お読みになったあとは、いつでも見られるとこ ろに必ず保管してください。 OPERATION MANUAL [Japanese/English] 1st Edition (Revised 1)
- Page 2 日本語 安全のために 電気製品は、安全のための注意事項を守らないと、火災や感電などにより死亡や 警告表示の意味 大けがなど人身事故につながることがあり、危険です。 事故を防ぐために次のことを必ずお守りください。 このオペレーションマニュアルお よび製品では、次のような表示を 安全のための注意事項を守る しています。表示の内容をよく理 解してから本文をお読みください。 3、4 ページの注意事項をよくお読みください。 定期点検をする 長期間安全に使用していただくために、定期点検を実施することをおすすめしま す。点検の内容や費用については、ソニーのサービス担当者、またはソニーの この表示の注意事項を守らないと、 サービス窓口にご相談ください。 火災や感電などにより死亡や大け がなど人身事故につながることが 故障したら使用を中止する あります。 ソニーのサービス担当者、またはソニーのサービス窓口にご連絡ください。 万一、異常が起きたら この表示の注意事項を守らないと、 ・ 異常な音、におい、煙が出たら 感電やその他の事故によりけがを ・ 落下させたら したり周辺の物品に損害を与えた りすることがあります。 a カメラの電源を切る。 b カメラから本製品を外す。 注意を促す記号 c ソニーのサービス担当者、またはソニーのサービス窓口に相談する。 炎が出たら 行為を禁止する記号...
-
Page 3: Table Of Contents
警告 目次 警告 .................. 3 注意 .................. 4 使用上のご注意 ..............4 概要..................6 各部の名称と働き..............8 カメラに取り付ける............10 分解しない、改造しない 電源を入れる ............... 11 外装を外したり、改造したりすると、感 位置を調整する ..............12 電の原因となります。 高さ/角度調整................12 ビューファインダー内部の調整や設定お 前後位置調整..................13 よび点検を行う必要がある場合は、必ず 画面を調整する ..............13 サービストレーニングを受けた技術者に アクセサリーを取り付ける ..........14 ご依頼ください。 フードの取り付け... -
Page 4: 使用上のご注意
使用上のご注意 画面について • 画面を太陽にむけたままにすると、画面を傷めてしまい ます。屋外でご使用のときは、太陽に向けて放置しない でください。 • 画面を強く押したり、ひっかいたり、上にものを置いた りしないでください。画面にムラが出たり、パネルの故 障の原因になります。 ビューファインダーの取り付 • 使用中に画面が温かくなることがありますが、故障では け、取り外しの際は三脚をチ ありません。 ルトロックする 焼き付きについて ビューファインダーを取り付け、取り外 すときは、三脚のチルトロックを確実に 一般に、有機 EL パネルは、その高精細な画像を得るため 固定してください。転倒してけがの原因 に採用している材料の特性上、焼き付きが起こることがあ となることがあります。 ります。画面内の同じ位置に変化しない画像の表示を続け たり、くり返し表示したりすると、焼き付いた画面を元に ビューファインダーの取り付 戻せなくなります。 け、取り外しの際は、指示に 長時間の表示で焼き付きが発生しやすい画像 したがって行なう • 画面縦横比 16:9 以外のマスク処理された画像 ビューファインダーの取り付け、取り外 • カラーバーや長時間静止した画像 しは、このオペレーションマニュアルに •... - Page 5 長時間の使用について • 画面の表面からほこりを取り除くときは、ブロアーをお 使いください。 固定された画像または静止画などの長時間連続表示や、高 温環境下で連続運用した場合、有機 EL パネルの構造上お 画面に強い衝撃を与えない よび材料の特性上、残像や焼き付き、しみ、すじ、輝度低 内部構造や外観の変形など損傷を受けることがあります。 下などを発生することがあります。 使用、保管場所について 特に、アスペクト変更などで表示エリアよりも狭いサイズ で表示し続けた場合、パネル劣化の進行が早まるおそれが 水平な場所、空調のある場所に保管してください。 あります。 次のような場所での使用および保管は避けてください。 静止画などの長時間連続表示、または密閉された空間や空 • 極端に暑い所や寒い所 調機器の吹き出し口付近など高温多湿環境下における連続 • 湿気の多い所 運用を避けてください。 • 激しく震動する所 • 強い磁気を発生する所 本機使用時に輝度を少し下げたり、本機未使用時に電源を • 直射日光が長時間あたる所や暖房器具の近く 切ったりするなどして、上記のような現象を未然に防ぐこ とをおすすめします。 結露 本機を寒い場所から暖かい場所に急に移動したり、湿度の 輝点・滅点について 高い部屋で使用したりすると、空気中の水分が水滴となっ 本機のパネルは有効画素 99.99% 以上の非常に精密度の高い て製品内部に付着することがあります。この現象を結露と...
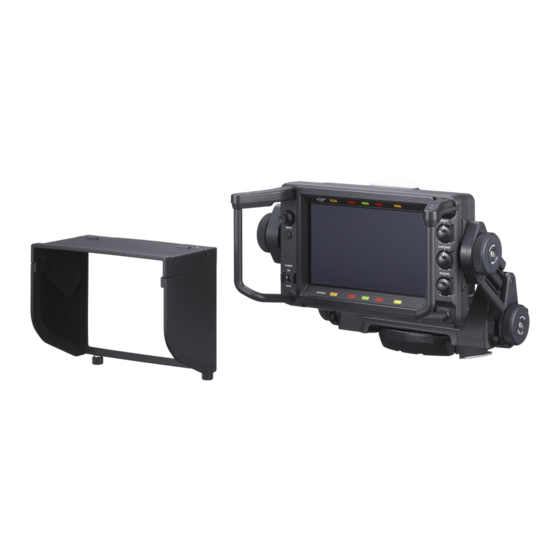
- Page 6 カラースペース変換機能 概要 マトリクス切り換えにより、放送規格 ITU-R BT.709、 EBU、SMPTE-C のカラースペースを再現できます。 マトリクスの設定をオフにすると、有機 EL パネル本来の 広い色域で映像を再現します。 HD エレクトロニックビューファインダー HDVF-EL70 は、 ソニーハイデフィニションカラーカメラ用の 7.4 型カラー 独自のフィードバック回路搭載 ビューファインダーです。 本機には以下のような特長があります。 有機 EL の発光状態を自動的に常にモニタリングし、 フィードバックして色調整を行うため、長期的に安定した 有機 EL パネル搭載 色再現を実現します。 有機 EL パネルは、電流を流すと光る性質を持つ有機材料 フォーカスアシスト機能 を用いています。有機材料が自ら発光する自発光型パネル で、流す電流量により発光の強さをコントロールします。 独自のフォーカスアシスト機能の搭載により、正確な これにより、以下の 3 つの特長があります。 フォーカス調整をサポートします。...
- Page 7 優れた操作性 • 新画面可動機構の採用 パネル部の重量を軽減するカウンターバランス機構とリ ンクアームを採用することにより、軽い操作感で画面角 度と上下位置を同時に調整できます。 • アサイナブルスイッチ付き大型ハンドル 画面の左右にアサイナブルスイッチを 2 個ずつ備えた大 型ハンドルを搭載。視界の妨げになりにくく、快適な操 作が可能です。 • 画面前後ロングスライド機構 お好みにより調整可能な最大 130 mm 画面を前後に移動 できるスライド機構を搭載しています。 屋内フード(付属)および屋外フード VFH- 790(別売)を取り付け可能 付属の屋内フードと、遮光性に優れている別売の屋外フー ド(VFH-790)を用意しています。 概要...
-
Page 8: 各部の名称と働き
各部の名称と働き SLIDE STOP LOCK FREE COUNTER BLANCE a ASSIGN.(アサイナブル)スイッチ f 予備インジケーター よく使う機能を任意で割り当てることができます。 現在は使用しません。 ハンドルの左側に ASSIGN. L1 と ASSIGN. L2 スイッチ、 g アップタリーランプ(赤) 右側に ASSIGN. R1 と ASSIGN. R1 スイッチが搭載されて ナンバープレート(付属)が取り付け可能です。 います。 レッドタリー信号が入力されると点灯します。 機能の割り当ては FUNCTION メニューの「ASSIGN. L1」 、 「ASSIGN. L2」 、 「ASSIGN. R1」 、 「ASSIGN. R2」で設定し h BRIGHT つまみ... - Page 9 l COUNTER BALANCE(カウンターバランス)つまみ ◆ ファンを強制的にストップさせる方法は、 「メニュー一覧」 (20 ページ)を参照してください。 画面部の重さを支える力を調整します。 +側に回すと、重さを支える力が強くなります。+側に回 0.5 秒間隔で点滅:自己診断で不具合を検出。 しにくい場合は、画面の高さを上げて、つまみを回してく 同時にエラーメッセージ (25 ページ)が表示されることが ださい。 ある。 電源を切ってソニーのサービス担当者に連絡する。 m スライドロックつまみ 画面部の前後位置を調整するときに使用します。 u リフトフリクション調整つまみ つまみを LOCK 矢印の方向へ回すと、任意の位置でスライ リフト操作のフリクションの強さを調整します。 ドをロックします。 +側に回すとフリクションが強くなり、−側に回すと弱く スライドポジションつまみを STOP(ストップ)にした なります。 あと、ゆるみが気になる場合にも使用できます。 v ハンドル n リフトロックつまみ 本機の画面部を動かすときに使用します。 つまみに表示されている矢印の方向へ回すと、ビューファ w POWER(電源)スイッチ...
-
Page 10: カメラに取り付ける
本機を任意の位置に回転させる。 カメラに取り付ける ハンドル ご注意 • 本機をカメラに取り付け/取り外しするときは、必ず本 ベース部 機を標準位置にロックしてください。 • 本機をカメラから取り外すときは、三脚のチルトロック を確実に行い、本機を確実に持って取り外してください。 また、本機およびカメラの転倒・落下にご注意ください。 ◆ カメラに取り付けた後本機の位置を変える方法については、 「位 置を調整する」 (12 ページ)の手順を参照してください。 カメラのパンベース受け台を、下図の位置まで右方向 いっぱいに回転させる。 本機の底面にあるパンベースの突起部が図の位置にく ご注意 るように本機を持ち、本機のマウントウェッジが、カ 本機は確実に固定してください。正しく取り付けられてい メラのパンベース受け台の V 字型溝の中に入るように ないと、落下してけがの原因となることがあります。 パンベース受け台にのせる。 取り外すには 突起部 パンベース 本機の底面 本機の画面部を標準位置に戻す。 チルトロックつまみとリフトロックつまみを、つまみ マウント に表示されている矢印の方向(ロック側)へ回し、画 ウェッジ 面部を標準位置に固定する。 標準位置:図のように画 面部の高さや角度を奥に... -
Page 11: 電源を入れる
本機を時計回り方向いっぱいに回転させる。 電源を入れる カメラの電源を入れ、本機の POWER スイッチを ON にす ると電源が入ります。 電源が入ると数秒後に、画像が表示されます。 スライドポジションつまみを時計回りへ回して FREE(フリー)にし、スライドロックつまみを反 時計回りへ回して、スライドポジションの固定を解除 する。 スライドポジ スライドロック ションつまみ つまみ SLIDE STOP LOCK FREE COUNTER BLANCE 手順 6 の図に示すように、 穴からつまみが見えるところ まで本機をスライドさせる。スライドポジションつま みを反時計回りへ回して STOP(ストップ)にし、 スライドポジションを固定する。 つまみを押しながら本機のハンドルを手前に引き、持 ち上げて外す。 つまみ SLIDE STOP LOCK FREE COUNTER BLANCE 電源を入れる... -
Page 12: 位置を調整する
位置を調整する 高さ調整 高さ/角度調整 本機は、ビューファインダーの高さや角度を任意の位置に 10 cm 調整できます。 チルトロックつまみとリフトロックつまみを下図の矢 印の方向へ回し、ロックを解除する。 最大調整範囲:10 cm チルトロックつまみ チルティング調整 リフトロックつまみ チルトフリクション調整つまみとリフトフリクション 調整つまみを下図の矢印の方向へ回し、フリクション を調整する。 最大調整範囲:上下 90° 必要に応じて、COUNTER BALANCE(カウンターバ ランス)つまみを回し、画面部の重みを支える力を調 整してください。+側に回すと、画面部の重みを支え ご注意 る力を強く調整できます。 上図の最大調整範囲で操作するには、ビューファインダー の位置をカメラ撮影者側へ近づけてください。ビューファ チルトフリクション インダーの前後位置調整は「前後位置調整」 (13 ページ) 調整つまみ を参照してください。 リフトフリクション チルトロックつまみとリフトロックつまみを、つまみ 調整つまみ に表示されている矢印の方向(ロック側)へ回し、位 置を固定する。 +側に回すとフリクションを強く調整できます。 ハンドルを持ちながら、ビューファインダーの高さや 角度を調整する。... -
Page 13: 前後位置調整
前後位置調整 画面を調整する ご注意 本機を低温下で使用した場合、内部の線材が硬くなりスラ ご注意 イド動作が重くなることがあります。その場合は、無理に スライド動作を行わないでください。 操作の前に、PRESET メニューの「PRESET」が「OFF」 に設定されていることを確認してください。 スライドポジションつまみを時計回りへ回して 「PRESET」が「ON」に設定されていると、BRIGHT、 FREE(フリー)にし、スライドロックつまみを反 CONTRAST、PEAKING つまみの操作が無効になります。 時計回りへ回して、スライドポジションの固定を解除 ◆ メニュー操作については、 「メニューを使う」 (18 ページ)を参 する。 照してください。 SLIDE STOP LOCK FREE COUNTER BLANCE 前後位置を調整する。 BRIGHT つまみを回して、画面の明るさを調節する。 明るくするには:時計方向に回す。 CONTRAST つまみを回して、画面のコントラストを 調節する。 コントラストを強くするには:時計方向に回す。 PEAKING つまみを回して、ピーキングを補正する。 輪郭をはっきりさせるには:時計方向に回す。 つまみの誤動作を避けるには... -
Page 14: アクセサリーを取り付ける
屋外フード(別売) アクセサリーを取り付け る フードの取り付け 屋外フード VFH-790(別売)の取り付けかたは、屋内フー ド(付属)と同じです。 ここでは、屋内フード(付属)の取り付けかたとして説明 コインネジ(両側) します。 屋外フードが動きにくいときや、逆に所定の位置に留まり 溝に引っかけて、取り付ける。 にくいときは、両側のコインネジで調節します。右に回す と動きが重くなり、左へ回すと軽くなります。 溝 ナンバープレートの取り付け ナンバープレート(付属)の左右のつめをアップタリーラ ンプの溝に差し込みます。 アップタリーランプ ネジを回して、固定する。 ナンバープレート(付属) ネジ 屋内フード(付属) フードは上方向に 45°向きを変えることができます。 アクセサリーを取り付ける... -
Page 15: フォーカスアシスト機能を使う
色で特定した画像の輪郭を補正するには フォーカスアシスト機能 PEAKING PLUS 機能を割り当てた ASSIGN スイッチを を使う 押して、PEAKING PLUS モードに切り換える。 PEAKING PLUS インジケーターが点灯します。 PEAKING PLUS メニューの「PEAKING MODE」で ◆ メニューの操作方法については、 「メニューを使う」 (18 ペー も設定できます (22 ページ) 。 ジ)を参照してください。 PEAKING PLUS メニューの「COLOR/AREA SEL」で ピーキング(COLOR PEAKING)機 「COLOR」を選択する。 能 PEAKING PLUS 機能を割り当てた ASSIGN スイッチを COLOR PEAKING 機能を「ON」にすると、ピーキング信... - Page 16 表示エリアで特定した画像の輪郭を補正す PEAKING PLUS メニューの「POSITION」でエリアを 選択する。 るには CENTER UPPER RIGHT LOWER LEFT PEAKING PLUS 機能を割り当てた ASSIGN スイッチを 押して、PEAKING PLUS モードに切り換える。 PEAKING PLUS インジケーターが点灯します。 「POSITION」の設定を変更すると、MAGNIFICATION PEAKING PLUS メニューの「PEAKING MODE」で メニューの「MAG POSITION」の設定も連動して変更 も設定できます (22 ページ) 。 されます。 PEAKING PLUS メニューの「COLOR/AREA SEL」で PEAKING PLUS 機能を割り当てた ASSIGN スイッチを 「AREA」を選択する。...
-
Page 17: 拡大表示(Magnification)機能
MAGNIFICATION メニューの「MODE SEL」で表示 拡大表示(MAGNIFICATION)機能 MODE1 ∼ 3 を選択する。 構図合わせ用とフォーカス合わせ用の画像を同時に表示で MODE1:通常の拡大表示 きます。 MAGNIFICATION機能を割り当てたASSIGN.スイッチ を押す。 画像が拡大表示されます。 MAGNIFICATION メニューでも設定できます (22 ページ) 。 MAGNIFICATION機能を割り当てたASSIGN.スイッチ MODE2:拡大表示内の右下に元画像を表示 を押したままにする。 拡大部分が以下の順で切り換わります。 「MAGNIFICATION」メニューの「MAG POSITION」 でも設定できます (22 ページ) 。 CENTER UPPER RIGHT LOWER LEFT MODE3:元画像表示の中央に拡大画像を表示 「MAG POSITION」の設定を変更すると、PEAKING メ ニューの「POSITION」の設定も連動して変更されま す。 通常表示に戻すには... -
Page 18: メニューを使う
• ページを選びなおすときは、MENU スイッチを押す メニューを使う と、ページ選択モードに戻ります。 • 設定値に ? マークがある場合(設定値変更モード) は、MENU スイッチを押すと項目選択モードに戻り ます。もう一度 MENU スイッチを押すと、ページ選 本機では、メニューを使って操作全般の設定を行います。 択モードになります。 項目を選ぶ。 メニューモードの基本操作 選択したページの設定項目に マークが表示されてい メニューモードに入る。 る状態(項目選択モード)で、MENU つまみを回し て、 マークを移動する。 MENU スイッチを押す。 時計方向に回すと、 マークが下へ移動し、反時計方 メニュー画面がビューファインダー画面に表示されま 向に回すと マークが上へ移動します。 す。 項目選択モード M E N U F U N C T I O N c マーク... - Page 19 なります。 速く回すと数値が速く変化し、ゆっくり回すと微調整 ができます。 設定値を確定する。 MENU つまみを押す。 設定値が確定され、項目選択モードに移ります。 MENU つまみを押す前に、MENU スイッチを押すと、 設定値は変更前の値に戻り、項目選択モードに戻りま す。 続けて設定を変更する。 続けて他の設定項目を変更するには、手順 2 ∼ 5 を繰り 返す。 メニューモードから抜ける。 メニュー画面が消えるまで、MENU スイッチを繰り返 し押す。 設定値を工場出荷値に戻すには 戻したい設定項目に マークを表示させる、または設定値 に?マークを表示した状態で、MENU つまみを 2 秒以上押 します。 メニューを使う...
-
Page 20: メニュー一覧
メニュー一覧 • 選択できない項目は、設定値に「−−−」と表示されま ご注意 す。 • 項目によっては、前のメニュー項目で「ON」が選択され ていないと選択できないものがあります。 ページ メニュー 項目 設定値([ ] は工場出荷 機能 値) FUNCTION ASSIGN. L1 OFF/MONO/MAG/ ASSIGN. L1 スイッチに機能を割り当てます。 [WFM]/PEAK+/KNEE/ 各機能の詳細設定はそれぞれのメニューページで設定します。 PRESET/UPTLY/FAN OFF: 未割付 MONO: 白黒表示の ON/OFF を切り換える MAG: 拡大表示機能の ON/OFF を切り換える(1 秒以上押すと 拡大位置を切り換える) WFM: WFM 表示の ON/OFF を切り換える PEAK+: ピーキング・モードの... - Page 21 ページ メニュー 項目 設定値([ ] は工場出荷 機能 値) PEAKING PLUS [MODE1]/MODE2 PEAKING PLUS 機能を割り当てた ASSIGN. スイッチを押した際 FUNCTION の動作モードを切り換えます。 MODE1: PEAKING MODE を STD ⇔ PLUS に切り換える MODE2: STD → COLOR → AREA → BOTH → STD の順に切 り換える TALLY/IND UP TALLY OFF/[ON] アップタリーをコントロールします。...
- Page 22 ページ メニュー 項目 設定値([ ] は工場出荷 機能 値) PEAKING PLUS PEAKING MODE [STD]/PLUS ピーキングのモードを切り換えます。 STD: 通常モード PLUS: PEAKING PLUS モード COLOR/AREA [COLOR]/AREA/BOTH 「PEAKING PLUS」のモードを選択します。 COLOR: 選択された色にのみ輪郭強調をかける AREA: 選択された領域にのみ輪郭強調をかける BOTH: 選択された色かつ領域にのみ輪郭強調をかける POSITION [CENTER]/UPPER/ 「COLOR/AREA SEL」で「AREA」または「BOTH」が選択され RIGHT/LOWER/LEFT ているとき、PEAKING の有効エリアを選択します。 設定値は MAGNIFICATION メニューの「MAG POSITION」と連 動します。...
- Page 23 ページ メニュー 項目 設定値([ ] は工場出荷 機能 値) PRESET PRESET [OFF]/ON BRIGHT、CONTRAST、PEAKING の各つまみおよび FUNCTION メニューで設定されたクロマレベルと、PRESET メ ニューの「PRST BRIGHT」 、 「PRST CONTRAST」 、 「PRST PEAKING」 、 「PRST CHROMA」で設定されたプリセット値のど ちらを有効にするかを切り換えます。 OFF: つまみおよび FUNCTION メニューで設定されたクロマレ ベルが有効 ON: PRESET メニューの設定値が有効 PRST BRIGHT − 99 ∼ [0] ∼ 99 「PRESET」で「ON」が選択されているときに画像の明るさを設定...
- Page 24 ページ メニュー 項目 設定値([ ] は工場出荷 機能 値) WAVEFORM LINE 0 ∼ [50] ∼ 100 選択ライン表示時、選択ラインの位置を設定します。 数値を大きくすると下方向、小さくすると上方向に移動します。 COLOR [W]/R/G/B/YL 選択ライン表示時、選択ラインの表示色を白(W) 、赤(R) 、緑 (G) 、青(B) 、黄(YL)から選択します。 INTENSITY 1 ∼ [5] ∼ 10 選択ラインの明るさを設定します。 数値を大きくすると明るくなります。 CURSOR 0 ∼ [50] ∼ 100 波形モニター内に表示されるカーソルの位置を設定します。数値を 大きくすると上方向、小さくすると下方向に移動します。...
-
Page 25: エラーメッセージ
エラーメッセージ 仕様 一般 表示 内容 電源 DC 10.5 V ∼ 17.0 V(カメラから供給) ERROR PEAKING PLUS モードの「COLOR 消費電力 19.5 W DETECT」に失敗したとき 使用温度 − 20゜C ∼ +45゜C BACKUP ERROR EEPROM のバックアップデータのチェック 保存温度 − 20゜C ∼ +60゜C サムが一致しないとき 質量 3.8 kg(フード含まず) VF TEMP HIGH 温度異常のとき... - Page 26 表示部 取り付ける場合は、ラージレンズアダプター HDLA1500 または ラージレンズビューファインダーアダプター HDLA1507 が必要 7.4 型、カラー、有機 EL パネル になります。 有効画面サイズ 164(水平)× 92(垂直) mm(アスペ クト比 16:9) 本機の仕様および外観は、改良のため予告なく変更するこ 有効画素数 960(水平)× 540(垂直)× 3 とがありますが、ご了承ください。 (RGB) お使いになる前に、必ず動作確認を行ってください。故障 その他に伴う営業上の機会損失等は保証期間中および保証 性能 期間経過後にかかわらず、補償はいたしかねますのでご了 輝度 350 cd/m (ピーク輝度、typical) 承ください。 解像度 500 TV 本以上 対応フォーマット 有効走査線数 フォーマット 水平走査線周波数 垂直走査線周波数...
- Page 27 English Before operating the unit, please read this manual Türkiye’deki müşteriler için thoroughly and retain it for future reference. AEEE Yönetmeliğine Uygundur For the customers in the U.S.A. This equipment has been tested and found to comply with the limits for a Class A digital device, pursuant to part 15 of the FCC Rules.
-
Page 28: Precautions
Table of Contents Precautions Precautions..........28 Handling the screen Overview ..........30 • The panel fitted to this unit is manufactured with high Functions of Parts and Controls.... 32 precision technology, giving a functioning pixel ratio of at least 99.99%. Thus a very small proportion of pixels Attaching to the Camera...... - Page 29 On IBAC (Intelligent Brightness Ambient abrasives, or chemical wipe as these may damage the Control) screen. • This product has a built-in IBAC function to reduce • Use a blower to remove dust from the screen surface. burn-in. When a nearly still image is displayed for a specified period of time, the IBAC function is activated On installation automatically and the brightness of the screen...
-
Page 30: Overview
The matrix switching function brings to you broadcast standard (ITU-R BT.709/EBU/SMPTE-C) color space settings. Setting the matrix to OFF reproduces images in the The HDVF-EL70 HD Electronic Viewfinder is a 7.4-type original wide color space of OLED. color viewfinder for use with a Sony high-definition color camera. - Page 31 switches are provided for the left and right sides of the screen. These do not hinder the operator’s view, and they offer comfortable operation. • Long slide mechanism to move the screen forward/ backward The long slide mechanism enables moving the viewfinder screen forward or backward up to 130 mm (5 1/8 inches).
-
Page 32: Functions Of Parts And Controls
Functions of Parts and Controls SLIDE STOP LOCK FREE COUNTER BLANCE a ASSIGN. (assignable) switches f Reserve indicator Can be used to store frequently used functions. Currently not used. The switches ASSIGN. L1 and ASSIGN. L2 are located g Up-tally lamp (red) on the left handle, and ASSIGN. - Page 33 An error message (see page 50) may be displayed at the same time. Turn off the power and contact your Sony n Lift-lock knob service representative. Turn this knob in the direction of the arrow indicated on u Lift friction adjustment knob the knob to fix the height of the viewfinder.
-
Page 34: Attaching To The Camera
z MENU control Attaching to the Camera Turn the control to select a menu item, and then press the control to confirm the selection. Use with the MENU switch to set various functions. When the menu is not displayed, pressing this control Notes shows the status information of the viewfinder on the screen. - Page 35 Turn the viewfinder to a random position. Handle Base portion Turn the slide position knob clockwise to FREE, and turn the slide-lock knob counterclockwise to release the lock of the slide position. Notes Make sure that the viewfinder is securely locked. If the Slide-lock Slide position viewfinder is not properly attached to the camera, it may...
-
Page 36: Turning On The Viewfinder
Turning on the Adjusting the Viewfinder Viewfinder Position When the camera is turned on and the POWER switch of Adjusting the Height and Tilting/ the viewfinder is set to ON, power is supplied to the Panning viewfinder. The image will be displayed several seconds after supplying power to the viewfinder. -
Page 37: Adjusting The Front-Back Position
Holding the handles, move the viewfinder to the Adjusting the Front-Back Position desired height and position. Note Height adjustment When the unit is being used under low temperatures, the inner wiring becomes hard, and the slide operation feels heavy. In this case, do not slide the viewfinder forcibly. Turn the slide position knob clockwise to FREE, 10 cm... -
Page 38: Adjusting The Screen
Adjusting the Screen Attaching Accessories Attaching a Hood Note Before operating, make sure that “PRESET” in the You can attach the optional VFH-790 outdoor hood in the PRESET menu is set to “OFF.” same way as the supplied indoor hood. The BRIGHT, CONTRAST, and PEAKING controls do This section describes the procedure of attaching the not operate when “PRESET”... -
Page 39: Attaching A Number Plate
Outdoor hood (optional) Using the Focus Assist Function For details on menu operations, see “Using the Menu” on page 42. COLOR PEAKING Function When the COLOR PEAKING function is set to “ON,” the Coin screw (on both sides) peaking signal is displayed with the colors changed. Set “COLOR PEAKING”... - Page 40 You can also set to this mode using “PEAKING You can also set to this mode using “PEAKING MODE” from the PEAKING PLUS menu (see page MODE” from the PEAKING PLUS menu (see page 46). 46). Select “COLOR” under “COLOR/AREA SEL” of Select “AREA”...
-
Page 41: Magnification Function
If the “POSITION” setting is changed, the “MAG MAGNIFICATION Function POSITION” setting in the MAGNIFICATION menu will be changed too. This function enables you to display both images for picture composition and for focusing at the same time. Press and hold the ASSIGN switch that is assigned the PEAKING PLUS function for one second or Press the ASSIGN. -
Page 42: Using The Menu
Using the Menu Many of the viewfinder’s functions can be set by a menu operation. Basic Menu Operations To return to normal display Enter the menu. The two manners of returning to the normal display, under “AUTO RELEASE” settings in the Press the MENU switch. - Page 43 item select mode. Press the MENU switch again to The setting is entered and the menu returns to item return to page select mode. select mode. Select menu items. If you press the MENU switch before pressing the MENU control, the setting returns to the value that With the mark positioned to the left of a menu item was previously set and then the menu returns to item...
-
Page 44: List Of Menu Items
List of Menu Items • “– – –” appears to the left of settings that cannot be Notes selected. • Some settings cannot be selected unless the previous menu item is set to “ON.” Page Menu Item Settings Function (default in [ FUNCTION ASSIGN. - Page 45 Page Menu Item Settings Function (default in [ FUNCTION OFF/[5]/15/30 For setting the time (minutes) after which the IBAC IBAC (Intelligent Brightness Ambient Control) function is activated. For the IBAC function, see “On IBAC (Intelligent Brightness Ambient Control)” on page 29. [MODE1]/MODE2 For selecting the operation mode upon pressing the PEAKING PLUS ASSIGN.
- Page 46 Page Menu Item Settings Function (default in [ PEAKING MODE [STD]/PLUS PEAKING PLUS For selecting a peaking mode. STD: Standard mode PLUS: PEAKING PLUS mode COLOR/AREA [COLOR]/AREA/ For selecting a PEAKING PLUS mode. BOTH COLOR: Sharpens the edges for the selected color only. AREA: Sharpens the edges for the selected area only.
- Page 47 Page Menu Item Settings Function (default in [ [OFF]/ON PRESET PRESET For selecting whether to enable the settings of the BRIGHT, CONTRAST, PEAKING controls and the chroma level in the FUNCTION menu, or to enable the preset “PRST BRIGHT,” “PRST CONTRAST,” “PRST PEAKING,” and “PRST CHROMA”...
- Page 48 Page Menu Item Settings Function (default in [ WAVEFORM Displays a simplified input signal waveform as a sub display. The right illustration is an example of the waveform monitor when a color bar Selected signal is input. LINE Notes • Adjust the output level of camera under the LEVEL ADJUST menu before using the WAVEFORM Cursor...
- Page 49 Page Menu Item Settings Function (default in [ STATUS DISPLAY ASSIGN. L1 OFF/[ON] For selecting whether the changes in the status of the function assigned to the ASSIGN. L1 switch is displayed (ON) or not (OFF). ASSIGN. L2 OFF/[ON] For selecting whether the changes in the status of the function assigned to the ASSIGN.
-
Page 50: Error Message
Error Message Specifications General Display Description Power supply 10.5 V to 17.0 V DC (supplied by the ERROR Failure in “COLOR DETECT” in camera) PEAKING PLUS mode Power consumption BACKUP ERROR Checksums of the EEPROM backup 19.5 W data are not consistent Operating temperature –20°C to +45°C (–4°F to +113°F) VF TEMP HIGH... - Page 51 Always verify that the unit is operating properly before lines frequency (kHz) frequency (Hz) use. SONY WILL NOT BE LIABLE FOR DAMAGES 1080 23.98PsF 26.97 47.95 OF ANY KIND INCLUDING, BUT NOT LIMITED 24PsF TO, COMPENSATION OR REIMBURSEMENT ON...
- Page 53 保守等) と異なる目的で本マニュアルを使用することを禁止 します。 The material contained in this manual consists of information that is the property of Sony Corporation and is intended solely for use by the purchasers of the equipment described in this manual. Sony Corporation expressly prohibits the duplication of any...
- Page 54 Sony Corporation Printed in Belguim 2017.08 08 HDVF-EL70 (SY) © 2010 4-258-596-02(1)
Need help?
Do you have a question about the HDVF-EL70 and is the answer not in the manual?
Questions and answers