Table of Contents
Advertisement
Quick Links
Advertisement
Table of Contents

Related Manuals for Midtronics EXP-800


Summary of Contents for Midtronics EXP-800
- Page 1 July 2008 168-547A EXP- 800 Battery & Electrical Diagnostic Analyzer For testing 6 and 12-volt automotive batteries and 12- and 24-volt charging systems INNOVATION TECHNOLOGY QUALITY WORLDWIDE INSTRUCTION MaNUal INNOVATION TECHNOLOGY QUALITY WORLDWIDE...
- Page 2 blank page behind cover...
-
Page 3: Table Of Contents
EXP-800 Contents Contents Chapter 1: Before You Begin Chapter 4: Admin/Utility Menu Safety Reminder Clock Personal Precautions Mode Time Chapter 2: Overview Format Date Connections and Data Ports Connecting the Battery Test Cable Shop Removing and Inserting the Data Card... - Page 4 Contents EXP-800 Chapter 6: Battery Test Chapter 10: Printing Test Results Additional Test Requirements and Messages Changing the Paper in the Internal Printer System Noise Detected Chapter 11: Troubleshooting Unstable Battery Detected Deep Scan Test Problems with the Display Voltage Out of Range...
-
Page 5: Chapter 1: Before You Begin
EXP-800 Chapter 1: Before You Begin Chapter 1: Before You Begin Battery acid is highly corrosive. If acid enters your eyes, im- Safety Reminder mediately flush them thoroughly with cold running water for at least 15 minutes and seek medical attention. If bat-... -
Page 6: Chapter 2: Overview
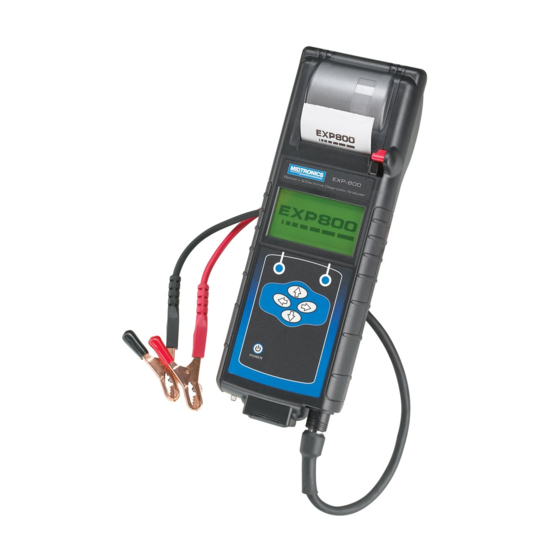
Chapter 2: Overview EXP-800 Chapter 2: Overview This chapter describes the analyzer’s hardware and software interface. The components include test leads and connectors, and the display and keypad. The user interface comprises the software menus, test options, and utilities. Connections and Data Ports... -
Page 7: Connecting The Battery Test Cable
EXP-800 Chapter 2: Overview Connecting the Battery Test Cable Removing and Inserting the Data Card CAUTION: To prevent damage to the analyzer’s The analyzer ships with a plastic insert in the data card slot to circuitry, do not connect the analyzer to a voltage protect it from dust and debris. -
Page 8: Display And Keypad
Chapter 2: Overview EXP-800 Display and Keypad The EXP display and keypad work together to help you quickly find and use the right tools at the right time. The display also keeps you on track with on-screen navigation aids, directions, and messages. The illustration shows how the elements on the screen relate to the keypad. - Page 9 EXP-800 Chapter 2: Overview ARROW keys Scroll Bar Press the UP ARROW key to move up to the next Another navigational aid is the scroll bar on the selectable item or row. When entering text, use right side of the screen. The position of its scroll...
-
Page 10: Data Entry Methods
Chapter 2: Overview EXP-800 Data Entry Methods Scrolling Lists Scrolling lists contain items that extend above and below the To perform a particular test or function, the EXP requires screen. The first number above the right soft key indicates different types of information. This means that the methods the position in the list of the highlighted item. -
Page 11: Menu Structure
Provides tips for troubleshooting problems with the printer, the cables, and loss of power. Also includes Midtronics Customer Service phone numbers. Info Menu The Info Menu has utilities to allow you to view and print test results, track the usage and history of your analyzer, and manage test data. -
Page 12: Admin/Utility Menu
Chapter 2: Overview EXP-800 Admin/Utility Menu The Admin/Utility Menu lets you customize your analyzer for your needs. Before using the analyzer for the first time, check the default values to see what options you may want to change, add, or delete. -
Page 13: Chapter 3: Getting Started
EXP-800 Chapter 3: Getting Started Chapter 3: Getting Started logging in as an Unregistered User The EXP is initially set up to require a default USER ID to access the Main Menu. The instructions in this section show you how... -
Page 14: Chapter 4: Admin/Utility Menu
Chapter 4: admin/Utility Menu EXP-800 Chapter 4: Admin/Utility Menu The Admin/Utility Menu has several utilities that customize the EXP—from the language of the user interface to the contrast of the text on the display. The utilities have default settings that you can change, depending on your requirements. The most important function is the ADMIN (administrative) function, which controls user access. -
Page 15: Clock
Chapter 4: admin/Utility Menu EXP-800 Clock Format Use the UP or DOWN ARROW to move the dot to the option The CLOCK ADJUST utility has four settings. Use the button of your choice (1 or 2). UP or DOWN ARROW key to highlight the setting Select the format of the date. -
Page 16: Shop
Chapter 4: admin/Utility Menu EXP-800 Shop To erase a character, press the LEFT ARROW key. Display a character by pressing the UP or DOWN ARROW The SHOP INFO utility allows you to create a header key as many times as needed. You can center text by in- for your printed test results with your business lo- serting blank spaces with the RIGHT ARROW key. -
Page 17: Deleting A User Id
EXP-800 Chapter 4: admin/Utility Menu To clear the default characters, press the LEFT ARROW Press the UP or DOWN ARROW key to select your prefer- key. To add a space, move the cursor forward by pressing ence. To erase a character, press the LEFT ARROW key. -
Page 18: Edit Coupon
Chapter 4: admin/Utility Menu EXP-800 Edit Coupon To create and edit a coupon, see the procedure under “Shop” in this chapter for using the keypad to enter and backspace The EDIT COUPON utility allows you to create and over characters. -
Page 19: Language
EXP-800 Chapter 4: admin/Utility Menu language 4 – LANGUAGE Select this setting to enable (ON) or disable (OFF) the The LANGUAGE utility allows you to select a lan- language selection option when the EXP boots up. guage for the display and printouts. You can over- ride the selection when the EXP displays the lan- 5 –... -
Page 20: Format Disk
Chapter 4: admin/Utility Menu EXP-800 Format Disk Select this utility to format an data card to receive data or erase all data on the card. The analyzer will warn you before formatting the disk and ask if you want to continue. -
Page 21: Chapter 5: Test Preparation
EXP-800 Chapter 5: Test Preparation Chapter 5: Test Preparation Inspecting the Battery Testing In-Vehicle (System Test) Before starting the test, inspect the alternator drive belt. A belt Before starting the test visually inspect the battery for: that is glazed or worn, or lacks the proper tension, will prevent •... -
Page 22: Chapter 6: Battery Test
Chapter 6: Battery Test EXP-800 Chapter 6: Battery Test The Battery Test analyzes a battery not connected to a vehicle. Select the BATTERY TYPE. The EXP guides you through the steps of selecting your AUTOMOTIVE (default) battery test parameters and interpreting the results. Before... -
Page 23: Additional Test Requirements And Messages
EXP-800 Chapter 6: Battery Test Unstable Battery Detected Table 2: Battery Rating Systems A battery that is weak or that has just been charged may retain Rating enough electrical activity to be detected by the analyzer System Description Range and will adversely affect the test results. A fully charged... -
Page 24: State Of Health (Soh)
Fully charge the battery and return it to service. CHARGE REQUIRED Fully charge the battery using a Midtronics Diagnostic Charger and retest. Failure to fully charge the battery before retesting may cause false readings. If CHARGE REQUIRED appears again after you fully charge the battery, replace the battery. -
Page 25: Chapter 7: System Test
The starter voltage is low and the battery is fully charged. CHARGE BATTERY The starter voltage is low and the battery is discharged. Fully charge the battery using a Midtronics Diagnostic Charger and retest the starter system. REPLACE BATTERY Replace the battery and retest before testing the alternator test.. -
Page 26: Charging System Test
Chapter 7: System Test EXP-800 Charging System Test 10. ACQUIRING DATA..HOLD ENGINE RPM: Continue to hold the rpm while the analyzer takes system measurements. When you press NEXT in any test result screen, the analyzer 11. ENGINE REV DETECTED, IDLE ENGINE: The analyzer has de- proceeds to the Charging System Test. - Page 27 EXP-800 Chapter 7: System Test Table 5: Charging System Decisions Charging System Decision Action The system is showing normal output from the alternator. No problem detected. PROBLEMS NO OUTPUT The alternator is not providing charging current to the battery. √...
-
Page 28: Chapter 8: Pdi Battery Test
Chapter 8: New Battery Test EXP-800 Chapter 8: PDI Battery Test Printing Test Results The PDI Battery Test in the Main Menu enables you to quickly check new batteries in your inventory. The test can verify up To print the test results for an individual battery, use the... -
Page 29: Chapter 9: Info Menu
EXP-800 Chapter 9: Info Menu Chapter 9: Info Menu Totals The Info Menu has several types of reports to help you manage your test data and track the usage and history of your analyzer. The TOTALS menu shows the total number of tests... -
Page 30: Chapter 10: Printing Test Results
Chapter 10: Printing Test Results EXP-800 Chapter 10: Printing Test Results If you are using the EXP internal printer, keep the clamps To replace the paper roll: connected to the battery during the printing process. After a Unlock the printer door by gently pressing down on the test the results automatically print. -
Page 31: Chapter 11: Troubleshooting
EXP Help Menu provides problems with the printer, the cables, and loss of power. The internal printer will not print It also includes Midtronics Customer Service phone • The analyzer must be connected to the vehicle battery to numbers. print to the internal printer. Check the clamp connections to the battery. -
Page 32: Chapter 12: Test Cable Maintenance
If an inspection or a change in test results indicate that the test test readings and protect the clamps by cleaning the bat- cables need to be replaced, please call Midtronics Customer tery case and terminals using a wire brush and a mixture Service at 1-800-776-1995. -
Page 33: Testing Resistance In The Cable Set
EXP-800 Chapter 12: Test Cable Maintenance Testing Resistance in the Cable Set Orientation of arrow on cable If the analyzer frequently displays CHECK CLAMP CONNECTION! connector BLACK clamp, you may have an intermittent open circuit along one or both RED clamp,... -
Page 34: Chapter 13: Exp Internal Batteries
EXP-800 Chapter 13: EXP Internal Batteries Chapter 13: EXP Internal Batteries The EXP uses six AA, 1.5-volt batteries (alkaline recommended) Lift the door at the tab and place it aside. to allow testing of batteries down to 1 volt and supply power Remove the discharged batteries. - Page 36 This analyzer is warranted to be free of defects in materials and workmanship for a period of one year from date of purchase. EXP-800 cables are warranted to be free of defects in materials and workmanship for a period of 9 months from date of purchase.
Need help?
Do you have a question about the EXP-800 and is the answer not in the manual?
Questions and answers