
Related Manuals for Midtronics MDX-655P


Summary of Contents for Midtronics MDX-655P
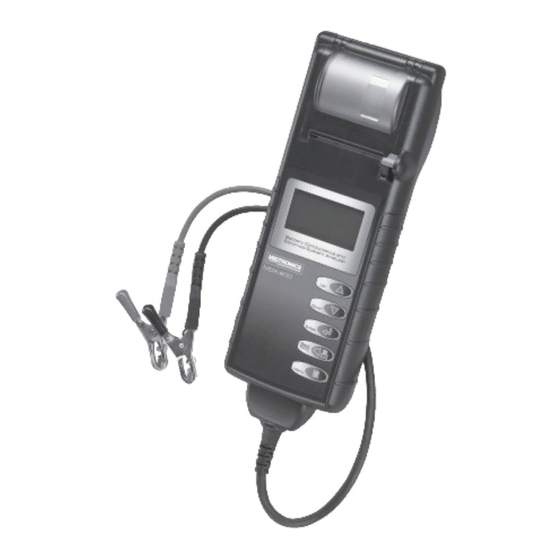
- Page 1 MDX-655P Battery Conductance & System Analyzer Battery Conductance and Electrical System Analyzer For 6 & 12-volt automotive starting batteries and 12 & 24-volt starting/charging systems INSTRUCTION MANUAL...
- Page 2 Blank page...
-
Page 3: Table Of Contents
BACK/PRINT Button MENU Button Options Menu Procedure Preparations Before the Test Connecting the Tester Battery Test Battery Test Results New Battery Test Results Starter System Test Starter System Test Results Charging System Test Charging System Test Results www.midtronics.com • •... - Page 4 Test Messages Error Messages Maintenance & Troubleshooting Changing The Cable Assembly Changing The Printer Paper Printer Troubleshooting Troubleshooting the Display Replacing the Battery www.midtronics.com • •...
-
Page 5: Safety Guidelines
It displays the test results in seconds and features a built-in printer to provide customers with a copy of the results. Additional features include the ability to: • test the Starting and Charging system • test batteries from rated from 100 to 2000 CCA • detect bad cells • protect against reverse polarity • test discharged batteries • test multiple rating systems • provide a multi-lingual user interface. www.midtronics.com • •... - Page 6 • •...
-
Page 7: Registering Your Mdx-Series Tester
Registration will also make it faster and easier for you to obtain technical support and service. To register, log on at www.midtronics.com/warranty.html and have your serial number ready. The number is at the bottom of the label on the back of the tester. -
Page 8: User Interface
You can also use this button to printout test results using the built-in printer. MENU Button Use the MENU button to access the Main Menu options of the tester. For information about the options, see “Options Menu”. www.midtronics.com • •... -
Page 9: Options Menu
Select the temperature units Degrees F or Degrees C Voltmeter Automatically test battery voltage when the clamps are first connected to the battery terminals. Press ENTER to continue testing the battery. Press BACK to return to the menu. (Default: ON) www.midtronics.com • •... -
Page 10: Preparations Before The Test
A poor connection will produce a CHECK CONNECTION or WIGGLE CLAMPS message. If the message appears, clean the terminals and reconnect the clamps. • The preferred test postion is at the battery terminals. If the battery is not accessible, you may test at the jumper post; however, the available power measurement may be lower than the actual value. www.midtronics.com • •... -
Page 11: Battery Test
JIS# Japanese Industrial Standard, shown on a 26A17 thru battery as a combination of numbers and letters. 245H52 Europa-Norm 100–2000 Deutsche Industrie-Norm 100–1200 Society of Automotive Engineers, the 100–2000 European labeling of CCA International Electrotechnical Commission 100–1200 www.midtronics.com • •... -
Page 12: Battery Test Results
New Battery Test Results Besides the standard battery test results new battery has two more: CYCLING REQUIRED Battery needs to be cycled for optimal performance. REST & RETEST Battery could have a surface charge, because it has recently been charged. www.midtronics.com • •... - Page 13 NOTE: For an in-vehicle test, the display alternates between the test results and the message “PRESS FOR STARTER TEST. See “Maintenence & Troubleshooting” in this manual for more information about the printer. IMPORTANT: The tester retains the results of the last test only. When you start a new test, the last results are overwritten. www.midtronics.com • •...
-
Page 14: Starter System Test
PRINT button to print the test results, MENU to return to the Options Menu. NOTE: For an in-vehicle test, the display alternates between the test results and the message “PRESS FOR CHARGING TEST. See “Maintenence & Troubleshooting” in this manual for more information about the printer. www.midtronics.com • •... -
Page 15: Charging System Test
Replace broken or slipping belts and retest. √ Check the connections from the alternator to the battery. If the connection is loose or heavily corroded, clean or replace the cable and retest. continued www.midtronics.com • •... - Page 16 Excessive AC ripple detected. RIPPLE √ One or more diodes in the alternator is not functioning or there is stator damage. 6. Press the BACK/PRINT button to print the test results or MENU to return to the Options Menu. See “Maintenence & Troubleshooting” in this manual for more information about the printer. www.midtronics.com • •...
-
Page 17: Test Messages
Make sure all vehicle loads are off including open doors and ignition switch. UNSTABLE Out-of-vehicle. Weak battery, should be charged and BATTERY retested. WIGGLE Clamps are not making good contact with CLAMPS battery terminals www.midtronics.com • •... -
Page 18: Error Messages
See “Maintenance & Troubleshooting” section. PRINTER PAPER. 2.5 IN. DIA. MAX. 2.25 IN. WIDE MAX QC DATA MEMORY FULL QC mode memory is full. Select QC mode from the PRINT RESULTS OR Options Menu to clear the memory. CLEAR MEMORY. www.midtronics.com • •... -
Page 19: Maintenance & Troubleshooting
Identify the circled screw. Remove the screw. Grasp the housing and firmly pull the cable assembly from housing. To attach a new cable, align the cable and tester housings and push to- gether. Insert the screw and tighten. www.midtronics.com • •... -
Page 20: Changing The Printer Paper
Place a new roll of paper in the compartment, and pull the paper forward so that it extends past the serrated edge of the paper slot. paper feeds from underneath the roll 3. Close the door and make sure the lever locks securely. www.midtronics.com • •... -
Page 21: Printer Troubleshooting
If the display does not turn on: • Check the connection to the vehicle battery. • The vehicle battery may be too low (below 1 volt) to power the analyzer. Fully charge the battery and retest. • The analyzer’s AA batteries may need to be replaced. (alkaline recom- mended). • If the analyzer does not power on when you press and hold the MENU but- ton, replace the AA batteries. www.midtronics.com • •... -
Page 22: Replacing The Battery
Remove the screw securing the battery compartment cover using a small Phillips screwdriver. Lift the door off and remove the discharged battery. Insert fresh AA batteries making sure the positive and negative terminals are positioned correctly. Reposition the cover and tighten the screw. www.midtronics.com • •... - Page 23 • •...
- Page 24 Patents The MDX series is made by Midtronics, Inc., and is protected by one or more U.S. and foreign patents. For specific patent information, contact Midtronics, Inc. at +1 630 323-2800. Limited Warranty This battery tester is warranted to be free of defects in materials and workmanship for a period of two years from the date of purchase.
Need help?
Do you have a question about the MDX-655P and is the answer not in the manual?
Questions and answers