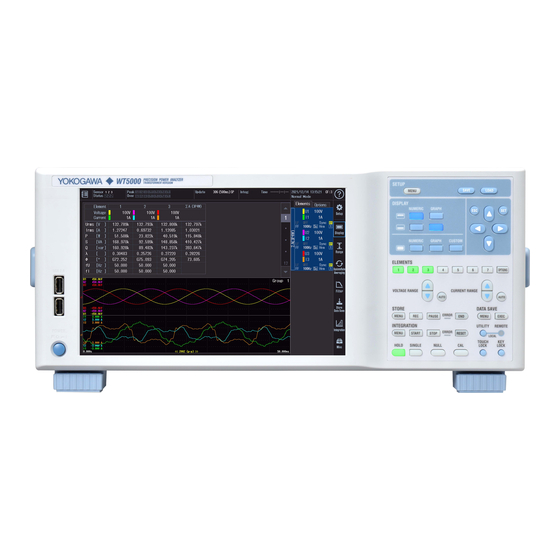
YOKOGAWA WT5000 Features Manual
Precision power analyzer
Hide thumbs
Also See for WT5000:
- User manual (233 pages) ,
- User manual (2 pages) ,
- User manual (211 pages)
Table of Contents
Advertisement
Quick Links
Advertisement
Table of Contents

Related Manuals for YOKOGAWA WT5000


Summary of Contents for YOKOGAWA WT5000
- Page 1 WT5000 Precision Power Analyzer Features Guide IM WT5000-01EN 1st Edition...
- Page 2 List of Manuals Thank you for purchasing the WT5000 Precision Power Analyzer. This manual contains useful information about the features of this instrument. To ensure correct use, please read this manual thoroughly before operation. Keep this manual in a safe place for quick reference in the event a question arises. The following manuals, including this one, are provided as manuals for this instrument.
- Page 3 • In this manual, the ® and TM symbols do not accompany their respective registered trademark or trademark names. • Other company and product names are trademarks or registered trademarks of their respective holders. Revisions • 1st Edition: September 2018 IM WT5000-01EN...
-
Page 4: Table Of Contents
Display Format of External Current Sensor Range (Ext Sensor Range Display Format) ..... 4-4 Valid Measurement Range (Valid Measurement Range) .............. 4-5 Line Filter (Line Filter) ........................4-6 Frequency Filter, Rectifier, Level (Freq Filter/Rectifier/Level) ............4-8 Null Feature (Null Settings) ......................4-11 Enabling and Disabling the Null Feature (Null, NULL) ..............4-12 IM WT5000-01EN... - Page 5 Equation for Apparent Power (S Formula) ..................8-8 Apparent Power and Reactive Power Computation Types (S,Q Formula) ........8-9 Equation for Corrected Power (Pc Formula) ................8-10 Phase Difference Display Format (Phase) ...................8-11 Master/Slave Synchronous Measurement (Sync Measure)............8-12 IM WT5000-01EN...
- Page 6 Display Format (Form, Vector) ....................11-15 Custom Display Custom Display (CUSTOM) ......................12-1 Holding Measured Values, Performing Single Measurements, and Zero-Level Compensation Holding Measured Values (Hold, HOLD) ..................13-1 Single Measurement (Single Execute, SINGLE) ................ 13-1 Zero-Level Compensation (Cal Execute, CAL) ................13-1 IM WT5000-01EN...
- Page 7 Saving Data (Data Save, MENU (DATA SAVE)) ................. 17-1 Storage Device ........................... 17-2 Saved Items (Saved Objects) ..................... 17-3 Conditions for Saving Numeric Data ................... 17-4 Conditions for Saving Screen Images..................17-5 File Save Conditions ........................17-6 Saving (Save Exec, EXEC)......................17-6 IM WT5000-01EN...
- Page 8 Instrument Information (System Overview)................. 19-2 System Configuration (System Configuration) ................19-3 Remote Control (Remote Control) ....................19-7 Releasing Remote Mode (UTILITY).................... 19-8 Key Lock (KEY LOCK) ........................ 19-9 Touch Lock (TOUCH LOCK) ....................... 19-9 Self-test (Selftest) ........................19-9 Index IM WT5000-01EN...
-
Page 9: Items That This Instrument Can Measure
The items that you can measure with this instrument are listed below. For details about how the values of the measurement functions are determined, see appendix 1 in the Getting Started Guide, IM WT5000-03EN. For explanations of the terms measurement function, input element, and wiring unit, see “What Is a Measurement Function?”... - Page 10 Sum of positive I values q− Sum of negative I values Volt-ampere hours Var hours Efficiency Function Description η1 to η4 Efficiency User-Defined Functions Function Description F1 to F20 User-defined functions User-Defined Events Function Description Ev1 to Ev8 User-defined events IM WT5000-01EN...
-
Page 11: Harmonic Measurement Functions
2, U2(1). In the same way ΦUi – Uk, ΦUi – Ii, ΦUj – Ij, and ΦUk−Ik represent to ΦU1 – U3, ΦU1 – I1, ΦU2 – I2, and ΦU3 – I3, respectively. 2 Setting i to an input element, is the same as setting k to 1 in Φ(k). IM WT5000-01EN... - Page 12 • Total: Total value (The total value of all harmonic components from the minimum order to N.* For information about how the value is determined, see appendix 12 in the Getting Started Guide, IM WT5000-03EN.) • 0(DC): DC value •...
-
Page 13: Delta Computation Functions
Motor3 (MTR2) Z terminal of the motor evaluation function as the reference (specify an input element). Auxiliary Input Measurement Functions (Option) Function Description Aux1 to 8 Auxiliary inputs 1 to 8 IM WT5000-01EN... - Page 14 Torque measurement range RngAux1 to 8 Aux measurement range For measurement range functions, data can be acquired using the following methods. • By setting a user-defined function • By storing or by saving numeric data • By outputting through communication IM WT5000-01EN...
-
Page 15: What Is A Measurement Function
Element number Voltage input Current input Three-phase Three-phase Three-phase three-wire three-wire four-wire ΣA ΣB ΣC Wiring system Wiring unit Measurement Period For information about the measurement period for computing measurement functions, see “Measurement Period (SYNC SOURCE).” Click here. IM WT5000-01EN... -
Page 16: Setup Menu
You can reset the instrument settings to their factory default values. This feature is useful when you want to cancel all the settings that you have entered or when you want to redo measurement from scratch. For information about how initialize the settings, see section 3.7 in the Getting Started Guide, IM WT5000-03EN. File List (File List) You can perform file operations such as creating folders on the storage device, deleting and copying files, and changing file names. - Page 17 You can move selected files and folders to other storage devices or folders. You can move multiple files at the same time. Renaming (Rename) You can rename a selected file or folder. Protecting (Protect) You can set or release the protection of selected files. Deleting (Delete) You can delete selected files and folders. IM WT5000-01EN...
-
Page 18: Saving Setup Data (Save Setup, Save(Setup))
• If you set auto naming to Numbering, a file name will consist of the characters that you entered for the file name and a four-character sequence number. • If you set auto naming to Date, the characters that you entered for the file name will not be used. File names will only consist of the date information. IM WT5000-01EN... -
Page 19: Loading Setup Data (Load Setup, Load(Setup))
• This instrument cannot load setup data that has been saved by a product with an incompatible firmware version. • This instrument cannot load setup data that was saved by an instrument with a different element configuration, different options, etc. IM WT5000-01EN... -
Page 20: Input Settings (Basic Measurement Conditions)
The measurement function of a wiring unit is called a Σ function. For example, “UrmsΣA” corresponds to the average of the voltages of the input elements that are assigned to the wiring unit ΣA. The average value represents the true rms value. IM WT5000-01EN... - Page 21 For details about the relationship between wiring systems and how the values of the measurement functions are determined, see appendix 1 in the Getting Started Guide, IM WT5000-03EN. Select the wiring system to match the actual wiring of the circuit under measurement. he method in which the Σ...
-
Page 22: Selecting The Element For Setting The Measurement Range (Element1 To 7, 1 To 7 (Elements))
The following methods are available for selecting the element for setting the measurement range. • 1 to 7 (ELEMENTS) keys • Element 1 to 7 of the S menu When range Σ link is set to on, the selected elements will switch for each wiring unit according to the wiring system. IM WT5000-01EN... -
Page 23: Voltage Range (Voltage, Voltage Range)
• When the secondary output of a VT (voltage transformer) is being applied to the voltage input terminal, set the voltage range according to the maximum value of the VT output. Then, use the scaling feature to set the VT ratio. IM WT5000-01EN... -
Page 24: Auto Voltage Range (Auto (Voltage), Auto (Voltage Range))
• When non-periodic pulse waveforms are applied, the range may not remain constant. If this happens, use the fixed range setting. IM WT5000-01EN... -
Page 25: Current Range (Current, Current Range)
CT or current sensor output. Then, use the scaling feature to set the CT ratio or the conversion ratio of the clamp-type current sensor that outputs current. Auto Current Range (Auto (Current), AUTO (CURRENT RANGE)) This is the same as the auto range feature for voltage. Click here. IM WT5000-01EN... -
Page 26: External Current Sensor On/Off (Ext Sensor)
Select from 50mV, 100mV, 200mV, 500mV, 1V, 2V, 5V, and 10V. • When the Crest Factor Is Set to CF6 or CF6A Select from 25mV, 50mV, 100mV, 250mV, 500mV, 1V, 2.5V, and 5V. Auto range This is the same as the auto range feature for voltage. Click here. IM WT5000-01EN... - Page 27 • The input peak over-range indicator at the top of the screen illuminates or blinks in red. • The measured values of the voltage and current are indicated as being overload values (“-OL-”). IM WT5000-01EN...
-
Page 28: Power Range
Click here. For a detailed list of the available voltage and current range combinations and power ranges when all the elements have the same voltage or current range, see appendix 4 in the Getting Started Guide, IM WT5000- 03EN. In auto range mode, because the voltage and current ranges switch independently according to range increase and decrease conditions, different power ranges may be set for the same power value. -
Page 29: Scaling (Scaling)
Set the CT ratio (or the conversion ratio of the current sensor that produces current) when applying the secondary output of a CT or clamp-type current sensor that produces current to the current input terminal. Then, set the current range according to the maximum CT or current sensor output. Selectable range: 0.0001 to 99999.9999 3-10 IM WT5000-01EN... - Page 30 Copy the power coefficient of the selected input element to the other input elements in the same wiring unit. Because the scaling feature sets each input element independently, regardless of the range Σ link on /off setting, execute copying if necessary. 3-11 IM WT5000-01EN...
-
Page 31: Line Filter (Line Filter)
Turning it off disables the line filter. When the line filter is turned on, the accuracy and the upper limit of the measurement band change. For details, see sections 6.15 and 6.16 in the Getting Started Guide, IM WT5000−03EN. Cutoff Frequency (CutOff) Set the cutoff frequency in the following range. -
Page 32: Frequency Filter (Freq Filter)
Turning the Frequency Filter On and Off (Freq Filter) Because the frequency filter is inserted as shown in the following figure, it affects frequency measurement (see the block diagram in appendix 11 of the Getting Started Guide, IM WT5000−03EN). Line filter... -
Page 33: Measurement Period (Sync Source)
Data update interval Measurement period Sync source Rising Falling If there is no more than one cross point within the data update interval, the measurement period is the entire data update interval. Data update interval Measurement period Sync source 3-14 IM WT5000-01EN... - Page 34 • When the computing method is sync source period average, if the sync source is not set correctly, the measured value may fluctuate or be incorrect. See appendix 5 in the Getting Started Guide, IM WT5000- 03EN.
- Page 35 3 Input Settings (Basic Measurement Conditions) When the Computing Method Is Digital Filter Average The measurement period is determined by the data update interval and response speed. You do not need to set the sync source (Sync Source). 3-16 IM WT5000-01EN...
-
Page 36: Input Settings (Advanced/Options)
You can specify the following items. • Crest factor (Crest Factor) • Range Σ link (Range Σ Link) • Display format of external current sensor range (Ext Sensor Range Display Format) • Valid measurement range (Valid Measurement Range) IM WT5000-01EN... -
Page 37: Crest Factor (Crest Factor)
The voltage range, current range, effective input range, and measurement accuracy vary depending on the crest factor setting. For details, see chapter 6 in the Getting Started Guide, IM WT5000−03EN. • When you change the crest factor, the following settings change for all elements. -
Page 38: Range Σ Link (Range Σ Link)
If multiple input elements are set to a common highest measurement range, the setting of the input element with the smallest input element number takes precedence. • In the valid measurement range settings, all measurement ranges are enabled (selected). IM WT5000-01EN... -
Page 39: Display Format Of External Current Sensor Range (Ext Sensor Range Display Format)
For example, if you are using a current sensor that produces 10 mV when it receives 1 A (external current sensor conversion ratio: 10 mV/A) and you set the external current sensor range to 1 V, the displayed current range is 100 A. IM WT5000-01EN... -
Page 40: Valid Measurement Range (Valid Measurement Range)
• If you set the valid range setting for the current measurement range to OFF, this instrument switches to the next highest measurement range. If there is no measurement range above the current one, this instrument switches to the next lowest measurement range. IM WT5000-01EN... -
Page 41: Line Filter (Line Filter)
When the line filter is turned on, the accuracy and the upper limit of the measurement band change. For details, see sections 6.15 and 6.16 in the Getting Started Guide, IM WT5000−03EN. Advanced Line Filter Setting (Line Filter Advanced Setting) Turn the advanced line filter setting on or off. - Page 42 Set the DLF(H) cutoff frequency in the following range. 0.1 kHz to 100.0 kHz (in 0.1 kHz steps) Setting All Input Elements Collectively If you select the top cell of each item in the table, you can set the item collectively on all input elements. IM WT5000-01EN...
-
Page 43: Frequency Filter, Rectifier, Level (Freq Filter/Rectifier/Level)
This is the same as the frequency filter cutoff frequency in the input settings (basic measurement conditions). The setting is shared. Click here. • Setting All Input Elements Collectively If you select the top cell of each item in the table, you can set the item collectively on all input elements. IM WT5000-01EN... - Page 44 Select whether to rectify the voltage and current (on/off). * If rectifier is set to ON, reactive power Q, phase difference Φ, and QΣ measurements may change. See appendix 1 in the Getting Started Guide, IM WT5000-03EN. • Turning the Frequency Filter (LPF) On and Off (Freq Filter) This is the same as turning the frequency filter on and off in the input settings (basic measurement conditions).
- Page 45 • When the rectifier is on: 0.0% to 100.0% (absolute value) • Setting All Input Elements Collectively If you select the top cell of each item in the table, you can set the item collectively on all input elements. 4-10 IM WT5000-01EN...
-
Page 46: Null Feature (Null Settings)
The saved null value discussed above is used to correct the measurement function values. • OFF: Even if you tap Null or press NULL, the null feature is not enabled. Measurement function values are produced with no null correction. 4-11 IM WT5000-01EN... -
Page 47: Enabling And Disabling The Null Feature (Null, Null)
AUX inputs that are set to ON or Hold. Null Indicator • If you tap Null or press NULL while the null feature is enabled, the NULL key light and Null indicators turn off, and the null feature is disabled. 4-12 IM WT5000-01EN... - Page 48 • When the range is changed, the null value upper limit will be determined by the new range. The null value upper limit will also be adjusted when the range is decreased by the auto range feature. 4-13 IM WT5000-01EN...
-
Page 49: Motor Evaluation And Auxiliary Input (Option)
The following figure shows a display example when motor evaluation function 1 is set to single motor (revolution signal, pulse) and motor evaluation function 2 is set to auxiliary input (Aux). Motor evaluation function 1 settings Motor evaluation function 2 settings IM WT5000-01EN... -
Page 50: Mtr Configuration (Mtr Configuration)
/MTR2 Function Signal Ch A Ch E Torque Analog/pulse Ch B Ch F Not use Ch C Ch G Speed Analog Ch D Ch H Not use Motor number assignments (Motor 1, Motor 3) Motor 1 Motor 3 IM WT5000-01EN... - Page 51 /MTR2 Function Signal Ch A Ch E Analog/pulse Ch B Ch F Pulse Ch C Ch G Analog/pulse Ch D Ch H Pulse Aux number assignments (Aux 1 to 8) Aux 1 to 4 Aux 5 to 8 IM WT5000-01EN...
-
Page 52: Motor/Aux Settings (Ch Settings)
Input Signal Name (Aux Name) When you set the MTR configuration auxiliary input (Aux), set the input signal name. • Number of characters: Up to eight • Usable characters: Spaces and all characters that are displayed on the keyboard IM WT5000-01EN... -
Page 53: Scaling Factor (Scaling)
This setting is used as the scaling factor in the equation for the linear scaling of analog input. Unit (Unit) • Number of characters: Up to eight • Usable characters: Spaces and all characters that are displayed on the keyboard IM WT5000-01EN... -
Page 54: Input Signal Type (Sense Type)
Common Settings Unrelated to the Signal Type • Scaling factor • Unit • Motor poles* • Sync speed frequency measurement source* * When the MTR configuration is set to auxiliary input (Aux), do not set this item. IM WT5000-01EN... -
Page 55: Analog Input Range
When non-periodic pulse waveforms are applied during auto range, the range may not remain constant. If this happens, use the fixed range setting. Analog Input Range (Fixed Range) (Analog Range) You can select one of the following input ranges. 20 V, 10 V, 5 V, 2 V, 1 V IM WT5000-01EN... -
Page 56: Linear Scaling Of Analog Input
Measured values of an input signal = AX + B – NULL The input signal is scaled when you set the input signal slope (A) to the input signal per 1 V of input voltage and offset (B) to the offset value. IM WT5000-01EN... - Page 57 Computed values (Point1Y and Point2Y): –1.000 T to 1.000 T Select Execute to use these four values to determine and set the input signal slope (A) and offset (B). Measured value y = Ax + B Point2 Point2Y Point1 Point1Y Input value Point2X Point1X Measurement range IM WT5000-01EN...
-
Page 58: Line Filter (Line Filter(Butterworth))
U1, I1, U2, I2, U3, I3, U4, I4, U5, I5, U6, I6, U7, I7, Ext Clk (external clock)*, Z Phase 1 (Ch D), Z Phase 3 (Ch H), None * For the EXT CLK connector specifications, see section 4.3 in the Getting Started Guide, IM WT5000-03EN. • The measurement period is determined according to the cross point of the selected sync source. This instrument uses the measurement period to measure the analog revolution and torque signals. -
Page 59: Upper And Lower Limits Of Pulse Input Range (Pulse Range Upper, Pulse Range Lower)
1 If the torque signal is a changed signal, you can set the scaling factor to determine the torque before the change. 2 The torque pulse coefficient and torque pulse offset are determined from the torque signal pulse rating as shown in the next figure. 5-11 IM WT5000-01EN... - Page 60 ±5 V for –20 N•m to +20 N•m The pulse input range setting applies to input signals whose type has been set to pulse. For input signals whose type has been set to analog, there is no need to configure this setting. 5-12 IM WT5000-01EN...
-
Page 61: Revolution Signal Pulses Per Revolution (Pulse N)
The setting specifying the number of revolution signal pulses per revolution applies to input signals whose type has been set to pulse. For input signals whose type has been set to analog, there is no need to configure this setting. 5-13 IM WT5000-01EN... -
Page 62: Sync Speed(Sync Speed)
SyncSp: The synchronous speed (min –1 Speed: The rotating speed (min Set the frequency measurement source to a stable voltage or current signal that is being applied to the motor and that has low distortion and noise. 5-14 IM WT5000-01EN... -
Page 63: Electrical Angle Measurement (Electrical Angle Measurement)
Select the voltage or current to automatically enter the calibration value. The available options vary depending on the installed elements. U1, I1, U2, I2, U3, I3, U4, I4, U5, I5, U6, I6, U7, I7 Executing the auto correction entry (Execute) An automatic electrical angle correction entry will be executed. 5-15 IM WT5000-01EN... -
Page 64: Computing The Motor Efficiency And Total Efficiency
If ΣA or ΣB is a three-phase, three-wire (3P3W) system, you can use delta computation to perform 3P3W>3V3A transformation on ΣA and ΣB. From the 3P3W>3V3A transformation, you can determine one unmeasured line voltage and one unmeasured common mode current. 5-16 IM WT5000-01EN... -
Page 65: Computation And Output Configuration
Data update interval (Update Rate) • Averaging (Averaging) • Harmonic measurement conditions (Harmonics) • Computation (Measure) • Display (Display) • Data storage (Store) • Data saving (Data Save) • Integrated power (watt hours, Integration) • D/A output (D/A Output, option) IM WT5000-01EN... -
Page 66: Efficiency Equation (Efficiency)
To correctly compute the efficiency, set the power coefficients of all elements so that all power units used in the computation are the same. For example, the efficiency cannot be computed correctly if elements or wiring units used in the computation have different power units, such as W (watt) and J (joule). IM WT5000-01EN... -
Page 67: Delta Computation (Δ Measure)
When you perform delta computation on wiring unit ΣA, the available measurement functions are as follows. ΔU1rms[UrsA], ΔU1mn[UrsA], ΔU1dc[UrsA], ΔU1rmn[UrsA], ΔU1ac[UrsA] ΔIrms[ItA], ΔImn[ItA], ΔIdc[ItA], ΔIrmn[ItA], ΔIac[ItA] ± ± ± ± * In the measurement functions, rms, mn(mean), dc, rmn(r-mean), and ac are the delta computation modes. A indicates the wiring unit. Click here. IM WT5000-01EN... - Page 68 When you perform delta computation on wiring unit ΣA, the available measurement functions are as follows. ΔU1rms[UrA], ΔU1mn[UrA], ΔU1dc[UrA], ΔU1rmn[UrA], ΔU1ac[UrA] ΔU2rms[UsA], ΔU2mn[UsA], ΔU2dc[UsA], ΔU2rmn[UsA], ΔU2ac[UsA] ΔU3rms[UtA], ΔU3mn[UtA], ΔU3dc[UtA], ΔU3rmn[UtA], ΔU3ac[UtA] ΔUΣrms[UΣA], ΔUΣmn[UΣA], ΔUΣdc[UΣA], ΔUΣrmn[UΣA], ΔUΣac[UΣA] ΔIrms[InA], ΔImn[InA], ΔIdc[InA], ΔIrmn[InA], ΔIac[InA] ΔP1[PrA] ΔP2[PsA] ΔP3[PtA] ΔPΣ[PΣA] IM WT5000-01EN...
- Page 69 * In the measurement functions, rms, mn(mean), dc, rmn(r-mean), and ac are the delta computation modes. A indicates the wiring unit. Click here. For information about equations, see appendix 1 in the Getting Started Guide, IM WT5000-03EN. For information about the measurement period, see “Measurement Period.” Click here.
-
Page 70: Data Update Interval (Update Rate)
• If you do not set the trigger level properly, the waveform display start point (the signal level on the left edge of the screen) may be unstable, or waveforms may not appear. • Even when the update mode is set to trigger, the mode is set to constant interval in the following situations. • During integration IM WT5000-01EN... - Page 71 Check whether the sync source signal frequency is being measured correctly by following the procedures in sections 3.1 and 3.4 in the User’s Manual, IM WT5000-02EN. • Digital Filter Average (Digital Filter Average) The sampled data is averaged by applying a digital filter to derive the measured values.
- Page 72 For the EXT CLK connector specifications, see section 4.3 in the Getting Started Guide, IM WT5000-03EN. When Ext Clk is set as the trigger source, the trigger slope and trigger level are set as follows: •...
- Page 73 After the trigger is activated, the waveform display continues from the left of the screen to the right of the screen with the passage of time. (The arrow below the word “Trigger point” in the figure below is just for illustration. The arrow does not appear on the actual display.) Trigger point Time IM WT5000-01EN...
- Page 74 • During integration Therefore, the waveform display start point (the signal level at the left edge of the screen) may not be stable. Also, the numeric data measurement period may not be synchronized with the waveform data measurement period. 6-10 IM WT5000-01EN...
-
Page 75: Averaging (Averaging)
• If the averaging type is exponential averaging, set the attenuation constant to a value within the following range. 2 to 64 • If the averaging type is moving average, set the average count to a value within the following range. 8 to 64 6-11 IM WT5000-01EN... - Page 76 The measurement functions that are directly averaged are indicated below. Other functions that use these functions in their computation are also affected by averaging. For details about how the values of the measurement functions are determined, see appendix 1 in the Getting Started Guide, IM WT5000-03EN. Measurement Functions Used in Normal Measurement •...
-
Page 77: D/A Output (D/A Output, Option)
You can select the D/A output range mode from the following options. Fixed (Fixed) When a measurement function’s rated value is received, +5 V is output. For details, see “Relationship between Output Items and the D/A Output Voltage.” Click here. 6-13 IM WT5000-01EN... - Page 78 When the elements have different scaling factors, this Instrument produces 100% output (5 V) when the scaled measured values are the same as the scaled rated values (measurement range × scaling factor). 6-14 IM WT5000-01EN...
- Page 79 • Real-time normal integration mode when the integration timer is not set to 00000:00:00 • Real-time continuous integration mode When the rated time for integrated D/A output is set to 00000:00:00, the D/A output for the integrated value is fixed at 0 V. 6-15 IM WT5000-01EN...
- Page 80 7.5 V. Only the outputs for U–pk and I–pk are approximately –7.5 V when an error occurs. • The outputs for η1 to η4, Uhdf, Ihdf, Phdf, Uthd, Ithd, Pthd, Uthf, Ithf, hvf, hcf, and Slip* are +5 V at 100%. 6-16 IM WT5000-01EN...
- Page 81 Pulse Range Upper × –1, and the output is +5 V when the auxiliary signal reaches the value specified for Pulse Range Upper.* * Applies to models with the motor evaluation 1 or 2 option. 6-17 IM WT5000-01EN...
-
Page 82: Harmonic Measurement Conditions
* If you select Ext Clk, the frequency of the signal applied to the rear panel’s external clock input connector (EXT CLK) is used as the fundamental frequency for harmonic measurement. For the EXT CLK connector specifications, see section 4.3 in the Getting Started Guide, IM WT5000-03EN. IM WT5000-01EN... -
Page 83: Measured Harmonic Orders (Min Order/Max Order)
• The specified maximum harmonic order to be measured • The value determined automatically according to the PLL source frequency (see section 6.7 in the Getting Started Guide, IM WT5000-03EN) • When the data update interval is 50 ms or Auto, the maximum measurable harmonic order is 100. -
Page 84: Distortion Factor Equation (Thd Formula)
“Line Filter (Line Filter).” Click here. The accuracy and the upper limit of the measurement bandwidth change when the anti-aliasing filter (line filter) is turned ON. For details, see sections 6.15 and 6.16 in the Getting Started Guide, IM WT5000−03EN. IM WT5000-01EN... -
Page 85: Computation
Turning the Computation of User-Defined Functions On or Off Turn the computation of user-defined functions on or off. User-Defined Function Name (Name) • Number of characters: Up to 8 • Usable characters: Spaces and all characters that are displayed on the keyboard IM WT5000-01EN... - Page 86 Itif: ITIF( ) −−− hvf: HVF( ) hcf: HCF( ) −−− fPLL1:PLLFRQ1( ) fPLL2:PLLFRQ2( ) Kfactor:KFACT( ) Φ Φ Φ U1−U2: PHIU1U2( ) U1−U3: PHIU1U3( ) U1−I1: PHIU1I1( ) Φ Φ −−− U2−I2: PHIU2I2( ) U3−I3: PHIU3I3( ) IM WT5000-01EN...
- Page 87 6 in the Getting Started Guide, IM WT5000−03EN. • For the Speed, Torque, Pm, Slip, and SyncSp measurement functions, set M1 to M4, which are symbols representing the motor numbers.
- Page 88 Values Substituted in Operands • The unit of ITIME( ) is seconds. • η1 to η4 are displayed as percentages (see in appendix 1 in the Getting Started Guide, IM WT5000-03EN). However, in this section ETA1 to ETA4 are described as ratios.
-
Page 89: Measuring The Average Active Power
• For information about the symbols that can be used for the parameters of each operand, see appendix 6 in the Getting Started Guide, IM WT5000−03EN. • The maximum values of the data above are held while the MAX hold function is enabled. -
Page 90: User-Defined Events (User Defined Event)
• Judgment Condition Select the method for comparing the measured value and the reference value from the following options. OFF, <, <=, =, >, >=, !=(not equal) • Reference Value Select a number from –9.9999 T to 9.9999 T. IM WT5000-01EN... - Page 91 FALSE. For example, if you set the judgment condition of event Ev2 to NOT(EV1()), if the judgment for Ev1 is FALSE because of the reason given in the example above, the result for Ev2 is not TRUE but FALSE. IM WT5000-01EN...
-
Page 92: Equation For Apparent Power (S Formula)
The product of the simple averages of the voltage and current • Umean*Irms The product of the voltage’s rectified mean value calibrated to the rms value and the current’s true rms value • Urmean*Irmean The product of the voltage’s and current’s rectified mean values IM WT5000-01EN... -
Page 93: Apparent Power And Reactive Power Computation Types (S,Q Formula)
Active power for a three-phase four-wire system PΣ = P1 + P2 + P3 Apparent power for a three-phase four-wire system SΣ = PΣ +QΣ Reactive power for a three-phase four-wire system QΣ = Q1 + Q2 + Q3 IM WT5000-01EN... -
Page 94: Equation For Corrected Power (Pc Formula)
P1, P2: Coefficients specified by the applicable standard Coefficients (P1 and P2) You can set coefficients P1 and P2 to values within the range of 0.0001 to 9.9999. The IEEE C57.12.90-2010 equation is the same as IEC761 (1976). 8-10 IM WT5000-01EN... -
Page 95: Phase Difference Display Format (Phase)
If the current phase is in the clockwise direction with respect to the voltage, the current is lagging (G) the voltage. The phase difference is expressed by an angle between 0 and 180° (see appendix 2 in the Getting Started Guide, IM WT5000-03EN). • 360 degrees (360 degrees) The phase difference is expressed as an angle between 0 and 360°... -
Page 96: Master/Slave Synchronous Measurement (Sync Measure)
For the specifications of the external start signal input/output terminals, see section 4.3 in the Getting Started Guide, IM WT5000-03EN. The measurement of the master and slave units cannot be synchronized under the following conditions: • When the data update interval differs between the master and slave. -
Page 97: Display
Each time you press NUMERIC, the display format switches, in order, between All Items, 4 Items, 8 Items, 16 Items, Matrix, Hrm List Single, and Hrm List Dual. Graph Display Each time you press GRAPH, the screen switches, in order, between waveform display, trend display, bar graph display, and vector display. IM WT5000-01EN... -
Page 98: Numeric Data Display
A table of numeric data is displayed with measurement functions listed vertically and symbols indicating elements and wiring units listed horizontally. You can change the order of the displayed items and the number of columns. Click here. 10-1 IM WT5000-01EN... - Page 99 Harmonic order data display area Measurement function 1 Measurement function 2 Distortion factors of each harmonic Numeric data for each (When the selected measurement function is harmonic U, I, or P, Uhdf, Ihdf, or Phdf is displayed.) Click here. 10-2 IM WT5000-01EN...
-
Page 100: Switching The Displayed Page
• If the value is greater than 600000: Five digits. For details, see appendix 4 in the Getting Started Guide, IM WT5000-03EN. When the range rating (rated value of the specified measurement range) is specified, the Σ functions of the voltage, current, active power, apparent power, reactive power, and so on, are set to the decimal place and unit of the element with the lowest number of displayed digits (display resolution) in the wiring unit. -
Page 101: Display Items (Items, Numeric)
Voltage of the 20 order of element 2 U2(20) Harmonic order 20 Element 2 Voltage Simple average of the fundamental currents of the elements in wiring unit ΣB IΣB(1) Order 1 (fundamental wave) Σ function of wiring unit ΣB Current 10-4 IM WT5000-01EN... - Page 102 1024, the data update interval is 50 ms and the fundamental frequency is 10 Hz (the period is 100 ms), the analysis window will be 1 wave wide (see section 6.7 in the Getting Started Guide, IM WT5000- 03EN), and the data measurement interval will be 100 ms.
-
Page 103: All Display (All Items)
10 columns using small fonts. If you select ON when the total number of elements and wiring units is seven or less, the display is the same as when OFF is selected. 10-6 IM WT5000-01EN... -
Page 104: 8-, And 16-Value Displays (4 Items/8 Items/16 Items)
All the display items on the current page are set to None. • Clear All Pages (Clear All Pages) All the display items on every page are set to None. Resetting the Items (Reset Items Exec) Reset the items. 10-7 IM WT5000-01EN... -
Page 105: Matrix Display (Matrix)
• If the selected wiring unit does not have any elements assigned to it, because there is no data, “-------” (no data) is displayed. For example, if elements are assigned to ΣA but not to ΣB, the measurement function for ΣB is displayed as “-------” (no data). Resetting the Settings (Reset Items Exec) Reset the column settings. 10-8 IM WT5000-01EN... -
Page 106: Harmonics List Single/Dual (Hrm List Single/Dual)
+/– on the screen. The number of harmonic orders that switch when you change the page is indicated below. Single Screen Display Split Display Harmonics list single screen 40th 20th Harmonics list dual screen 20th 10th 10-9 IM WT5000-01EN... -
Page 107: Graph Display
• The number of data points between the left and right edges of the display. • “P-P” indicates that the displayed waveform has been P-P compressed. Scale value Voltage or current, element, and lower limit of the displayed waveform 11-1 IM WT5000-01EN... -
Page 108: Display Group (Group)
Each displayed waveform can be scaled. You can select one of the following zoom factors: 0.1, 0.2, 0.25, 0.4, 0.5, 0.75, 0.8, 1, 1.14, 1.25, 1.33, 1.41, 1.5, 1.6, 1.77, 2, 2.28, 2.66, 2.83, 3.2, 3.54, 4, 5, 8, 10, 12.5, 16, 20, 25, 40, 50, 100 11-2 IM WT5000-01EN... - Page 109 1. Set the zoom factor to 1. 2. Following the instructions in this section for shifting a waveform’s vertical position, shift the part of the waveform that you want to view to the center of the display. 3. Set the vertical zoom factor. 11-3 IM WT5000-01EN...
-
Page 110: Display Format (Form, Wave)
> 2 ms > 5 ms > 10 ms > 20 ms > 50 ms > 100 ms > 200 ms > 500 ms. 1 grid division = 10 ms 1 grid division = 20 ms 100 ms 200 ms (observation time) (observation time) 11-4 IM WT5000-01EN... - Page 111 Waveform display data (WT screen) sampling data to 2 points (extracts the maximum and minimum values and draws them in each raster) Time axis 1001 rasters 1000 Number of data points: With display interpolation on 2002 (1001 pairs) 11-5 IM WT5000-01EN...
-
Page 112: Vertical Axis (Amplitude)
100 Vrms 300 Vpk Input zero line −300 Vpk 1 grid division = 100 V When the same signal is measured with a measurement range of 300 Vrms 900 Vpk −900 Vpk 1 grid division = 300 V 11-6 IM WT5000-01EN... -
Page 113: Advanced Waveform Display Settings (Advanced)
• The values at the left and right edges of the horizontal axis (time axis). Turning the Display of Waveform Labels On and Off (Wave Label) Select whether to display waveform labels. Cursor Measurement (Cursors) Click here. 11-7 IM WT5000-01EN... -
Page 114: Trend Display (Trend)
The trend number, measurement function, element, and lower limit of the displayed trend Display Group (Group) Select the group you want to display from 1 to 4. To assign waveforms to each group (1 to 4), set the displayed item (Trend). 11-8 IM WT5000-01EN... -
Page 115: Display Items (Items, Trend)
• Manual (Manual): You can set the upper and lower limits manually. Upper and Lower Limits for Manual Scaling (Upper Scale and Lower Scale) You can set the upper and lower limits within the range of –9.999 T to 9.999 T. 11-9 IM WT5000-01EN... -
Page 116: Display Format (Form, Trend)
For example, if you set the display of the scale values to OFF in the trend display, the display of the scale values will also be set to OFF in the waveform display. 11-10 IM WT5000-01EN... -
Page 117: Cursor Measurement (Cursors)
(800 rasters). The oldest 2 div (200 rasters) that would be displayed at the left edge if this setting were set to off are not shown. The time scale (Time/div) does not change whether this setting is on or off. Measured value screen off Measured value screen on 11-11 IM WT5000-01EN... -
Page 118: Bar Graph Display (Bar)
Select the number, from 1 to 3, of the bar graph that you want to select. Function (Function) You can select the measurement function to display from the following options. U, I, P, S, Q, λ, Φ, ΦU, ΦI, Z, Rs, Xs, Rp, Xp 11-12 IM WT5000-01EN... -
Page 119: Display Format (Form, Bar)
You can select a value between 10 and 500. However, the ending harmonic order cannot be more than 10 orders greater than the starting order. You cannot display bar graphs containing harmonic orders that are greater than the maximum measurable order (see section 6.7 in the Getting Started Guide, IM WT5000-03EN). Cursor Measurement (Cursors) Click here. -
Page 120: Vector Display (Vector)
For details, see "Notes about the Numeric Data Display." Click here. Display Group (Group) Select the group you want to display from 1 to 4. To assign waveforms to each group (1 to 4), set the displayed item (Vector). 11-14 IM WT5000-01EN... -
Page 121: Display Items (Items, Vector)
You can select whether to show (ON) or hide (OFF) numeric data. You can display the size of each signal and the phase differences between signals. For information about phase difference display formats, see “Phase Difference Display Formats.” Click here. 11-15 IM WT5000-01EN... -
Page 122: Custom Display
12 Custom Display Custom Display (CUSTOM) The CUSTOM key on the front panel cannot be used currently. Nothing will appear even if you press this key. 12-1 IM WT5000-01EN... -
Page 123: Holding Measured Values, Performing Single Measurements, And Zero-Level Compensation
30 minutes. Also, the ambient temperature should be stable and within the specified range (see chapter 6 in the Getting Started Guide, IM WT5000-03EN). • If the measurement range and input filter remain the same for a long period of time, the zero level may change due to the changes in the environment surrounding this Instrument. -
Page 124: Integrated Power (Watt Hours/Ampere Hours)
• If the integration mode is real-time normal integration mode or real-time continuous integration mode and the scheduled integration stop time arrives causing the integration to automatically pause, appears. In this condition, you cannot resume integration even if you tap Start or press START. To start integration, reset it first. 14-1 IM WT5000-01EN... - Page 125 Integration timer Example of the Display When Independent Integration Is Enabled Integration status of each element Element 1: Running Element 2: Running Element 3: Reset Element 4: Stop Element 5: Running Element 6: Stop Element 7: Stop 14-2 IM WT5000-01EN...
-
Page 126: Number Of Displayed Digits (Display Resolution)
On models with the 20-channel D/A output option, you can use the remote control feature to use an external signal to start, stop, and reset integration. For details about the remote control feature, see section 4.5 in the Getting Started Guide, IM WT5000-03EN. 14-3... - Page 127 Limitations on Modifying the Settings during Integration During integration, there are some settings that you cannot change and functions that you cannot execute. For details, see appendix 9 in the Getting Started Guide, IM WT5000-03EN. Limitations on Waveform Display during Integration •...
-
Page 128: Integration Mode (Integration Mode)
• The integration time reaches the maximum integration time (10000 hours). • The integrated value reaches its maximum or minimum displayable value. Hold Hold When the maximum integrated value is reached Hold Hold Start Stop Reset Start Reset 14-5 IM WT5000-01EN... - Page 129 STOP. However, if the integrated value reaches its maximum or minimum displayable value before the specified amount of time has elapsed, integration is stopped, and the integration time and integrated value at that point are held. Hold Hold Timer Timer Timer value value value Start Reset Stop 14-6 IM WT5000-01EN...
- Page 130 • The scheduled stop time is reached. • The Stop button is tapped, or the STOP key is pressed. • The integration time reaches the maximum integration time (10000 hours). • The integrated value reaches its maximum or minimum displayable value. 14-7 IM WT5000-01EN...
-
Page 131: Integration Timer (Integration Timer)
• Each (Each): Set it separately for each input element. • All (All): Set it for all installed input elements at the same time. • Element1 to Element7 You can set the integration timers for each element within the range given above. 14-8 IM WT5000-01EN... -
Page 132: Scheduled Times For Real-Time Integration (Start Time/End Time)
This is because the numeric data is updated in sync with the clock of this instrument. This ensures that the numeric data is updated at the same time as the scheduled integration start time and that the integration time is accurate. 14-9 IM WT5000-01EN... -
Page 133: Enabling Or Disabling Independent Integration (Independent Control)
If you start or stop the integration of element 1 under the above conditions, the integration of elements 2 and 3, whose check boxes are not selected, also starts or stops. To independently control the integration of input elements that are assigned to the same wiring unit, you must enable independent integration and disable range Σ link. 14-10 IM WT5000-01EN... -
Page 134: Integration Auto Calibration On/Off (Auto Cal)
Element1 to Element7 You can select the current mode from the following options. For information about the equations used in each current mode, see appendix 1 in the Getting Started Guide, IM WT5000-03EN. • rms: True rms value • mean: Rectified mean value calibrated to the rms value •... -
Page 135: Integration Resume Action At Power Failure Recovery (Resume Action)
You can start integration by resetting it. When integration is reset, the measurement result is displayed as “-----” (no data). If necessary, record the integration result up to that point before resetting it. 14-12 IM WT5000-01EN... -
Page 136: Starting, Stopping, And Resetting Integration
• When the integration mode is real-time normal integration mode or real-time continuous integration mode Integration stops automatically when the scheduled integration end time is reached. The STOP key illuminates, and the integration status shows 14-13 IM WT5000-01EN... - Page 137 (turn it off) or make a single measurement, the integration result at the point when integration was stopped is displayed and transmitted. HOLD SINGLE Execution Execution Execution (Single measurement) Displayed value (The dotted line is the integrated value.) Integration time Start Stop Reset 14-14 IM WT5000-01EN...
-
Page 138: Cursor Measurement
• Speed3, Speed4, Torque3, Torque4, Aux5 to 8 (models with the motor evaluation 2 option) In the Trend Display You can set the trend to measure with cursor 1 (+) to a trend from T1 to T16. 15-1 IM WT5000-01EN... -
Page 139: Position Of Cursor 1 (+) (C1+ Position)
This item only appears in the waveform display. It does not appear in the trend or bar graph display. Linking Cursor Movement (Linkage) Set Linkage to ON to move cursor 1 (+) and cursor 2 (x) without changing the distance between them. Set the positions of the cursors by setting C1+Position. 15-2 IM WT5000-01EN... -
Page 140: Measured Items
The vertical-axis (Y-axis) value of cursor 1 (+) of bar graph 3 The vertical-axis (Y-axis) value of cursor 2 (x) of bar graph 3 ΔY3 The difference between the vertical-axis (Y-axis) values of cursor 1 (+) and cursor 2 (x) of bar graph 3 15-3 IM WT5000-01EN... -
Page 141: Cursor Movement
• The orders indicating the locations of cursors 1 (+) and 2 (x) are the same for each bar graph, from 1 to 3. If immeasurable data exists, “***” is displayed in the measured value display area. 15-4 IM WT5000-01EN... -
Page 142: 16 Data Storage
Limitations on Changing the Settings during Storage While data is being stored, there are some settings that you cannot change and functions that you cannot execute. For details, see appendix 9 in the Getting Started Guide, IM WT5000-03EN. Storage Conditions The following storage configuration menus are available. -
Page 143: Storage Control
You can store numeric data each time the measured data is updated until the storage count is reached. • Single Shot (Single Shot) Numeric data is stored whenever you tap Rec or press REC. You can store numeric data until the storage count is reached. 16-2 IM WT5000-01EN... - Page 144 Make more space available, by deleting files for example. • If you change the number of stored items specified in Item Settings after you set the storage count, the maximum storage count will change, and you will need to set the storage count again. 16-3 IM WT5000-01EN...
- Page 145 • The storage mode is set to Manual, and the storage interval is not 00:00:00. • The storage mode is set to real-time control, and the storage interval is not 00:00:00. • The storage mode is set to Integ Sync. 16-4 IM WT5000-01EN...
-
Page 146: Stored Items
Select whether to store the data of motor input 1 to 4 by selecting or clearing their check boxes. Auxiliary Input (Aux) Select whether to store the data of auxiliary input 1 to 8 by selecting or clearing their check boxes. 16-5 IM WT5000-01EN... - Page 147 • User-defined function, user-defined event (User Func/User/Event) • Harmonics (Harmonics) • Delta computation (Δ Measure) • Motor/Auxiliary inputs (Motor/Aux) • Measurement range (Range) You can select any of the measurement function types listed under “Items That This Instrument Can Measure.” Click here. 16-6 IM WT5000-01EN...
-
Page 148: File Save Conditions
You can choose whether to automatically create an ASCII format storage data file (.csv) from the storage data file (.wts) and the header file (.hds) that are saved when storage finishes or is reset. A CSV file is saved in the same folder as the storage data file. 16-7 IM WT5000-01EN... - Page 149 If this is the case, you will not be able to convert the data to ASCII format (.csv). Be sure to remove the USB memory after storage has been reset or has completed (CMPL). • Please be aware that the number of times that you can write to USB memory is limited. 16-8 IM WT5000-01EN...
-
Page 150: Starting, Pausing, And Ending Storage Recording
PAUSE, storage ends.* The storage data file (.wts) and storage header file (.hds) are deleted. * This state can occur in real-time storage mode when you have tapped Rec or pressed REC but the scheduled storage start time has not yet arrived (the storage operation has not begun). 16-9 IM WT5000-01EN... - Page 151 • When storage has been completed (CMPL), the storage data file (.wts) and header file (.hds) are already closed, so no file operations are performed when you end storage. • If storage recording is in progress (REC) and you end storage, the storage is paused and then ended. 16-10 IM WT5000-01EN...
-
Page 152: Storage Operations In Each Storage Mode
• If you restart integration after it has been stopped, the store state changes to recording (REC). The stored data continues to be written to the file from before storage was paused. Event Synchronization (Event) PAUSE Solid Blinking Solid State CMPL READY Time Event occurrence Storage count 16-11 IM WT5000-01EN... - Page 153 When the Storage Mode Is Integration Synchronization and the Integration Mode Is Not Continuous or Real-Time Continuous Storage is performed at the first data update after the storage interval passes. Time [s] 0 Data update Time [s] Storage 16-12 IM WT5000-01EN...
- Page 154 In the above example, the integration timer is set to 20 s, so the data is stored after 20 s have passed, and then the integrated values are reset. 16-13 IM WT5000-01EN...
- Page 155 • When this instrument automatically changes the range during storage, because measured data is not updated, the storage operation is suspended and no measured data is stored. After this instrument finishes changing the range, storage resumes. 16-14 IM WT5000-01EN...
-
Page 156: Saving Numeric Data, Waveform Data, And Screen Images
Offline BMP format (.bmp) BMP format (.bmp) PNG format (.png) PNG format (.png) JPEG format (.jpg) JPEG format (.jpg) Screen image Screen image 1 Data acquisition using USB, Ethernet, or GP-IB 2 Data acquisition using USB memory 17-1 IM WT5000-01EN... -
Page 157: Storage Device
• Do not connect or remove USB devices from the time when this instrument is turned on until key operation becomes available (approximately 20 to 30 seconds). • This instrument can handle up to two USB memory devices. 17-2 IM WT5000-01EN... -
Page 158: Saved Items (Saved Objects)
* Sample rate: Approx. 10 MS/s, but approx. 5 MS/s during integration • Screen Image (Image) You can save screen image data to files in BMP, PNG, and JPEG formats. Click here. 17-3 IM WT5000-01EN... -
Page 159: Conditions For Saving Numeric Data
Select whether to save the data of motor input 1 to 4 by selecting or clearing their check boxes. Auxiliary Input (Aux) Select whether to save the data of auxiliary input 1 to 8 by selecting or clearing their check boxes. 17-4 IM WT5000-01EN... -
Page 160: Conditions For Saving Screen Images
• Black and white (Black & White): Data is saved in black and white. • Color (Color): Data is saved in 65536 colors. • Reverse (Reverse): Data is saved in 65536 colors. The image background will be white. • Grayscale (Gray): Data is saved in 16 grayscale levels. 17-5 IM WT5000-01EN... -
Page 161: File Save Conditions
Because the header files saved by this instrument use a format that is common to YOKOGAWA measurement devices, they contain some data that is not used by this instrument. -
Page 162: Ethernet Communication
The instrument clock can be set using SNTP. When this Instrument is turned on, the date and time are set automatically. Click here. To connect a PC to this Instrument, use a hub or router, and connect to a network. Do not connect a PC directly to the instrument. 18-1 IM WT5000-01EN... -
Page 163: Tcp/Ip(Tcp/Ip)
You can use up to 127 characters. The characters that you can use are 0 to 9, A−Z, a−z, and dashes. Applying the Settings (Bind) TCP/IP settings are applied when you tap Bind in the dialog box or when you turn on the instrument the next time. 18-2 IM WT5000-01EN... -
Page 164: Ftp Server (Ftp Server)
When the instrument is connected to the network as an FTP server, the following features become available. FTP Server Feature From a PC, you can view a list of files that are stored in the instrument storage device (the internal memory or a storage device that is connected to it) and retrieve files. 18-3 IM WT5000-01EN... -
Page 165: Network Drive (Net Drive)
You can set the timeout time to a value between 1 and 3600. Connecting to the Network Drive(Connect/Disconnect) When you press Connect, this instrument connects to the specified network drive. When you press Disconnect, the network drive is disconnected. 18-4 IM WT5000-01EN... -
Page 166: Sntp(Sntp)
(Date/Time). If you change this setting in the Ethernet communication (Network) settings, the Time Difference from GMT in the date and time settings (Date/Time) also changes. Executing Time Adjustment (Adjust) The instrument clock is synchronized to the SNTP server clock. 18-5 IM WT5000-01EN... -
Page 167: Utility
You can select the method for connecting a PC to this Instrument to control it. Click here. Network (Network) You can configure TCP/IP, FTP server, network drive, and SNTP settings. Click here. Self-test (Selftest) You can test the keyboard and memory operations. Click here. 19-1 IM WT5000-01EN... -
Page 168: Instrument Information (System Overview)
Version The firmware version Element Configuration The input element type Options The options Link Date The firmware date Product ID A unique number assigned to each instrument (This number is necessary for the purchase of additional options.) 19-2 IM WT5000-01EN... -
Page 169: System Configuration (System Configuration)
• The Time Difference from GMT setting is shared with the same setting found in the SNTP settings in the Ethernet communication (Network) settings. If you change this setting in the date and time settings, the Time Difference from GMT in the Ethernet communication (Network) settings also changes. 19-3 IM WT5000-01EN... - Page 170 Error messages appear when errors occur. You can choose to display these messages and the help using one of the following languages. The error codes for error messages are the same for all languages. For details on error messages, see the appendix in the User’s Manual, IM WT5000-02EN. • English •...
- Page 171 • When the Crest Factor Is Set to CF6 or CF6A When Urms, Uac, Irms, or Iac is 0.6% or less. When Umn, Urmn, Imn, or Irmn is 4% or less. • OFF The measured values are displayed and output as they are. 19-5 IM WT5000-01EN...
- Page 172 USB Human Interface Devices (HID) Class Ver. 1.1. • English: 104 keyboard • Japanese: 109 Keyboard For details on how the keys of this instrument are mapped to the keys on a USB keyboard, see appendix 7 in the Getting Started Guide, IM WT5000-03EN. 19-6 IM WT5000-01EN...
-
Page 173: Remote Control (Remote Control)
Communication interface for controlling this Instrument from a PC. GP-IB, USB, and Network are the available communication interfaces. For details, see the Communication Interface User's Manual, IM WT5000-17EN. • Only use one communication interface: GP-IB, USB, or Network. If you send commands simultaneously from more than one communication interface, the instrument will not execute the commands properly. -
Page 174: Releasing Remote Mode (Utility)
To connect the instrument to a PC through the USB port, carry out the following procedure. Install the YOKOGAWA USB driver on your PC. For information about how to obtain the YOKOGAWA USB driver, contact your nearest YOKOGAWA dealer. You can also access the YOKOGAWA USB driver download webpage and download the driver (https://tmi.yokogawa.com/library/). -
Page 175: Key Lock (Key Lock)
If the characters that you type appear correctly in the keyboard’s input box, the keyboard is functioning properly. Test Execution (Test Exec) The selected self-test starts. If an Error Occurs during a Self-Test If an error occurs even after you perform self-tests numerous times, contact your nearest YOKOGAWA dealer. 19-9 IM WT5000-01EN... -
Page 176: Index
Efficiency ................6-2 Page electrical angle..............5-15 C1+ Position ............... 15-2 Electrical Angle ..............5-15 C1+ Trace ................15-1 electrical angle correction ........... 5-15 C2x Position ............... 15-2 Electrical Angle Correction ..........5-15 C2x Trace ................15-2 Index-1 IM WT5000-01EN... - Page 177 11-15 integration, starting ............14-13 number of divisions of the waveform display ....... 11-4 integration, stopping ............14-13 numeric data display, turning on and off ......11-15 numeric data, saving ............17-4 Index-2 IM WT5000-01EN...
- Page 178 6-9 scheduled storage time ............16-4 Trigger Settings ..............6-8 scheduled time ..............14-9 trigger slope ................6-8 screen image colors ............17-5 trigger source................ 6-8 screen image data format ........... 17-5 Selected Items ............16-5, 17-4 Index-3 IM WT5000-01EN...
- Page 179 Wave Label ................11-7 Wiring ................... 3-1 wiring system ..............1-7, 3-1 wiring system pattern............3-2 wiring unit ..............1-7, 3-1 WP± Type ................14-11 Page X-axis position ..............11-13 X Axis Position ..............11-13 Page zero-level compensation............. 13-1 Index-4 IM WT5000-01EN...
Need help?
Do you have a question about the WT5000 and is the answer not in the manual?
Questions and answers