Table of Contents
Advertisement
Quick Links
Fiber Coupled Laser Sources
Operating Manual
THORLABS, Inc.
435 Route 206N
Newton, NJ 07860 USA
FIBER LASER SOURCE
LD PWR ADJ.
OFF
mW
ON
LASER
ENABLE
ON
POWER
FIBER DFB LASER SOURCE
LD PWR ADJ.
OFF
ON
LASER
ENABLE
ON
POWER
LASER APERTURE
TEMP. ADJUST
LASER APERTURE
o
C
mW
Phone: (973) 579-7227
Fax: (973) 383-8406
Serial #:_______________
Advertisement
Table of Contents

Related Manuals for THORLABS S1 Series


Summary of Contents for THORLABS S1 Series
- Page 1 FIBER LASER SOURCE LD PWR ADJ. LASER APERTURE LASER ENABLE POWER FIBER DFB LASER SOURCE LD PWR ADJ. TEMP. ADJUST LASER APERTURE LASER ENABLE POWER THORLABS, Inc. Phone: (973) 579-7227 435 Route 206N Fax: (973) 383-8406 Newton, NJ 07860 USA Serial #:_______________...
-
Page 2: Table Of Contents
Electrical: ..........................2 Optical:..........................2 Thermal:..........................2 Setting the AC Line Voltage and Installing Fuses ..............3 OPERATION ..........................4 S1 SERIES FABREY-PEROT....................4 1) Initial Set-up ........................4 2) Turning ON the Source ....................5 3) Adjusting the Laser Output Power.................5 4) Turning the Laser OFF ....................5 5) Modulating the Laser Output ..................5... -
Page 3: Description
Description The Thorlabs Fiber Coupled Laser Sources are fiber optic laser sources that provide ease of coupling and simple control of laser diode driven fiber optics. These laser sources are available in two versions, Fabry- Perot and Distributed Feed Back (DFB). The Fabry-Perot version comes in five available wavelength choices from 635nm up to 1550nm. -
Page 4: Setting The Ac Line Voltage And Installing Fuses
Setting the AC Line Voltage and Installing Fuses Your S1 or S3 Series Laser Source has been shipped from Thorlabs, Inc. configured for 115VAC operation. If you are planning to operate your unit using a 220 / 230VAC input, or need to replace an open fuse, you must perform the following procedure: Remove any AC Input cords that may be connected to the unit. -
Page 5: Operation
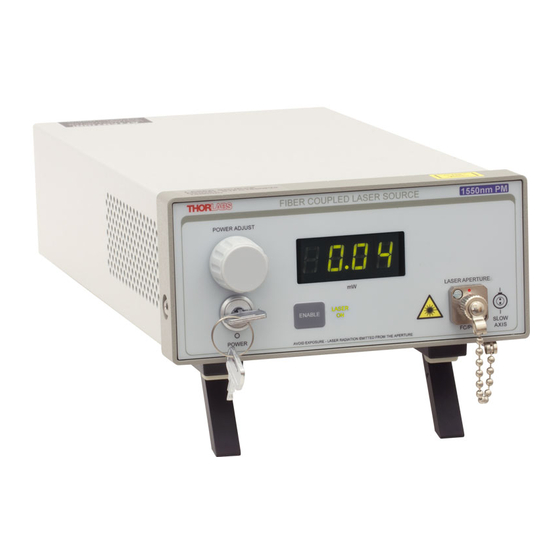
OPERATION S1 SERIES FABREY-PEROT 3 ½ Digit Display FIBER LASER SOURCE LD PWR ADJ. Power Adjust Laser Aperture Connect FC Keylock Power LASER APERTURE Terminated Switch Fiber Cable Key removes LASER ENABLE only in OFF POWER position Laser Enable Laser Emission... -
Page 6: Turning On The Source
2) Turning ON the Source Turn the POWER keyswitch clockwise. The unit is ON when the 3 ½ Digit Display lights up. Make sure the Interlock Input is short-circuited, refer to “Making the Safety Interlock Connections”. Press and release the ENABLE switch to turn ON the laser. Immediately the LASER ON indicator will light up, after a “safety delay”... -
Page 7: S3 Series Dfb Models
S3 SERIES DFB MODELS 3 ½ Digit Display FIBER DFB LASER SOURCE LD PWR ADJ. TEMP. ADJUST Power Adjust Laser Aperture Connect FC Terminated Fiber Cable Keylock Power LASER APERTURE Switch Key removes LASER ENABLE only in OFF POWER position Laser Enable Switch Display Select Switch... -
Page 8: Adjusting The Laser Output Power
The MOD IN input can be used to sinusoidally modulate the laser output, or set the laser output remotely using a 0 to 5V power source. The 5V maximum input corresponds to the maximum calibrated power of the S1 Series Laser Source, which operates using a constant power drive technique. The S3 Series DFB Laser Sources operate using a constant current drive technique, which causes the actual output power to be dependent on the operating temperature as set using the TEMP ADJ pot. -
Page 9: Making The Safety Interlock Connections
ENABLE switch. All units shipped from Thorlabs are configured with a shorting device installed in the Interlock connector. If you are not going to use this feature then you can leave the shorting device installed and the unit will operate normally as described in the procedures above. -
Page 10: Maximizing The Stability Of The S3 Series Dfb Laser Source
Maximizing the Stability of the S3 Series DFB Laser Source The S3 Series DFB Laser Source provides the ability to control not 75% Current 1547.993nm only the output power of the fiber coupled laser diode, it also allows for the precise control of the temperature at which the laser is operating. These two controls can be used to “tune”... - Page 11 How to tune your Laser Source to the most optimum power: So what does all this mean? It means that through careful use of both the laser diode power control and laser diode temperature control you 24.3 C will be able to tune your unit to provide the most stable output. Ideally 1547.994nm this procedure should be done using an Optical Spectrum Analyzer (OSA), however, lacking one you should be able to tune the unit using...
- Page 12 CAUTION- use of controls or adjustments or performance of procedures other than those specified herein may result in hazardous radiation exposure. Class 1 Laser Product 1310nm <5mW Class 1 Laser Product 1550nm <5mW Laser Radiation Do Not Stare Into Beam Class 3R Laser Product 600-700nm <5mW...
Need help?
Do you have a question about the S1 Series and is the answer not in the manual?
Questions and answers