
Related Manuals for Prestigio RoadRunner 400GPS


Summary of Contents for Prestigio RoadRunner 400GPS
- Page 1 Car Video Recorder RoadRunner 400GPS, 410GPS User Manual Version 2.0 www.prestigio.com...
- Page 2 - Prestigio continuously strives to improve its products. Due to software upgrading, some contents in this user manual may be different from your product. Prestigio reserves the rights to revise this user manual or withdraw it at any time without prior notice. Please take your product as standard.
-
Page 3: Table Of Contents
Contents 1. Unboxing ......................... 1 Inside your package ........................... 1 Device overview ........................... 1 2. Getting started......................2 Insert a microSD card ........................2 Mount to Windshield ......................... 2 Charge the battery..........................2 3. Settings ......................... 3 Video settings............................3 Picture settings ............................ -
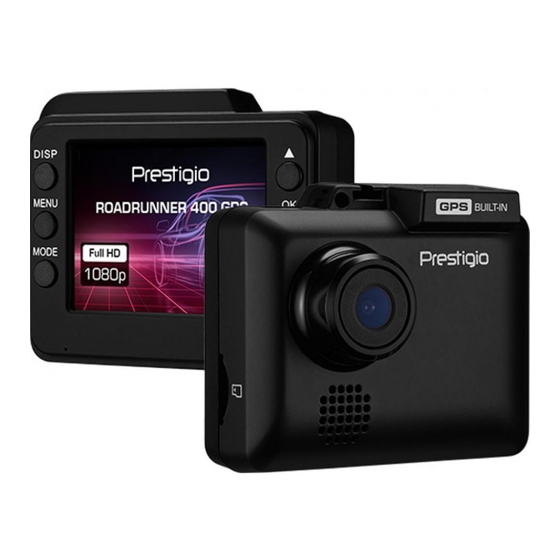
Page 4: Unboxing
• Car video recorder • Car charger • Mount • Quick start guide Device overview 4User Manual | RoadRunner 400-410GPS... -
Page 5: Getting Started
2. Getting started Insert a microSD card Before starting video recording, please insert a microSD card (not included) into the slot until it locks in place. The device will automatically recognize it as default storage and all the data will be saved on this card. -
Page 6: Settings
3. Settings Before recording, you can set up the device according to your requirements. - In preview mode, press [MENU] to enter settings, then pressing [MODE] one can to go to MOVIE settings, PICTURE settings, PLAYBACK mode, SD tool, General settings and E- dog settings, press [MENU] to exit. -
Page 7: General Settings
GENERAL SETTINGS Date/Time: Set date and time on device. Beep Sound: Off/On. Turn off/on beep sound. Stamp Date: Off/On. Add date stamp onto videos. Stamp Time: Off/On. Add time stamp onto videos. Language: Choose your language. Frequency: 50Hz, 60Hz. For a given luminance, the frequency of light fluctuation that evokes a sensation of flicker. -
Page 8: Recording
4. Recording Record a video Auto video recording Connect the device to car charger, when the car engine launches, the device will automatically turn on and start loop video recording. When shut off the car engine, the device will save the last file and turn off. Manual video recording In video preview mode, press [OK] button to start and stop video recording. -
Page 9: Playback
6. Playback Play video on DVR In playback mode, press [▲]/[▼] to scroll through the files. Press [OK] to start/Pause playback. Press [OK] again to stop playing. Press [MENU] again to exit playback mode. Playback on PC Remove memory card from DVR and insert it into computer’s card reader. DVR’s USB port is for charging purpose only. -
Page 10: Specifications
7. Specifications Display 2.0", 480x240 pixels Processor MSC8328P Image sensor 2 MP CMOS GC2023 View angle 140° 1920x1080@30FPS Video resolution 1280x720@30FPS 640x480@30FPS Photo resolution Video format Picture format 64 MB, Micro SD/SDHC up to 128 GB (class Memory Microphone Built-in WDR, GPS, Lane Departure Warning Features System, Front Collision Warning...
Need help?
Do you have a question about the RoadRunner 400GPS and is the answer not in the manual?
Questions and answers