Table of Contents
Advertisement
Quick Links
Advertisement
Table of Contents
Troubleshooting

Related Manuals for Miller Roughneck C Series


Summary of Contents for Miller Roughneck C Series
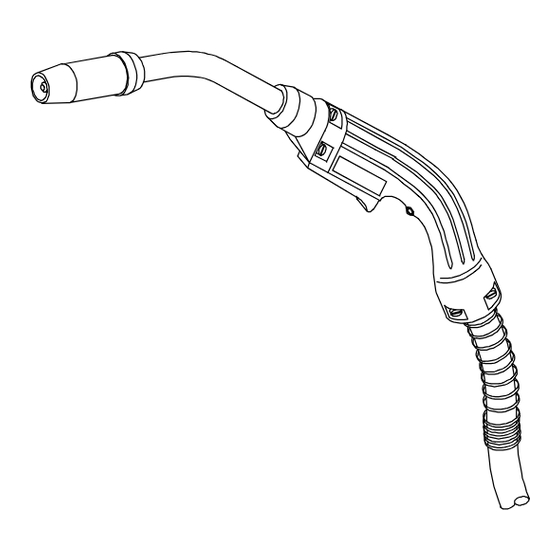
- Page 1 OM-199 706A August 2001 Processes MIG (GMAW) Welding Flux Cored (FCAW) Arc Welding Description Semi-Automatic, Air-Cooled, MIG (GMAW) Welding Gun Roughneck C-Series 300, 400, 500, And 600 Ampere MIG Welding Guns Visit our website at www.MillerWelds.com...
- Page 2 They had to be the best you could buy. Today, the people that build and sell Miller products continue the tradition. They’re just as committed to providing equipment and service that meets the high standards of quality and value established in 1929.
-
Page 3: Table Of Contents
TABLE OF CONTENTS SECTION 1 – SAFETY PRECAUTIONS - READ BEFORE USING ......SECTION 1 –SAFETY PRECAUTIONS FOR GMAW WELDING GUNS –... -
Page 5: Section 1 -Safety Precautions For Gmaw Welding Guns - Read Before Using
SECTION 1 –SAFETY PRECAUTIONS FOR GMAW WELDING GUNS – READ BEFORE USING SR7_7/01 1-1. Symbol Usage Y Marks a special safety message. Means Warning! Watch Out! There are possible hazards with this procedure! The possible hazards are shown in the adjoining symbols. Means NOTE;... -
Page 6: Emf Information
EMF INFORMATION Considerations About Welding And The Effects Of Low Frequency Electric And NOTE Magnetic Fields The following is a quotation from the General Conclusions Section of To reduce magnetic fields in the workplace, use the following procedures: the U.S. Congress, Office of Technology Assessment, Biological Effects of Power Frequency Electric &... -
Page 7: Section 2 - Installation
SECTION 2 – INSTALLATION 2-1. Specifications Air-Cooled Guns For GMAW Welding Note: Using mixed gases other than CO reduces duty cycle ratings by 10-50%. C-30 Gun Feeds .023 To 5/64 in (0.6 To 2.0 mm) Wire Duty Cycle Rating: 100%: 300 A With CO Shielding Gas Weight With 15 Ft (Heaviest) Power Cable: 7.5 lb (3.4 kg) Maximum Recommended Wire Size –... -
Page 8: Gun Connection And Operation
2-3. Gun Connection And Operation Gun Securing Knob Gun Block Feeder Connector Loosen knob. Insert feeder connec- tor until it is as close as possible to drive rolls without touching. Tighten knob. Gun Trigger Plug Gun Trigger Receptacle Insert plug into receptacle and tight- en threaded collar. -
Page 9: Replacing The Contact Tip
3-2. Replacing The Contact Tip Turn off welding power source/wire feeder. Cut off wire at contact tip. Nozzle Contact Tip Diffuser Correct wire size is stamped on tip. Be sure to use indicated wire size. Tools Needed: Ref. 802 661 3-3. -
Page 10: Replacing Feeder Connector
3-4. Replacing Feeder Connector Y Turn off welding power Threaded End source and wire feeder. Nozzle Contact Tip Diffuser Fiber Washer Insulator Liner Feeder Connector Lay gun cable out straight. Remove nozzle, contact tip, diffus- er, fiber washer, and insulator. Re- move existing liner from feeder con- nector by unscrewing threaded end of liner and removing liner from gun... -
Page 11: Installing Optional Gun Hook 199 662
3-5. Installing Optional Gun Hook 199 662 Y Turn Off welding power source and wire feeder and be sure gun is cool before proceeding. Retaining Screw Gun Hook Remove single retaining screw in location shown, position gun hook in place, and reinstall retaining screw. -
Page 12: Section 4 - Parts List
SECTION 4 – PARTS LIST 802 630-B Figure 4-1. C-30, C-40, C-50, And C-60 Guns OM-199 706 Page 8... - Page 13 Item Part Description Quantity Figure 4-1. C-30, C-40, C-50, And C-60 Guns Nozzles ♦199 610 ... NOZZLE, screw on brass 1/2 in orifice tapered ......♦199 611 .
- Page 14 Item Part Description Quantity Figure 4-1. C-30, C-40, C-50, And C-60 Guns (continued) Gas Diffusers ... . . 206 195 1/8 in tip recess – for standard and heavy duty FasTip contact tips (standard on all guns) .
- Page 15 ♦199 663 ....KIT, adapter Miller to old Hobart/Thermal/Tweco (includes) .......
- Page 16 Standard Consumables Chart 300 Amp Guns 400 Amp Guns 500 Amp Guns 600 Amp Guns Contact Tip 206 179 206 179 206 190 206 190 Nozzle 198 855 198 855 199 618 199 618 Diffuser* 206 195 206 195 206 195 206 195 Liner 202 890...
- Page 17 Notes OM-199 706 Page 13...
- Page 18 Notes OM-199 706 Page 14...
- Page 19 Effective January 1, 2000 (Equipment with a serial number preface of “LA” or newer) This limited warranty supersedes all previous Miller warranties and is exclusive with no other Warranty Questions? guarantees or warranties expressed or implied. Call LIMITED WARRANTY – Subject to the terms and conditions APT, ZIPCUT &...
- Page 20 Distributor Address City State For Service Call 1-800-4-A-Miller or see our website at www.MillerWelds.com to locate a DISTRIBUTOR or SERVICE AGENCY near you. Always provide Model Name and Serial/Style Number. Contact your Distributor for: Welding Supplies and Consumables Options and Accessories...
Need help?
Do you have a question about the Roughneck C Series and is the answer not in the manual?
Questions and answers