HBM QuantumX Operating Manual
Canbus
Hide thumbs
Also See for QuantumX:
- Quick start manual (200 pages) ,
- Operating manual (192 pages) ,
- Quick start manual (52 pages)
Table of Contents
Advertisement
Available languages
Available languages
Advertisement
Chapters
Table of Contents

Related Manuals for HBM QuantumX


Summary of Contents for HBM QuantumX
- Page 1 Operating Manual | Bedienungsanleitung English Deutsch CANBus...
- Page 2 Tel. +49 6151 803-0 Fax +49 6151 803-9100 info@hbm.com www.hbm.com Mat.: 7-2002.4461 DVS: A4461-2.0 HBM: public 03.2017 E Hottinger Baldwin Messtechnik GmbH. Subject to modifications. All product descriptions are for general information only. They are not to be understood as a guarantee of quality or durability.
- Page 3 Operating Manual | Bedienungsanleitung English Deutsch CANBus Receive / Transmit...
-
Page 4: Table Of Contents
..........QuantumX / SomatXR and CAN . - Page 5 ......6.6.2 Other numbering systems not used in QuantumX / SomatXR parameterization .
- Page 6 QuantumX / SomatXR and CCP / XCP-on-CAN ....Introduction to CCP and XCP ....... .
-
Page 7: Safety Instructions
In the event of a fault, these precautions establish safe operating conditions. This can be done, for example, by mechanical interlocking, error signaling, etc. CANBus A4461-2.0 HBM: public... - Page 8 After making settings and carrying out activities that are password-protected, you must make sure that any controls that may be connected remain in safe condition until the switching performance of the module has been tested. CANBus A4461-2.0 HBM: public...
- Page 9 S The operator makes unauthorized changes to the device. Warning signs and danger symbols Important instructions for your safety are specifically identified. It is essential to follow these instructions in order to prevent accidents and damage to property. CANBus A4461-2.0 HBM: public...
- Page 10 This marking draws your attention to a situation in Note which failure to comply with safety requirements may lead to damage to property. CANBus A4461-2.0 HBM: public...
- Page 11 The supply connection, as well as the signal and sensor leads, must be installed in such a way that electromagnetic interference does not adversely affect device functionality (HBM recommendation: "Greenline shielding design", downloadable from the Internet at http://www.hbm.com/Greenline). Automation equipment and devices must be covered over in such a way that adequate protection or locking against unintentional actuation is provided (e.g.
- Page 12 S As commissioning engineers or service engineers, you have successfully completed the training to qual ify you to repair the automation systems. You are also authorized to activate, ground and label circuits and equipment in accordance with safety engineering standards. CANBus A4461-2.0 HBM: public...
- Page 13 Safety instructions It is also essential to comply with the legal and safety requirements for the application concerned during use. The same applies to the use of accessories. CANBus A4461-2.0 HBM: public...
-
Page 14: Markings Used
Device -> New Bold text indicates menu items, as well as dialog and window titles in the user interfaces. Arrows between menu items indicate the sequence in which the menus and sub-menus are opened. CANBus A4461-2.0 HBM: public... - Page 15 Bitrate, 500 Bold text in italics indicates inputs and input fields in the user interfaces. Emphasize Italics are used to emphasize and highlight text and See… identify references to sections, diagrams, or external documents and files. CANBus A4461-2.0 HBM: public...
-
Page 16: Quantumx / Somatxr Documentation
QuantumX / SomatXR documentation QuantumX / SomatXR documentation The QuantumX / SomatXR family documentation con sists of S the QuantumX / SomatXR operating manual in PDF format S the data sheets in PDF format S the operating manuals for the CX22B-W data recorder S the operating manual for the EtherCAT®... -
Page 17: Canbus
CANbus CANbus This manual is intended to support you in connecting your QuantumX or SomatXR system to a CANbus with the following modules: - MX471B(-R) - MX840B(-R) In the following we will refer to these modules as MX471B and MX840B and only state the SomatXR modules in case of significant differences. -
Page 18: Quantumx / Somatxr And Can
QuantumX / SomatXR and CAN QuantumX / SomatXR and CAN General information The MX471B module provides four independent CAN bus nodes that are all electrically isolated from each other and power supply. Module MX840B provides an electrically isolated CANbus node on channel 1. - Page 19 QuantumX / SomatXR and CAN The configuration of a node is retained after switching the modules off and on. For decoding signals at a rate greater than 2000/s, please set up signal inputs 1 to 8 on the MX471B. The signal buffers of these signal inputs have been expanded accordingly.
-
Page 20: Can Bus
QuantumX / SomatXR and CAN CAN bus Receiving CAN signals: - MX471B, MX840B (channel 1) Transmitting CAN signals: - MX471B - MX840B (measurement signals within the module only) - The MX Assistant software can generate a DBC file from the list of all the messages that have been sent Receiving CCP or XCPoverCAN signals:... - Page 21 QuantumX / SomatXR and CAN MX471B-R MX840B-R Channel 1 SomatXR M12 5‐pin ODU 14‐pin Grey White CAN-High Blue Green CAN-Low Grey/Black Black CAN-GND Notice Ensure correct termination with termination resistors is made, as shown in Fig. 5.1. The MX840B does not have any termination.
- Page 22 Fig. 5.1 Bus termination resistors The adapter cable 1-KAB418 is used to connect the D-SUB-15HD device sockets of the QuantumX MX840B to standard D-SUB plugs with a standardized CiA assign ment of the MX840B to standard CAN plugs (D-SUB-9). 5.2.1...
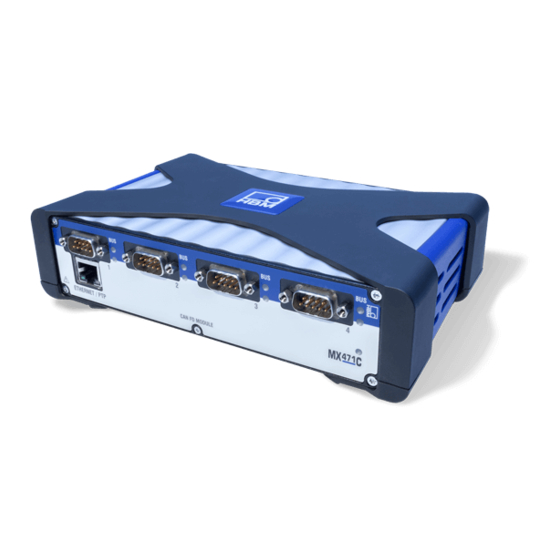
- Page 23 QuantumX / SomatXR and CAN CAN LEDs “BUS” System LED CAN LEDs “Channel” Fig. 5.3 SomatXR MX471B-R front view For module-related status displays (error messages) see also section 6.3. System LED Green Error-free operation Yellow System is not ready, boot procedure running...
- Page 24 QuantumX / SomatXR and CAN CAN LEDs (channel) Constant green Channel is ready for operation Flashing yellow Firmware download active Yellow on Boot process running Red on Channel has errors Ethernet LED (only QuantumX) Green on Ethernet link status is OK...
- Page 25 SamplePointRatio = 87.5 %, SJW = 4. 6.1.2 CANBus line termination All the MX471B variants and the MX840B-R can switch CAN bus line termination on or off via parameterization. The MX840, MX840A and MX840B do not support internal line termination. CANBus A4461-2.0 HBM: public...
- Page 26 This is also a reliable way to detect individual error events without having to constantly monitor the error status during mea surement. However, this method does not always reflect the current state of the CAN bus. CANBus A4461-2.0 HBM: public...
- Page 27 Error events often only occur sporadically and briefly. If the application also requires reliable detection of one-off events, you can set “error mode” in the parameterization (see Section 1.3) so that errors are only deleted when the error status is read out. CANBus A4461-2.0 HBM: public...
- Page 28 CAN bus are lost, and the “Overrun” flag is set. At this moment in time, no-one knows whether the lost data are relevant, that is, whether the CAN identifier for this message is parameterized in the decoder. CANBus A4461-2.0 HBM: public...
- Page 29 MX840B: If the signal fails completely within 128 ms, this is detected and a measured value marked as invalid is included in the signal current. This message is deleted again as soon as the next message has been decoded. CANBus A4461-2.0 HBM: public...
- Page 30 6.3.1 MX840B The behavior of the channel LED in CAN operating mode is described for the MX840B. The flickering of the LED during activity on the CAN bus is not synchronized with the individual messages. CANBus A4461-2.0 HBM: public...
- Page 31 CAN BUS activated, no errors, no activity on the CAN flickering green CAN BUS activated, no errors, activity on the CAN constant orange CAN controller defective at times (“BUS WARNING”). No activity on the CAN. CANBus A4461-2.0 HBM: public...
- Page 32 It may take a reset to reactivate the CAN controller. If the other channel LEDs and the system LED are also flashing red, there is a hardware defect. CANBus A4461-2.0 HBM: public...
-
Page 33: Can Decoder: Receiving Can Data
CAN message and the data format in which they are available as a signal in the QuantumX / SomatXR system. The CAN decoder behaves differently, depending on the com bination of the two data types. This may seem confusing at first, but it allows integer values to constantly be han... -
Page 34: Calculation Rule Data Types
Format”.The application of floating point numbers means that rounding errors are inherent. If the data type for “SignalFormat” is 64-bit integer, the decimal places of the floating point value are truncated before the final conversion from REAL64 to UINT64 or CANBus A4461-2.0 HBM: public... - Page 35 REAL32 REAL64 UINT32 REAL32 REAL64 REAL64 INT32 UINT64 INT64 REAL32 REAL64 UINT32 REAL64 REAL64 REAL64 INT32 UINT64 INT64 REAL32 REAL64 UINT32 INT32 REAL64 REAL64 INT32 UINT64 INT64 REAL32 REAL64 INT32 UINT32 REAL64 REAL64 INT64 UINT32 UINT64 CANBus A4461-2.0 HBM: public...
- Page 36 Conversion of the example in the module highlighted in color: int32_t raw; double factor, offset; int32_t signal = (int32_t) (round((double)raw * factor) + offset) ); Pascal: var raw: LongInt; factor, offset: Double; signal: LongInt begin signal:= LongInt(Round ((Int64(raw) * factor) + offset ); CANBus A4461-2.0 HBM: public...
- Page 37 Details on signal encoding can be found in the docu mentation defining the streaming protocol. 6.4.5.2 Parameterization Parameterization individually switches on and off CAN raw data reception for each CAN connector (<Active>). In addition, the signal, like many other signals in the CANBus A4461-2.0 HBM: public...
-
Page 38: Integer Scaling
Functional description QuantumX / SomatXR system, includes a name (<ChannelName>) and an ID specifying whether this name was set by the user or taken from the default settings (<OriginOfName>). 6.4.6 Integer scaling If the values for both “factor” and “offset” have been parameterized with an integer, particular emphasis is given to the accuracy of the integer. - Page 39 REAL32 REAL64 UINT32 REAL64 REAL64 REAL64 INT32 UINT64 INT64 REAL32 REAL32 REAL64 INT64 UINT32 INT32 INT32 INT32 INT32 UINT64 INT64 INT64 REAL32 REAL32 REAL64 REAL64 INT32 INT32 INT32 UINT32 INT64 INT64 UINT32 UNIT32 UNIT32 UINT64 UNIT64 CANBus A4461-2.0 HBM: public...
- Page 40 Conversion of the example in the module highlighted in color: double raw; int32_t factor, offset; int32_t signal = (int32_t) ( ((int64_t)raw * factor) + offset ); Pascal: var raw: Double; factor, offset: LongInt; signal: LongInt begin signal := LongInt((Int64(raw) * factor) + offset ); CANBus A4461-2.0 HBM: public...
-
Page 41: Can Encoder (Mappable Can Transmit Messages)
CAN Nachricht. As data 1 bit in length can also be “mapped”, it is conceivable to have up to 64 different sources in a single CAN message. The signal source in the system (e. g. “ModuleReference” = “UUID = 1234”, “SignalReference” = “AnalogIn_Connector1.Signal2”), the CANBus A4461-2.0 HBM: public... -
Page 42: Measured Value Scaling
<DataFormat> (e. g. Real32, Integer32) and the kind of coding <BitSequence> (Intel/Motorola) are defined for each source. The sources can be measured values from the QuantumX / SomatXR system transmitted via FireWire, or can also be decoded data received by the CAN bus. -
Page 43: Data Types And Bit Positions Of A Measured Value
64-bit integer takes place now. Then, starting with the MSB of the resultant integer value, the number of bits defined in <SignalLength> are mapped into the CAN message. This means that the most significant bits of a measured value are always transmitted. CANBus A4461-2.0 HBM: public... -
Page 44: Transmit Data In The Event Of An Error
<DataFormat> defines an integer value. Then the value from <Value> is transmitted in the event of an error. “Hex”: This selection is valid for all values of <DataFormat>. In the event of an error, the hex string is CANBus A4461-2.0 HBM: public... -
Page 45: Can Message Parameters
If, for example, only the first 18 data bits of a CAN mes sage are mapped, the data length of the CAN message <ByteCount> is 3 bytes. It is always possible and acceptable to have “gaps” in the CAN message. Their unspecified bits are transmitted with “0”. CANBus A4461-2.0 HBM: public... -
Page 46: Example Of The Different Signal Sources Within A Single Can Message
CAN bus. Required parameters, specified by the user. Bold italic marks the values that are mandatory, in order to meet the above conditions: The same values for <Identifier> and <Frameformat> apply to all sources. CANBus A4461-2.0 HBM: public... - Page 47 Integer-Wert die Bits 31 bis 8 INTEL-codiert gesendet) Source 3: Input: ModuleReference = “ ”, SignalReference = “CanReceiver_Connector2_Decoder1.Signal1” Type = MeasVal DataFormat = Unsigned Integer32 Factor = 1.0 Offset = 0.0 StartBit = 52 SignalLength = 3 CANBus A4461-2.0 HBM: public...
-
Page 48: Transmission Type
CAN bus is to be sent. There are various modes to choose from. The transmitted value is always the one actually present at this time. If a value for a source is not yet known, the value parameterized in Section 5.5 is transmitted. CANBus A4461-2.0 HBM: public... -
Page 49: Control
<Delta>, the CAN mes sage is transmitted. <Delta> is defined in the parameters of each source. If several measured values are “mapped” in a CAN message, the entire CAN message is sent when a source changes. CANBus A4461-2.0 HBM: public... -
Page 50: Isoevent
10 different CAN messages, and each CAN message will only be able to have 1 source, corresponding to an ana log measured value within the module. So these parameters cannot be freely selected in the MX840B, they are fixed as stated: CANBus A4461-2.0 HBM: public... -
Page 51: Data Bit Numbering Systems According To The Vector Dbc Format
MX840B as well in future, with a resolution of 1000 μs. Data bit numbering systems according to the vector DBC format 6.6.1 Numbering systems used in QuantumX / SomatXR parameterization The data for the measured values can be interpreted in different numbering systems. -
Page 52: Intel Standard Format
If the data type is signed, this is always assumed in the “msb” and is filled with 1 when right- shifting to the intermediate value. If the “BitSequence” or “ModeBitSequence” element has the value “1”, this CANBus A4461-2.0 HBM: public... -
Page 53: Motorola Forward Msb Format
If the data type is signed, this is always assumed in the “msb” and when receiving CAN mes sages, is filled with 1 when right-shifting to the intermediate value. If the “BitSequence” or “ModeBitSe quence” element has the value “0”, this decoding is used CANBus A4461-2.0 HBM: public... -
Page 54: Other Numbering Systems Not Used In Quantumx / Somatxr Parameterization
² ² lsb 6.6.2 Other numbering systems not used in QuantumX / SomatXR parameterization The following tables are for your information, so that other numbering systems can be transposed into a for mat that is used for MX parameterization. CANBus... -
Page 55: Motorola Forward Lsb Format
6.6.2.1 MOTOROLA Forward LSB format Internal CANdb “MOTOROLA Forward LSB” format example, start bit = 18, length = 12: Bit no. within the data byte msb ² ² ² ² ² ² Start bit/ ² ² ² ² ² CANBus A4461-2.0 HBM: public... -
Page 56: Motorola Backward Format
= 8, start bit = 42, length = 12: Bit no. within the data byte msb ² ² ² ² ² ² Start bit/ ² ² ² ² The same use information, sent in 3 data bytes: CANBus A4461-2.0 HBM: public... -
Page 57: Intel Sequential Format
6.6.2.3 INTEL Sequential format Internal CANdb “INTEL Sequential” format example, start bit = 14, length = 12: Bit no. within the data byte Start bit/ ² ² ² ² ² msb ² ² ² ² ² CANBus A4461-2.0 HBM: public... -
Page 58: Motorola Sequential Format
6.6.2.4 MOTOROLA Sequential format Internal CANdb “MOTOROLA Sequential” format example, start bit = 10, length = 12: Bit no. within the data byte msb ² ² ² ² ² ² Start bit/ ² ² ² ² CANBus A4461-2.0 HBM: public... -
Page 59: Quantumx / Somatxr And Ccp / Xcp-On-Can
QuantumX / SomatXR and CCP / XCP-on-CAN QuantumX / SomatXR and CCP / XCP-on-CAN Introduction to CCP and XCP Modern Electronic Control Units (ECUs) in vehicles com municate in different protocols with each other or with tuning or analysis tools. The “Universal Measurement and Calibration Protocol “or short XCP is a modern proto... -
Page 60: Mx471B And Can / Xcp-On-Can
QuantumX / SomatXR and CCP / XCP-on-CAN MX471B and CAN / XCP-on-CAN The MX471B offers 4 individually configurable CAN ports which can be parameterized to work on CCP or XCP-on- CAN and thus to read signal values from ECUs. In this mode the MX471B works as logger. - Page 61 QuantumX / SomatXR and CCP / XCP-on-CAN S If ECU is locked by “Seed & Key” mechanism, corre sponding *.skb file has to be available S CANape version 10.0 or higher installed (might also work with previous versions, but not tested)
-
Page 62: Initialization Per Xml
QuantumX / SomatXR and CCP / XCP-on-CAN Initialization per XML The initialization is performed with XML parameters in file "AddConnParam.xml", XPath: …<CanBus><ECU>. The content of a vector DBC file must be written to the <DBC> tag as a string. If a "seed and key binary" file will be used, its content must be written as a string to the <SKB>... -
Page 63: General Workflow
QuantumX / SomatXR and CCP / XCP-on-CAN Processing can be stopped and started again at any time using this control item. The "CANECU" control item uses these parameters to start and stop: Connector Number of the CAN bus connections („1…4“, „0“: all) Index Index of the ECU, currently always "1". - Page 64 QuantumX / SomatXR and CCP / XCP-on-CAN Step 1 - Create Measurement Configuration using CANape S ·Create new CANape project S ·Create new CCP or XCP device, depending on the protocol that is implemented on the ECU S ·Create a measurement configuration with all the signals that you want to record with MX471B.
- Page 65 QuantumX / SomatXR and CCP / XCP-on-CAN CANBus A4461-2.0 HBM: public...
- Page 66 QuantumX / SomatXR and CCP / XCP-on-CAN S ·Switch to Expert settings tab. Modify INIT_RETRIES = 100 and INIT_RETRY_DELAY = 2000 (recom mended values). MX471B will try to start communication with ECU 100 times and every 2000ms. This is important if ECU is powered up after MX471B.
- Page 67 QuantumX / SomatXR and CCP / XCP-on-CAN Step 2b – Only for XCP-on-CAN – Adjust Protocol Settings in Device configuration (not necessary for CCP): S ·Set parameter”DAQ_CALCU LATE_FIRST_PIDS_WHEN_OFFLINE” to “yes” CANBus A4461-2.0 HBM: public...
- Page 68 QuantumX / SomatXR and CCP / XCP-on-CAN S ·Set “Consistency mode” to “ODT” and “Identification field type” to “Absolute” CANBus A4461-2.0 HBM: public...
- Page 69 QuantumX / SomatXR and CCP / XCP-on-CAN Step 3 - Export Measurement configuration to a *.dbc file using CANape: S ·Select ECU in Logger Configuration (Tools -> Logger configuration) and click on “Create file” button. S => *.dbc file is created in your CANape project direc...
- Page 70 QuantumX / SomatXR and CCP / XCP-on-CAN If the check box next to Active is set, processing starts immediately. If the check box is not selected, processing does not begin until a control item is written. CANBus A4461-2.0 HBM: public...
- Page 71 QuantumX / SomatXR and CCP / XCP-on-CAN Result: All configured signals are now visible on CAN Bus 1 Step 5 – You can now open Catman and start mea surement Configuration of a Gateway Mode The MX471B can also be used as a gateway transferring XCP-on-CAN or CCP signals to CAN.
- Page 72 QuantumX / SomatXR and CCP / XCP-on-CAN 4. Adjust CAN IDs in that way, that every signal has its own unique ID. In this example 385, 386, 387, 388: (An automatic assignment of consecutive IDs can be done via CAN bus settings -> Assign message IDs).
-
Page 73: Glossary
QuantumX / SomatXR and CCP / XCP-on-CAN Glossary Extension of a Device Description File of an ECU. Standardized by ASAM. ASAM Association for Standardisation of Automation and Measuring Systems CAN Calibration Protocol. Standardized by ASAM. Data Base CAN: File format for CAN communication Electronic Control Unit Seed &... - Page 74 QuantumX / SomatXR and CCP / XCP-on-CAN CANBus A4461-2.0 HBM: public...
- Page 75 Operating Manual | Bedienungsanleitung English Deutsch CANBus Empfangen / Senden...
- Page 76 ..........QuantumX / SomatXR und CAN .
- Page 77 ......6.6.2 Weitere Zählweisen, nicht in QuantumX / SomatXR‐Parametrierung genutzt ...........
- Page 78 QuantumX / SomatXR und CCP / XCP-on-CAN ....Einführung in CCP und XCP ....... . .
-
Page 79: Sicherheitshinweise
Bei Anlagen, die aufgrund einer Fehlfunktion größere Schäden, Datenverlust oder sogar Personenschäden verursachen können, müssen zusätzliche Sicherheitsvor kehrungen getroffen werden. Im Fehlerfall stellen diese Vorkehrungen einen sicheren Betriebszustand her. Dies kann z. B. durch mechanische Verriegelungen, Feh lersignalisierung, Grenzwertschalter usw. erfolgen. CANBus A4461-1.0 HBM: public... - Page 80 Paßwort geschützt sind, ist sicherzustellen, dass evtl. angeschlossene Steuerungen in einem sicheren Zustand verbleiben, bis das Schaltver halten des Moduls geprüft ist. Wartung und Reinigung Die Module sind wartungsfrei. Beachten Sie bei der Rei nigung des Gehäuses folgende Punkte: CANBus A4461-1.0 HBM: public...
- Page 81 Anwendungsbereichs eingesetzt. S Am Gerät werden vom Betreiber unautorisiert Ände rungen vorgenommen. Warnzeichen und Gefahrensymbole Wichtige Hinweise für Ihre Sicherheit sind besonders ge kennzeichnet. Beachten Sie diese Hinweise unbedingt, um Unfälle und Sachschäden zu vermeiden. CANBus A4461-1.0 HBM: public...
- Page 82 Situation hin, die – wenn die Sicherheits bestimmungen nicht beachtet werden – leichte oder mittlere Körperverletzung zur Folge haben kann. Diese Kennzeichnung weist auf eine Situation hin, Hinweis die – wenn die Sicherheitsbestimmungen nicht beachtet werden – Sachschäden zur Folge haben kann. CANBus A4461-1.0 HBM: public...
- Page 83 Sicherheitsbewussten Arbeiten Der Versorgungsanschluss, sowie Signal‐ und Fühlerlei tungen müssen so installiert werden, dass elektromagne tische Einstreuungen keine Beeinträchtigung der Geräte funktionen hervorrufen (Empfehlung HBM ”Greenline‐Schirmungskonzept”, Internetdownload http://www.hbm.com/Greenline). Geräte und Einrichtungen der Automatisierungstechnik müssen so verbaut werden, dass sie gegen unbeabsich...
- Page 84 Umgang mit den Anlagen unterwiesen und mit der Bedienung der in dieser Dokumentation be schriebenen Modulen und Technologien vertraut. S Als Inbetriebnehmer oder im Service eingesetzt ha ben sie eine Ausbildung absolviert, die Sie zur Repa CANBus A4461-1.0 HBM: public...
- Page 85 Geräte gemäß den Normen der Sicherheitstechnik in Betrieb zu nehmen, zu erden und zu kennzeichnen. Bei der Verwendung sind zusätzlich die für den jeweiligen Anwendungsfall erforderlichen Rechts‐ und Sicherheits vorschriften zu beachten. Sinngemäß gilt dies auch bei Verwendung von Zubehör. CANBus A4461-1.0 HBM: public...
-
Page 86: Verwendete Kennzeichnungen
Körperverletzung zur Folge haben kann. Diese Kennzeichnung weist auf wichtige Informa tionen zum Produkt oder zur Handhabung des Pro Wichtig duktes hin. Diese Kennzeichnung weist auf Anwendungstipps oder andere für Sie nützliche Informationen hin. Tipp CANBus A4461-1.0 HBM: public... - Page 87 Menüs und Untermenüs aufgerufen werden. Bitrate, 500 Fett‐kursive Schrift kennzeichnet Eingaben und Ein gabefelder in Programmoberflächen. Hervorhebung Kursive Schrift kennzeichnet Hervorhebungen im Siehe … Text und kennzeichnet Verweise auf Kapitel, Bilder oder externe Dokumente und Dateien. CANBus A4461-1.0 HBM: public...
-
Page 88: Quantumx / Somatxr-Dokumentation
Verfügung steht. Hier finden Sie auch Hinweise zur Konfiguration der Module und Kanäle. Sie finden diese Dokumente S auf der mit dem Gerät gelieferten QuantumX / SomatXR-System-CD S nach Installation des MX-Assistenten auf der Fest platte ihres PCs, zu erreichen über Windows-Start S immer aktuell auf unseren Internetseiten unter www.hbm.com/... -
Page 89: Der Canbus
Der CANBus Der CANBus Diese Anleitung unterstützt Sie beim Anschließen Ihres QuantumX- oder SomatXR-Systems an einen CAN-Bus mit den folgenden Modulen: - MX471B(-R) - MX840B(-R) Im Folgenden werden diese Module als MX471B und MX840B bezeichnet. Die SomatXR-Module werden nur im Falle wesentlicher Unterschiede speziell genannt. -
Page 90: Quantumx / Somatxr Und Can
QuantumX / SomatXR und CAN QuantumX / SomatXR und CAN Übersicht Das Modul MX471B bietet vier unabhängige CANbus- Knoten, die alle untereinander und zur Stromversorgung potentialgetrennt sind. Das Modul MX840B bietet am Kanal 1 einen CANbus‐Knoten, der galvanisch getrennt ist. -
Page 91: Anschluss Canbus
QuantumX / SomatXR und CAN Im Datenblatt wird der Zusammenhang zwischen Bitrate und maximale Leitungslänge des Busses dargestellt. Die Konfiguration eines Knotens bleibt auch nach dem Ab- und Anschalten der Module bestehen. Sollten Sie Signale mit einer Rate größer als 2000/s de... - Page 92 QuantumX / SomatXR und CAN MX840B MX471B QuantumX Kanal 1 SubHD-15pol. SubD-9pol. CAN-High CAN-Low CAN-GND CANBus A4461-1.0 HBM: public...
- Page 93 QuantumX / SomatXR und CAN MX471B-R MX840B-R Kanal 1 M12 5pol. SomatXR ODU 14pol Grau Weiß CAN-High Grün Blau CAN-Low Grau/Schwarz Schwarz CAN-GND Hinweis Sorgen Sie für eine korrekte Terminierung mit Abschluss widerständen, wie in Abb. 5.1 dargestellt. Das Quan...
-
Page 94: Zustandsanzeige Leds Der Geräte
QuantumX / SomatXR und CAN Abschluss- Abschluss- widerstand widerstand 120 120 Knoten 1 ..Knoten n Abb. 5.1 Busabschlusswiderstände Zum Anschluss der D-SUB-15HD-Gerätebuchsen des QuantumX MX840B an handelsübliche D-SUB-Stecker mit standardisierter CiA‐Belegung dient das Adapterkabel 1-Kab418. - Page 95 QuantumX / SomatXR und CAN System-LED CAN-LEDs “BUS” CAN-LEDs “Kanal” Abb. 5.3 SomatXR Frontansicht MX471B-R Modulbezogene Zustandsanzeigen (Fehlermeldungen) siehe auch Kapitel 6.3. System-LED Grün Fehlerfreier Betrieb Gelb System ist nicht bereit, Bootvorgang läuft Gelb blinkend Download aktiv, System ist nicht bereit...
-
Page 96: Can-Nachrichten Empfangen
QuantumX / SomatXR und CAN CAN-LEDs (BUS) Grün flackert Bus ist fehlerfrei und Aktivität auf CAN Grün dauerhaft an Bus ist fehlerfrei und keine Aktivität auf CAN Gelb flackert Bus ist zeitweise fehlerfhaft (Warning) und Aktivität auf CAN Gelb dauerhaft an Bus ist zeitweise fehlerfhaft (Warning) und keine Aktivität auf... - Page 97 QuantumX / SomatXR und CAN Es können auch CAN-Datenbasen vom Typ *.dbc in die Sensordatenbank eingelesen werden. Steht keine CAN- Datenbasis zur Verfügung, kann diese auch selbst erstellt werden. Unterschiedliche Firmen bieten hierzu Editoren an. Im Messbetrieb werden die empfangenen CAN-Nachrich...
-
Page 98: Funktionsbeschreibung
= 87,5 %, SJW = 4. 6.1.2 Terminierung des CANBus Alle Varianten von MX471B, sowie MX840B-R können eine Terminierung des CAN-Bus per Parametrierung zu- oder abschalten. MX840, MX840A und MX840B unter stützen keine interne Terminierung. CANBus A4461-1.0 HBM: public... -
Page 99: Fehlerbehandlung
Fehlerstatus ausgelesen wurde. Auf diese Weise können auch einzelne Fehlerereignisse sicher erfasst werden, ohne dass der Fehlerstatus während einer Messung dau erhaft beobachtet werden muss. Allerdings gibt diese Methode nicht immer den aktuellen Zustand des CAN- Bus wider. CANBus A4461-1.0 HBM: public... -
Page 100: Fehlerereignisse
Wenn die Anwendung fordert, dass auch ein malige Ereignisse sicher erkannt werden können, kann in der Parametrierung (siehe Kapitel 1.3) der „Fehlermodus“ so eingestellt werden, dass Fehler erst mit dem Auslesen des Fehlerstatus gelöscht werden. CANBus A4461-1.0 HBM: public... -
Page 101: Mögliche Fehlerursachen Im Can-Betrieb
Wenn die Daten nicht schnell genug vom CAN-Controller im Modul ausgelesen werden können, gehen Daten verloren, die auf dem CAN-BUS anliegen und das Flag „Overrun“ wird gesetzt. Zu diesem Zeitpunkt ist nicht bekannt, ob die verloren gegangenen Daten relevant CANBus A4461-1.0 HBM: public... -
Page 102: Can „Transmitter Overrun
CAN-Nachricht. Für MX840B) gilt: Wenn das Signal innerhalb 128 ms völlig ausfällt, wird dies detektiert und ein ungültig markierter Messwert in den Signalstrom eingefügt. Sobald die nächste Nach richt dekodiert wurde, wird dieser Fehler wieder gelöscht. CANBus A4461-1.0 HBM: public... -
Page 103: Modul-Ressourcen
über den Fehlerstatus ausgelesen werden können. 6.3.1 MX840B Für MX840B ist das Verhalten der Kanal-LED im CAN- Betriebsmode beschrieben. Das Flackern der LED bei Aktivität auf dem CAN-Bus ist nicht mit einzelnen Nach richten synchronisiert. CANBus A4461-1.0 HBM: public... -
Page 104: Mx471B
LED rot, liegt ein Hardware-Defekt vor. 6.3.2 MX471B BUS‐LED Funktion dauerhaft grün CAN-BUS aktiviert, keine Fehler, keine Aktivität auf CAN flackernd grün CAN-BUS aktiviert, keine Fehler, Aktivität auf CAN dauerhaft orange CAN-Controller zeitweise fehlerhaft („BUS WARNING“). Keine Aktivität auf CAN. CANBus A4461-1.0 HBM: public... - Page 105 CAN-Nachrichten möglich. Bitrate aller angeschlos senen Teilnehmer, Verpolung oder Kurzschlüsse prüfen. CAN-Controller wird evtl. erst nach einem Rücksetzen wieder aktiviert. Blinken zusätzlich die übrigen Kanal-LED und die System- LED rot, liegt ein Hardware-Defekt vor. CANBus A4461-1.0 HBM: public...
-
Page 106: Can-Dekoder: Empfang Von Can-Daten
Im CAN-Dekoder wird durchgängig unterschieden, in welchem Datenformat die Daten aus der CAN-Nachricht extrahiert und in welchem Datenformat sie als Signal im QuantumX / SomatXR-System verfügbar sind.. Je nach Kombination beider Datentypen verhält sich der CAN- Dekoder unterschiedlich. Das mag zunächst verwirrend sein, bietet aber die Möglichkeit, dass Integer-Werte... -
Page 107: Datentypen Der Rechenvorschrift
6.4.4 Fließkomma‐Skalierung Sofern wenigstens einer der Werte von „factor“ oder „offset“ mit einem Fließkommawert parametriert wurde, wird das CAN-Rohsignal „raw_value“ zunächst in einen Fließkommawert (REAL64) umgewandelt. „factor“ und „offset“ sind in diesem Fall immer vom Fließkomma- CANBus A4461-1.0 HBM: public... - Page 108 Nachkommastellen des Fließkommawerts vor der abschliessenden Umwandlung von REAL64 nach UINT64 bzw. INT64 abgeschnitten. In allen anderen Fäl len wird der Fließkommawert zunächst auf eine Ganz zahl gerundet. Nachfolgende Tabelle gilt ausschließlich für die hier beschriebene „Fließkomma-Skalierung“: CANBus A4461-1.0 HBM: public...
- Page 109 REAL32 REAL64 UINT32 REAL32 REAL64 REAL64 INT32 UINT64 INT64 REAL32 REAL64 UINT32 REAL64 REAL64 REAL64 INT32 UINT64 INT64 REAL32 REAL64 UINT32 INT32 REAL64 REAL64 INT32 UINT64 INT64 REAL32 REAL64 INT32 REAL64 REAL64 UINT32 INT64 UINT32 UINT64 CANBus A4461-1.0 HBM: public...
- Page 110 Umsetzung des farbig hervorgehobenen Beispiels im Modul: int32_t raw; double factor, offset; int32_t signal = (int32_t) (round((double)raw * factor) + offset) ); Pascal: var raw: LongInt; factor, offset: Double; signal: LongInt begin signal:= LongInt(Round ((Int64(raw) * factor) + offset ); CANBus A4461-1.0 HBM: public...
-
Page 111: Can-Rohdaten-Empfang
Definition des Streaming-Protokolls zu entnehmen. 6.4.5.2 Parametrierung Die Parametrierung schaltet den Empfang der CAN-Roh daten individuell für jeden CAN-Connector ein und aus (<Active>). Außerdem enthät das Signal wie viele andere Signale im QuantumX / SomatXR-System einen Namen CANBus A4461-1.0 HBM: public... -
Page 112: Ganzzahl-Skalierung
Ebenso werden „factor“ und „offset“ mit dem in der Tabelle genannten Datentyp gerechnet. Das Zwischenergebnis wird schließlich in das Datenformat umgewandelt, das als „SignalFormat“ angegeben wurde. Nachfolgende Tabelle gilt ausschließlich für die hier beschriebene „Ganzzahl‐Skalierung“. CANBus A4461-1.0 HBM: public... - Page 113 REAL32 REAL64 UINT32 REAL64 REAL64 REAL64 INT32 UINT64 INT64 REAL32 REAL32 REAL64 INT64 UINT32 INT32 INT32 INT32 INT32 UINT64 INT64 INT64 REAL32 REAL32 REAL64 REAL64 INT32 INT32 INT32 UINT32 INT64 INT64 UINT32 UNIT32 UNIT32 UINT64 UNIT64 CANBus A4461-1.0 HBM: public...
- Page 114 Umsetzung des farbig hervorgehobenen Beispiels im Modul: double raw; int32_t factor, offset; int32_t signal = (int32_t) ( ((int64_t)raw * factor) + offset ); Pascal: var raw: Double; factor, offset: LongInt; signal: LongInt begin signal := LongInt((Int64(raw) * factor) + offset ); CANBus A4461-1.0 HBM: public...
-
Page 115: Can-Encoder (Mappable Can-Sende-Nachrichten)
Name> zur Anzeige in den Oberflächen der PC-Soft ware. 6.5.2 Definition der Signalquellen Was wird wo gesendet? In jeder CAN-Nachricht können Daten aus mehreren ver schiedenen Quellen gesendet werden. Da auch Daten mit 1 bit Länge „gemappt“ werden können, sind bis zu 64 CANBus A4461-1.0 HBM: public... -
Page 116: Skalierung Des Messwertes
= „AnalogIn_Connector1.Signal2“) definiert, das Datenformat <DataFormat> (z. B. Real32, Integer32) und die Art der Codierung <BitSequence> (Intel/Motorola). Die Quellen können Messwerte aus dem QuantumX / SomatXR-System sein, die per FireWire übertragen wurden, aber auch dekodierte Daten, die vom CAN-Bus empfangen wurden. -
Page 117: Datentypen Und Bit-Positionen Eines Messwertes
1 und 64 Bit betragen kann. Die Auflösung des Messwerts als Ganzzahl ist also variabel. Dies leistet eine differenzierte Datentyp-Umwandlung. Zuerst wird der Messwert als Fließkommawert skaliert. Wenn das Sende-Datenformat <DataFormat> als Integerwert gewählt ist, erfolgt erst jetzt die Umrechnung CANBus A4461-1.0 HBM: public... -
Page 118: Sendedaten Im Fehlerfall
Fehlerfall „2,0E15“ gesendet. Ist <Type> auf „BitArray“ gesetzt oder <DataFormat> ist auf einen Integer oder Boolean parametriert, wird „0“ gesendet. Dies entspricht dem Verhalten des Moduls, als <ValueOnError> noch nicht existierte und ist die Werkseinstellung. CANBus A4461-1.0 HBM: public... -
Page 119: Parameter Der Can-Nachricht
Signalquelle „gemappt“ werden soll. 6.5.6.1 Datenlänge der CAN‐Nachricht Daten in CAN-Nachrichten sind immer Vielfache Byte. Die Länge der CAN-Nachricht entspricht der Anzahl Byte, die erforderlich ist, um alle in diese CAN-Nachricht aktiven „gemappten“ Signalquellen zu versenden. CANBus A4461-1.0 HBM: public... -
Page 120: Beispiel Für Verschiedene Signalquellen Innerhalb Einer Einzigen Can-Nachricht
Nachricht kodiert werden. Als nächstes soll ein Float- Wert einer Mathematikeinheit als 18 bit langer Signed- Integer unter Berücksichtigung von 2 Nachkommastellen an der Bit-Position 33 gesendet werden. Schließlich sollen ab Bit-Position 52 drei Bit mit Schaltzuständen CANBus A4461-1.0 HBM: public... - Page 121 Offset = 0.0 StartBit = 33 SignalLength = 18 BitSequence = INTEL (Nachdem der Float-Wert mit 100 multipliziert und danach in einen Signed-Integer32-Wert konvertiert wurde, werden aus diesem Integer-Wert die Bits 31 bis 8 INTEL-codiert gesendet) Source 3: CANBus A4461-1.0 HBM: public...
- Page 122 Mit der CAN-Receive-Funktionalität (CAN-Dekoder <CanInChannel>) im MX840B oder eines anderen CAN- Kanals eines MX471B kann diese CAN-Nachricht direkt wieder zu vier verschiedenen Signalen dekodiert werden, indem <DataFormat>, <StartBit>, <BitSequence> und <SignalLength> aus obiger Parametrierung übernommen werden. CANBus A4461-1.0 HBM: public...
-
Page 123: Transmission-Type
Control (siehe Kap. 5.8.1) ausgelöst werden. Die Daten in der CAN-Nachricht entsprechen dem Momentanwert und sind nicht synchronisiert mit der Datenquelle. Im MX471B realisieren wir die Timer-Auflösung durch Abzählen der isochronen Ereignisse (1200 Hz). Die Peri CANBus A4461-1.0 HBM: public... -
Page 124: Sourcechange
Ereignisse gesendet wird. Damit kann die Auslastung auf dem CAN-Bus verringert werden, wenn z. B. Messwerte mit niedriger Dynamik (z. B. Temperatur) gesendet werden sollen. Der Versand einer CAN-Nachricht kann zusätzlich per Control (siehe Kap. 5.8.1) ausgelöst werden. CANBus A4461-1.0 HBM: public... -
Page 125: Einschränkungen Für Mx840B
BitSequence = INTEL oder MOTOROLA CanMessage-TransmissionType = „Control” oder „Timer” Eine empfangene CAN-Nachricht kann nicht per CAN weitergesendet werden. Auch muss die Signalquelle innerhalb des Moduls entnommen werden, also: ModuleReference (leer bzw. „UUID=[eigene UUID]”), SignalReference = „AnalogIn_Connec tor[2…8].Signal1” CANBus A4461-1.0 HBM: public... -
Page 126: Zählweisen Der Datenbit Gemäß Vector-Dbc-Format
MX840B in Microsekunden angegeben werden, wobei die Auflösung 1000 μs beträgt. Zählweisen der Datenbit gemäß Vector‐DBC‐Format 6.6.1 Zählweisen, in QuantumX / SomatXR‐Parametrierung genutzt Die Daten für die Messwerte können in unterschiedlichen Zählweisen interpretiert werden. Die Formate „INTEL Standard“, „MOTOROLA Forward“... -
Page 127: Format Intel-Standard
Datentyp vorzeichenbehaftet, wird dies immer im „msb“ angenommen und beim Rechtsschieben in den Zwi schenwert mit 1 aufgefüllt. Diese Dekodierung wird sowohl für den Messwert als auch die Mode-Information gleichermaßen verwendet, wenn im Element „BitSe quence“ bzw. „ModeBitSequence“ der Wert „1“ steht. CANBus A4461-1.0 HBM: public... -
Page 128: Format Motorola Forward Msb
Rechtsschieben in den Zwischenwert mit 1 aufge füllt. Diese Dekodierung wird sowohl für den Messwert als auch die Mode-Information gleichermaßen verwendet, wenn im Element „BitSequence“ bzw. „ModeBitSequence“ der Wert „0“ steht. Beispiel CANdb-internes „MOTOROLA Forward MSB“-Format, Startbit = 13, Länge = 12: CANBus A4461-1.0 HBM: public... -
Page 129: Weitere Zählweisen, Nicht In Quantumx / Somatxr-Parametrierung Genutzt
² ² ² ² ² lsb 6.6.2 Weitere Zählweisen, nicht in QuantumX / SomatXR‐Parametrierung genutzt Um weitere Zählweisen in ein Format überführen zu können, das zur Parametrierung von MX genutzt wird, dienen nachfolgende Tabellen zur Information. CANBus A4461-1.0 HBM: public... -
Page 130: Format Motorola Forward Lsb
² ² ² Startbit/ ² ² ² ² ² 6.6.2.2 Format MOTOROLA Backward Bei diesem Format wird ab dem letzten zu versendenden Bit gezählt. Somit ist das Startbit abhängig von der Anzahl der zu versendenden Byte. CANBus A4461-1.0 HBM: public... - Page 131 ² Die gleiche Nutzinformation, gesendet in 3 Daten-Byte: CANdb-internes „MOTOROLA Backward“-Format, Datenlänge = 3, Startbit = 2, Länge = 12: Bit-Nr. innerhalb des Daten-Byte msb ² ² ² ² ² ² Startbit/ ² ² ² ² CANBus A4461-1.0 HBM: public...
-
Page 132: Format Intel Sequential
Funktionsbeschreibung 6.6.2.3 Format INTEL Sequential Beispiel CANdb-internes „INTEL Sequential“-Format, Startbit = 14, Länge = 12: Bit-Nr. innerhalb des Daten-Byte Startbit/ ² ² ² ² ² msb ² ² ² ² ² CANBus A4461-1.0 HBM: public... -
Page 133: Format Motorola Sequential
Funktionsbeschreibung 6.6.2.4 Format MOTOROLA Sequential Beispiel CANdb-internes „MOTOROLA Sequential“-Format, Startbit = 10, Länge = 12: Bit-Nr. innerhalb des Daten-Byte msb ² ² ² ² ² ² Startbit/ ² ² ² ² CANBus A4461-1.0 HBM: public... -
Page 134: Quantumx / Somatxr Und Ccp / Xcp-On-Can
QuantumX / SomatXR und CCP / XCP-on-CAN QuantumX / SomatXR und CCP / XCP-on-CAN Einführung in CCP und XCP Moderne Steuergeräte (Electronic Control Units, ECUs) in Fahrzeugen kommunizieren untereinander oder mit Abstimmungs- und Analysewerkzeugen über verschiedene Protokolle. Das “Universal Measurement and Calibration Protocol”... -
Page 135: Mx471B Und Can / Xcp-On-Can
QuantumX / SomatXR und CCP / XCP-on-CAN XCP bietet die Möglichkeit, Messwerte “ereignissynchron” zu Prozessen in Steuergeräten zu erfassen. Dies sichert die Konsistenz der Daten unterein ander. MX471B und CAN / XCP-on-CAN Der MX471B bietet 4 einzeln konfigurierbare CAN- Schnittstellen, die für den Betrieb mit CCP oder XCP-on- CAN und damit für das Lesen der Signalwerte von... - Page 136 QuantumX / SomatXR und CCP / XCP-on-CAN Voraussetzungen S Das Steuergerät unterstützt die folgenden Protokolle: S CCP Version 2.1 oder höher S XCP-on-CAN Version 1.1 oder höher S Die Parameterbeschreibungsdatei *.a2l vom Her steller des Steuergeräts ist verfügbar. S Wenn das Steuergerät durch ein Schlüsselaustausch...
-
Page 137: Initialisierung Per Xml
QuantumX / SomatXR und CCP / XCP-on-CAN MX‐Assistent Abb. 7.2 Hardware Setup Initialisierung per XML Die Initialisierung erfolgt über XML-Parameter in der Datei „AddConnParam.xml“, ab XPath: …<CanBus><ECU>. In das Tag <DBC> muss der Inhalt einer Vector-DBC- Datei als String geschrieben werden, sofern eine „seed and key binary“-Datei verwendet werden soll, deren... -
Page 138: Start Und Stopp Per Control „Canecu
QuantumX / SomatXR und CCP / XCP-on-CAN Nach dem Neustart des Moduls werden die Daten automatisch aktiviert, die zuvor in die XML-Tags einge tragen wurden. Die PC-Software „MXAssistant“ bietet im Reiter „Kanal“ den Dialog „CAN-Bus“ - „Einstellungen…“. Im folgenden Dialog „CCP / XCP über CAN“ können die erforderlichen Parameter gesetzt werden. -
Page 139: Allgemeiner Arbeitsablauf
QuantumX / SomatXR und CCP / XCP-on-CAN Allgemeiner Arbeitsablauf Starten Sie CANape von Vector Informatik, und lesen Sie die *.a2l-Datei ein. Erstellen Sie nun eine Messkonfigura tion mit allen relevanten Signalen, die Sie mit MX471B erfassen möchten. Wandeln Sie die Messkonfiguration anschließend in eine *.dbc-Datei um. - Page 140 QuantumX / SomatXR und CCP / XCP-on-CAN Messmodus handelt. Der Polling-Modus wird nicht unterstützt. Schritt 2 – Konfigurieren der Schlüsselaustausch- Option “Seed & Key” und Anpassen der “Init”-Einstellungen mit CANape S ·Wenn das Steuergerät die Schüsselaustausch- Option “Seed & Key” nicht unterstützt, müssen Sie sie in den “Protocol Settings”...
- Page 141 QuantumX / SomatXR und CCP / XCP-on-CAN CANBus A4461-1.0 HBM: public...
- Page 142 QuantumX / SomatXR und CCP / XCP-on-CAN S ·Wechseln Sie zur Registerkarte “Expert settings” (Erweiterte Einstellungen). Ändern Sie die Einstellungen in INIT_RETRIES = 100 und INIT_RETRY_DELAY = 2000 (empfohlene Werte). MX471 B versucht dann 100 Mal, die Kommunikation mit dem Steuergerät aufzubauen, und wiederholt die Versuche alle ms.
- Page 143 QuantumX / SomatXR und CCP / XCP-on-CAN Schritt 2b – Nur für XCP-on-CAN – Anpassen der Protokolleinstellungen in der Gerätekonfiguration (für CCP nicht notwendig) S ·Setzen Sie den Parameter “DAQ_CALCULATE_FIRST_PIDS_WHEN_OFFLINE” auf “yes” (ja). CANBus A4461-1.0 HBM: public...
- Page 144 QuantumX / SomatXR und CCP / XCP-on-CAN S ·Setzen Sie “Consistency mode” (Konsistenzmodus) auf “ODT” und “Identification field type” (Typ des Identifizierungsfelds) auf “Absolute” (Absolut). CANBus A4461-1.0 HBM: public...
- Page 145 QuantumX / SomatXR und CCP / XCP-on-CAN Schritt 3 – Exportieren der Messkonfiguration in eine *.dbc-Datei mit CANape S ·Wählen Sie in “Logger Configuration” (Logger- Konfiguration) (aufgerufen über “Tools” (Extras) -> “Logger configuration” (Logger-Konfiguration)) die Option “ECU” (Steuergerät), und klicken Sie auf die Schaltfläche “Create file”...
- Page 146 QuantumX / SomatXR und CCP / XCP-on-CAN S ·Wenn das Steuergerät mit einem Schlüsselaus tauschverfahren (“Seed & Key”) gesperrt ist, müssen Sie die *skb-Datei auswählen. S ·Wenn das Steuergerät nicht gesperrt ist, lassen Sie das Feld leer. S ·Klicken Sie auf die Schaltfläche “OK”.
- Page 147 QuantumX / SomatXR und CCP / XCP-on-CAN Ergebnis: Alle konfigurierten Signale werden nun im CAN-Bus 1 angezeigt. Schritt 5 – Nun können Sie Catman öffnen und die Messung starten. Konfiguration eines Gateway-Modus MX471B kann auch als Gateway genutzt werden, das XCP-on-CAN- oder CCP-Signale an das CAN überträgt.
- Page 148 QuantumX / SomatXR und CCP / XCP-on-CAN 7. Ziehen Sie Signale per Drag & Drop aus dem Bereich “Sources” (Quellen) auf einen “CAN Output” (CAN- Ausgang). 8. Passen Sie die CAN-IDs so an, dass jedes Signal seine eigene eindeutige ID hat, in diesem Beispiel 385, 386, 387, 388.
- Page 149 QuantumX / SomatXR und CCP / XCP-on-CAN CANBus A4461-1.0 HBM: public...
-
Page 150: Glossar
QuantumX / SomatXR und CCP / XCP-on-CAN Glossar Dateierweiterung der Gerätebeschreibungsdatei eines Steuergeräts. Wurde von der ASAM standardisiert. ASAM “Association for Standardisation of Automation and Measuring Systems” (Vereinigung zur Stan dardisierung von Automatisierungs- und Messsystemen) “CAN Calibration Protocol” (CAN-Kalibrierungsproto koll). Wurde von der ASAM standardisiert. - Page 151 QuantumX / SomatXR und CCP / XCP-on-CAN CANBus A4461-1.0 HBM: public...
- Page 152 HBM Test and Measurement Tel. +49 6151 803-0 Fax +49 6151 803-9100 info@hbm.com measure and predict with confidence...
Need help?
Do you have a question about the QuantumX and is the answer not in the manual?
Questions and answers