
Related Manuals for Focusrite Red 8Pre


Summary of Contents for Focusrite Red 8Pre
- Page 1 Red 4Pre Red 8Pre Red 16Line A range of up to 64 in / 64 out Thunderbolt™ audio interfaces with Pro Tools | HD and Dante network audio connectivity ® User Guide www.focusrite.com FFFA002051-01...
-
Page 2: Table Of Contents
Front Panel (Red 4Pre and Red 8Pre) ............. . . - Page 3 ..............Red 4Pre and Red 8Pre .
-
Page 4: About This User Guide
• Where channel quantities differ between each Red range device, the channel counts for all three unit types will be shown in squared brackets in the order: [Red 4Pre / Red 8Pre / Red 16Line]. Eg., “Connectors for the [4/8/2] microphone inputs are located on the rear panel.”... -
Page 5: Introduction
• BNC connectors allow syncing or slaving to external devices via Word Clock or Loop Sync. • Permanent 8-channel LCD meter display (Red 4Pre & Red 8Pre), selectable to show all input types. • Two 8-channel LCD meter displays (Red 16Line) show 16 Inputs, 16 Outputs or a combined I/O view. -
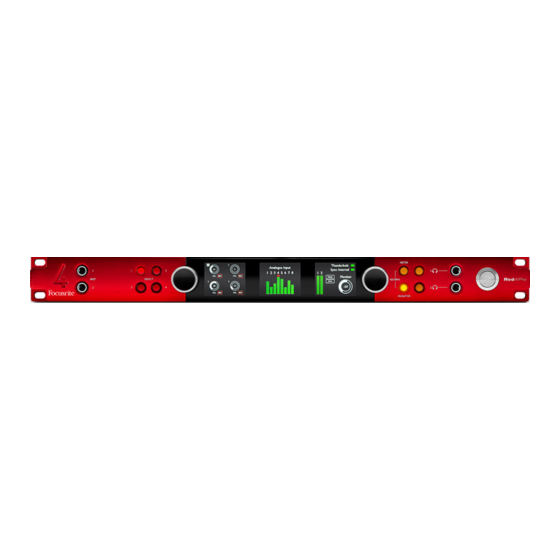
Page 6: Controls And Connections
Buttons Display Monitor Buttons Channel numbering is indicated as [Red 4Pre/Red 8Pre] • Instrument Inputs. Two high-impedance inputs on 1/4” jack sockets. • Input select buttons provide direct access to the control and menu settings for analogue input channels [1-4/1–8]. -
Page 7: Front Panel (Red 16Line)
Controls and Connections . . . Continued Front Panel (Red 16Line) Instrument Input Select Input Level Meter Menu & Menu & O/P H/phone Power Inputs Buttons Encoder Display 9-16 O/P Display Encoder Select Switch Meter I/O Input & Level Menu, Meter & H/phone Select Buttons Meter Display 1-8... -
Page 8: Rear Panel (Red 4Pre And Red 8Pre)
Outputs Inputs Channel quantities are referred to in the order: [Red 4Pre/Red 8Pre] • aC Mains Inlet. Standard IEC receptacle for connection of AC mains. The units feature ‘Universal’ PSUs, enabling them to operate on any supply voltage between 100 V and 240 V AC. -
Page 9: Rear Panel (Red 16Line)
Controls and Connections . . . Continued Rear Panel (Red 16Line) Word Loop Thunderbolt 3 Pro Tools | HD Line Inputs AC Inlet Line Outputs Clock Sync Interface Interface Microphone Dante 2 x ADAT S/PDIF L/R Monitor Network Optical I/O Outputs Inputs •... -
Page 10: Physical Characteristics
Please refer all servicing issues to the Customer Support Team (see “Customer Support and Unit Servicing” on page 42). Unit Weight Power Consumption Red 4Pre 4.59 kg 35 W Red 8Pre 5.14 kg 65 W Red 16Line 5.04 kg 120 W... -
Page 11: Operation Inputs
Pressing an input Select button brings up the Focus screen which provides additional detail about that channel’s current settings. If no changes are made within approximately 3 seconds, the display will revert to the Overview screen. Preamp Focus Screen Red 4Pre and Red 8Pre... -
Page 12: Input Configuration
Inputs. . . Continued Input Configuration Settings for the [4/8/2] configurable input channels (input Type and function options), are selected via the Config Menu screen. • To enter the Config Menu press-and-hold a channel’s Select button To exit this screen press any of the channel Select buttons – or rotate the Input Encoder to the ‘Back’... -
Page 13: Encoder Toggle Function
Inputs. . . Continued encoder toggle Function The Input Encoder can be programmed to toggle any one of the input Type functions with a single push (ie., without having to enter the Config +24dBu +18dBu Level Menu screen). This can be very useful when, for example, experimenting with +48V microphone phasing. -
Page 14: Digital Inputs
Digital Inputs aDat ADAT inputs 1 and 2 are accessed via the rear panel connectors. Signals will be available if the source is connected and the system is synced to a common clock. Each In/Out connection provides: • 8ch at 44.1 / 48 kHz •... -
Page 15: Monitoring
Monitoring Monitors Monitor outputs, at line level, are provided via the 1/4” balanced jack outputs on the rear panel. • The Output Encoder will adjust the monitor output level whenever the Monitor button is illuminated Monitor Display The monitor display shows the current volume level and whether either Dim or Mute is active. -
Page 16: Lcd Meter Displays
LCD Meter Displays Red 4Pre and Red 8Pre The centre LCD screen displays eight level meters. These indicate the internal signal level after A-D conversion (or pre D-A conversion when monitoring outputs), with 0 dBFS being at full scale. A red clip indicator is displayed on channels that reach clipping point. -
Page 17: Red 16Line
LCD Meter Displays . . . Continued Red 16Line Level Meters 1–8 and 9–16 The left and centre LCD screens can both display level meters. These indicate the internal signal level of channels 1–16, after A-D conversion (or pre D-A conversion when monitoring outputs), with 0 dBFS being at full scale. -
Page 18: Analogue Outputs
[8/16/16] analogue outputs are provided on DB25 female connector(s) on the rear panel. The Line outputs for Red 4Pre and Red 8Pre are at fixed gain, where 0 dBFS corresponds to a signal level of +18 dBu. operating Level selection... -
Page 19: Thunderbolt Connection
See appendix 3, pages 29–37 for the channel I/O allocation tables. Thunderbolt 3 Logic Pro X setup • From the menu bar, go to: Logic Pro X > Preferences > audio... • Under the Devices tab, set: Input Devices and output Devices to ‘Focusrite Thunderbolt’... -
Page 20: Pro Tools Connection
Pro tools Connection Confirm that your Red unit’s Host setting is set to ‘Pro Tools’, see Global Host Settings on page 22. Connect both rear panel PRIMARY ports to a Pro Tools | HDX card or HD Native system using Mini DigiLink cables. -
Page 21: Pro Tools Setup
Pro tools Connection . . . Continued Pro tools setup • From the Pro Tools menu bar, go to: setup > Playback engine... • In the Playback engine menu pop- up, select: ‘HDX’ or ‘HD Native’, as appropriate for your system The following steps are optional but will simplify signal routing: •... -
Page 22: Global Settings
GLobaL settInGs Press the Meter and Monitor buttons simultaneously to enter the Global settings menu. • Rotate the Output Encoder to select a menu item • Click the Output Encoder to step through the available options To exit the Global settings screen press the Monitor button (or select the ‘Back’... -
Page 23: Other Red System Components
Red and RedNet range of interfaces. Graphical representation for each device shows: controls, function settings, signal meters, signal routing and mixing. Graphical control for the Red 4Pre, Red 8Pre and Red 16Line units is separated into five pages: • I/O Control & Metering •... -
Page 24: Tools Menu
- MIDI channel selection is saved with the computer, not the device. Therefore, when controlling the same unit from a different computer the MIDI channel allocation may no longer be the same http://www.focusrite.com/downloads For more information, please download the MIDI Control User Guide at:... - Page 25 • Ch. 16: +18dBu / +24dBu iOS Page Shows the list of iOS devices able to access the unit. Each device can have its control access approved or be removed from the list. The Red devices are controlled from the Focusrite Control iOS app.
-
Page 26: Appendices
Channel 8 – Connector type: DB25 female Ground Channel 7 Applies to: Analogue Line Input / Line Output Channel 7 – Mic Inputs (Red 8Pre) Ground Channel 6 Channel 6 – Ground Channel 5 Channel 5 Ground Channel 4 Channel 4 –... - Page 27 appendix 1 – Connector Pinouts Continued... 1/4” Jack Connectors Connector type: Balanced socket signal Applies to: Monitor Outputs Hot (+ve) Ring Cold (–ve) Connector type: Unbalanced socket Sleeve Ground Applies to: Instrument Inputs Tip Ring Sleeve Balanced Jack Sleeve Unbalanced Jack Pro tools Interface Connector type: Mini DigiLink receptacle...
-
Page 28: Appendix 2 - System Diagrams
appendix 2 – system Diagrams system Diagram: Red 4Pre Input Function Meters Output Control Input Select and Gain Monitor Instrument Headphones Analogue 1&2 Outputs Line Analogue 3-10 Inputs Thunderbolt Line Host Select Pro Tools ROUTER ADAT 1 ADAT 2 Digital 9-16 Inputs Dante... - Page 29 2 – system Diagrams Continued... system Diagram: Red 8Pre Input Function Input Select Meters Output Control and Gain Monitor Instrument Headphones Analogue 1&2 Outputs Line 3-10 Analogue Mic/Line Line Inputs 11-18 Thunderbolt Line 9-16 Host Select Pro Tools ROUTER...
- Page 30 appendix 2 – system Diagrams Continued... system Diagram: Red 16Line Meters 1-8 Meters 9-16 Output Control Input Function Input Select Gain and Reference Monitor Instrument Headphones Analogue 1&2 Outputs Line Analogue Mic/Line Line Inputs 9-16 Thunderbolt Line Host Line Select 9-16 Pro Tools ROUTER...
-
Page 31: Appendix 3 - I/O Channel Allocation
appendix 3 – I/o Channel Red 4Pre – Inputs Red 4Pre – Outputs allocation Mic/Line/Inst Monitor Red 4Pre – 44.1 / 48 khz Mic/Line Headphone 1 Line In Headphone 2 Line Out This is the input/output default routing allocation. The input and output ordering S/PDIF can be configured using RedNet Loopback... - Page 32 appendix 3 – I/o Channel allocation Continued... Red 4Pre – 88.2 / 96 khz Red 4Pre – Inputs Red 4Pre – Outputs Mic/Line/Inst Monitor Mic/Line Headphone 1 This is the input/output default routing Line In Headphone 2 allocation. The input and output ordering can be configured using RedNet Line Out Control when the unit is connected to...
- Page 33 appendix 3 – I/o Channel allocation Continued... Red 4Pre – 176.4 / 192 khz Red 4Pre – Inputs Red 4Pre – Outputs Mic/Line/Inst Monitor Mic/Line Headphone 1 This is the input/output default routing Line In Headphone 2 allocation. The input and output ordering can be configured using RedNet Line Out Control when the unit is connected to...
- Page 34 3 – I/o Channel allocation Continued... Red 8Pre – 44.1 / 48 khz Red 8Pre – Inputs Red 8Pre – Outputs Mic/Line/Inst Monitor Mic/Line Headphone 1 Headphone 2 This is the input/output default routing allocation. The input and output ordering...
- Page 35 3 – I/o Channel allocation Continued... Red 8Pre – 88.2 / 96 khz Red 8Pre – Inputs Red 8Pre – Outputs Mic/Line/Inst Monitor Mic/Line Headphone 1 This is the input/output default routing Headphone 2 allocation. The input and output ordering...
- Page 36 3 – I/o Channel allocation Continued... Red 8Pre – 176.4 / 192 khz Red 8Pre – Inputs Red 8Pre – Outputs Mic/Line/Inst Monitor Mic/Line Headphone 1 This is the input/output default routing Headphone 2 allocation. The input and output ordering...
- Page 37 appendix 3 – I/o Channel allocation Continued... Red 16Line – 44.1 / 48 khz Red 16Line – Inputs Red 16Line – Outputs Mic/Line/Inst Line (Monitor/HP1) 1 (L) 2 (R) Line Line This is the input/output default routing allocation. The input and output ordering can be configured using RedNet Control when the unit is connected to a computer over Thunderbolt.
- Page 38 appendix 3 – I/o Channel allocation Continued... Red 16Line – 88.2 / 96 khz Red 16Line – Inputs Red 16Line – Outputs Mic/Line/Inst Line (Monitor/HP1) 1 (L) 2 (R) Line Line This is the input/output default routing allocation. The input and output ordering can be configured using RedNet Control when the unit is connected to a computer over Thunderbolt.
- Page 39 appendix 3 – I/o Channel allocation Continued... Red 16Line – 176.4 / 192 khz Red 16Line – Inputs Red 16Line – Outputs Mic/Line/Inst Line (Monitor/HP1) 1 (L) 2 (R) Line Line This is the input/output default routing allocation. The input and output ordering can be configured using RedNet Control when the unit is connected to a computer over Thunderbolt.
-
Page 40: Appendix 4 - Air Information
appendix 4 – air Information Air is the name we give to the sonic signature of the classic transformer ISA Preamp. Our customers first coined this name as a simple description of the effect the ISA preamp added to their sound recordings. -
Page 41: Performance And Specifications
-3 dB @ 80 Hz, 12 dB/octave -131 dBu ‘A’-Weighted (typical) Line Inputs Maximum Input Level +27 dBu ±0.5, minimum gain (Red 4Pre and Red 8Pre) +18 or +24 dBu 0 dBFS switchable per channel (Red 16Line) Dynamic Range 119 dB ‘A’-Weighted Frequency Response 20 Hz –... - Page 42 2 x Mini DigiLink Dante 2 x Ethernet standard RJ45 (Cat 5e and above) Mic Input [4/2] x XLR-3F (Red 4Pre & Red 16Line) 1 x DB25-F (Red 8Pre) Line Input 2 x DB25-F Line Output 2 x DB25-F ADAT...
- Page 43 Dimensions Height 44 mm / 1.73” [1RU] Width 483 mm / 19” Depth 340 mm / 13.4” Weight Weight [4.59/5.14/5.04] kg [10.12/11.33/11.11] lbs Power Internal, 100-240 V, 50/60 Hz, consumption [35/65/120] W...
-
Page 44: Focusrite Red Range Warranty And Service
In the event of a Manufacturing Defect becoming evident in a product within 24 months from the date of the original purchase Focusrite will ensure that the product is repaired or replaced free of charge. A Manufacturing Defect is defined as a defect in the performance of the product as described and published by Focusrite.
Need help?
Do you have a question about the Red 8Pre and is the answer not in the manual?
Questions and answers