Table of Contents
Advertisement
Quick Links
Advertisement
Table of Contents

Related Manuals for Focusrite Saf?re PRO 14


Summary of Contents for Focusrite Saf?re PRO 14
- Page 1 Saffire PRO 14 User Guide FA0415-01...
-
Page 2: Important Safety Instructions
Important Safety Instructions Read these instructions. Keep these instructions. Heed all warnings. Follow all instructions. Do not use this apparatus near water. Clean only with dry cloth. Do not block any ventilation openings. Install in accordance with the manufacturer’s instructions. Do not install near any heat sources such as radiators, heat registers, stoves, or other apparatus (including amplifiers) that produce heat. -
Page 3: Important Safety Precautions
Do not modify this unit! This product, when installed as indicated in the instructions contained in this manual, meets FCC requirements. Modi- fications not expressly approved by Focusrite may void your authority, granted by the FCC, to use this product. -
Page 4: Table Of Contents
Contents Introduction ........................5 Basics ........................... 5 Box Contents ........................ 5 Getting Started ......................6 Hardware ........................7 Back Panel ......................7 Front Panel ......................8 System Requirements ....................9 Installation ........................9 Audio Set-up in your DAW ..................... 9 Saffire PRO 14 Architecture ..................10 Saffire MixControl ......................11 Preamp section ....................12... -
Page 5: Introduction
Thank you for purchasing Saffire PRO 14, one in a family of Focusrite professional multi-channel FireWire interfaces featuring high quality Focusrite pre-amps. You now have a complete solution for routing high quality audio in and out of your computer. This guide provides a detailed explanation of both the hardware and accompanying control software “Saffire MixControl” to help you achieve a thorough understanding of the product’s operational features. -
Page 6: Getting Started
FireWire devices are connected. For example, a FireWire disk used for back-up or a digital camera should not cause any problems, but when streaming audio from a FireWire hard disk or a FireWire box such as Focusrite Liquid Mix, the total FireWire bandwidth may be reached. -
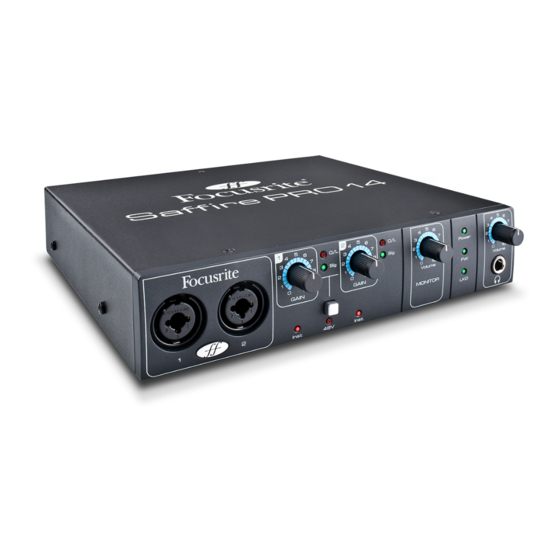
Page 7: Hardware
Hardware Back Panel The Back Panel provides the majority of input and output connections on the Saffire PRO 14 2 x TRS jack sockets line inputs 3 and 4 * 4 x TRS jack sockets for line outputs 1-4 * 1 x IEEE1394 6 pin FireWire socket 2 x DIN5 MIDI input and output sockets 1 x 2.0mm DC power inlet socket - use supplied power supply only... -
Page 8: Front Panel
Front Panel The Front Panel includes the input connectors for mic, line and instrument signals, as well as the input gain controls and monitoring controls. 6, 7, 8 Channels 1 and 2 with combo XLR input sockets for mic / line / instrument Channels 1 and 2 gain controls with signal and overload LEDs Channels 1 and 2 instrument LEDs Phantom power switch with LED for mic inputs 1-2... -
Page 9: System Requirements
We aim to ensure that the latest installation software will be on the disk included with your Saffire PRO 14. However we strongly recommend that you check for the latest version of software on our website; www.focusrite.com before starting to work with your Saffire PRO 14 unit. -
Page 10: Saffire Pro 14 Architecture
Saffire PRO 14 Architecture Saffire PRO 14 offers more than just simple input and output routing to and from your computer. Saffire MixControl software also allows you to re-route audio signals to any output, and to create custom mixes to be sent to your recording artists, outboard processing equipment, or mixing console. -
Page 11: Saffire Mixcontrol
All sample rate selection, digital syncing and buffer size settings (Windows only) are available from Saffire MixControl. To open Saffire MixControl. Windows Start > Programs > Focusrite > Saffire MixControl. Open Finder > Applications > Saffire MixControl. This is how the Saffire MixControl Graphical Interface will appear on your computer. Mixer... -
Page 12: Preamp Section
Pre-amp section When connecting a microphone to the Saffire PRO 14, you must connect an XLR cable to the combo inputs on the front panel. When connecting either line level signal or instrument signal to the combo inputs, you must select either ‘Line’ or ‘Inst’ from the preamp section. - Page 13 Input channel Here is a picture of 2 mixer input channels. Below is a description of every component of a mixer channel. Audio source select When there is no input to a mixer channel, it will display “Off”. Clicking on the “Off” region brings up a list of all available inputs that can be fed to the channel.
- Page 14 Pan slider A Pan Slider is used to position the audio signal anywhere between the left and right speakers. Moving the horizontal slider from left to right will move the audio signal from left to right within the stereo field, i.e., the signal is faded between two audio outputs such as monitor L and R.
- Page 15 Stereo Pressing this button combines 2 mono channels into 1 stereo channel. Track name As a default, each track is given a number as a name. Double click to rename the track to something more useful such as ‘Vocal Mic’. Mix Output channel The output channel of the mix is where all the input channels are routed to and mixed together.
-
Page 16: Routing Section
Routing section The routing section allows you to set up which audio sources are to be routed directly to which physical outputs. The routing section displays every physical output on the Saffire PRO 14. An audio stream can be routed to an output using the dropdown menu to the left of the output. - Page 17 Routing presets Routing presets are provided as a starting point for you to create your own routing and mixer set-ups. These will enable you to quickly set up your routing for recording (monitoring your inputs); mixing (sending signals out to outboard processors or external mixer);...
-
Page 18: Monitor Section
Monitor section The output levels of the monitor outputs and line outputs are configured in the Monitor Section. You can set up your Saffire PRO 14 so that the audio sent to the line outputs are controlled by the software volume dial; independent of the software volume dial; or muted. - Page 19 Monitor Presets drop-down menu These presets allow quick changing of typical monitoring set-ups. For the monitor presets to work, you must have your speakers connected to the line outputs as shown in the picture below. Surround sound monitoring: 2.1 Line out Speaker Left Right...
-
Page 20: Mute Switch
Monitor Presets Preset Name Output Off - no monitor control buttons enabled, therefore no sound will come out of any analogue output Mono - outputs only to the centre / mono speaker (Line output 3.) All other channels are muted Output - 3 Stereo - outputs to stereo speakers (monitor 1 and 2 output.) All other channels are muted Outputs - 1, 2... -
Page 21: Device Status Section
Device Status section The Device Status section shows information about the sample rate, synchronisation and driver status of the Saffire PRO 14. The desired sample rate can be set as well as external synchronisation options for using the Saffire PRO 14 with external digital devices. Sample rate display This displays the current sample rate at which the Saffire PRO 14 is running. -
Page 22: Settings Menu
Settings Menu This is a drop down menu containing all of the following items which allow you to set up different global/system configurations. This is the only part of Saffire MixControl software where there are differences between the Windows and Mac versions. Windows S/PDIF AC3 Allows the user to stream AC3 directly via the S/PDIF outputs. -
Page 23: File Menu
File Menu Windows Open - opens a ‘File Open’ window allowing selection of any pre-saved Saffire MixControl set-ups. Save - opens a ‘File Save’ window allowing selection of a location into which your Saffire MixControl set-up can be saved. Subsequent saves overwrite the original file. Save As - opens a ‘File Save’... -
Page 24: Dual Unit Support
Dual Unit Support It is now possible to run two Saffire interfaces connected to a single computer. This enables two devices to be connected to the same system and used as one device expanding the available Inputs and Outputs to your DAW. Dual Device Support is limited to two devices connected to the same bus at sample rates of 48kHz or below. -
Page 25: Master Sync Device
Master Sync Device When dual Saffire devices are connected to one computer via FireWire, the two devices will automatically sync together with no need for any additional cable connections. However one device will be set as the Master Sync Device. Click on the settings menu to select which unit is the Sync Master. -
Page 26: Daw Routing
The look-up tables at the end of this guide show how the DAW inputs and outputs are routed to the inputs and outputs of Saffire MixControl. DAW routing Audio can be routed from Saffire to Saffire using your DAWs own routing capabilities. This allows audio processing from the DAW, but will result in audio latency due to the DAWs audio buffer. - Page 27 Unit 1 Setup Cue Mix (unit 1) Open Saffire MixControl. Click on the first mixer tab. Ensure that the mixer output is stereo by clicking on the stereo button (below the meters of the output channel). Add the analogue inputs to the mixer, and set the required levels and panning. Add the S/PDIF input to the mixer (this is the feed from unit 2).
- Page 28 S/PDIF Output Mix (unit 1) Click on the second mixer tab. Ensure that the mixer output is stereo by clicking on the stereo button (below the meters of the output channel). The input configuration will be the same as in the first mixer, set the levels and panning as required. The S/PDIF input to the mixer should be MUTED (this prevents feedback).
- Page 29 Unit 2 Setup Monitor Output Mix (unit 2) Switch Saffire Mix Control to the unit 2. Click on the first mixer tab. Ensure that the mixer output is stereo by clicking on the stereo button (below the meters of the output channel). Add the analogue inputs to the mixer, and set the required levels and panning.
- Page 30 S/PDIF Output Mix (unit 2) Click on the second mixer tab. Ensure that the mixer output is stereo by clicking on the stereo button (below the meters of the output channel). The input configuration will be the same as in the first mixer, set the levels and panning as required. The S/PDIF input to the mixer should be MUTED (this prevents feedback).
-
Page 31: Dual Unit Look-Up Tables
Dual unit look-up tables The following tables show how the inputs and outputs of dual Saffires will appear in your DAW’s I/O list. The order in which the units appear in a DAW is as follows: Pro40; LS56; Pro24; Pro24DSP, this is always the case when using different type of unit. - Page 32 Unit: Input: DAW Input: Saffire Mix Output: DAW Output: Saffire PRO 24 Anlg in 1 DAW 1 (Lower ID) Anlg in 2 DAW 2 Anlg in 3 DAW 3 Anlg in 4 DAW 4 SPDIF 1 DAW 5 SPDIF 2 DAW 6 ADAT in 1 DAW 7...
- Page 33 Unit: Input: DAW Input: Saffire Mix Output: DAW Output: Saffire PRO 24 DSP Anlg in 1 DAW 1 (Lower ID) Anlg in 2 DAW 2 Anlg in 3 DAW 3 Anlg in 4 DAW 4 SPDIF 1 DAW 5 SPDIF 2 DAW 6 ADAT in 1 DAW 7...
- Page 34 Unit: Unit Input: DAW Input: Saffire Mix Output: DAW Output: Saffire PRO 40 Anlg in 1 DAW 1 Anlg in 2 DAW 2 Anlg in 3 DAW 3 Anlg in 4 DAW 4 Anlg in 5 DAW 5 Anlg in 6 DAW 6 Anlg in 7 DAW 7...
- Page 35 Unit: Unit Input: DAW Input: Saffire Mix Output: DAW Output: Saffire PRO 40 Anlg in 1 DAW 1 Anlg in 2 DAW 2 Anlg in 3 DAW 3 Anlg in 4 DAW 4 Anlg in 5 DAW 5 Anlg in 6 DAW 6 Anlg in 7 DAW 7...
- Page 36 Unit: Unit Input: DAW Input: Saffire Mix Output: DAW Output: Saffire PRO 40 Anlg in 1 DAW 1 (Lower ID) Anlg in 2 DAW 2 Anlg in 3 DAW 3 Anlg in 4 DAW 4 Anlg in 5 DAW 5 Anlg in 6 DAW 6 Anlg in 7...
- Page 37 Unit: Unit Input: DAW Input: Saffire Mix Output: DAW Output: Liquid Saffire 56 Anlg in 1 DAW 1 Anlg in 2 DAW 2 Anlg in 3 DAW 3 Anlg in 4 DAW 4 Anlg in 5 DAW 5 Anlg in 6 DAW 6 Anlg in 7 DAW 7...
- Page 38 Unit: Unit Input: DAW Input: Saffire Mix Output: DAW Output: Liquid Saffire 56 Anlg in 1 DAW 1 Anlg in 2 DAW 2 Anlg in 3 DAW 3 Anlg in 4 DAW 4 Anlg in 5 DAW 5 Anlg in 6 DAW 6 Anlg in 7 DAW 7...
- Page 39 Unit: Input: DAW Input: Saffire Mix Output: DAW Output: Saffire PRO 24 DSP Anlg in 1 DAW 1 (Lower ID) Anlg in 2 DAW 2 Anlg in 3 DAW 3 Anlg in 4 DAW 4 SPDIF 1 DAW 5 SPDIF 2 DAW 6 ADAT in 1 DAW 7...
- Page 40 Unit: Input: DAW Input: Saffire Mix Output: DAW Output: Saffire PRO 40 Anlg in 1 DAW 1 (Lower ID) Anlg in 2 DAW 2 Anlg in 3 DAW 3 Anlg in 4 DAW 4 Anlg in 5 DAW 5 Anlg in 6 DAW 6 Anlg in 7 DAW 7...
- Page 41 Unit: Input: DAW Input: Saffire Mix Output: DAW Output: Saffire PRO 24 Anlg in 1 DAW 1 (Lower ID) Anlg in 2 DAW 2 Anlg in 3 DAW 3 Anlg in 4 DAW 4 SPDIF 1 DAW 5 SPDIF 2 DAW 6 ADAT in 1 DAW 7...
- Page 42 Unit: Input: DAW Input: Saffire Mix Output: DAW Output: Liquid Saffire 56 Anlg in 1 DAW 1 (Lower ID) Anlg in 2 DAW 2 Anlg in 3 DAW 3 Anlg in 4 DAW 4 Anlg in 5 DAW 5 Anlg in 6 DAW 6 Anlg in 7 DAW 7...
- Page 43 Unit: Input: DAW Input: Saffire Mix Output: DAW Output: Saffire PRO 14 Anlg in 1 DAW 1 (Lower ID) Anlg in 2 DAW 2 Anlg in 3 DAW 3 Anlg in 4 DAW 4 SPDIF 1 DAW 5 SPDIF 2 DAW 6 Loop back 1 DAW 7...
-
Page 44: Saffire Pro 14 Specifications
Performance Specifications Microphone inputs 1-2 • Frequency response: 20Hz - 20kHz +/- 0.2 dB • Gain range: +13dB to +60dB • Maximum headroom +8dBu • THD+N: 0.001% (measured at 1kHz with a 20Hz/22kHz bandpass filter) • Noise EIN: 124dB analogue to digital (measured at 60dB of gain with 150 Ohm termination (20Hz/22kHz bandpass filter) •... -
Page 45: Troubleshooting
For all troubleshooting queries, please visit the Focusrite Answerbase where there are articles covering numerous troubleshooting examples. www.focusrite.com/answerbase. Copyright Focusrite and Saffire are registered trade marks of Focusrite Audio Engineering Limited. 2010 © Focusrite Audio Engineering Limited. All rights reserved...
Need help?
Do you have a question about the Saf?re PRO 14 and is the answer not in the manual?
Questions and answers