Table of Contents
Advertisement
Quick Links
Advertisement
Table of Contents

Subscribe to Our Youtube Channel
Related Manuals for Marco FRIIA


Summary of Contents for Marco FRIIA
- Page 1 FRIIA Instruction Manual Machine P/N: 1000864# & 1000865#...
-
Page 2: Table Of Contents
(CO2) User Manual It is highly recommended to fit a water regulator to the supply feed. In the event of mechanical failure a regulator set correctly will ensure the water supply is cut. Marco suggests 10 litres continuous flow. Machine... -
Page 3: Introduction
Introduction The information provided in this manual is intended to assist in the installation and maintenance of the Marco FRIIA System. Please read the instructions carefully to prevent accidents and ensure an efficient installation. This manual is not a substitute for any safety instructions or technical data affixed to the machine or its packaging. -
Page 4: Specification
Do not run any other liquid besides water through the system. • If you believe the system to be damaged, contact Marco Beverage systems. 2.3 SYMBOLS USED IN THE MANUAL This manual uses the following safety symbols to draw the operator’s attention to all operations which must be strictly observed in order to prevent injury to persons or damage to the equipment. - Page 5 WARNING Shows the existence, on or around the equipment, of a potential risk of death or severe injury for the operator or other persons; it is therefore essential to take great care and proceed with the greatest caution. CAUTION Shows the existence, on or around the equipment, of a potential risk of minor injury for the operator or other persons;...
- Page 6 DANGER ELECTRICAL MAINS Always disconnect the equipment from the electricity supply before doing any work on it, to prevent damage and health hazards. CAUTION ELECTRICAL REQUIREMENTS The electrical circuit must be correctly earthed and connected by means of a suitable differential safety breaker.
-
Page 7: Basic Installation
DANGER ELECTRICAL MAINS Always isolate chiller from power supply before doing any work on it, to prevent damage and health hazards. CAUTION Before carrying out the following operations, carefully read the instructions given by the sanitization prod- uct manufacturer and make sure all personal protective equipment (gloves, masks, etc.) is worn correctly. The sanitization of the product lines must only be carried out by specialized technical service personnel. -
Page 8: Co2 Installation
If you use CO2, especially in a small area, ventilate the contaminated area at once. • Please use Dual gauge CO2 regulator 1400195 • Check for leaks using a solution of soapy water. Recommended CO2 regulator Marco Part number 1400195 BS8 connection To CO2 canister 8mm push fit connection To Chiller 3.5 BACKFLOw PREvENTION... - Page 9 4. OPERATING 4.1 BEFORE USING CHILLER •Before connecting the appliance to the power source, let it stand upright for approximately 2 hours. This will reduce the possibility of a malfunction. •Check that all installation procedures have been carried out. •Ensure water inlet is open. •Before supplying power to the unit check water and Carbon Dioxide lines do not leak.
-
Page 10: Operation
4.3 MAINTENANCE Maintenance procedures (described below) are required for optimum equipment operation. 4.3.1 DAILY MAINTENANCE 1. Water faucet. Clean the faucet nozzle and remove any residue using warm water; do not use solvents or abrasive detergents. If required, remove all the limestone with a food descaling solution. 2. -
Page 11: Sanitzation And Cleaning
SANITISING 1. Turn off Electrical Power Supply. 2. Replace the filter cartridge with a sanitizing filter recommended by Marco and fill with clean water and with sanitizing fluid in the concentration and contact time recommended by the manufacturer. 3. Disconnect the water connections and connect them to the sanitization cartridge. -
Page 12: Troubleshooting
6. Troubleshooting Contact Marco service... -
Page 13: Friia Installation Guide
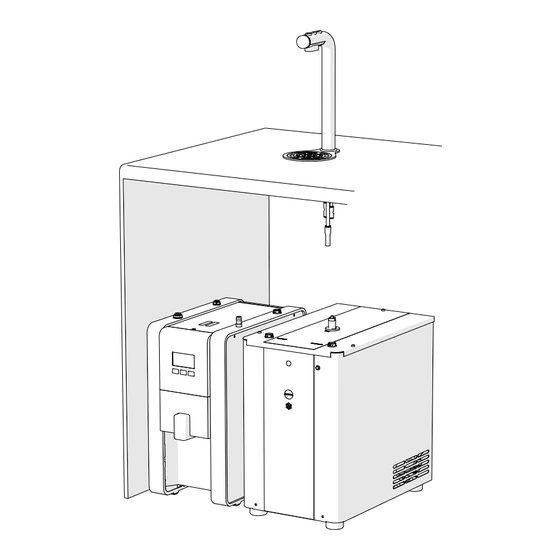
7. FRIIA INSTALLATION GUIDE Font Positioning Programing switch Power 100 min. Applies to model(s) 1000850# & 1000851# (where # is blank, or one or more alphanumeric characters) PANEL REMOVAL FRIIA Assembly (in cabinet) PJT 20-08-14 C.O. DWG NO.: DESCRIPTION: DRAWN BY... - Page 14 FRIIA Font Counter Cut Out Check scale of template 32mm before cutting. Scale 1:1 / 1 ¼” 105mm / 4 ⅛” For drip tray only...
- Page 15 Recommended Plumming...
- Page 16 Chiller Installation CO2 pressure release valve Cold/CO2 water out (1/4”) Thermostat control Power cord socket Power switch water in (3/8”) CO2 connection (8mm tube)
- Page 17 Boiler Installation...
- Page 18 Font Installation 1. No Drip Tray 32mm / 1 ¼” Hosing should be trimmed to ensure continuous drop from font to boiler 100mm 50mm...
- Page 19 Font Installation 2. Drip Tray (sold seperately p/n. 2300268) 32mm/ 1 ¼” 105mm/ 4 ⅛” The drain outlet to the drip tray should be plumbed to waste Hosing should be trimmed to ensure continuous drop from font to boiler 100mm 50mm...
- Page 20 Connecting Hoses POWER VENT COLD POWER COLD CHILLER TO BOILER CONNECTION VENT CHILLER TO BOILER CONNECTOR Hot Water Cold Water Power COLD Vent...
- Page 21 Software Setup Diagram of Parts Hot Connection Vent Wiring Connection Access Panel Screen Push Buttons Service Panel Set Up Single Button Font (default is 3 button font) Factory preset Descale weeks: Mode: UC MIX BOTH Filter Litres: DEFAULT Temp Units: °C Set Pin: Next...
- Page 22 Cabinet ventilation Please Note: In all cases remove the back panel from the cabinet. Front ventilation Side ventilation Base ventilation Ventillation grilles cut out of Ventillation grilles cut out of standard Ventilation grilles cut in base panel standard cabinet door. 600mm cabinet.
- Page 23 Marco Beverage Systems Limited, 74 Heather Road, Sandyford Business Park, Dublin 18, Ireland Tel: 00353 (0) 1 295 2674 Email: sales@marcobeveragesystems.com...
Need help?
Do you have a question about the FRIIA and is the answer not in the manual?
Questions and answers