Table of Contents
Advertisement
Available languages
Available languages
Quick Links
H-1619
AUTOMATIC STRETCH
WRAP DISPENSER
WITH SCALE
MACHINE DIMENSIONS
Length
Width
Height
Turntable Diameter
Turntable Height from Floor
Wrapping Height
Operation Space
Maximum Load Size
Approximate Shipping Weight
ELECTRICAL SPECIFICATIONS
• 115 VAC, 60 Hz, Single-phase, 15 AMP
TURNTABLE SYSTEM
• 20 loads per hour (spiral)
• 12 RPM turntable maximum speed
• 4,000 lbs turntable maximum load capacity
FILM CARRIAGE/ELEVATOR SYSTEM
• Adjustable raise and lower speeds
• Automatic height detection photoelectric sensor
SCALE
• RS232 Serial Port
PAGE 1 OF 33
SySTEM SpECIfICATIONS
98"
60"
91"
60"
3"
80"
98 x 60 x 91"
52 x 52 x 72"
1175 lbs
Pour le français, consulter les pages 23-33.
FILM DELIVERY SYSTEM
• Infinite / Manual Stretch Adjustment
• 10" Diameter Roll Capacity
• 20" Roll Width Capacity
CAUTION! Motor control equipment and
electronic controllers are connected to
hazardous line voltages. When servicing
drive and controllers, there may be exposed
components with housings or protrusions at or
above line potential. Extreme care should be
taken to protect against shock.
The user is responsible for conforming to all
applicable code requirements with respect to
grounding requirements. Do NOT use extension
cords to operate the equipment.
Disconnect AC input power before checking
components, performing maintenance,
cleaning up, and when the machine is not in
use. Do NOT connect or disconnect wires and
connectors while power is applied to circuit.
Wiring work should be performed only by
qualified personnel. There is a danger of
electric shock or fire.
WARNING! Loose clothing must NOT be worn
while the machine is in operation. Stay clear
of moving parts while the machine is running.
Para en Español, vea páginas 12-22.
0913 IH-1619
Advertisement
Table of Contents

Related Manuals for U-Line H-1619


Summary of Contents for U-Line H-1619
- Page 1 Para en Español, vea páginas 12-22. Pour le français, consulter les pages 23-33. H-1619 AUTOMATIC STRETCH WRAP DISPENSER WITH SCALE SySTEM SpECIfICATIONS MACHINE DIMENSIONS FILM DELIVERY SYSTEM Length 98" • Infinite / Manual Stretch Adjustment Width 60" • 10" Diameter Roll Capacity Height 91"...
-
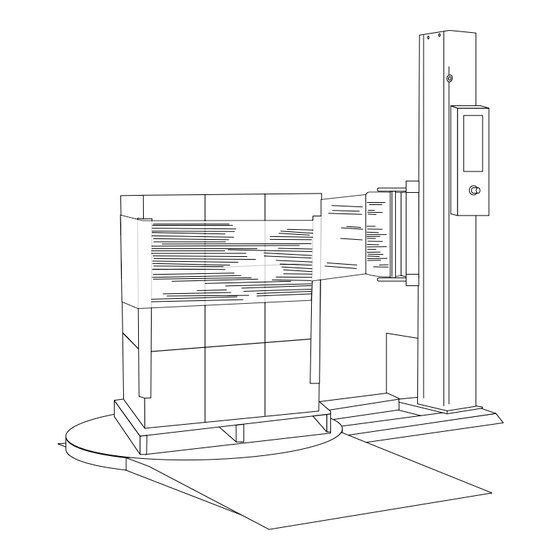
Page 2: System Description
SySTEM DESCRIpTION Control Box Tower Stretch Handle Tension Adjustment Knob Film Carriage Foot Safety Bar Motor Box Seat Turntable PAGE 2 OF 33 0913 IH-1619... -
Page 3: System Setup
SySTEM SET-Up MACHINE PLACEMENT MACHINE SET-UP Place the Automatic Stretch Wrap Machine close to an 1. Place skidded machine close to the designated wrap area where you will be wrapping your pallet loads. Make area. Remove all shipping fasteners holding the sure that there is sufficient room to load/unload the machine to the pallet. -
Page 4: Control Box
CONTROL BOX INFO WRAP TURNTABLE MODES WRAPS BOTTOM SYSTEM CARRAIGE RESET WRAPS START BANDING TURNTABLE CARRIAGE SPEED SPEED PAGE 4 OF 33 0913 IH-1619... -
Page 5: Led Display
CONTROL BOX CONTINUED LED DISpLAy Emergency Stop Condition System is normal Mode A Selected Mode B Selected Continue operation by pushing START button System is in Manual BUTTONS WRAPPING MODE A - WRAP UP AND DOWN The LED on the button’s upper left is on. In Mode A, the bottom wrap is applied first, and then the top wrap follows. - Page 6 CONTROL BOX CONTINUED Push the BOTTOM WRAPS button to select the number of bottom wraps desired (0 - 9). Turn the CARRIAGE SPEED adjustment knob clockwise to increase, and counterclockwise to decrease the carriage speed. This allows you to adjust the overlap of your film. Turn the TURNTABLE SPEED adjustment knob clockwise to increase, and counterclockwise to decrease the turntable speed.
-
Page 7: Machine Operation
MACHINE OpERATION FILM LOADING Stretch Handle CAUTION! Be sure EMERGENCy STOp is pushed (Off Position) Stretch Tension in before threading the film and pulled out Adjustment Knob when the film is threaded. 1. Place the film on the film mandrel. 2. -
Page 8: Self-Test Procedure
SELf-TEST pROCEDURE An operator may check the status of the machine by DISpLAy pOSSIBLE pROBLEM LOCATION(S) running a self-test. If the procedure is carried out Film carriage Safety Bar properly, the INFO screen will display the location of the problem(s). EMERGENCY STOP button Electrical enclosure safety switch To run the self-test, follow the procedure below:... - Page 9 CALIBRACIÓN/fUNCIONAMIENTO DE LA BÁSCULA SCALE CALIBRATION/OpERATION SCALE CALIBRATION/OPERATION • Set value to ‘1’. Press NET/GROSS to save. Press UNITS to exit. (See Figure 6) 1. Turn power off. Remove ‘X1’ plate from bottom of Figure 6 display to expose calibration switch. (See Figure 2) Figure 2 Placa X1 UNITS...
- Page 10 RECOMMENDED SCALE CONfIGURATION VALUES NOTE: Changing the scale parameters to values other than the recommended values may result in poor scale operation. NAME/CODE DESCRIpTION RECOMMENDED VALUE F1: GRADUATIONS Specifies the number of full-scale graduations. Value should be consistent with legal 5000 requirements and environmental limits on the useful system resolution.
-
Page 11: Troubleshooting
TROUBLESHOOTING WARNING! Make sure that only qualified CAUTION! Disconnect all power, including personnel perform inspection, troubleshooting external control power that may be present, and part replacement. before servicing the frequency drive controllers. WAIT for three (3) minutes for the DC bus capacitors to discharge. The frequency drive controller’s display and/or LEDs are not accurate indicators of the absence of DC bus voltage. -
Page 12: Especificaciones Del Sistema
π H-1619 01-800-295-5510 uline.mx DESPACHADORA AUTOMÁTICA DE PELÍCULA ELÁSTICA CON BÁSCULA ESpECIfICACIONES DEL SISTEMA DIMENSIONS DE LA MACHINE SISTEMA PARA DESPACHAR LA PELÍCULA Largo 98" • Ajuste de Película Infinito / Manual Ancho 60" • Capacidad del Rollo de 10” de Diámetro Altura 91"... -
Page 13: Descripción Del Sistema
DESCRIpCIÓN DEL SISTEMA Caja de Control Torre Portador de Películ Perilla para Ajuste de Tensión Portador de Películ Pedal de Seguridad Caja del Motor Soporte Plataforma Giratoria PAGE 13 OF 33 0913 IH-1619... -
Page 14: Configuración Del Sistema
CONfIGURACIÓN DEL SISTEMA COLOCACIÓN DE LA MÁQUINA INSTALACIÓN DE LA MÁQUINA Coloque la Máquina Automática para Película Elástica 1. Coloque la máquina entarimada cerca del área cerca del área donde esté envolviendo sus tarimas de designada para envoltura. Retire todos los cinchos carga. -
Page 15: Caja De Control
CAJA DE CONTROL INFORMACIÓN IMPULSO DE ENVOLTURA MODOS DE PLATAFORMA SUPERIOR ENVOLTURA GIRATORIA ENVOLTURA REINICIO IMPULSO DEL AL SISTEMA PORTADOR INFERIOR INICIO ATAR CON BANDA VELOCIDAD VELOCIDAD DE PLATAFORMA DEL PORTADOR GIRATORIA PAGE 15 OF 33 0913 IH-1619... -
Page 16: Pantalla Led
CONTINUACIÓN DE CAJA DE CONTROL pANTALLA LED Parada por Situación de Emergencia Sistema normal Modo A Seleccionado Modo B Seleccionado Funcionamiento Continuo al presionar el botón START Sistema en Manual BOTONES ENVOLTURA EN MODO A – ENVOLTURA POR ARRIBA Y ABAJO El LED de la parte izquierda superior del botón está... - Page 17 CONTINUACIÓN DE CAJA DE CONTROL Presione el botón BOTTOM WRAPS para seleccionar el número de envolturas deseadas en parte inferior (0-9). Gire la perilla de ajuste CARRIAGE SPEED en el sentido de las manecillas del reloj para incrementar, y al contrario de las manecillas del reloj para disminuir la velocidad del portador. Esto le permite ajustar la superposición de su película.
-
Page 18: Funcionamiento De La Máquina
fUNCIONAMIENTO DE LA MÁQUINA CARGAR LA PELÍCULA ¡pRECAUCIÓN! Asegúrese de presionar el Asa para Película (Posición Apagado) BOTÓN DE EMERGENCIA antes de cargar la Perilla de Ajuste de película y sea presionado de nuevo para Tensión de Película liberar cuando la película está cargada. 1. - Page 19 pROCEDIMIENTO DE AUTOpRUEBA Un operador puede revisar el estado de la máquina pANTALLA pOSIBLE UBICACIÓN DE pROBLEMA(S) corriendo la autoprueba. Si el procedimiento se lleva a Barra de Seguridad del portador de película. cabo correctamente, la pantalla de INFO mostrará la ubicación del (los) problema(s).
- Page 20 CALIBRACIÓN/fUNCIONAMIENTO DE LA BÁSCULA CALIBRACIÓN/fUNCIONAMIENTO DE LA BÁSCULA CALIBRACIÓN/FUNCIONAMIENTO DE LA BÁSCULA • Configure el valor a ´1´. Presione NET/GROSS para grabar. Presione UNITS para salir. (Vea Diagrama 6) 1. Apague la unidad. Retire la placa ’X1´ de la base Diagrama 6 de la pantalla para exponer el interruptor de calibración.
- Page 21 RECOMMENDED SCALE CONfIGURATION VALUES NOTA: Cambiar los valores de los parámetros de la báscula a otros a valores diferentes a los recomendados puede resultar en un funcionamiento deficiente de la báscula. VALOR NOMBRE/CÓDIGO DESCRIpCIÓN RECOMENDADO F1: GRADUACIONES Especifica el número de la escala completa de graduaciones. El valor debe ser 5000 consistente con los requerimientos legales y los límites ambientales sobre el uso de la resolución del sistema.
-
Page 22: Solución De Problemas
SOLUCIÓN DE pROBLEMAS ¡ADVERTENCIA! Asegúrese de que solo ¡pRECAUCIÓN! Desconecte toda la corriente, personal calificado lleve a cabo la incluyendo el control externo de corriente inspección, solución de problemas y que pudiera estar presente, antes de dar reemplazo de partes. servicio a los controladores de frecuencia de dirección. -
Page 23: Spécifications Du Système
π H-1619 1-800-295-5510 uline.ca DISTRIBUTEUR DE FILM ÉTIRABLE AUTOMATIQUE AVEC BALANCE SpéCIfICATIONS DU SySTèME DIMENSIONS DE LA MACHINE SYSTÈME DE DISTRIBUTION DE FILMS Longueur 98 po (249 cm) Réglage continu/manuel de l’allongement Largeur 60 po (152 cm) Capacité d’enroulement de 10 po (25 cm) de Hauteur 91 po (231 cm) - Page 24 SySTEM DESCRIpTION Boîte de commande Tour Poignée d’allongement Bouton de réglage de tension Chariot porte-film Barre de sécurité pour pied Boîte à moteur Siège Plaque tournante PAGE 24 OF 33 0913 IH-1619...
-
Page 25: Installation Du Système
INSTALLATION DU SySTèME EMPLACEMENT DE LA MACHINE INSTALLATION DE LA MACHINE Placez la machine d’emballage sous film étirable 1. Placez la machine sur patins près de la zone indiquée automatique près d’une zone où vous allez emballer vos pour le banderolage. Enlevez toutes les attaches charges palettisées. - Page 26 BOÎTE DE COMMANDE INFO MODES VITESSE EMBALLAGES D’EMBALLAGE DE LAPLAQUE SUPÉRIEURS SYSTÈME CHARIOTMANUEL EMBALLAGES DERÉINITIALISATION INFÉRIEURS DÉMARRER BANDEROLAGE VITESSE DE LAPLAQUE VITESSE DUCHARIOT TOURNANTE PAGE 26 OF 33 0913 IH-1619...
-
Page 27: Affichage À Del
BOÎTE DE COMMANDE SUITE AffICHAGE À DEL État d’arrêt d’urgence - -Le système est normal Mode A sélectionné Mode B sélectionné Poursuivre l’opération en appuyant sur le bouton START (DÉMARRER) Le système est en manuel BOUTONS BANDEROLAGE MODE A - ENROULEMENT EN HAUT ET EN BAS Le voyant DEL dans le coin supérieur gauche du bouton est allumé. - Page 28 BOÎTE DE COMMANDE SUITE Appuyez sur le bouton BOTTOM WRAPS (EMBALLAGES INFÉRIEURS) pour sélectionner le nombre d’emballages inférieurs souhaité (0 à 9). Tournez le bouton de réglage CARRIAGE SPEED (VITESSE DU CHARIOT) dans le sens horaire pour augmenter la vitesse du chariot et dans le sens antihoraire pour la diminuer. Cela vous permet de régler la superposition de votre film.
-
Page 29: Fonctionnement De La Machine
fONCTIONNEMENT DE LA MACHINE CHARGEMENT DE FILM Poignée MISE EN GARDE! N’oubliez pas d’appuyer sur le d’allongement bouton EMERGENCy STOp (ARRÊT D’URGENCE) (Position arrêt) Tension d’allongement avant d’enrouler le film et de tirer sur ce Bouton de réglage bouton lorsque le film est enroulé. 1. - Page 30 pROCéDURE D’AUTO-CONTRÔLE Un opérateur peut vérifier l’état de la machine en AffICHAGE EMpLACEMENTS SUSpECTS exécutant un auto-contrôle. Si la procédure est Barre de sécurité du chariot porte-film effectuée correctement, l’écran INFO indique l’emplacement du ou des problèmes. Bouton EMERGENCY STOP (ARRÊT D’URGENCE) Interrupteur de sécurité...
- Page 31 éTALONNAGE DE LA BALANCE/UTILISATION ÉTALONNAGE DE LA BALANCE/UTILISATION • Appuyez sur PRINT (IMPRIMER) ou TARE et faites défiler jusqu’à F9. Appuyez sur ZERO (ZÉRO). 1. Mettez hors tension. Retirez le plateau « X1 » du fond (Voir figure 5) de l’écran pour afficher l’interrupteur d’étalonnage. Figure 5 (Voir figure 2) Figure 2...
- Page 32 éTALONNAGE DE LA BALANCE/UTILISATION SUITE 5. POUR STABILISER LA BALANCE : • Utilisez PRINT (IMPRIMER), TARE et ZERO (ZÉRO) pour entrer le poids de test (il ne doit pas être inférieur à 10 % de la • Retirez tout article de la balance. capacité de la balance). • Utilisez PRINT (IMPRIMER) ou TARE pour faire défiler jusqu’à...
-
Page 33: Dépannage
DépANNAGE AVERTISSEMENT! Veillez à ce que seul un MISE EN GARDE! Coupez toutes les ARRÊT personnel qualifié effectue les inspections, le alimentations, dont celle de la commande dépannage et le remplacement des pièces. externe qui peut être présente, avant toute opération d’entretien des variateurs de fréquence.
Need help?
Do you have a question about the H-1619 and is the answer not in the manual?
Questions and answers