Table of Contents
Advertisement
Advertisement
Table of Contents

Related Manuals for Pokini Tab K11


Summary of Contents for Pokini Tab K11
- Page 1 Tab K11 Quick Start Guide English...
- Page 2 English...
-
Page 3: Table Of Contents
Table of Contents Before you start ............................Package Contents ............................Product Overview ............................Status Indicators ............................Getting started ............................. Installing the Battery Removing the SSD Kit Installing the SSD Kit Connecting the Power Starting your Tablet Pc Operating your Tablet PC ...................... -
Page 4: Before You Start
English Before You Start Congratulations on your purchase of this Tablet PC. This fully-rugged Tablet PC is porta- ble and provides users with maximum mobile computing experience in a wide range of working enviroments. Bevor you begin using your tabelt PC, read this chapter to famil- iarize yourself with the main computents installed in the system. - Page 5 bay battery charger 2-bay battery Folio Case Soft handle (optional) charger (optional) (optional) (optional) Rotate strap Shoulder strap (optional) (optional) Note: The pictures are for reference only, actual items may slightly differ. Declaration of product weight: 1,39kg. The actual weight may varies by configuration...
-
Page 6: Product Overview
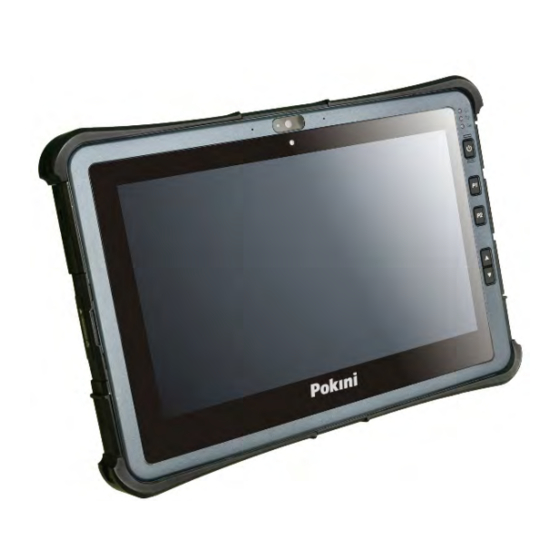
English Product Overview Front View Microphones Record the surrounding sound. Use to detect the current level of visible light in the Ambient light sensor surrounding environment. Front camera Use for video conference. Status indicators Indicate the corresponding function status. Power button Press to turn your tablet PC on or off. - Page 7 P1: Press to activate the assigned function. - Stealth mode button (by default). - Night Vision button. - Disable (no function). Programmable P2: Press to activate the assigned function. - Scanner buttons button (if the barcode scanner is integrated). - Touch screen mode selection. - Shortcut key for launching the specific application.
- Page 8 English Product Overview Back View Speakers Emit sound. SSD kit latch Lock the SSD kit in place. SSD kit compartment Contain the SSD module. Provide additional lighting when taking pictures under Camera LED flash low light environment. Rear camera Use to take pictures. Fingerprint scanner Scan the fingerprint for biometric identification.
- Page 9 Top View RS232 port Connect a serial peripheral device. (for selected model) USB port Connect a USB peripheral device. (for selected model) Barcode scanner Scan barcodes. (for selected model) Bottom View Use for the external WLAN antenna. RF Pass-thru connector Use for the external GNSS antenna.
- Page 10 English Left View Strap holes Attach the strap for the stylus pen. Kensington lock slot Connect a Kensington-compatible tablet PC security lock. Smart card reader Use to insert smart cards. (for selected model) Right View DC-in jack Connect the power adapter. Mini DisplayPort Connect to an external display.
-
Page 11: Status Indicators
Status Indicators The status indicators of the tablet PC light up when a particular function of the tablet PC is active. The LED always lights on (green) when the system is running. Power When the system is in sleep mode, the LED blinks. Indicate the battery status: Green: when battery is fully charged (95% or above) Orange: when battery is charging... -
Page 12: Getting Started
English Getting Started This chapter will help you get started using the device. Installing the Battery To install the battery, follow the steps below: 1. Align and insert the battery to the battery compartment. 2. Push completely until the battery locks into place. -
Page 13: Removing The Ssd Kit
When to replace the Battery Pack The battery performance gradually decreases over time and usage. We recommend you to replace your battery pack after 18 to 24 months of usage. Removing the Battery To remove the battery, follow the steps below: 1. -
Page 14: Installing The Ssd Kit
English Installing the SSD Kit To install the SSD kit, follow the steps below: 1. Align and insert the SSD kit to its compartment. 2. Slide the SSD kit latch to the lock posi- tion to secure the SSD kit. Connecting the Power Your tablet PC can be powered up using the AC adapter or the Lithium-ion battery. -
Page 15: Starting Your Tablet Pc
Using Battery Power 1. Install a charged battery in the battery compartment. 2. Remove the AC adapter (if plugged). Your tablet PC will automatically use the battery power. Note: If your tablet PC is connected to an electrical outlet and the battery is installed, your tablet PC uses power from the electrical outlet. -
Page 16: Operating Your Tablet Pc
English Operating Your Tablet PC This chapter will guide you on how to use your Tablet PC. Using the Quick Menu To enter the Quick menu, tap the arrow on the task bar to display hidden icons. Then tap the Quick Menu icon ( You can also access the Quick menu in the All apps list. - Page 17 Viewing the Version Information On the Version section, you can view the Bios version, EC version, and Quick Menu version. Viewing the Battery Charge Cycles On the Battery Charge Cycles section, you can view the battery charge cycle and bat- tery status.
- Page 18 English Assigning an Application the P2 Button Tap the P-Key tab to assign an application to the P2 button. Select the desired applica- tion and click Open. Configuring the Up/Down Keys (UP / Down) On the Up/Down Button Setting section, you can assign the function for the Up and Down buttons.
- Page 19 Accessing the Mobility Center Tap the Mobility Center tab to adjust or configure the brightness, volume level, battery status, screen orientation, external display, sync, and presentation settings. Configuring the Touchscreen Settings Your tablet PC is equipped with a touchscreen. Using the touchscreen, you can navigating the screen by using touch gestures (any input from your finger, a glove, or a stylus).
- Page 20 English Configuring External Antenna Switching Mode Select the respective external antenna tab to configure the setting. - Tap the Wi-Fi Antenna tab to enable/disable the device to automatically switch to the external WLAN antenna when it is affixed on a docking station. - Tap the LTE Antenna tab to enable/disable the device to automatically switch to the external WWAN antenna when it is affixed on a docking station.
- Page 21 Using the Camera Using the Camera application, you can use this tablet PC to take photos or videos. Opening Camera App To access the Camera application, do one the following: a. Tap > Camera. b. In Cortana search box, enter “camera” Then tap Camera.
- Page 22 English Recording Videos 1. Tap to witch to Video mode. 2. Press to start recording a video. The recording time appears on the bottom on the screen. 3. To stop recording the video, tap. Recording Videos 1. Tap > to switch to Pro mode. 2.
- Page 23 Set the action when you tap and hold the Camera button. - Video – Tap and hold the Camera button to create a video Press and hold - Photo burst - Tap and hold the Camera button to take photos camera button continuously.
-
Page 24: Making Connections
English Making Connections This chapter will guide you on installing peripheral devices to maximize the use of your tablet PC. Installing the Memory Card Your Tablet PC supports different types of memory cards to provide faster data transfer. Supported types: Micro SDHC, Micro SDXC 1. -
Page 25: Installung The Smart Card
1. Slide to the left to open the memory/SIM card cover. 2. Push a valid SIM card into the SIM card slot until it clicks into place. 3. Close the memory/SIM card cover. Installing the Smart Card Your tablet PC is equipped with a built-in smart car make secure purchases, store security information, and provide identification and information using a smart card. -
Page 26: Connecting The Microphone/Headset
English Connecting the Microphone/Headset Your Tablet PC is equipped with audio combo jack that enables you to use the headset or microphone. - To connect to a headset, open the memory/SIM card cover and plug the stereo headphone cable into the audio combo jack of your device. - To connect to a microphone, open the memory/SIM card cover and plug the micro- phone cable into the audio combo of your device. -
Page 27: Connecting Usb Devices
Connecting USB Devices You can connect your tablet PC to other USB devices. such as a mouse, keyboard, digital camera, printer, or an external hard disk drive. 1. Slide to the right to pen the I/O port cover. 2. Connect one end of the USB cable to the USB port of your device. 3. -
Page 28: Connecting External Display
English Connecting to External Display You can connect an additional display to your tablet PC using the mini DisplayPort cable. 1. Slide to right to open the I/O port cover. 2. Connect one end of the mini DisplayPort cable to the mini DisplayPort of your device. 3. - Page 29 Connecting to a Bluetooth Device Your Tablet Pc can connect and communicate with other Bluetooth-enabled devices. By default, the Bluetooth function is disabled. 1. Tap on the system tray. Then tap Bluetooth to enable the function. 2. Tap the arrow icon ( ) on the System tray to display hidden icons.
- Page 30 English 5. Select the device you want to connect. Verify the pairing code on the screen of your device and pairing device match, then tap Connect to start pairing. Note: If the device that you want to add does not appear on the screen, please check if the device is turned on and discoverable.
- Page 31 Connecting to a Wireless Local Area Network Your tablet PC comes with a WLAN module. A wireless network can be added either when the network is detected or by manually entering the settings information. To connect, follow the steps below: 1.
- Page 32 English Note: - Wi-Fi access requires service from a wireless service provider. Contact your service provider for more information. - Actual wireless connectivity will depend on system configuration. Please contact your dealer for more information. - To disconnect from the wireless network, select the network in the wireless in the wireless network list and tap Disconnect.
-
Page 33: Using The Bios Setup Utility
- Press the P1 key. - Tap Setup (on the upper right corner of the screen) when the Pokini logo appears. - Press the Delete button on the keyboard. - Page 34 English Navigating and Entering Information in BIOS Use the following keys to move between fields and to enter information: Select screen / click Select item Enter / Double-click Select + / — Change Opt. General Help Previous Values Optimized Defaults Save &...
-
Page 35: Main Menu
Main Menu The Main menu displays the system overview information about the device, including the system date and time. BIOS Information Display the BIOS version detected during boot up. Display the CPU type and speed, total memory, mainboard System Information version, PCH SKU, ME FW version, and ME Firmware SKU. -
Page 36: Advanced Menu
English Advanced Menu The Advanced menu allows you to configure specific system settings. CPU Configurations Configure the CPU parameters. Key Definitions Configure the Key Definition settings under Windows. Configure the device settings including USB3.0 port, LAN, SD card reader, TPM device, HD audio, finger print scanner, touch Device Configurations screen, PCMCIA/ExpressCard, front camera, rear camera, digitizer, barcode, wireless LAN, Bluetooth, WWAN, and GPS. -
Page 37: Boot Menu
Boot Menu The Boot menu allows you to configure the boot settings and boot sequence. Save Changes and Reset Reset the system after saving the changes. Discard Changes and Reset Reset the system setup without saving any changes. Restore Defaults Restore the default values for all the setup options. -
Page 38: Security Menu
English Security Menu The Security menu allows you to set or change the Administrator and User passwords. Administrator Password Set the Administrator password. Secure Boot Customize the Secure Boot settings. -
Page 39: Save & Exit Menu
Save & Exit Menu The Save & Exit menu allows you to save/discard the changes and restore the default values for all setup options before leaving the BIOS Setup Menu. Bootup NumLock State Select the keyboard NumLock state. Launch CSM Enable/Disable CSM support. -
Page 40: Appendix
English Appendix Copyright Copyright© 2018. All rights reserved. No part of this user manual may be transmitted, stored in a retrieval system, or translat- ed into any language or computer language, in any form or by any means, without the prior written permission of the manufacturer. - Page 41 RF exposure warning This equipment must be installed and operated in accordance with provided instructions and must not be co-located or operating in conjunction with any other antenna or trans- mitter. End-users and installers must be provided with antenna installation instructions and transmitter operating conditions for satisfying RF exposure compliance.
- Page 42 English PRODUIT LASER DE CLASSE 1 LASERSCHUTZKLASSE 1 PRODUKT TO EN60825 ATTENTION : CE PRODUIT CONTIENT UN SYSTÈME LASER ET EST CLASSE: N TANT QUE « PRODUIT LASER DE CLASSE 1 ». POUR UTILISER CE MODÈLE CORRECTE- MENT, LISEZ LE MANUEL D’INSTRUCTIONS ATTENTIVEMENT ET CONSERVEZ-LE POUR RÉFÉRENCE FUTURE.
-
Page 43: Safety Instructions
Safety Instructions These safety instructions should always be observed to ensure safe operation when handling the device. - Do not place this device on an unstable table or surface. The device may fall, causing serious damage to its housing and components. - Do not cover the device, or block the air ventilation holes of the device with any other objects. - Page 44 English Instructions de sécurité Ces instructions de sécurité doivent toujours être suivies pour assurer le fonctionnement sûr de l’appareil lors de sa manipulation. - Ne placez pas cet appareil sur une table ou surface instable. L’appareil pourrait tomber et causer des dégâts sérieux à son boîtier et ses composants. - Ne couvrez pas l’appareil, et ne bloquez pas les trous de ventilation avec d’autres objets.
- Page 45 Support Sie haben Fragen technischer Art? Bei Problemen oder Fragen wenden Sie sich bitte per E-Mail an: support@pokini.de V 1.0 / 08-2018 Alle Rechte vorbehalten. © 2017 EXTRA Computer GmbH...
Need help?
Do you have a question about the Tab K11 and is the answer not in the manual?
Questions and answers