
Subscribe to Our Youtube Channel
Related Manuals for KitchenAid SMART OVEN+


Summary of Contents for KitchenAid SMART OVEN+
- Page 1 SMART OVEN+ POWERED ATTACHMENTS USER INSTRUCTIONS INSTRUCTION D’UTILISATION DES ACCESSOIRES ÉLECTRIQUES POUR FOUR INTELLIGENT...
-
Page 2: Table Of Contents
THANK YOU for purchasing this high-quality product. Register your built-in oven at register.kitchenaid.com. In Canada, register your built-in oven at register.kitchenaid.ca. For future reference, please make a note of your product model and serial numbers. They can be found on the label located on the bottom edge of the control panel, right hand side. -
Page 3: Installing The +Powered Attachments
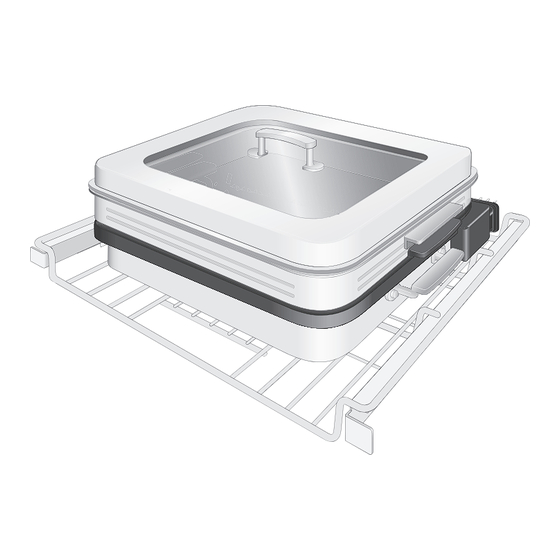
INSTALLING THE +POWERED ATTACHMENTS INSTALLATION The +Powered Attachments fit on the SatinGlide Roll-Out Extension Rack for Smart Oven+ Attachments. They will not rock or wobble when installed correctly. Always fully extend the roll-out rack before placing the +Powered Attachments. The roll-out rack will lock in place when fully extended. Heating Element Roll-out rack... -
Page 4: Using The +Powered Attachments
USING THE +POWERED ATTACHMENTS GETTING STARTED Steamer The +Powered Attachments are composed of Perforated several parts. The roll-out rack for powered Steamer attachments and Base Pan positions the Tray +Powered Attachments in the oven and catches Water drips. The Heating Element provides even heat Basin to the +Powered Attachments. - Page 5 USING THE +POWERED ATTACHMENTS CLEANING To avoid damage to the +Powered Attachments, do not use the oven’s self- cleaning function for the +Powered WARNING Attachments. The Base Pan and +Powered Attachments are dishwasher-safe. The Heating Element is not dishwasher-safe. If hand-washing, use soapy water and a soft cloth or sponge.
-
Page 6: Storing The +Powered Attachments
STORING THE +POWERED ATTACHMENTS GETTING STARTED SMART OVEN+ The +Powered Attachments are designed for The +Powered Attachments can be stored inside ease of storage. The +Steamer Attachment, the Smart Oven+ cavity for ease of access. Place +Baking Stone Attachment, and +Grill Attachment the +Grill and the +Baking stone attachment conveniently stack together on top of the Heating on top of the Heating Element inside the Base... -
Page 8: Smart Oven+ Powered Baking Stone Attachment
* Compared to baking stones of similar size, weight and material. **Wi-Fi & App required. Features subject to change. For details and privacy statement, visit kitchenaid.com/connect. 8 | SMART OVEN+ POWERED BAKING STONE ATTACHMENT... -
Page 9: Installing The +Baking Stone Attachment
INSTALLING THE +BAKING STONE ATTACHMENT INSTALLATION The +Powered Attachments fit on the SatinGlide Roll-Out Extension Rack for Smart Oven+ Attachments. They will not rock or wobble when installed correctly. Always fully extend the roll-out rack before placing the +Powered Attachments. The roll-out rack will lock in place when fully extended. Place the Base Pan and Heating Insert the roll-out rack into the lowest Element on the roll-out rack. -
Page 10: Using The +Baking Stone Attachment
USING THE +BAKING STONE ATTACHMENT GETTING STARTED Cover the +Baking Stone Attachment with a sheet of parchment paper for easier clean- Preheat the +Baking Stone Attachment before up, especially when baking items such as free placing food. While the length of preheat time form pies, tarts, or fruit turnovers. - Page 11 USING THE +BAKING STONE ATTACHMENT CLEANING If hand washing, use soapy water and a soft cloth or sponge. WARNING Baking soda can aid in removing difficult spills. Avoid extreme temperature changes. Before cleaning, allow the +Baking Stone Attachment to cool. Do not use +Baking Stone Attachment if damaged or chipped.
-
Page 13: Smart Oven+ Powered Grill Attachment
And you can control the grilling process through the display, or monitor and control it from a mobile device when remote-enabled.* *Wi-Fi & App required. Features subject to change. For details and privacy statement, visit kitchenaid.com/connect. SMART OVEN+ POWERED GRILL ATTACHMENT | 13... -
Page 14: Installing The +Grill Attachment
INSTALLING THE +GRILL ATTACHMENT INSTALLATION The +Powered Attachments fit on the SatinGlide Roll-Out Extension Rack for Smart Oven+ Attachments. They will not rock or wobble when installed correctly. Always fully extend the roll-out rack before placing the +Powered Attachments. The roll-out rack will lock in place when fully extended. Place the Base Pan and Heating Insert the roll-out rack into the lowest Element on the roll-out rack. -
Page 15: Using The +Grill Attachment
USING THE +GRILL ATTACHMENT GETTING STARTED Add 1 cup (240 mL) of water to the base pan when grilling to avoid smoke generation Preheat the +Grill Attachment per the recipe (recommended if broiling greasy/fatty foods instructions before placing food. such as burgers, rib eye steaks, etc.). The +Grill Attachment has a nonstick coating When grilling unevenly thick pieces of fish for easy cleaning. - Page 16 USING THE +GRILL ATTACHMENT CLEANING To avoid damage, do not use the oven’s self- cleaning function for the +Grill Attachment. WARNING The +Grill Attachment is dishwasher-safe. If hand washing, use soapy water and a soft cloth or sponge. Electrical Shock Hazard Do not immerse heating element in water or place in dishwasher.
-
Page 18: Smart Oven+ Powered Steamer Attachment
And you can control the attachment through the display, or monitor and control it from a mobile device when remote-enabled.* *Wi-Fi & App required. Features subject to change. For details and privacy statement, visit kitchenaid.com/connect. 18 | SMART OVEN+ POWERED STEAMER ATTACHMENT... -
Page 19: Installing The +Steamer Attachment
INSTALLING THE +STEAMER ATTACHMENT INSTALLATION The +Powered Attachments fit on the SatinGlide Roll-Out Extension Rack for Smart Oven+ Attachments. They will not rock or wobble when installed correctly. Always fully extend the roll-out rack before placing the +Powered Attachments. The roll-out rack will lock in place when fully extended. Place the Base Pan and Heating Insert the roll-out rack into the lowest Element on the roll-out rack. -
Page 20: Using The +Steamer Attachment
USING THE +STEAMER ATTACHMENT The Steam Assist Mode uses the +Steamer Steamer Attachment. When cooking with the Steam Assist Mode, do not use the Steamer Lid. This will allow the steam to escape and fill the oven cavity during Perforated the cooking process. - Page 21 USING THE +STEAMER ATTACHMENT CLEANING To avoid damage, do not use the oven’s self-cleaning function for the +Steamer Attachment. WARNING The +Steamer Attachment is dishwasher-safe. If hand washing, use soapy water and a soft cloth or sponge. Electrical Shock Hazard Do not immerse heating element in water or place in dishwasher.
-
Page 22: Troubleshooting
TROUBLESHOOTING First try the solutions suggested here. If you need further assistance or more recommendations that may help you avoid a service call, visit http://producthelp.kitchenaid.com. In Canada, visit http://www.kitchenaid.ca. Contact us by mail with any questions or concerns at the address below: In the U.S.A.:... - Page 23 TROUBLESHOOTING GENERAL 5. Oven is smoking – Should you notice smoke 7. Smoke/steam from oven changes the during a cooking cycle, it is time to self clean User Interface (UI) (false touch) – If steam the oven. Once the current cooking cycle is from the oven affects the UI, simply hit the over and the +Powered Attachments have Back button once to return to the preheat/...
-
Page 24: Warranty
Your Choice of: eXperience Center toll-free at 1-800-541-6390. The replacement parts and repair labor costs to correct defects in materials and workmanship. Service must be provided by an Authorized KitchenAid Service Center. KitchenAid Will Not Repairs when your +Powered Attachments is used in other than Pay for: normal single family home use. - Page 25 DISTRICT OF COLUMBIA, AND PUERTO RICO We’re so confident the quality of our products 1-800-541-6390 Monday through Friday. Please meets the exacting standards of KitchenAid that, if have your original sales receipt available when you your +Powered Attachments should fail within the call.
- Page 26 In the United States and Puerto Rico: Outside the United States and Puerto Rico: For service information, or to order accessories Consult your local KitchenAid dealer or the store or replacement parts, call toll-free at where you purchased the +Powered Attachments 1-800-541-6390 or write to: for information on how to obtain service.
- Page 27 MERCI d’avoir acheté ce produit de grande qualité. Enregistrer votre four encastré au register.kitchenaid.com. Au Canada, enregistrer votre four encastré sur register.kitchenaid.ca. Pour référence ultérieure, consignez par écrit les numéros de modèle et de série de votre produit. Ces numéros se trouvent sur l’étiquette située sur le bord inférieur du tableau de commande, côté...
-
Page 28: Installation Des Accessoires Électriques
INSTALLATION DES ACCESSOIRES ÉLECTRIQUES INSTALLATION Les accessoires électriques peuvent être placés sur la grille coulissante SatinGlide conçue pour four intelligent. Ils ne se balanceront et n’oscilleront pas s’ils sont bien installés. Toujours déployer complètement la grille coulissante avant d’y placer un accessoire électrique. La grille coulissante se verrouille en place lorsqu’elle est entièrement déployée. -
Page 29: Utilisation Des Accessoires Électriques
UTILISATION DES ACCESSOIRES ÉLECTRIQUES MISE EN PLACE Couvercle du cuiseur-vapeur Les accessoires électriques sont composés de plusieurs pièces. La grille coulissante pour Plateau accessoires électriques et le plateau inférieur placent perforé du cuiseur-vapeur les accessoires électriques dans le four et ramassent les gouttes. - Page 30 UTILISATION DES ACCESSOIRES ÉLECTRIQUES NETTOYAGE Pour éviter d’endommager les accessoires électriques, ne pas utiliser la fonction d’autonettoyage du four pour les AVERTISSEMENT accessoires électriques. Le plateau inférieur et les accessoires électriques peuvent être lavés au lave- vaisselle. L’élément chauffant n’est pas lavable au lave-vaisselle.
-
Page 31: Rangement Des Accessoires Électriques
RANGEMENT DES ACCESSOIRES ÉLECTRIQUES MISE EN PLACE FOUR INTELLIGENT Les accessoires électriques sont conçus pour Les accessoires électriques peuvent être rangés être faciles à ranger. Le cuiseur-vapeur, la pierre dans le four intelligent pour un accès facile. de cuisson et le gril s’empilent facilement sur Placer le gril et la pierre de cuisson sur l’élément l’élément chauffant et le plateau inférieur. -
Page 33: Pierre De Cuisson Électrique Pour Four Intelligent
* Comparée à une pierre de cuisson fabriquée dans le même matériau, de taille et poids similaires. ** Connexion Wi-Fi et application requises. Caractéristiques sujettes à changement. Pour obtenir les détails et la politique en matière de vie privée, visiter le kitchenaid.com/connect. PIERRE DE CUISSON ÉLECTRIQUE POUR FOUR INTELLIGENT | 33... -
Page 34: Installation De La Pierre De Cuisson
INSTALLATION DE LA PIERRE DE CUISSON INSTALLATION Les accessoires électriques peuvent être placés sur la grille coulissante SatinGlide conçue pour four intelligent. Ils ne se balanceront et n’oscilleront pas s’ils sont bien installés. Toujours déployer complètement la grille coulissante avant d’y placer un accessoire électrique. La grille coulissante se verrouille en place lorsqu’elle est entièrement déployée. -
Page 35: Utilisation De La Pierre De Cuisson
UTILISATION DE LA PIERRE DE CUISSON MISE EN PLACE Pour facilement accéder à la pierre, tirer sur la grille coulissante pour accessoires électriques. Préchauffer la pierre de cuisson avant d’y placer Repousser simplement la pierre de cuisson des aliments. Même si la durée du préchauffage dans le four (dans les 2 minutes) pour peut varier en fonction de la température du continuer la cuisson. - Page 36 UTILISATION DE LA PIERRE DE CUISSON NETTOYAGE Pour le nettoyage à la main, utiliser de l’eau savonneuse et un chiffon doux ou une éponge. Le bicarbonate de soude peut aider à nettoyer AVERTISSEMENT les taches tenaces. Éviter les variations de température extrêmes. Avant de procéder au nettoyage, laisser la pierre de cuisson refroidir.
-
Page 38: Gril Électrique Pour Four Intelligent
à distance est activée.* * Connexion Wi-Fi et application requises. Caractéristiques sujettes à changement. Pour obtenir les détails et la politique en matière de vie privée, visiter le kitchenaid.com/connect. 38 | GRIL ÉLECTRIQUE POUR FOUR INTELLIGENT... -
Page 39: Installation Du Gril
INSTALLATION DU GRIL INSTALLATION Les accessoires électriques peuvent être placés sur la grille coulissante SatinGlide conçue pour four intelligent. Ils ne se balanceront et n’oscilleront pas s’ils sont bien installés. Toujours déployer complètement la grille coulissante avant d’y placer un accessoire électrique. La grille coulissante se verrouille en place lorsqu’elle est entièrement déployée. -
Page 40: Utilisation Du Gril
UTILISATION DU GRIL MISE EN PLACE Ajouter 1 tasse (240 ml) d’eau dans le plateau inférieur lors de l’utilisation du gril pour Préchauffer le gril selon les instructions de éviter la production de fumée (recommandé la recette avant d’y placer des aliments. pour la cuisson d’aliments gras comme les Le gril possède une surface antiadhésive facile hamburgers, le bifteck de faux-filet, etc.). - Page 41 UTILISATION DU GRIL NETTOYAGE Pour éviter les dommages, ne pas utiliser la fonction d’autonettoyage du four pour le gril. Le gril peut être lavé au lave-vaisselle. AVERTISSEMENT Pour le nettoyage à la main, utiliser de l’eau savonneuse et un chiffon doux ou une éponge.
-
Page 43: Cuiseur-Vapeur Électrique Pour Four Intelligent
à partir d’un appareil mobile lorsque la commande à distance est activée.* * Connexion Wi-Fi et application requises. Caractéristiques sujettes à changement. Pour obtenir les détails et la politique en matière de vie privée, visiter le kitchenaid.com/connect. CUISEUR-VAPEUR ÉLECTRIQUE POUR FOUR INTELLIGENT | 43... -
Page 44: Installation Du Cuiseur-Vapeur
INSTALLATION DU CUISEUR-VAPEUR INSTALLATION Les accessoires électriques peuvent être placés sur la grille coulissante SatinGlide conçue pour four intelligent. Ils ne se balanceront et n’oscilleront pas s’ils sont bien installés. Toujours déployer complètement la grille coulissante avant d’y placer un accessoire électrique. La grille coulissante se verrouille en place lorsqu’elle est entièrement déployée. -
Page 45: Utilisation Du Cuiseur-Vapeur
UTILISATION DU CUISEUR-VAPEUR CONSEILS POUR OBTENIR DE Couvercle du cuiseur-vapeur BONS RÉSULTATS Plateau Des pièces de taille semblable cuiront de perforé du façon plus uniforme. cuiseur-vapeur Différents aliments, comme du poisson Bac à eau du et des légumes, peuvent être préparés cuiseur-vapeur en même temps sans mélanger les parfums. - Page 46 UTILISATION DU CUISEUR-VAPEUR NETTOYAGE Pour éviter les dommages, ne pas utiliser la fonction d’autonettoyage du four pour le cuiseur-vapeur. AVERTISSEMENT Le cuiseur-vapeur peut être lavé au lave-vaisselle. Pour le nettoyage à la main, utiliser de l’eau savonneuse et un chiffon doux ou une éponge. Risque de choc électrique Ne pas plonger l’élément chauffant dans l’eau ou le placer au lave-vaisselle.
-
Page 47: Dépannage
DÉPANNAGE Essayez d’abord les solutions suggérées ici. Pour obtenir de l’aide ou des recommandations supplémentaires pour éviter un appel de service, visiter le http://producthelp.kitchenaid.com. Au Canada, visiter le http://www.kitchenaid.ca. Il est possible d’adresser ses commentaires ou questions par courrier à l’adresse ci-dessous : Aux États-Unis :... - Page 48 DÉPANNAGE INFORMATIONS GÉNÉRALES 5. Le four produit de la fumée – Il est temps 7. De la fumée/vapeur s’échappant du four modifie l’interface utilisateur (IU) – Si de d’effectuer un autonettoyage si le four commence à produire de la fumée pendant la vapeur s’échappant du four affecte l’IU, la cuisson.
-
Page 49: Garantie
SI CE PRODUIT NE FONCTIONNE PAS COMME GARANTI, LE SEUL ET UNIQUE RECOURS DU CLIENT CONSISTE À EN OBTENIR LA RÉPARATION OU LE REMPLACEMENT CONFORMÉMENT AUX TERMES DE LA PRÉSENTE GARANTIE LIMITÉE. KITCHENAID ET KITCHENAID CANADA DÉCLINENT TOUTE RESPONSABILITÉ AU TITRE DES DOMMAGES FORTUITS OU INDIRECTS. Cette garantie vous confère des droits juridiques spécifiques et vous pouvez également jouir d’autres droits qui peuvent... - Page 50 à la clientèle au 1 800 541-6390, du nos produits satisfait aux normes exigeantes de KitchenAid que si les accessoires électriques cessent lundi au vendredi. Veuillez avoir l’original de votre de fonctionner au cours de la première année suivant reçu de vente à...
- Page 51 Aux États-Unis et à Porto Rico : En dehors des États-Unis et de Porto Rico : Pour des informations sur le service de dépannage Consulter le revendeur KitchenAid local ou ou pour commander des accessoires ou des pièces le détaillant auprès duquel les accessoires de rechange, composer le numéro sans frais...
- Page 52 /™ ©2018 KitchenAid. All rights reserved. Used under license in Canada. ® W11095988B Tous droits réservés. Utilisé sous licence au Canada. 07/18...
Need help?
Do you have a question about the SMART OVEN+ and is the answer not in the manual?
Questions and answers