Table of Contents
Advertisement
Quick Links
02/23/2012
Ins-30168-US Net2 PaxLock
Technical Support
1.800.672.7298
Technical help is available:
Documentation on all Paxton products can be found on our web site - http://www.paxton-access.com/
Parts list
1
Tools List
Power Drill
Drill bits
Philips screwdriver
2
4
3
5
/
",
/
"
8
8
supportUS@paxton-access.com
Monday - Friday from 02:00 AM - 8:00 PM (EST)
This wireless unit requires a Net2Air bridge
to communicate with the server PC.
Net2Air Site Surveyor (690-200-US).
This access control unit uses wireless
communication. It is recommended that a
Net2Air site surveyor is used to determine the
best position for the bridge and control units.
This unit requires Net2 v4.23 or later software.
Call Technical Support if you require advice.
3
5
6
7
9
8
Small flat blade terminal screwdriver
Pencil
4mm Allen key (supplied)
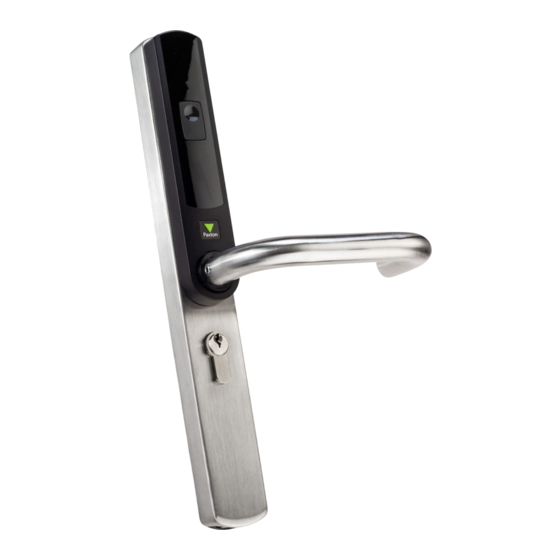
1) Front Lock Assembly
2) Rear Lock Assembly
3) Door Handle x 2
1
4) Mounting screw (1
5) Mounting screw ( 1
6) Mounting screw ( 1
7) 8 mm Spindle
8) AA battery x 4
9) 4 mm Allen Key
Paxton
/
") x 2
4
1
/
") x 2
2
3
/
" ) x 2
4
PAGE 1
Advertisement
Table of Contents

Subscribe to Our Youtube Channel
Related Manuals for Paxton Net2 PaxLock


Summary of Contents for Paxton Net2 PaxLock
-
Page 1: Technical Support
Technical help is available: Monday - Friday from 02:00 AM - 8:00 PM (EST) Documentation on all Paxton products can be found on our web site - http://www.paxton-access.com/ This wireless unit requires a Net2Air bridge to communicate with the server PC. -
Page 2: Installing The Hardware
Installing the hardware Step 1 - Marking out The lock (not supplied) must first be fitted to the door. Ø 16 Slide the spindle through the lock to allow the template Ø 10 to locate over it. Ensure that the template is square to the door edge by using the top and bottom ruler scales. -
Page 3: Step 8 - Fitting The Batteries
Step 5 - Mounting on the door Present the front lock assembly to the door passing the wiring harness through the " hole. Present the rear lock assembly to the door and join the two parts together with the two mounting screws. Mounting screws are provided in three lengths. -
Page 4: Step 10 - Fitting The Handles
The Net2 software should be loaded on the controlling PC with at least one Net2Air bridge installed. Full documentation is supplied with the Net2Air bridge unit and also from the website as follows: XAN1051 - Installing Net2 software < http://paxton.info/1520 >... -
Page 5: Software Configuration
The unit is configuring - Please wait. Net2Air wireless communication The access control unit connects to the Net2 software running on the PC using Paxton Net2Air proprietary wireless technology. A Net2Air bridge enables communication from the Net2 software to the Paxton wireless products. -
Page 6: Sleep Mode
Sleep mode The PaxLock is a standalone unit and stays asleep while there is no user activity. The Net2 server cannot wake up the unit. If the PIR is activated or the front button is pressed, it powers up the reader circuits in readiness for a token read. -
Page 7: Fcc Compliance
Total outside dimensions (includes handle clearance) The declaration of conformity is available on request. Contact details are provided at: http://paxton.info/596 This product is not suitable for retail sale. All warranties are invalid if this product is not installed by a trained technician.
Need help?
Do you have a question about the Net2 PaxLock and is the answer not in the manual?
Questions and answers