
Related Manuals for Tsurumi Pump EPT3 Series


Summary of Contents for Tsurumi Pump EPT3 Series
- Page 1 OPERATION, SERVICE, AND REPAIR MANUAL FOR TSURUMI EPT3-SERIES TRASH PUMPS MODELS EPT3-50HA EPT3-80HA EPT3-100HA...
- Page 2 TSURUMI MANUFACTURING CO., LTD. (“TSURUMI”) warrants to the original end purchaser during the warranty period, every new TSURUMI pump or product to be free from defects in material and workmanship under normal use and service, when properly installed, used, and maintained (in accor- dance with Tsurumi’s Operation, Service, and Repair Manual) for a period of two years from the date...
-
Page 3: Table Of Contents
TABLE OF CONTENTS Section/Title Page Introduction ............1-1. -
Page 5: Introduction
Tsurumi’s Operation, Service, and Repair Manual INTRODUCTION 1-1 Using Your Tsurumi Operation, Repair and Service Manual We thank you for purchasing a Tsurumi trash pump. We are sure that the trash pump you have select- ed will meet your portable pumping needs. This manual applies to the Tsurumi trash pumps listed below. -
Page 6: Safety Precautions
Tsurumi’s Operation, Service, and Repair Manual 1-3 Safety Precautions WARNING: • IN ORDER TO ASSURE SAFE AND EFFICIENT OPERATION OF THE TRASH PUMP, OPERA- TOR’S SHOULD READ AND COMPLY WITH THE FOLLOWING SAFETY PRECAUTIONS. • Do not operate the trash pump near gasoline or gaseous fuels because of the potential dan- ger from explosion or fire. -
Page 7: Specifications / Key Features
Tsurumi’s Operation, Service, and Repair Manual 1-4 Specifications / Key Features • Heavy-duty Honda Engine— proven reliability—quiet operation—efficient fuel consumption • Oil Level Sensor—prevents engine operation when oil level is low • New Design Clean Out Cover— cover removes quickly for clean-out without the need to remove the suction hose •... - Page 8 Tsurumi’s Operation, Service, and Repair Manual INDIVIDUAL MODEL EPT3-50HA PERFORMANCE MODEL EPT3-50HA QUANTITY(g.p.m.) INDIVIDUAL MODEL EPT3-80HA PERFORMANCE MODEL EPT3-80HA QUANTITY(g.p.m.) INDIVIDUAL PERFORMANCE MODEL EPT3-100HA MODEL EPT3-100HA QUANTITY(g.p.m.) Page 4 Introduction...
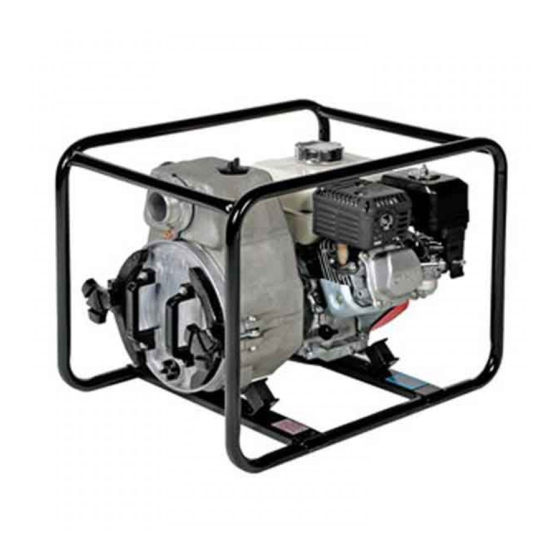
- Page 9 Tsurumi’s Operation, Service, and Repair Manual Engine Air Priming Filter Plug Discharge Engine Fitting Muffler Suction Fitting Vibration Isolation Mounts Casing Cover Clamping Knobs PUMP END Fuel Tank Tubular Frame Honda Engine Recoil Starter Engine Controls ENGINE END Figure 1: Key Features of the Trash Pump Introduction Page 5...
-
Page 10: Operating Instructions
Tsurumi’s Operation, Service, and Repair Manual OPERATING INSTRUCTIONS 2-1 Operating Controls The trash pump operating controls are located on the engine. The controls consist of a throttle lever (for speed control), choke lever (for cold weather starting), fuel shutoff lever (to prevent fuel spills), and a recoil starter (to turnover engine by hand). - Page 11 Tsurumi’s Operation, Service, and Repair Manual Figure 2-2: Oil Viscosity Grade-to-Temperature Recommendations When checking oil, observe the following (refer to Figure 2-3): (Make sure the engine is in a level position.) Remove the oil filler cap/dipstick and wipe it clean. Insert the filler cap/dipstick into the oil filler neck, but do not screw it in.
-
Page 12: Check Engine Fuel
Tsurumi’s Operation, Service, and Repair Manual 2-3 Check Engine Fuel WARNING • MAKE SURE YOU REVIEW EACH WARNING IN ORDER TO PREVENT FIRE HAZARD. • DO NOT REFILL TANK WHILE ENGINE IS RUNNING OR HOT. • CLOSE FUEL SHUT OFF VALVE BEFORE REFUELING WITH FUEL. •... -
Page 13: Pre-Start Checks
Tsurumi’s Operation, Service, and Repair Manual 2-5 Pre-Start Checks WARNING: • MAKE SURE YOU REVIEW EACH WARNING IN ORDER TO PREVENT FIRE HAZARD. • KEEP AREA CLEAR OF FLAMMABLES OR OTHER HAZARDOUS MATERIALS. Check the following items before starting the engine. Fuel leakage from (fuel hose, sediment cup, etc.). -
Page 14: Using The Trash Pump
Tsurumi’s Operation, Service, and Repair Manual NOTE: • The choke may not be needed if the engine is warm or the air temperature is high. Set the ON/OFF switch to ON (the ON/OFF switch is mounted on the recoil shroud). Move the throttle lever slightly to the left. -
Page 15: Troubleshooting
Tsurumi’s Operation, Service, and Repair Manual TROUBLESHOOTING The troubleshooting tables below can be used as a guide to isolate trash pump faults. Refer to these tables when the engine fails to start after several attempts. If, after following these procedures, the pump fails to start, contact the nearest Tsurumi generator dealer. -
Page 16: Maintenance
Tsurumi’s Operation, Service, and Repair Manual MAINTENANCE 4-1 Maintenance Schedule To maintain the trash pump in peak operating condition, observe and implement the maintenance and adjustment schedule in Table 4-1. Inspect and/or service the trash pump at the intervals shown in Table 4-1. -
Page 17: Changing Engine Oil
Tsurumi’s Operation, Service, and Repair Manual 4-2 Changing Engine Oil An initial oil change should be performed after the first twenty- (20) hours of use. Thereafter, change oil every 100 hours. Before changing the oil, check for a suitable way to dispose of the used oil. Do not pour it down sewer drains, onto garden soil or into open streams. -
Page 18: Air Cleaner Service
Tsurumi’s Operation, Service, and Repair Manual 4-3 Air Cleaner Service WARNING • Never use gasoline or low flash point solvents for cleaning the air cleaner element. A fire or explosion could result. A dirty air cleaner will restrict airflow to the carburetor. To prevent degraded engine operation, service the air cleaner regularly. -
Page 19: Trash Pump Exploded Views
Tsurumi’s Operation, Service, and Repair Manual Measure the plug gap with a feeler gauge. Adjust the gap as necessary by bending the side electrode (refer to Figure 4-3). The gap should be 0.7 - 0.8 mm (0.028 - 0.031 inch) as shown. 4-6 Trash Pump Exploded Views Exploded views of the trash pump components are provided in the MAINTENANCE sec- tion for parts identification purposes. - Page 20 Tsurumi’s Operation, Service, and Repair Manual (3) Impeller (4) Inner Casing (15) O-Ring (1) Casing (2) Casing (5) Liner Cover (23) Holder (10/11) Plug (24) Knob and O-Ring (16) O-Ring Figure 4-4: Exploded View of Internal Components View A: Remove casing cover View B: If liner is damaged, View C: Remove 3 screws to gain access to impeller —...
- Page 21 Tsurumi’s Operation, Service, and Repair Manual Loosen two casing holder knobs (24). Pivot the casing holders (23) to the side and away from the casing cover (2). Pull casing cover (2) out of pump casing (1). NOTE: • When you first attempt to remove the casing cover (2), you may feel resistance caused by O-ring drag.
- Page 22 Tsurumi’s Operation, Service, and Repair Manual NOTE: • Refer to View D for an illustration depicting the mating ring. Lubricate mating ring and cushion with water. Make the measurements that need to be taken for calculating the thickness of shaft- mounted shims.
- Page 23 Tsurumi’s Operation, Service, and Repair Manual (1) CASING (4) VOLUTE CASING (6) MECHANICAL SEAL (5) WEAR PLATE (3) IMPELLER (41) IMPELLER SHIM (6-3) MECHANICAL SEAL -FIXED ELEMENT (1) CASING (3) IMPELLER (6-2) MATING (6-1) RUBBER RING-ROTATING CUSHION ELEMENT REMOVED VIEW Figure 4-5: Shimming Of Mechanical Seal Maintenance Page 19...
-
Page 24: Replacing Of Check Valve
Tsurumi’s Operation, Service, and Repair Manual Model Number Shim Thickness OD x ID Part Number EPT3-50HA 0.3 mm (0.012 Inch) 20 x 18 mm 801-037 0.6 mm (0.024 Inch) (0.787 x 0.709 inch) 801-038 EPT3-80HA 0.3 mm (0.012 Inch) 24.2 x 20.0 mm 1001-043 0.6 mm (0.024 Inch) (0.952 x 0.787 inch) - Page 25 Tsurumi’s Operation, Service, and Repair Manual (13) Priming Plug and (12) O-Ring (14) Check Valve (7) Case (1) Casing (21) Rivet (17) Bolt (11) Plug and (23) Holder (10) O-Ring (24) Knob (20) Pin (22) Bolt Special Orientation: Make sure tab on check valve is at zero degrees (at top).
-
Page 26: Storage Instructions
Tsurumi’s Operation, Service, and Repair Manual STORAGE 5-1. Procedures for Storing Pump WARNING • To avoid severe burns or fire hazards, let the engine cool before transporting it or storing it indoors. • When transporting the pump, turn the fuel shutoff valve to the OFF position and keep the engine level to prevent fuel spillage. -
Page 27: Replacement Parts
Tsurumi’s Operation, Service, and Repair Manual REPLACEMENT PARTS 6-1 Introduction This section provides exploded view illustrations that show the replacement parts for Tsurumi Trash Pumps, Models EPT3-50HA, EPT3-80HA, and EPT3-100HA. Also provided are parts listings that pro- vide part number, description, and quantity. The item numbers shown on the illustrations correspond with the item numbers in the facing parts listing. - Page 28 Tsurumi’s Operation, Service, and Repair Manual Exploded View - Model EPT3-50HA Trash Pump Page 24 Replacement Parts...
- Page 29 Tsurumi’s Operation, Service, and Repair Manual Parts Listing- Model ETP3-50HA Trash Pump Ref. Part Ref. Part Number Description Number Description 200 201 140 Casing (STH-50) 203 000 650 Bolt, Hex Socket (M8 X 20 SUS) 200 201 240 Cover, Casing 203 100 130 Washer, Spring (Tsurumi Logo)
- Page 30 Tsurumi’s Operation, Service, and Repair Manual Exploded View - Model ETP3-80HA Trash Pump Page 26 Replacement Parts...
- Page 31 Tsurumi’s Operation, Service, and Repair Manual Parts Listing- Model ETP3-80HA Trash Pump Ref. Part Ref. Part Number Description Number Description 200 201 150 Casing (STH-80) 203 100 130 Washer, Spring (M8 SUS) 200 201 250 Cover, Casing 200 500 230 Handle, Drain (Tsurumi Logo) Cover...
- Page 32 Tsurumi’s Operation, Service, and Repair Manual Exploded View - Model ETP3-100HA Trash Pump Page 28 Replacement Parts...
- Page 33 Tsurumi’s Operation, Service, and Repair Manual Exploded View - Model EPT3-100HA Trash Pump Ref. Part Ref. Part Number Description Number Description 142-163-18 200 201 160 Casing (STH-100) Washer, Spring (M8 SUS) 200 201 250 Cover, Casing 200 500 230 Handle, Drain (Tsurumi Logo) Cover 200 210 500...
- Page 34 WHEEL KIT PGWK-200 FITS TSURUMI PUMPS & GENERATORS Installation Instructions Product Features Safety Guidelines Operate the pump or DANGER generator on a level I DESIGNED FOR LIFELONG This manual contains information that is surface to prevent fuel spills. DURABILITY very important to know and understand. Before installation, I STATE-OF-THE-ART ADJUSTABLE...
- Page 35 5. Once axle assembly (Ref. No. 1 and 2) STEP 1 - AXEL AND WHEEL INSTALLATION is in place, secure width adjustment by 1. Elevate pump or generator with a block tightening bolt (Ref. No. 12) and nut to allow enough clearance to assemble (Ref.
Need help?
Do you have a question about the EPT3 Series and is the answer not in the manual?
Questions and answers