Table of Contents

Related Manuals for Alfa Laval Rotacheck


Summary of Contents for Alfa Laval Rotacheck
- Page 1 Instruction Manual Alfa Laval Rotacheck+ & Rotacheck Basic Covering: Standard Machines Machines delivered with ATEX Certification in accordance with Directive 2014/34/EU TE91A664 First published: 2012-09 ESE02219-EN5 2017-06 Original manual...
-
Page 3: Table Of Contents
4.7. Connect electrical cable - step 2 ..............4.8. Digital version - PNP ................4.9. Calibrate - step 3 - Rotacheck Basic ............4.10. Calibrate - step 3 – Rotacheck+ (with TEACH) ..........4.11. Recycling information ................5. Troubleshooting .................. -
Page 4: Ec/Eu Declaration Of Conformity
Albuen 31, DK-6000 Kolding, Denmark Address +45 79 32 22 00 Phone No. hereby declare that Rotacheck+ & Rotacheck Basic Designation Unit for rotation validation of tank cleaning machines Type is in conformity with the following directives with amendments: Low Voltage Directive (LVD) 2006/96/EF Directive 2006/95/EC on low voltage... -
Page 5: Safety
Indicates that special procedures must be followed to avoid serious personal injury. CAUTION Indicates that special procedures must be followed to avoid damage to the Rotacheck + or the Rotacheck Basic. NOTE Indicates important information to simplify or clarify procedures. -
Page 6: Safety Precautions
Always place the protective cap on the Rotacheck again immediately after disassembly. Always make sure that all connections are disconnected before attempting to remove the Rotacheck from the installation. Always ensure adequate fixing of the Rotacheck during transportation – if specially designed packaging material is... -
Page 7: Introduction
3.1 Introduction This manual has been prepared as a guide for installing, operating and maintaining your Alfa Laval Rotacheck Basic and Ro- tacheck+. Should you require further assistance, our Technical Sales Support department and worldwide net of sales offices are pleased to help you. -
Page 8: Patents And Trademarks
Alfa Laval, Kolding A/S. All rights reserved. The Rotacheck product has patents in the EPO member states and in other countries. The Alfa Laval logotype is a trademark or a registered trademark of Alfa Laval Corporate AB. Other products or company names mentioned herein may be the... -
Page 9: Atex Marking
Changes to the Alfa Laval Rotacheck+ and Rotacheck Basic are not allowed without approval by the person responsible for the ATEX certification at Alfa Laval Kolding A/S. If changes are made – or spare parts other than Alfa Laval original spare parts are used - the EC Type Examination certification (the ATEX Directive) is no longer valid. -
Page 10: Installation
Rotacheck Basic The Rotacheck Basic registers when the sensor head is hit by the cleaning jet. Status is shown by digital PLC output as well as a visual light indication. The system feedback has 3 different outputs. -
Page 11: Specific Conditions For Safe Use In Accordance With Atex Certification
4 Installation 4.2 Specific Conditions for Safe Use in Accordance with ATEX Certification Directive 2014/34/EU Warning: Surface temperature The surface temperature must not exceed 140°C. Warning: Use in explosive atmosphere The device may be used in an explosive atmosphere, the apparatus of category 1 requires only operate if there are atmospheric conditions (temperature of -20°C to +60°C, pressure of 0.8 bar to 1.1 bar). -
Page 12: Mounting Position Of Hygienic Tank Connection
Deviations from the above given positions may work, but will influence the signal quality. It is not recommended to go closer to the centerline, as there is a risk of having no signal. If the Rotacheck Sensor is placed further away from the centerline, the number of times it is directly hit by a jet is reduced. -
Page 13: Overview Of Installation Instructions
4 Installation 4.4 Overview of installation instructions Step 1 Mount Rotacheck on tank 4512-0010 Step 2 Connect electrical cable 4512-0011 Step 3 Calibrate. 4512-0012... -
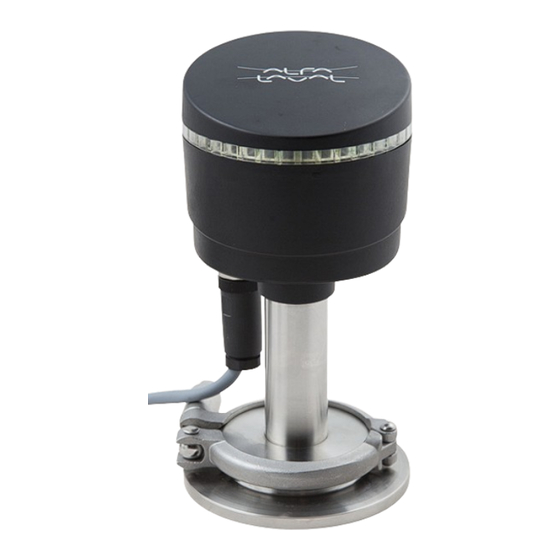
Page 14: Product Dimensions
4 Installation 4.5 Product dimensions ø96 4512-0013 ø69 Weight: 0.6 kg... -
Page 15: Mounting Rotacheck On Tank - Step 1
4 Installation 4.6 Mounting Rotacheck on tank – step 1 Step 1 Remove protective cap from sensor. Check that o-ring on sensor head is in place. Step 2 Mount Rotacheck on flange. Step 3 Tighten clamp ring. 4512-0014... -
Page 16: Connect Electrical Cable - Step 2
4 Installation 4.7 Connect electrical cable - step 2 WARNING Special considerations for use in hazardous areas For the installation, maintenance and cleaning of the device, you must absolutely observe the relevant regulations and stipulations on explosion protection (EN 60079-14 and EN60079-17) as well as the occupational safety provisions. The device is designed acc. - Page 17 Step 3 Connect wires to board according to illustration number 4512-0018 on page 18. 4512-0017 M12 plug version Step 1 Connect the electrical M12 plug to the connector on Rotacheck. Tighten the knurled nut. See wiring diagram on page 18.
-
Page 18: Digital Version - Pnp
Feedback Hit/Rotation OK Alarm Activate teach (Rotacheck+ only) 4512-0018 M12 connector Designation Supply 24 VDC Supply 0 VDC Feedback Idle Feedback Hit/Rotation OK Alarm Activate teach (Rotacheck+ only) 4512-0019 View from mounting side Alfa Laval part number 9611995257 (not part of delivery) -
Page 19: Calibrate - Step 3 - Rotacheck Basic
4 Installation 4.9 Calibrate - step 3 - Rotacheck Basic Step 1 The Rotacheck Basic must be fully installed: - Mechanically - Electrically The unit will flash green on power up and perform an internal calibration after 5 sec. The unit is ready to use when the green LED lights steadily. -
Page 20: Calibrate - Step 3 - Rotacheck+ (With Teach)
- A red LED is flashing to indicate TEACH ongoing - Let the cleaning process run for at least 16 minutes (the Rotacheck+ will teach-in cleaning pattern during this time) - Every sensor hit during TEACH is indicated by a yellow LED flash - Rotacheck+ will light up green when teach-in is finished The TEACH sequence is terminated if no sensor hits are registered within a 4 min. - Page 21 - If parameters are within the calibrated values, a “Rotation OK” feedback is initiated - If parameters are outside the calibrated values, the alarm function is entered. NOTE If it – due to special circumstances - proves too difficult to make a proper calibration, Rotacheck+ can be reset to “1 power up mode”.
- Page 22 Feedback test mode is a function that can be enabled after installation to validate proper function of the external wiring. When the mode is entered, Rotacheck+ automatically switches PLC and LED outputs in 5 seconds intervals. Enter Feedback test mode: Press the blue button on the sensor board and release after 5 seconds when 2 Yellow LED flashes are seen.
-
Page 23: Recycling Information
If the diaphragm is calcified, it is recommended to send the device to Alfa Laval Tank Equipment for decalcification. Please note the chapter “Service/Repair” page 31. -
Page 24: Troubleshooting
- If problem persists, please contact Alfa Laval. 5.2 Red light Constant red LED light is an indication of an alarm condition. Such condition can be “Rotation not OK” (Rotacheck+), or if there is a constant jet impact on the sensor (Rotacheck Basic, Rotacheck+). -
Page 25: Technical Data
Surges immunity EN 61000-4-5 Special conditions for use in hazardous areas Rotacheck is approved in accordance with ATEX directive 94/9/EC, for use in Zone 0/20 in the product wetted area and Zone 2/22 in the non-product wetted area. Ex identification: II 1/3G Ex ia/nA IIB T4/T3 Ga/Gc II 1/3D Ex ia/tc IIIB T130 °C Da/Dc... -
Page 26: Parts Lists And Drawing
7 Parts Lists and Drawing 7.1 Parts drawing and list Parts Drawing 4512-0009... - Page 27 7 Parts Lists and Drawing Parts list Pos. Denomination Top cover/prism and o-ring assembly Top cover/prism assembly O-ring for top cover Sensor unit with o-ring Sensor unit O-ring O-ring (Q-doc version) O-ring set (10 pcs.) EPDM □ Configuration according to delivery note/order.
-
Page 28: Optional Parts
7 Parts Lists and Drawing 7.2 Optional parts Optional Parts Drawing 4512-0022... - Page 29 7 Parts Lists and Drawing Parts list Pos. Denomination Clamp ring M12 connector Tank flange, Hygienic tank connection HTC Tank flange, Hygienic tank connection HTC (Q-doc version) Blind cap with o-ring Blind cap with o-ring (Q-doc version) □...
-
Page 30: Short Functional Guide
Initial calibration Green Idle On/off (95/5%) First power-up (Rotacheck+ before Teach) Green Yellow LED flash (1s) Sensor hit (Rotacheck basic or Rotacheck+ before Teach) Yellow On/off (50/50%) Operation In window (Rotacheck+) Yellow Sensor hit during operation In window (Rotacheck+) Yellow... -
Page 31: General Information
9 General Information 9.1 Service & Repair Upon every return of a product, no matter if for modifications or repair, it is necessary to contact your local Alfa Laval office to guarantee a quick execution of your request. You will receive instructions regarding the return procedure from your local Alfa Laval office. Be sure to follow the instructions closely. - Page 32 © Alfa Laval Corporate AB This document and its contents is owned by Alfa Laval Corporate AB and protected by laws governing intellectual property and thereto related rights. It is the responsibility of the user of this document to comply with all applicable intellectual property laws. Without limiting any rights related to this document, no part of this document may be copied, reproduced or transmitted in any form or by any means (electronic, mechanical, photocopying, recording, or otherwise), or for any purpose, without the expressed permission of Alfa Laval Corporate AB.
Need help?
Do you have a question about the Rotacheck and is the answer not in the manual?
Questions and answers