Advertisement
Quick Links
Advertisement

Related Manuals for Fein Optic Mi50


Summary of Contents for Fein Optic Mi50
- Page 1 Mi50 Inverted Microscope User’s Manual Fein info@feinoptic.com...
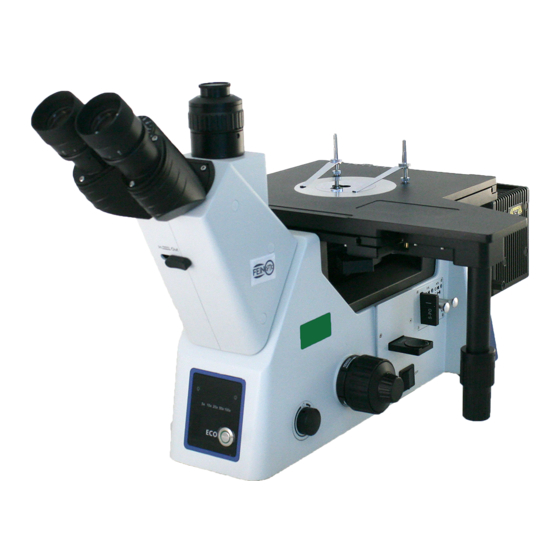
- Page 2 Mi50 Microscope Components Siedentopf Mechanical Trinocular Head Locking Stage Stage Plate Screw Hex Wrench Storage Beam Splitter Dust Protector ECO Energy Saving Color Button Filter Slider Light Rheostat Aperture Diaphragm Tension Fine Base Coarse Adjustment On/Off Switch Field Focus Focus...
- Page 3 Mi50 Microscope Components Objective Lens Quintuple Brightfield / Nosepiece Darkfield Lever Analyzer Polarizer Fein...
- Page 4 Mi50 Inverted Microscope Assembly 1. Install the bulb into the lamp housing. 2. Connect the lamp housing to the microscope frame. 3. Connect the nosepiece to the frame. 4. Screw the objective lenses onto the nosepiece. 5. Insert the stage plate.
- Page 5 Mi50 Inverted Microscope Operation Instructions Do not shake or drop the microscope. Do not expose the microscope to direct sun, high temperatures, high humidity, dust, or damp environments. Use a flat work surface. When moving the microscope use both hands, holding the handle at the back (1) and the frame at the front (2) as shown in the image at right.
- Page 6 Mi50 Inverted Microscope Bulb Replacement Power off and unplug the microscope. Loosen the set screw (1) and remove the lamp housing. Open the bulb locking mechanism (2) and holding the bulb (3) with a soft tissue, insert the bulb pins (4) into the bulb holder (5).
- Page 7 Mi50 Inverted Microscope Operation Instructions ASSEMBLE THE NOSEPIECE: Rotate the coarse focus knob (1) until the focusing slider is raised to the position where the locking screw (1 below) can be rotated with a screw driver. Loosen the lock screw on the focusing slider.
- Page 8 Mi50 Inverted Microscope Operation Instructions Insert the metal stage plate (1) into the hole in the top of the stage. Turn the stage plate so that “V” groove (2) is closest to the eyepieces. This makes it easier to view the objective lenses.
- Page 9 Mi50 Inverted Microscope Operation Instructions Install the color filter slider (1) by unscrewing and removing one of the handles on the slider (2). Insert the filter slider into the slot (3) on the illuminator connector. When the slider clicks into place it is aligned in one of the proper operating positions.
- Page 10 Mi50 Inverted Microscope Operation Instructions Plug in the power cord and turn the microscope on (1). Adjust the rheostat knob (2) until the illumination is comfortable for observation. Rotate clockwise to increase brightness, which in turn will increase the brightness readout (3).
-
Page 11: Interpupillary Distance
Mi50 Inverted Microscope Operation Instructions DIOPTER: Align the scale on the diopter ring (1) to “0” with the scale on the eyepiece (2) and focus the image so it is clear. While looking through the other eyepiece, if the image is unclear rotate the diopter ring of that eyepiece until the image is clear. -
Page 12: Field Diaphragm
Mi50 Inverted Microscope Operation Instructions COLOR FILTERS: The color filter can strengthen image contrast. Pull the color filter slider (1) to the left or right and insert the filter (2) into the slot, then slide the slider into the light path. There are 4 types of filter options: blue, green, yellow, and LBD. -
Page 13: Aperture Diaphragm
Mi50 Inverted Microscope Operation Instructions APERTURE DIAPHRAGM: The aperture diaphragm decides the numerical aperture (N.A.) of the illumination system. If the N.A. of the illumination system matches the N.A. of the objective, the depth of field is increased and resolution and contrast are improved. - Page 14 Mi50 Inverted Microscope Operation Instructions Polarization uses a polarizer and analzyer. Remove the dust cover (1) and insert the polarizer (2) as shown. The polarizer will click into place. Remove the color filter when using the polarizer. Remove the dust cover (3) from the analyzer socket and insert the 360°...
- Page 15 Mi50 Inverted Microscope Trouble Shooting TROUBLE POSSIBLE CAUSE SOLUTION Field diaphragm is not open enough. Adjust field diaphragm. Bulb is on but field Rheostat is too low. Adjust rheostat control. of view is dark. Polarizer & analyzer are being used.
- Page 16 Mi50 Inverted Microscope Trouble Shooting TROUBLE POSSIBLE CAUSE SOLUTION No power supply. Check power cord, plug in. Bulb does not Bulb is not installed properly. Install bulb correctly. work. Bulb burned out. Replace bulb. Bulb burns out Replace bulb with 12v, Incorrect bulb is being used.
Need help?
Do you have a question about the Mi50 and is the answer not in the manual?
Questions and answers