Table of Contents
Advertisement
THE PERFECT BALANCE OF FUNCTION AND STYLE
LAUNDRY - DISHWASHING - COOKING - COOLING
Installation and Operating Instructions
Integrated Fridge Freezer
MIFF7301F - Frost Free - 70/30 Split
Please read these instructions carefully before attempting to install or use this appliance.
We recommend that you keep these instructions in a safe place for future reference.
Advertisement
Table of Contents

Subscribe to Our Youtube Channel
Related Manuals for montpellier MIFF7301F


Summary of Contents for montpellier MIFF7301F
- Page 1 Installation and Operating Instructions Integrated Fridge Freezer MIFF7301F - Frost Free - 70/30 Split Please read these instructions carefully before attempting to install or use this appliance. We recommend that you keep these instructions in a safe place for future reference.
- Page 2 Montpellier Service. such as a Sales Receipt, showing that the appliance was purchased within the 24 months prior to the • Repairs carried out by a non-approved Montpellier date of claim. Service engineer. What is not covered under the Guarantee: YOUR GUARANTEE IS VALID ONLY IN THE UK &...
- Page 3 • Children should be supervised to ensure that they do not play with the appliance. Built in Frost Free Fridge Freezer PERFORMANCE MIFF7301F Energy ef Energy consumption - Kwh/year Net storage - vol fresh food ltrs (cu.ft.) 193 (6.8) Net storage - vol frozen food ltrs (cu.ft.) 69 (2.4)
-
Page 4: Table Of Contents
CONTENTS PAGE SAFETY FIRST / ELECTRICAL REQUIREMENTS TRANSPORTATION INSTRUCTIONS IMPORTANT INSTALLATION INSTRUCTIONS GETTING TO KNOW YOUR FRIDGE / FREEZER SUGGESTED ARRANGEMENT OF FOOD IN THE FRIDGE / FREEZER TEMPERATURE CONTROL AND ADJUSTMENT STARTING STORING FROZEN FOOD FREEZING FRESH FOOD MAKING ICE CUBES DEFROSTING CLEANING AND CARE REPLACING THE INTERIOR LIGHT BULB... -
Page 5: Safety First / Electrical Requirements
ELECTRICAL REQUIREMENTS Before you insert the plug into the wall socket make sure that the voltage and the frequency shown in the rating plate inside the appliance corresponds to your electricity supply. Rating label is on the left hand side of fridge inner liner. We recommend that this appliance be connected to the mains supply via a suitable switched and fused socket. -
Page 6: Transportation Instructions
TRANSPORTATION INSTRUCTIONS 1. The appliance should be transported only in a vertical upright position. The packing as supplied must be intact during transportation. 2. If during the course of transport the appliance has to be transported horizontally, it must only be laid on its left hand side when standing in the front of the appliance. -
Page 7: Important Installation Instructions
IMPORTANT INSTALLATION INSTRUCTIONS The space in the room where the appliance is installed must not be smaller than 10 cubic metres. 2. See pages 13 to 23 for detailed Installation Instructions including reversing door opening direction. 3. This appliance has been designed to operate in ambient temperatures up to 38 degrees C (100 degrees F) and is equipped with Freezer Guard technology which ensures that even if the ambient temperature falls to -15 °C, frozen food in the freezer does not thaw thanks to this. -
Page 8: Getting To Know Your Fridge / Freezer
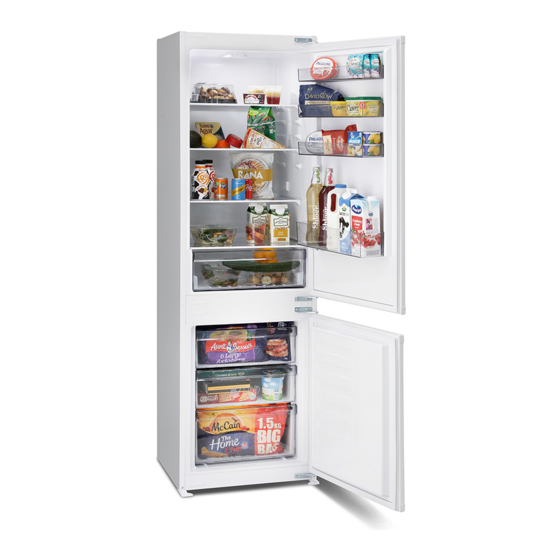
GETTING TO KNOW YOUR COMBI FROST FREE FRIDGE/FREEZER DOOR SHELF TEMPERATURE SETTING KNOB EGG TR AY INTERIOR LIGHT (Audible Alarm where applicable) DOOR SHELF CABINET SHELVES DEFROST WATER BOTTLE COLLECTION SHELF CHANNEL SALAD CRISPER FREEZER FAN FAST FREEZE COMPARTMENT FROZEN FOOD STORAGE DRAWERS Figures in this user manual are schematic and may not match the product exactly. -
Page 9: Suggested Arrangement Of Food In The Fridge/Freezer
SUGGESTED ARRANGEMENT OF FOOD IN THE FRIDGE/FREEZER Arrangement Examples (See diagram) 1. Baked, chilled cooked food, dairy products, cans. 2. Meat, sausages, cold cuts. Fruit, vegetables, salads. Frozen food and freezing of fresh food. 5. Frozen food. 6. Butter, cheese. 7. -
Page 10: Temperature Control And Adjustment
TEMPERATURE CONTROL AND ADJUSTMENT Operating temperatures are controlled by the thermostat knob (see diagram) located on the ceiling of fridge compartment. Settings may be made from 1 to 5, 5 being the coldest position. When the appliance is switched on for the first time, the thermostat should be adjusted so that after 24 hours, the average fridge temperature is no higher than +5°C (+41°F). -
Page 11: Starting
STARTING Final Check Before you start using the fridge/freezer check that: 1. The interior is dry and air can circulate freely at the rear of the cabinet. 2. Clean the interior as recommended under "CLEANING AND CARE." 3. Insert the plug into the wall socket and switch on the electricity supply. •... -
Page 12: Defrosting
DEFROSTING A) FRIDGE COMPARTMENT The fridge compartment defrosts Defrosted automatically. The defrosting water runs Water to the drain tube via a collection Drain Tube Collection container at the back of the appliance (1). (see diagram) During defrosting water droplets may form at the back of the fridge compartment where concealed evaporator is located. -
Page 13: Cleaning And Care
CLEANING AND CARE ** We recommend that you switch off the appliance at the socket outlet and pull out the mains plug before cleaning. ** Never use any sharp abrasive instrument, soap, household cleaner, detergent and wax polish for cleaning. ** Use luke warm water to clean the cabinet of the appliance and wipe it dry. -
Page 14: Do's And Don'ts
DO'S AND DON'TS Clean and defrost your appliance regularly (See "Defrosting") Keep raw meat and poultry below cooked food and dairy products. Do- Take off any unusable leaves on vegetables and wipe off any soil. Leave lettuce, cabbage, parsley and cauliflower on the stem. Do- Wrap cheese firstly in greaseproof paper and then in a polythene bag excluding as much air as possible. -
Page 15: Installation Instructions Detailed Step By Step
INSTALLATION INSTRUCTIONS DETAILED STEP BY STEP No wooden back wall Adjusting the legs (*optional) If your refrigerator is unbalanced: You can balance your refrigerator by turning the legs of it as illustrated in the figure. The corner where the leg exists is lowered when you turn in the direction of black arrow and raised when you turn in the opposite direction. - Page 17 Torx Wood Plastic Sheet Wood (PS) (1TW) * Spares included view 42 mm ≤ 17 Note: Installation step for 2, screws for connecting top plastic part should not be screwed very hard, because of moving the plastic part easily left or right side.
- Page 20 4 2 . (1TW)
- Page 21 4 2 , (1TW) 4 2 , (1TW)
- Page 22 2.0 mm 21 mm...
- Page 23 2 mm 2 mm 2 mm...
-
Page 24: Reversing The Doors
REVERSING THE DOORS Proceed in numerical order. - Page 25 Top Door 1.Unscrew top hinge (1). 2.Carefully remove the top door (2). 3.Unscrew lower hinge (3). 4.Remove plastic plugs (7 & 8 ). 5.Refit top hinge (1) as lower hinge (17) on the left hand side. 6.Replace top door (18). 7.Refit lower hinge (3) as top hinge (19) on the left hand side.
-
Page 26: Guarantee And Points Of Contact
Insurance If after the previous checks there is still a The warranty provided with this product does not fault, please contact the Montpellier Service cover loss of food content. Help-line below. Any claim for loss, damage, costs or expenses of... - Page 27 Montpellier Domestic Appliances Ltd. Unit 1, Tewkesbury Retail Park, Northway Lane, Tewkesbury, Gloucestershire GL20 8JU www.montpellier-appliances.com The symbol on the product or on its packaging indicates that this product may not be treated as household waste. Instead it shall be handed over to the applicable collection point for the recycling of electrical and electronic equipment. By ensuring this product is disposed of correctly, you will help prevent potential negative consequences for the environment and human health, which could otherwise be caused by inappropriate waste handling of this product.
Need help?
Do you have a question about the MIFF7301F and is the answer not in the manual?
Questions and answers
Bulb model numbers
Interior bulb model