Table of Contents
Advertisement
Quick Links
Integrated Freezer - In Column
MITF122
- 122cm - Slider Fixings
Please read these instructions carefully before attempting to install or use this appliance.
We recommend that you keep these instructions in a safe place for future reference.
THE PERFECT BALANCE OF FUNCTION AND STYLE
LAUNDRY - DISHWASHING - COOKING - COOLING
Installation and Operating Instructions
Advertisement
Table of Contents

Subscribe to Our Youtube Channel
Related Manuals for montpellier MITF122


Summary of Contents for montpellier MITF122
- Page 1 LAUNDRY - DISHWASHING - COOKING - COOLING Installation and Operating Instructions Integrated Freezer - In Column MITF122 - 122cm - Slider Fixings Please read these instructions carefully before attempting to install or use this appliance. We recommend that you keep these instructions in a safe place for future reference.
- Page 2 Welcome Thank you for choosing this Montpellier Integrated Freezer. Our refrigeration products have been designed to provide you with the best combination of style, reliability and performance to give you years of trouble-free use. You may be familiar with a similar product, but please take time to read these instructions carefully before installing or using your Freezer to ensure you get the most from your purchase.
-
Page 3: Table Of Contents
Contents Safety Instructions ………………………………………. Electrical Safety ………………………………………. Transportation & Handling ………………………………………. ………………………………………. Installing & Switching on your Appliance Before Switching On ………………………………………. Product Overview ………………………………………. Unit & Spare Parts ………………………………………. Usage ………………………………………. Temperature Selection ………………………………………. Installation ………………………………………. 10-17 Door Reversal ………………………………………. -
Page 4: Safety Instructions
Safety Instructions Important note: Please read this booklet before installing and switching on this appliance. The manufacturer assumes no responsibility for incorrect installation and usage as described in this booklet. • This model uses natural refrigerant gas as part of its cooling system. This gas is known as R600a (Isobutene) and is environmentally friendly but can be combustible. -
Page 5: Electrical Safety
• This appliance can be used by children aged from 8 years and above and persons with reduced physical, sensory or mental capabilities or lack of experience and knowledge if they have been given supervision or instruction concerning use of the appliance in a safe way and understand the hazards involved. -
Page 6: Transportation & Handling
Transportation and Handling For safe lifting, tilt the appliance backwards by no more than 45 degrees, hold the base and rear corners of cabinet. Lift the refrigerator carefully. Never use the door handles for lifting. To move the refrigerator on a flat level surface, tilt it slightly backwards and push backwards. -
Page 7: Before Switching On
• Choose a dry and well-ventilated space. • The appliance should be positioned so that the plug is easily accessible. Before Switching On • Before using your appliance, add a teaspoon of bicarbonate of soda to warm water and with a damp cloth wipe down all parts of the new appliance, then repeat the process with a clean damp cloth and dry. -
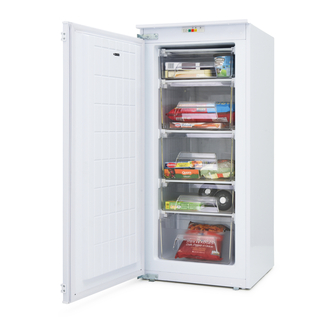
Page 8: Product Overview
Product Overview Thermostat Drawers Feet (adjustable feet at the front) 1 x ice cube tray, 1 x ice scraper Installation accessories Unit Parts & Spare Parts Before installation, check that all parts detailed in the product overview are present. -
Page 9: Usage
Usage Allow to stand for a minimum of 3 hours before plugging in to the mains The temperature in the appliance is controlled by the temperature control dial or thermostat located at top of the appliance. Rotate the control dial anti- clockwise and clockwise to regulate the temperature inside the freezer. - Page 10 Usage Allow to stand for a minimum of 3 hours before plugging in to the mains Depending on the ambient temperature of the room the appliance is situated in, you may need to adjust the temperature control dial; in a room with a high ambient temperature the temperature control dial may need to be adjusted to a colder setting (moved towards setting 5) or in a room with a low ambient temperature the temperature control dial may need to be adjusted to a warmer...
-
Page 11: Installation
Installation • This appliance can be installed as a built in unit only. The clearances shown in the below drawing must be followed. • Avoid damaging the product during installation, positioning of the appliance requires two people in order to avoid injuries or damage to the appliance. •... - Page 12 Installation The aperture size has to be a minimum of (H)1223 x (W)560 x (D)550mm. The cabinet in which the appliance is housed in must have a ventilation recess of (W)540 x (D)50mm.
- Page 13 Installation The cabinet in which the appliance is housed in must have a ventilation recess of (W)540 x (D)50mm. Wooden back panel cut out (if applicable) Carefully push the appliance into the housing, ensuring that the cabinet doors are able to fully close.
- Page 14 Installation Rollout the joint cover and on the side of the appliance without the hinges press it between the appliance and the inside of the cabinet wall (start from the bottom and work upwards). Open the door and push the side of the appliance without the hinges against the side of cabinet wall.
- Page 15 Installation Apply blanking covers by clipping them in to place at the top metal plinth at the top of the appliance. Apply a foot blanking covers by clipping them in to place on the feet at the bottom of the appliance. The plastic stem on the foot caps are there as a guide of what the distance between the product and the edge of the cabinet should be (approximately 42mm).
- Page 16 Installation – Door attachment 1. Locate parts A and B (see the below) in the bag with the installation accessories: A. Door guide B. Door guide cover 2. Open the cabinet door and the freezer door, mark on the back of the cabinet door where the top of the freezer door reaches.
- Page 17 Installation – Door attachment 4. Open the appliance door and the cabinet door to 90°, remove the 2 screws from the door guide holder that is already prefixed to the door and place it on to the door guide (part A). Push the appliance door and the cabinet door together, align the holes on the door guide holder and the holes on the edge of the door and fix into place with the 2 screws that were removed previously.
- Page 18 Installation – Door attachment 7. You will then have to repeat these steps at the bottom of the freezer door, please ensure you follow the below diagram when locating the door guide (part A) on the bottom of the freezer door. 8.
-
Page 19: Door Reversal
Door Reversal To reverse the door you will need to tilt the appliance backward to access the lower hinge which holds screws. Do not tilt the appliance more than 45 degrees and do not lay the appliance flat on its side. For your own safety, a minimum of 2 people should lift or tilt this product. - Page 20 Door Reversal 2. Unscrew the 2 screws from the lower hinge and remove the hinge. Do not fix the hinge to the opposite side at this stage. 3. Remove all of the screw cap covers on the opposite side of the appliance from where the hinges have just been removed.
- Page 21 Door Reversal 5. Flip the lower hinge 180° (so the pin is pointing downwards) and put the pin of the hinge into the top of the door and fix it in to place. Ensure the door is aligned horizontally and vertically so that the seals are closed on all sides before finally tightening the top hinge pin.
-
Page 22: Energy Saving Advice
Energy Saving Advice • Do not install the appliance close to sources of heat, such as a cooker, dishwasher or radiator. • Locate the appliance in a cool well-ventilated room and make sure that the air vents are clear. • Try to avoid keeping the doors open for a long time, as warm air will enter the cabinet and may cause a build-up of ice as well as affecting the energy consumption. -
Page 23: Power Failure
Power Failure If there is a power failure during the storage of frozen foods, keep the door closed. If the temperature within your freezer should rise, do not refreeze the food without checking it's condition. • Ice Cream: Once thawed should be discarded. •... -
Page 24: Maintenance & Cleaning
Maintenance & Cleaning Disconnect the appliance from the power supply before cleaning. Internal Cleaning • Do not pour water over the appliance. • The cavity should be cleaned periodically using a solution of bicarbonate of soda and lukewarm water (5ml to 0.5 litre of water) •... -
Page 25: Defrosting
Maintenance & Cleaning Defrosting Note: Care must be taken when performing the following procedure. Defrost twice a year or when a frost layer of approximately 7 mm (1/4”) has formed. • 2 hours before the defrosting process, set the thermostat knob at the “5” position to make sure the food is at the lowest temperature before removing the frozen foods. -
Page 26: Trouble Shooting
Trouble shooting Problem Solution Check that the appliance is switched on. Check that there has not been a power cut. Check that the plug is not faulty. Check that the fuse has not blown. The freezer doesn't work Check that the voltage is correct for the appliance. Are there any faults with the socket? For this purpose, try the plug of your appliance by connecting it to a socket which you are sure is working. - Page 27 Trouble shooting Problem Solution Check all the food and drink that is in the freezer is in date and correctly packaged. If it isn’t then it should be removed immediately or repackaged. Smell/odour Check for spillages on each shelf, rack and drawer. You may need to remove the drawers to check that no spillages have settle underneath them.
-
Page 28: Connection To The Mains Supply
Connection to the Mains Supply WARNING- THIS APPLIANCE MUST BE EARTHED This appliance is designed to operate from a mains supply of AC220V - 240V; 50HZ. Check that the voltage marked on the product corresponds with your supply voltage. For UK use only – Plug fitting details (where applicable): As the colours of the wires in the mains lead of this appliance may not correspond with the coloured markings identifying the terminals in your plug, proceed as follows: The GREEN/YELLOW wire is the EARTH and must be connected to the terminal which... -
Page 29: Technical Specification
Technical Specification Montpellier - MITF122 Manufacturer/Model number Rated Voltage 220V – 240V ~ 50Hz Capacity 130L 1220mm x 540mm x 540mm External Dimensions(HxWxD) -
Page 30: Guarantee
THIS DOES NOT AFFECT YOUR STATUTORY RIGHTS. Your 5 year Manufacturer’s guarantee Your new Montpellier appliance carries a free guarantee which protects you against the cost of repairs during THIS DOES NOT AFFECT YOUR STATUTORY RIGHTS. the first 60 months from date of purchase provided that:... - Page 31 Montpellier Domestic Appliances Ltd. Unit 1, Tewkesbury Retail Park, Northway Lane, Tewkesbury, Gloucestershire GL20 8JU www.montpellier-appliances.com The symbol on the product or on its packaging indicates that this product may not be treated as household waste. Instead it shall be handed over to the applicable collection point for the recycling of electrical and electronic equipment. By ensuring this product is disposed of correctly, you will help prevent potential negative consequences for the environment and human health, which could otherwise be caused by inappropriate waste handling of this product.
Need help?
Do you have a question about the MITF122 and is the answer not in the manual?
Questions and answers