IQAir HealthPro Plus User Manual
Air cleaning system
Hide thumbs
Also See for HealthPro Plus:
- User manual (28 pages) ,
- User manual (50 pages) ,
- User manual (8 pages)

Related Manuals for IQAir HealthPro Plus


Summary of Contents for IQAir HealthPro Plus
- Page 1 ® H i g h - P e r f o r m a n c e Air Cleaning System H e a l t h P r o P l u s U s e r ’ s M a n u a l...
-
Page 2: Important Safety Instructions
Do not operate this appliance if it has a damaged cord or plug, if the motor fan fails to rotate, if it is not working properly, if it has been dropped or damaged, or dropped into water. Return the appliance to an IQAir Service Centre for service or repair. - Page 3 Important Information and Technical Specifications Chapter 8 Warranty and Service Information IQAir reserves the right to change specifications contained in this document at any time and without prior notice. Copyright Incen AG & IQAir, Inc. 1998-2001 - All rights reserved...
-
Page 4: Table Of Contents
Chapter 1 SETTING UP YOUR IQAIR CLEANER 1. 1 Unpacking Your Air Cleaner 1. 2 Choosing a Suitable Location for Your IQAir Cleaner 1. 3 Connecting Your Air Cleaner 1. 4 Removing the Protective Film from the LCD Display Chapter 2 YOUR IQAIR CLEANER AND ITS COMPONENTS 2. - Page 5 6. 3 Maintenance-Free Fan Chapter 7 IMPORTANT INFORMATION AND TECHNICAL SPECIFICATIONS 7-1 7. 1 Important Guidelines for the Use of IQAir Systems in Critical Environments 7. 2 Technical Specifications Chapter 8 WARRANTY AND SERVICE INFORMATION Warranty Conditions for IQAir Cleaners...
-
Page 6: Air Cleaners And Indoor Air Quality
• A daily and weekly timer to automatically switch your air cleaner on and off at a preset time • A countdown timer to allow your IQAir cleaner to run for a set number of hours before automatic switch-off... -
Page 7: Improving Indoor Air Quality
To achieve that level of air turnover, it may be necessary to employ more than one air cleaner. Disclaimer about Air Cleaning Results Although IQAir cleaners may be advertised and sold to be suitable for the use in specific indoor environments and to deal with specific indoor air quality problems, the manufacturer and distri- butors make no claim as to the specific air cleaning results that are achieved under the user’s... -
Page 8: Setting Up Your Iqair Cleaner
Chapter 1 Setting Up Your IQAir Cleaner Chapter 1 Setting Up Your IQAir Cleaner 1.1 Unpacking Your Air Cleaner To unpack your air cleaner, open the top of the box and remove the square styrofoam pad. Lay the box on its side, hold the air cleaner by the handle and pull it out of the box. Remove the plastic bag and foam belt. -
Page 9: Choosing A Suitable Location For Your Iqair Cleaner
Chapter 1 Setting Up Your IQAir Cleaner 1.2 Choosing a Suitable Location for Your Air Cleaner When choosing a suitable location for your air cleaner, keep the following considerations in mind: • Choosing the most suitable room for your air cleaner will depend on where you would like the focus of your air cleaning efforts.Two main considerations are the time you spend in a... -
Page 10: Connecting Your Air Cleaner
Do not use the air cleaner when the power cord becomes damaged. The power cord may be replaced with an approved cord with a two-pole plug. These power cords are commonly used for computers and similar appliances.The power cord may be ordered from your IQAir distributor. Power outlet... -
Page 11: Removing The Protective Film From The Lcd Display
1.4 Removing the Protective Film from the LCD Display A removable film protects the LCD display on some IQAir cleaner models. This film should be removed to enable clear viewing of the LCD. To take the protective film off, loosen it first on one corner with your finger and then remove it entirely. -
Page 12: Your Iqair Cleaner And Its Components
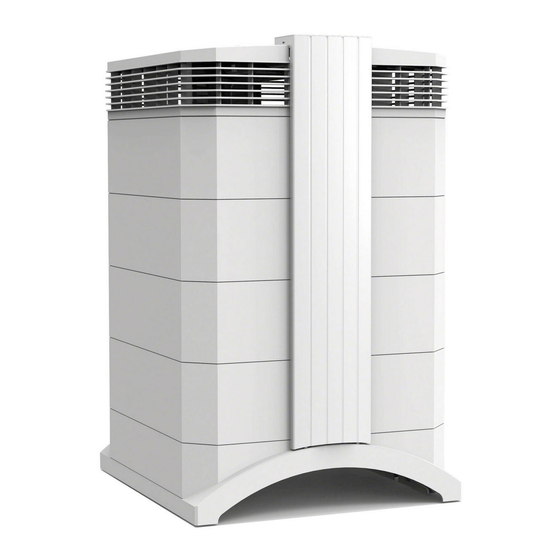
Your IQAir Cleaner and its Components 2.1 Description of Housing Components Your IQAir cleaner features a modular tower design in which all important filtration and air moving components are positioned vertically in-line, i.e. after one another. Air is drawn into the unit at the base, and passes through several filter stages to be returned to the room via the diffuser on top of the unit.The housing modules are held together by two locking arms. -
Page 13: Description Of Removable Components
2.2 Description of Removable Components Your IQAir cleaner features a modular housing design which enables the easy replacement of all filter elements in a matter of minutes.The illustration below shows all the removable compo- nents. For more details on how to replace filters, please refer to Chapter 5: Replacing Filters. -
Page 14: How Your Iqair Cleaner Works
Chapter 2 Your IQAir Cleaner and Its Components 2.3 How Your IQAir Cleaner Works Low turbulence, low velocity air is returned to the room via the diffuser. The air is pushed through 40 sq.ft. of tightly pleated high- efficiency particulate air filter (HEPA) media. -
Page 16: Using The Control Panel
Chapter 3 Using the Control Panel Chapter 3 Using the Control Panel Your IQAir cleaner is operated and controlled via the electronic control panel which is located on top of the front locking arm. The electronic control panel allows you to:... - Page 17 Chapter 3 Using the Control Panel. Power Key The Power key turns your air cleaner on and off. When your air cleaner is turned off, the fan stops to run, but the air cleaner will remain connected to the power supply (standby mode).The standby mode allows for automatic timer start-up.
-
Page 18: Fan Speed And Air Delivery
3.2 Fan Speed and Air Delivery Your IQAir cleaner can be set to run at five fan speeds which correspond to five different air flow rates. Speed 1 is the lowest, speed 5 the highest fan speed.The higher the air flow, the more room air will be filtered by the unit.The high fan speed settings provide you with the additional air cleaning... -
Page 19: Air Exchange Rates In Differently Sized Rooms
IQAir HealthPro Plus The table below shows the relationship between your IQAir cleaner’s fan speed (and the corresponding air flow rate) and the air exchange rate (room air volumes filtered by the unit per hour) in differently sized rooms. -
Page 20: Using The Menu Functions
Chapter 3 Using the Control Panel 3.3 Using the Menu Functions Your IQAir control panel lets you choose from a number of menu options which allow you to take advantage of the additional features of your air cleaner.There are eight menu windows that can be accessed with the Menu key. - Page 21 Chapter 3 Using the Control Panel 6. Remaining Filter Life Menu Allows you to view the remaining filter life of the individual filter elements in your air cleaner. 7. New Filter Menu Allows you to reset the remaining filter life after changing a filter element.
- Page 22 Chapter 3 Using the Control Panel 3.3.3 Time & Day Menu When you first plug in your air cleaner, the day and time displayed will be incorrect and you will be prompted to set them. Once the current day and time are set, they will only need to be reset, if the unit is disconnected from the power supply for more than an hour.
- Page 23 Chapter 3 Using the Control Panel 3.3.4 Daily Timer The Daily Timer function allows you to set one start and one stop time at which the air cleaner will automatically switch on and off.The air cleaner will start up in the fan speed which was last selected.
- Page 24 .Chapter 3 Using the Control Panel.. 9. Enter the desired stop hour by pressing the key. 10. Press the Enter key to save the stop hour and to proceed to the minute setting. 11. Enter the desired minute setting by pressing key.
-
Page 25: Timer Information In The Control Panel
3.3.6 Timer Information in the Control Panel The IQAir control panel keeps you informed about the timer status without the need to use the Daily & Weekly Timer Menus.When the timer is enabled, the second line of the display’s main window shows the timer’s current start and the stop times. -
Page 26: Countdown Timer Menu
Chapter 3 Using the Control Panel 3.3.7 Countdown Timer Menu The Countdown Timer Menu allows you to set a period from 1 to 72 hours for which the air cleaner will run and then switch off automatically. Note: Should the daily timer also be enabled, the countdown timer will take priority until the countdown period has elapsed. -
Page 27: Filter Load Index Menu
The setting for each of the three filter load indexes can range from 1 and 9. Index setting 1 corresponds to the lowest, and 9 to the highest anticipated filter load.Your IQAir cleaner is supplied with the following default filter load index settings, which correspond to use in an office or home... - Page 28 Chapter 3 Using the Control Panel. Tobacco smoke The amount of tobacco smoke in your air cleaner’s application environment can have a significant effect on filter life. If tobacco smoke exposure is regular, the following values should be added to the appropriate filter load indexes: Tobacco smoke presence Large Dust Index...
- Page 29 Chapter 3 Using the Control Panel. Modifying the Filter Load Indexes The Filter Load Index Menu lets you adjust indexes to reflect more closely the situation in your particular application environment. 1. Press the Menu key five times to reach the Air Pollution Index Menu.
-
Page 30: Remaining Filter Life Menu
Chapter 3 Using the Control Panel 3.3.9 Remaining Filter Life Menu Your air cleaner is equipped with an electronic filter life monitor that calculates the remaining life of your unit’s filter elements.Thanks to the filter life monitor, you do not have to guess when filters need to be replaced or replace them at fixed intervals (which seldomly correspond to the actual amount of use).The filter life monitor watches over the most important factors affecting the life of your filter elements.The Remaining Filter Life Menu displays at any given time the remaining life of... -
Page 31: Filter Life Chart
3.3.10 Filter Life Chart The IQAir filter life monitor calculates the life time of each filter element based on the set fan speed and the set filter load indexes. The chart below shows how fan speed and filter life indexes affect the life time for new filter elements as estimated by the filter life monitor. -
Page 32: New Filter Menu
Chapter 3 Using the Control Panel 3.3.11 New Filter Menu The New Filter Menu allows you to reset the filter life counter for a newly replaced filter element. As a result, the appropriate filter life LED on the control panel will be reset to green and the hour count in the Remaining Filter Life Menu will be reset to the full life span of the new filter element. -
Page 33: Display Language Menu
The Display Language Menu allows you to change your air cleaner’s display language.The languages from which you can choose will depend on your IQAir model and the country of purchase. 1. To reach the Display Language Menu from the main display window, press the Menu key eight times. -
Page 35: Using The Remote Control
Chapter 4 Using the Remote Control In addition to the control panel, your IQAir cleaner can also be controlled by using the hand-held remote control. (Note: A remote control is only supplied with selected IQAir cleaners, but can be obtained as an optional extra for all IQAir models with an electronic control panel.) The remote control allows you: •... -
Page 36: Description Of Remote Control Functions
Chapter 4 Using the Remote Control. 4.2 Description of Remote Control Functions Turning on your air cleaner To switch your air cleaner on with the remote control, press any of the four speed control keys marked with 1, 2, 3 and 4. Key 1 will put your air cleaner into minimum speed. Key 4 will put your air cleaner into maximum speed. -
Page 37: Placing Batteries In Your Remote Control
Chapter 4 Using the Remote Control. 4.3 Placing batteries in your remote control In order to function, your remote control needs two AAA 1,5 V batteries (supplied with the unit). To load the batteries, remove the back cover and insert the batteries (see illustration 4.7). The batteries will need to be replaced when the air cleaner no longer responds to the signal from the remote control. -
Page 38: Replacing Filters
Filter Positions in Filter Positions as shown Your Air Cleaner on the Control Panel Filter 3 corresponds to HEPA Filter Filter 2 corresponds to Gas & Odor Filter (HealthPro Plus only) Filter 1 corresponds to Pre-Filter Illustration 5.1... -
Page 39: Ordering Replacement Filters
Filters. 5.2 Ordering Replacement Filters Please order your replacement filter elements by quoting the appropriate article numbers stated below: IQAir HealthPro Plus Pre-filter element Art. No. 102 10 10 00 Gas & odor filter element Art. No. 102 18 10 00 HEPA filter element Art. -
Page 40: Opening The Air Cleaner Housing
Chapter 5 Replacement of Filters 5.3 Opening the Air Cleaner Housing The stacked housing elements are held together by two locking arms that hook into the diffuser from opposite sides.To open your air cleaner, follow the steps below. 1. Disconnect your air cleaner from the 2. - Page 41 Chapter 5 Replacement of Filters 3. Disengage the other arm in the same way. 4. Pull both locking arms evenly toward the outside until they click into place.The top five modules of the air cleaner housing will now be lifted from the two lower modules, resting on the arm extentions.
-
Page 42: Closing The Air Cleaner Housing
Chapter 5 Replacement of Filters 5.4 Closing the Air Cleaner Housing When the air cleaner housing is to be closed again, first make sure that both locking arms are fully extended outwards and that the upper part of the air cleaner housing is centered above the lower part of the unit. -
Page 43: Troubleshooting When Closing The Air Cleaner Housing
Chapter 5 Replacement of Filters. 5.4.1 Troubleshooting when Closing the Air Cleaner Housing Problem 1: The air cleaner does not close properly Reason: The upper part of the air cleaner is offset against the lower part of the unit. Solution: Open both locking arms again and push them to the center Upper part simultaneously. -
Page 44: Replacing The Pre-Filter (Filter 1)
Chapter 5 Replacing Filters 5.5 Replacing the Pre-Filter (Filter 1) Frame 1 1. Open the locking arms, making sure they 2. Opening the arms will cause the upper are fully extended outward. part of the housing to separate from (For details, refer to page 5-3.) Frame 1.This will leave a narrow gap. - Page 45 Chapter 5 Replacing Filters. 6. Turn the frame upside down. 5. Remove the eight filter clamps that secure the filter in the frame. 7. With the palm of your hand, press down on the 8. Lift the frame from the filter element. filter element and loosen it from the frame.
-
Page 46: Replacing The Gas & Odor Filter (Filter 2)
Chapter 5 Replacing Filters 5.6 Replacing the Gas & Odor Filter (Filter 2) Diffuser Frame 3 Frame 2 1. Open the locking arms, making sure they 2. Opening the arms will release the top are fully extended outwards. housing modules. First, remove the diffuser, (For details, refer to page 5-3.) then Frame 3 and put these to the side. - Page 47 Chapter 5 Replacing Filters. 4. Remove the used gas & odor filter element 5. Insert the new filter element, ensuring that the by lifting it out of the frame. correct side is facing up. 6. Put the frame back onto the housing, followed by frame 3 and the diffuser.
-
Page 48: Replacing The Hepa Filter (Filter 3)
Chapter 5 Replacing Filters 5.7 Replacing the HEPA Filter (Filter 3) Diffuser Frame 3 1. Open the locking arms, making sure they 2. Opening the arms will release the top housing modules. Removing the diffuser will reveal the are fully extended outwards. HEPA filter element which is located inside (For details, refer to page 5-3.) Frame 3. - Page 49 Chapter 5 Replacing Filters. 4. Place the frame on an even surface. 5. Turn the frame upside down. 6. With the palm of your hand, press down on 7. Lift the frame from the filter element. the filter element and loosen it from the frame. 8.
-
Page 50: Discarding Old Filters
Chapter 6 Caring for Your Air Cleaner 5.8 Discarding old Filters Used pre-filter elements and post-filter sleeves can normally added to the regular garbage for disposal. Only when the air cleaner has been exposed to potentially hazardous substances may these filters have to be disposed of as hazardous waste. Chapter 6 Caring for Your Air Cleaner 6.1 Cleaning the Housing... -
Page 51: Important Information And Technical Specifications
Filter life must be monitored by periodically checking the filter life indicator LEDs and by accessing the filter life monitor on the IQAir control panel. A visual inspection of the filter elements should also be made from time to time. - Page 52 Proper installation and maintenance of the ducting system are critical for the proper functioning of the system. • The ducting system and connection to the IQAir device must be checked for damage and leaks at regular intervals. • In certain environments (i.e. tuberculosis isolation wards), it is advisable to label the ducts...
-
Page 53: Technical Specifications
Chapter 7 Important Information and Technical Specifications. 7.2 Technical Specifications for HealthPro & HealthPro Plus General HealthPro air delivery per fan speed* 1: 35 cfm 2: 60 cfm 3: 85 cfm 4: 115 cfm 5: 150 cfm 6: 240 cfm... -
Page 54: Warranty And Service Information
IQAir, Inc. will at their option repair or replace the same free of charge for labor and materials. Obvious defects must be communicated to the retailer within 10 days of the purchase date. -
Page 55: Warranty And Product Registration Card
Date of purchase: Room in which unit is mainly used: Main reason for using unit: Please return this card to: IQAir, Inc., 1785 Locust Street, Unit 2, Pasadena, CA 91106 Alternatively you may fax this page: Fax 626 564 9197... - Page 56 From: Stamp IQAir, Inc. 1785 Locust Street, Unit 2 Pasadena, CA 91106...
Need help?
Do you have a question about the HealthPro Plus and is the answer not in the manual?
Questions and answers
Small parts cannot understand where they go