Table of Contents
Advertisement
Quick Links
41012_ins_quantum_slider_temp_display
Product Identification and Overview
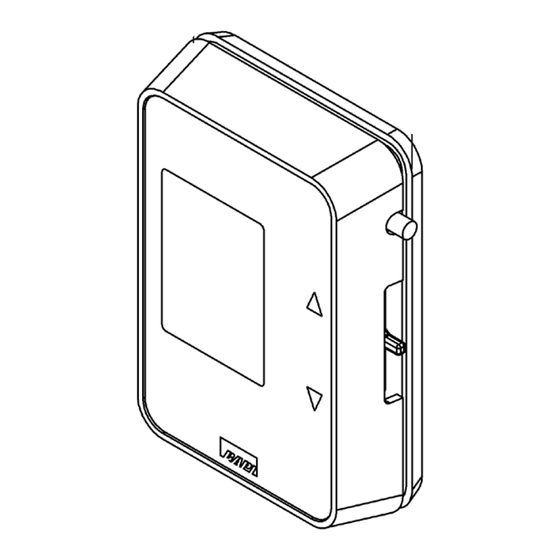
The BAPI-Stat "Quantum" style room temperature sensor features a
large format LCD and slider setpoint adjustment. Additional options
include button override and communication jack.
The setpoint is available as a resistance or voltage output. The
override is a momentary closure signal that can be configured in
parallel with the sensor or setpoint, or as a separate momentary
output.
Mounting
JUNCTION BOX
1. Pull the wire through the wall and out of the junction box, leaving about 6
inches free.
2. Pull the wire through the hole in the base plate.
3. Secure the base to the box using the #6-32 x 1/2 inch mounting screw
provided.
4. Terminate the unit according to the guidelines in the Termination section.
5. Attach Cover by latching it to the top of the base, rotating the cover down
and snapping it into place.
6. Secure the cover by backing out the lock-down screws using a 1/16" Allen
wrench until they are flush with the bottom of the cover.
DRYWALL MOUNTING
1. Place the base plate against the wall where you want to mount the sensor.
2. Using a pencil, mark out the two mounting holes and the area where the
wires will come through the wall.
3. Drill two 3/16" holes in the center of each marked mounting hole. Insert a
drywall anchor into each hole.
4. Drill one 1/2" hole in the middle of the marked wiring area.
5. Pull the wire through the wall and out the 1/2" hole, leaving about 6" free.
6. Pull the wire through the hole in the base plate.
7. Secure the base to the drywall anchors using the #6 x 1 inch mounting screws provided.
8. Terminate the unit according to the guidelines in the Termination section.
9. Attach cover by latching it to the top of the base, rotating the cover down and snapping it into place. Secure the cover
by backing out the lock-down screws using a 1/16" Allen wrench until they are flush with the bottom of the cover.
NOTE: In a wall-mount application, the mixing of room air and air from within the wall cavity can lead to erroneous
readings, condensation, and premature failure of the sensor. To prevent this condition, plug the conduit hole with
insulation in the junction box.
Building Automation Products, Inc., 750 North Royal Avenue, Gays Mills, WI 54631 USA
Tel:+1-608-735-4800 • Fax+1-608-735-4804 • E-mail:sales@bapihvac.com • Web:www.bapihvac.com
BAPI-Stat "Quantum" Temperature Sensor with Display
Fig. 1: BAPI-Stat
"Quantum" with slider
setpoint adjustment,
Override Button and
provided screw pack.
Specifications subject to change without notice.
and Slider Setpoint
Installation & Operating Instructions
Fig. 2: Mounting hardware is provided
for both J-Box and drywall installation
(J-Box installation shown)
rev. 04/23/18
1 of 6
Advertisement
Table of Contents

Related Manuals for BAPI BAPI-Stat Quantum Series


Summary of Contents for BAPI BAPI-Stat Quantum Series
- Page 1 41012_ins_quantum_slider_temp_display rev. 04/23/18 Product Identification and Overview The BAPI-Stat “Quantum” style room temperature sensor features a large format LCD and slider setpoint adjustment. Additional options include button override and communication jack. The setpoint is available as a resistance or voltage output. The...
- Page 2 All wiring must comply with the National Electric Code (NEC) and local codes. Do NOT run this device’s wiring in the same conduit as AC power wiring. BAPI’s tests show fluctuating and inaccurate signals are possible when AC power wiring is in the same conduit as the signal lines.
- Page 3 BAPI-Stat “Quantum” Temperature Sensor with Display and Slider Setpoint Installation & Operating Instructions 41012_ins_quantum_slider_temp_display rev. 04/23/18 Optional Communication Jack Wiring C35L Comm. Jack Wiring Location WIRE COLOR Ground Black White Fig. 5: C35L Comm. Jack Ring (3.5mm plug shown for clarity) C11L/C22L Comm.
- Page 4 Fig. 8: BAPI-Man Icon whenever the confirmation signal is removed and occupied when the signal is returned. The only way to blank the BAPI-Man from the display after it has received a first confirmation signal is to cycle power. Specifications subject to change without notice.
- Page 5 BAPI-Stat “Quantum” Temperature Sensor with Display and Slider Setpoint Installation & Operating Instructions 41012_ins_quantum_slider_temp_display rev. 04/23/18 Optional Technician Adjustments The unit is shipped ready to install. The following Setup or Program Menu Changes are available if the installer decides to change the factory settings.
- Page 6 Compare the temperature sensor’s resistance to the appropriate temperature sensor table on the BAPI website. If the measured resistance is different from the temperature table by more than 5% call BAPI technical support. Find BAPI’s website at www.bapihvac.com; click on “Resource Library”...
Need help?
Do you have a question about the BAPI-Stat Quantum Series and is the answer not in the manual?
Questions and answers