Table of Contents
Advertisement
Available languages
Available languages
What's in the box?
(1) Antenna boom
(1) Balun housing
(1) Mounting bracket
ATTIC/OUTDOOR
COMPACT DESIGN
HD ANTENNA
User's Guide
(2) VHF folding dipoles
(2) Reflectors
(1) Antenna bracket
(1) J pole mast
(2) Reflector clamps
(2) UHF X dipoles
(1) Hardware kit, including:
(1) M6 large wing nut
(3) M6 small wing nuts
(4) M4 wing nuts
(1) M6x25 carriage bolt
(3) M6x30 carriage bolts
(4) M4x20 hexagon bolts
(1) Aluminum shorting strap
(1) Weather boot
1
Advertisement
Table of Contents

Related Manuals for RCA ANT705Z


Summary of Contents for RCA ANT705Z
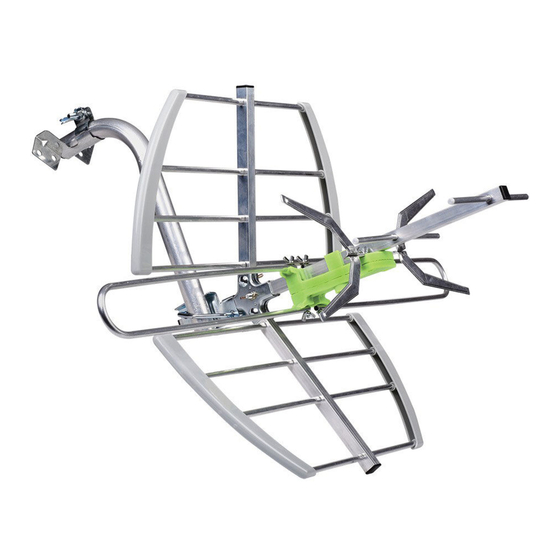
- Page 1 ATTIC/OUTDOOR COMPACT DESIGN HD ANTENNA User’s Guide What’s in the box? (1) Antenna boom (2) Reflectors (2) Reflector clamps (1) Balun housing (2) VHF folding dipoles (2) UHF X dipoles (1) Hardware kit, including: (1) M6 large wing nut (3) M6 small wing nuts (4) M4 wing nuts (1) M6x25 carriage bolt (3) M6x30 carriage bolts...
-
Page 2: Assembling The Antenna
Assembling the antenna 1. Attach the reflectors to the antenna boom. Pieces used in this step: (3) M6x30 carriage bolts (1) Antenna boom (2) Reflectors (2) Reflector clamps (3) M6 small wing nuts A. Place the two reflector clamps on either side of the large hole on the antenna boom. Line up the middle hole on each clamp Clamps with the hole on the boom. - Page 3 2. Attach the balun housing to the antenna boom. Pieces used in this step: (1) Balun housing Line up the guide on the balun housing with the hole on the Guide bottom of the antenna boom. Press the balun housing onto the antenna boom so that the housing’s guide goes into the hole on the bottom of the boom.
-
Page 4: Mounting The Antenna
4. Attach the UHF dipoles to the balun housing. Pieces used in this step: Place one of the UHF dipole onto one of the posts at the front of the balun housing. Screw a wing nut on top. (2) UHF dipoles Repeat with the other UHF dipole on the other post at the front of the balun housing. -
Page 5: Connecting The Antenna To Your Tv
3. Mount the antenna onto the mast. Pieces used in this step: Insert the reflector end of the antenna boom into one side of the mounting bracket as shown here. (1) Assembled antenna Place the mounting bracket with (1) Mounting bracket antenna onto the J-pole mast. -
Page 6: 12 Month Limited Warranty
12 Month Limited Warranty Voxx Accessories Corporation (the “Company”) warrants to the original retail purchaser of this product that should this product or any part thereof, under normal use and conditions, be proven defective in material or workmanship within 12 months from the date of original purchase, such defect(s) will be repaired or replaced with new or reconditioned product (at the Company’s option) without charge for parts and repair labor. -
Page 7: Qué Hay En La Caja
DISEÑO COMPACTO DE ANTENA HD PARA ÁTICOS O EXTERIORES Guía del Usuario ¿Qué hay en la caja? (1) Brazo de la antena (2) Reflectores (2) Abrazaderas de reflector (1) Alojamiento del balún (2) Dipolos doblados de (2) Dipolos X de frecuencia frecuencia muy alta (VHF) ultraalta (UHF) (1) Juego de herrajes, incluyendo:... -
Page 8: Montaje De La Antena
Montaje de la antena 1. Instale los reflectores en el brazo de la antena. Piezas utilizadas en este paso: (3) Pernos de carrocería M6x30 (1) Brazo de la antena (2) Reflectores (2) Abrazaderas de reflector (3) Tuercas de mariposa pequeñas M6 A. - Page 9 2. Instale el alojamiento del balún en el brazo Piezas utilizadas en este paso: de la antena. (1) Alojamiento del balún Alinee la guía en el alojamiento del balún con el orificio en la Guía parte inferior del brazo de la antena.
- Page 10 4. Instale los dipolos de UHF en el alojamiento Piezas utilizadas en este paso: del balún. Coloque uno de los dipolos de UHF sobre uno de los postes en el frente del alojamiento del balún. Enrosque una tuerca de mariposa encima. (2) Dipolos de UHF Repita con el otro dipolo de UHF en el otro poste en el frente del...
- Page 11 3. Monte la antena en el mástil. Piezas utilizadas en este paso: Inserte el extremo con los reflectores del brazo de la antena en uno de los lados del soporte de montaje, tal como se muestra aquí. (1) Antena armada Coloque el soporte de montaje con la (1) Soporte de montaje antena en el poste J mástil.
-
Page 12: Garantía Limitada De 12 Meses
Garantía limitada de 12 meses Voxx Accessories Corporation (la “Compañía”) le garantiza a usted, el comprador original de este produc- to que si, bajo condiciones y uso normales, se encontrara que este producto o alguna pieza del mismo presenta defectos materiales o de mano de obra dentro de los primeros 12 meses a partir de la fecha de compra original, tales defectos serán reparados o reemplazados con un producto nuevo o renovado (a opción de la Compañía) sin cargo alguno por las piezas y labores de reparación.
Need help?
Do you have a question about the ANT705Z and is the answer not in the manual?
Questions and answers