Table of Contents
Advertisement
Advertisement
Table of Contents

Related Manuals for Advance acoustic LIGHTNESS 3


Summary of Contents for Advance acoustic LIGHTNESS 3
- Page 1 Betriebshandbuch Edition 1 / 09_2018...
-
Page 3: Table Of Contents
Clipping in ......... . . 40 LIGHTNESS 3 – Ready to Transit ....... 6 Takeoff preparation and check . -
Page 4: Thank You For Flying Advance
If you have any further questions or problems please contact your dealer or get in touch directly with ADVANCE. Now we wish you a lot of enjoyment with your LIGHTNESS 3, and al- ways «happy landings». Team ADVANCE... -
Page 5: About Advance
About ADVANCE ADVANCE, based in Switzerland, is one of the world’s leading para- glider manufacturers. Since it was founded in 1988, the company has consistently pursued its own directions and concepts, both in develop- ment and production. The results are quality products with distinctive characteristics. -
Page 6: Lightness 3 - Ready To Transit
Redesigned suspension and chest strap geometry distinguishes the dard or light speedbag results in a wider range of uses; there’s also the LIGHTNESS 3 by its excellent comfort in flight – especially when acce- option of a windshield, which significantly raises flying comfort on long lerated –... -
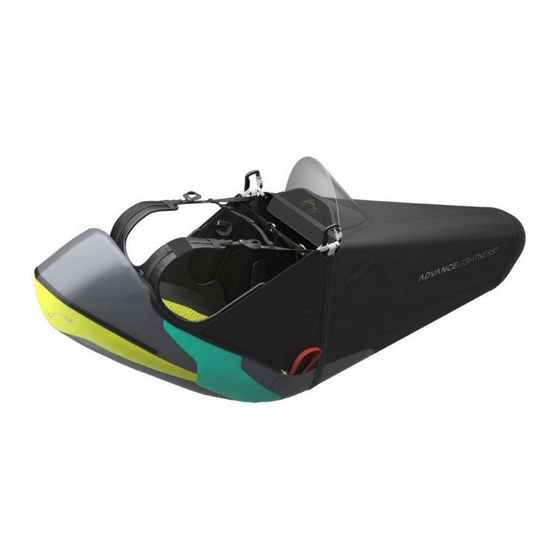
Page 7: Features Lightness 3
Features LIGHTNESS 3 Side view Edelrid ALIAS alu carabiners Recline angle adjustment (Back strap) Shoulder strap adjuster Drink tube guide Shoulder harness velcros Drink Tube opening Inner pocket for drink system Reserve V-connection channel with zip Easy-release reserve system... - Page 8 Front view 10 Additional stowage 11 Mesh back section on the back 12 Air-filled neck spoiler 13 Air intake for neck spoiler 14 Relief tube exit 15 Small chest strap 16 Optional Windshield for standard speedbag 17 Carbon footplate...
-
Page 9: Protectors At A Glance
Protectors at a glance The LIGHTNESS 3 has an LTF (91/09) certified foam protector and vis- co-elastic soft foam along the back section up to the neck vertebrae. This visco-elastic back protection from the German SAS-TEC company attenuates impacts. Our familiar comfort foam, as used since the first generation LIGHTNESS, lies on top. -
Page 10: Features Lightpack 3
Features LIGHTPACK 3 Circumferential zip Rucksack handle Ergonomically shaped, adjustable shoulder straps Large stretch side pocket Wrist loop Netting pocket Elasticated waist strap pocket Elasticated side pocket Waist strap pocket with zip 10 Ergonomic waist strap 11 Ergonomic mesh back support... -
Page 11: Safety Advice
All harness adjustments should be made before the harness is flown. the weather conditions at the chosen site before taking off. His abilities Correct adjustment of the LIGHTNESS 3 greatly contributes to safety, must be sufficient for the demands of the selected paraglider. When correct function and comfort in flight. -
Page 12: Handle With Care
ADVANCE products. LIGHTNESS 3 products should never be dragged over the ground. All the zips are for light use only; they should never be closed under heavy loading. -
Page 13: Preparing The Product
Optional Extras: § Detachable Windshield, only compatible with Standard speedbag Delivery package § Step-in aid for Standard speedbag LIGHTNESS 3 delivery includes § Radio pocket for shoulder harness § Harness with Standard or Light speedbag, incl. carbon footboard and integrated cockpit §... -
Page 14: Harness Adjustment
General Choice of Speedbag size Individual LIGHTNESS 3 set up is easy, even though there are many Speedbag material stretches and most pilots are happy with the spee- adjustment possibilities. As is generally required for reclining harnes- dbag that comes with their harness size (S, M, L). - Page 15 Basic setting these positions before you start your own adjusting. Put the LIGHTNESS 3 on, close the chest and leg straps with the two-buckle clips, fasten the Closure Remember System and the speedbag/cockpit and hang the harness in a harness stand by its carabiners.
- Page 17 Chest strap adjustment Speedbag adjustment The chest strap sets the distance between the main support Correct speedbag length is essential, because the fixed foot posi- points (carabiners). The chest strap is closed by the 2-Buckle- tion sets the pilot’s centre of gravity position relative to the carabi- System and completes the Safe-T-System.
-
Page 18: Setting The Speed System
Connect the LIGHTNESS 3 speed lines to your paraglider using Brummel hooks or kite loops (anchor hitch). Set the speed loop lengths by moving the positions of the knots inside the speedbag and tighten the kite loops at this position (same both sides). - Page 19 Caution: Always check that ALL buckles and loops are correc- Then lay the speedbag sides left over right, and fix the left side loop over another black ball on the red line from the right hand speedbag tly closed! carabiner loop (Step 2). Caution: Always close the chest strap first, then the Closure Remember System and finally the speedbag.
-
Page 20: Cockpit And Instrument Panel
Cockpit and Instrument panel At delivery the cockpit pocket has a foam blank inside. This holds the cockpit steady and/or keeps its shape as a spoiler. The blank can be A cockpit is built in to both Standard and Light speedbags. The removed and the space used for personal essentials. -
Page 21: Additional Stowage
Additional stowage Fitting the optional Windshield The LIGHTNESS 3 has a 6 ltr stowage under the seat – an ideal place The optional Windshield * for the standard speedbag markedly re- near the pilot centre of gravity. duces windchill and its associated body cooling. Continuous wind noi- se is also suppressed in transiting flight, especially when accelerated. -
Page 22: Sensible Details
Put the filled bottle inside and secure it with the hol- der above the pocket. Lead the white holder loop through the bottle’s The LIGHTNESS 3 right shoulder strap has a Velcro and loop. These eyelet and pull it over the toggle. -
Page 23: Relief Tube Routeing
The entry point for the relief tube is on the left side of the speedbag, at approximately hip height, and is hemmed in red. After closing the LIGHTNESS 3 lead the tube out of your trousers and push the end out of the red-marked opening on the left side of the speedbag. Make sure your tube is not kinked, twisted, knotted or otherwise obstructed. -
Page 24: Fitting The Step-In Aid
Fitting the Step-in Aid The Light speedbag has the Step-in aid already fitted. This makes it easy to get your first foot in the speedbag after takeoff. The light spee- dbag is more easily blown back because of its lighter material, making it more difficult to reach. -
Page 25: Replacing Parts
SAS-TEC back protection The SAS-TEC back protection goes in a separate pocket in the back The LIGHTNESS 3 is delivered with foam protector, SAS-TEC back gu- of the harness. To take it out first open the zip in the back pocket. - Page 26 Velcro un- lines from their attachment on the footboard. Loosen the kite knots derneath of the LIGHTNESS 3 and the lower speedbag lines to the and pull the blue lines off the red attachment lines.
- Page 27 Now thread the upper ends of the blue speedbag lines through the blacktabs on the seat surface and pull them through (Fig. 1). Fold the upper loop of the line into a kite knot and pull the lower, red-marked part of the line through it (Fig. 2). Then pull the kite knot up tight be- hind the black ball.
- Page 28 At the second step fix your new speedbag to the underside of the tely damaged under load. Info: The footboard is part of the speedbag and provides si- gnificant support in your no-seatboard reclining position. The LIGHTNESS 3 only functions with the Speedbag.
- Page 29 Carbon seatboard Caution: Only use the original speed lines and speed loop. A A new footboard is pushed into its pocket in the end of the speedbag. different line or a solid speedbar could seriously damage the speedbag and harness by point-load or friction. This pocket is closed by Velcro strips Speed loop The lower speed loop has a grey locating loop...
-
Page 30: Installing The Reserve
The certified vo- Every reserve/harness combination has its own peculiarities. It is es- lumes for the LIGHTNESS 3 are specified as a function of harness size: sential that pilots and parachute packers familiarise themselves wi- size S 3 to 5.5 litres, size M 3 to 6 litres;... - Page 31 Always fold your reserve to the shape and dimensions of the inner con- fort foam pocket. Once again a compatibility test will decide if the cho- tainer supplied with the LIGHTNESS 3. At the final packing stage put sen reserve works properly with the LIGHTNESS 3.
- Page 32 risers. the package by the lines - the weight of the reserve should release the line loop. Closing the inner container Close the container flap in the order indicated (1-3). Secure the final container flap (3) with a 5 to 6 cm line loop (ca. 3 finger widths). Now check the tension of the bungee loop and adjust if necessary.
- Page 33 Now close the outer container flap (red border) with two similar line lo- ops (5 to 6 cm). These two line loops are secured in the two attached rubber bands though their eyelets on the outer flap.
- Page 34 Connecting the reserve to the harness Info: when looping a COMPANION reserve to the LIGHTNESS The reserve bridle and the harness connection must be connected to 3 the V-line Neoprene protector must finally be pulled over the connection. each other by the means of a suitable quicklink of at least 2400 daN safe load (fig.
- Page 35 Putting the inner container in the reserve compartment Spot to spot First lay the harness V-connection in the compartment, then put the inner container on top. It is essential that the inner container closu- re flaps face the bottom (when in flight) of the harness. Follow the di- rections indicated on the inner container and the inside of the reserve compartment.
- Page 36 Closing the reserve compartment and fitting the reserve handle The outer container is closed by the white closure loops and the two yellow cables on the reserve handle. First lead the lower, longer yel- low cable through the “buttonhole” of the reserve handle pocket and further down its channel until it comes out of the harness Now fix the reserve handle in its pocket and then lead the upper, shor- ter yellow cable...
- Page 37 Protect the zip with the upper, shorter cable. To do this thread a pa- cking help line through the upper white loop and pull this through its metal closure eyelet. Push the yellow cable through the white loop and stow the end in its channel. Tip: If the V-connection zip tracks get out of sync.
-
Page 38: Compatibility Test
Put the harness on, close the 2-buckle closure, the Remember Closure System and the speedbag, and hang the LIGHTNESS 3 up by § Pilot arm length is a factor: short pilots with short arms can so- its carabiners in a harness stand. - Page 39 The LIGHTPACK 3 Rucksack has been designed specially for the LIGHTNESS 3 harness. The two sizes, S/M and L, are arranged to Careful packing of the 2 harness stowages has a significant effect on carry a normal size paraglider, the LIGHTNESS 3 harness and speed- flying comfort.
-
Page 40: Use In Practice
Getting the feet into the speedbag ops make it especially easy to clip in an ADVANCE paraglider to the LIGHTNESS 3. The pilot only has to make sure that the red and blue Take off with a pronounced forward-leaning body position and keep markings on the paraglider risers join the equivalent red and blue lines this after lift off, so that you don’t slide down too low in the harness. -
Page 41: Using The Speed Loop
After taking up the flying position and stretching your legs the spee- dbag closure system will automatically close the speedbag top and As a lightweight XC harness the LIGHTNESS 3 does not have a sepa- bring the cockpit into position. For landing take both feet out of the rate water ballast compartment. -
Page 42: Acro
Paraglider compatibility the rescue boat. Care and maintenance after a water landing The LIGHTNESS 3 can be used with any glider - there is no restriction. After contact with water all the protectors and comfort foam should be Landing in water removed from the LIGHTNESS 3. -
Page 43: Packing The Lightpack 3
When closing the rucksack always be careful with the zip. Never side load it while pulling too hard. The LIGHTNESS 3 comes with a compression inner bag, so that the paraglider takes up minimum space in the LIGHTPACK 3. The COMPRESSBAG is perfectly coordinated with LIGHTNESS 3 and LIGHTPACK 3. -
Page 44: Hiking With The Lightpack 3
The LIGHTPACK 3 is most comfortable to carry when it is full, and lightly tensioned. This is automatically achieved when it is packed wi- th a COMPRESSBAG and LIGHTNESS 3, as already described. When packed, the compressed protector automatically expands to fill spare space and tension the LIGHTPACK 3. -
Page 45: Care, Check & Repair
Care, check & repair Care and maintenance The life of your harness can be greatly extended if you observe the fol- lowing points: Weight saving was a priority when it came to the choice of materials. § Allow a wet or damp harness to dry completely at room temperature, The harness was designed for high loadings, but not for extreme phy- or outside in the shade. -
Page 46: Foam Protector
Repairs Most reserve parachute manufacturers recommend an inspection and repacking every six months, so as to guarantee a fast and rou- As a general rule you should not attempt to repair a harness yourself. tine opening every time. If the reserve gets wet, damp or overheated The various seams are made with great precision, and, for this reason, it must definitely be repacked. -
Page 47: Disposal
Disposal Environmental protection plays an important role in the selection of materials and the manufacture of an ADVANCE product. We use only non-toxic materials that are subjected to continuous quality and envi- ronmental impact assessments. When your harness reaches the end of its useful life in a number of years’... -
Page 48: Technical Data
Technical Data LIGHTNESS 3 Pilot height 155–172 165–183 178–202 Seat width N. A. N. A. N. A. Support point height N. A. N. A. N. A. Chest strap width 40–48 40–48 40–48 Standard harness weight 3.25 3.50 3.58 Light version harness weight 2.75... -
Page 49: Material Description
Material description page 1 / 2 page 2 / 2 ADVANCE LIGHTNESS 3 ADVANCE LIGHTNESS 3 Material description Material description Ref Nr. Item Nr. Description Name & Dimension Manufacturer Bruchlast ADVANCE Harness Mainstrap 1434 Güth&Wolf 1‘060 kg 80005-25 mm - Polyamid... -
Page 50: Certification
Certification The LIGHTNESS 3 was tested and certified in accordance with DIN EN-Norm 1651 at 120 kg supported weight. The Airfoam-Hybrid- Protector has LTF certification. Only the original reserve handle and its attached four-flap inner container may be used. This conforms to the... -
Page 51: Service
Service ADVANCE Service Centres § find out about new safety-related knowledge and advice concerning ADVANCE products ADVANCE operates two company-owned Service Centres that car- § download an application form in PDF format which you can use ry out checks and repairs of all types. The workshops based in when sending your glider in for a check at ADVANCE. -
Page 52: Warranty
Warranty As part of the ADVANCE warranty, we undertake to rectify any de- fects in our products that are attributable to manufacturing faults. In order for a warranty claim to be made, ADVANCE must be notified im- mediately on discovery of a defect, and the defective product sent in for inspection. - Page 54 a d v a n c e t h u n a g + 41 3 3 225 70 10 i n f o @ a d v a n c e.c h u t t i g e n g s t r a s s e 87 w w w.
Need help?
Do you have a question about the LIGHTNESS 3 and is the answer not in the manual?
Questions and answers