
Subscribe to Our Youtube Channel
Related Manuals for Whip Mix SinterPro


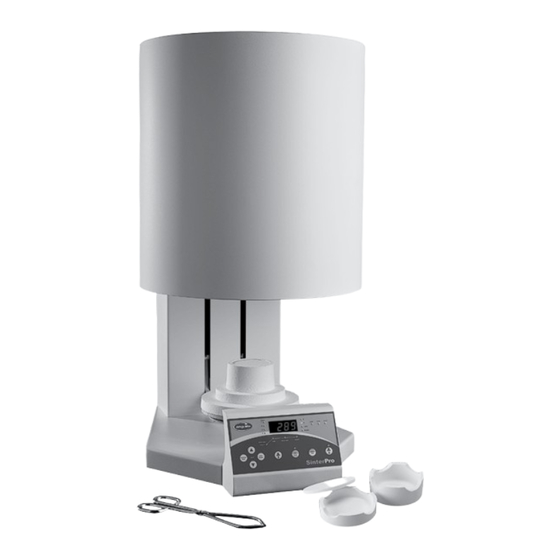
Summary of Contents for Whip Mix SinterPro
- Page 1 SinterPro Operator’s Manual Whip Mix Corporation 361 Farmington Ave. P.O. Box 17183 Louisville, KY 40217-0183 USA • • • 502-637-1451 800-626-5651 Fax 502-634-4512 www.whipmix.com • • •...
-
Page 2: Table Of Contents
SinterPro Furnace Operator’s Manual Table of Contents To Program And Operate – Introduction ................3 Four Stage Program Warranty ................3 ..........15 Specifications ................3 Running a Program .............15 Safety Instructions To Review A Program ..........4 .........15 Unpacking the Furnace Edit A Program While The Program Is Running ..........16... -
Page 3: Introduction
We have designed and manufactured this furnace using the latest in microcomputer technology to give you many years of dependable service. To ensure that your SinterPro Sintering Furnace gives you the highest level of service, review and follow the guidelines outlined in this Operator’s Manual. -
Page 4: Safety Instructions
TECHNICIANS. SINCE THE INTERIOR OF THE UNIT MAY CONTAIN HIGH VOLTAGE AND DANGEROUS COMPONENTS, FAILURE TO Use of the SinterPro furnace not in conformance with the HEED THIS WARNING MAY RESULT IN EQUIPMENT DAMAGE, instructions specified in this manual may result in premature PERSONAL INJURY AND/OR DEATH. - Page 5 SinterPro Furnace Operator’s Manual 4. Remove carton lid and locate “READ ME FIRST” document to review important instructions to familiarize unpacking of SinterPro furnace. Remove white metal lid and other documents; set aside until needed. 5. Remove black cut foam spacers, outer carton.
-
Page 6: Installing Heating Rods
SinterPro Furnace Operator’s Manual 6. Remove both the Accessory box (small) and the Heater 9. Lower the heater rods into the wells with the two Element box (large) from the unit. electrical plugs oriented towards the rear of the oven. -
Page 7: Lifting And Carrying
• Place the SinterPro on a non-flammable, level surface • The SinterPro Oven should not be placed in such capable of supporting 200 lb. / 90 kg. The surface a way as to obstruct access to the AC Mains should be high enough to allow easy access to the disconnect to the oven in case of an emergency. -
Page 8: Setting Up The Oven
SinterPro Furnace Operator’s Manual Setting Up The Oven Unpack contents of the accessory carton. • USB Flash Drive • Locate the Power Cord and plug the appropriate end Contents: into the back of the oven (see picture below), and the •... -
Page 9: Controls & Indicator Familiarization
SinterPro Furnace Operator’s Manual Controls & Indicator Familiarization Controls Description (Left To Right) Indicators Description 1. PROGRAM SELECT: Press to select a program or to 8. STAGE 1–2–3–4 indicator lights: While programming, review the program currently running. the number of active stages are illuminated. -
Page 10: Powering On The Furnace
SinterPro Furnace Operator’s Manual Powering On The Furnace To Set Temperature Scale • Make sure both 3 Amp button circuit breakers are fully pressed in. The furnace is pre-set in degrees Celsius. • At the right rear corner of the chassis is the Power 1. -
Page 11: Lift Operation
90mm your SinterPro oven. The sintering tray is indented at the (3.5") and the stack cannot exceed 142mm (5.6") or bottom to allow the tray to index into the firing tray to hold damage to the lift or muffle insulation will result. -
Page 12: To Program And Operate - One Stage Program
SinterPro Furnace Operator’s Manual To Program And Operate – One Stage Program Note: Always use the START/STOP button to halt a C. If Fast Cooling is desired, scroll to “FCL” or if running program before turning the oven power off. -
Page 13: To Program And Operate - Two Stage Program
SinterPro Furnace Operator’s Manual button to extinguish the Ready LED and halt the periodic you have confirmation that the cycle completed normally, beeping. This is useful if you have an overnight run so that even if it is hours later. -
Page 14: To Program And Operate - Three Stage Program
SinterPro Furnace Operator’s Manual To Program And Operate – Three Stage Program 1. Follow Two Stage Program, Steps 1 – 4. 6. All necessary information for this program is now entered. 2. Press ENTER / REVIEW. STAGE 2 light turns off, STAGE 3 and HEAT RATE lights turn on. -
Page 15: To Program And Operate - Four Stage Program
SinterPro Furnace Operator’s Manual To Program And Operate – Four Stage Program NOTE: If DELAY (START) is pressed while a program 1. Follow Three Stage Program, Steps 1 – 4. is running, the time remaining for completion of the 2. Press ENTER / REVIEW. STAGE 3 light turns off, program will appear on the Main Display for 5 seconds. -
Page 16: Edit A Program While The Program Is Running
NOTE: HEAT RATE cannot be changed to “NO” in SinterPro will try to heat with a 0°F / Min (0°C / Min) the stage currently running or in the stages already HEAT RATE. -
Page 17: Troubleshooting
SinterPro Furnace Operator’s Manual Troubleshooting Internal Fuse List: IMPORTANT: YOU SHOULD HEAR THE COOLING FAN RUNNING WHENEVER THE OVEN IS POWERED ON. 1. Inline Fuses (2) on DC power supply output are: IF YOU DO NOT HEAR THE FAN (LOCATED BELOW THE MUFFLE HOUSING) CALL FOR SERVICE. - Page 18 SinterPro Furnace Operator’s Manual Error Code Description Probable Cause INVALID ENTRY ERROR: STAGE, Occurs when the HEAT RATE is set to COOL but the TEMP of (Soft Error) HEAT RATE and TEMP lights flash that stage is higher than the TEMP of the prior stage (should be heating).
-
Page 19: Routine Maintenance
When power is turned off and on while a program is running and returns, the SinterPro returns to the same point in the START / STOP was not pressed. It will not flash if the power program. -
Page 20: Lift Preventative Maintenance
SinterPro Furnace Operator’s Manual Lift Preventative Maintenance WARNING: BEFORE ATTEMPTING ANY OF THE SERVICE turning off the oven. Remove all mains power from the PROCEDURES IN THIS SECTION, BE SURE TO TURN oven, and unplug the mains power cord for safety. - Page 21 SinterPro Furnace Operator’s Manual 8. Apply recommended lubricant as necessary to the rail shield for ease of assembly. Ensure the electrical wire guides and the lead screw along its length as shown in connections are not disturbed. below figure. 11. Secure the shield with nuts using the nut driver.
-
Page 22: Replacement Of Heating Elements
SinterPro Furnace Operator’s Manual Replacement Of Heating Elements WARNING: BEFORE ATTEMPTING ANY OF THE SERVICE fully, replace the electrical hardware you removed in PROCEDURES IN THIS SECTION, BE SURE TO TURN step number 5. Make sure there is a LOCK WASHER... -
Page 23: Replacement Of Thermocouple
SinterPro Furnace Operator’s Manual Replacement Of Thermocouple WARNING: BEFORE ATTEMPTING ANY OF THE 5. Remove the retainer nut at the 12 o’clock position with SERVICE PROCEDURES IN THIS SECTION, BE SURE a nut driver. TO TURN OFF THE FURNACE POWER VIA THE POWER 6. -
Page 24: Replacement Of Logic Pcb
SinterPro Furnace Operator’s Manual Replacement Of Logic PCB WARNING: BEFORE ATTEMPTING ANY OF THE SERVICE 9. Power up the oven and verify the Power On Self-Test PROCEDURES IN THIS SECTION BE SURE TO TURN executes properly as below; OFF THE OVEN POWER VIA THE POWER SWITCH AND a. -
Page 25: Replacement Of Solid State Relay
SinterPro Furnace Operator’s Manual Replacement Of Solid State Relay WARNING: BEFORE ATTEMPTING ANY OF THE SERVICE 8. Before re-installing the mounting screws, make sure PROCEDURES IN THIS SECTION BE SURE TO TURN the Solid State Relay is oriented exactly the way it was OFF THE OVEN POWER VIA THE POWER SWITCH AND in the photo above. -
Page 26: Replacement Of Voltage Monitor Pcb
SinterPro Furnace Operator’s Manual Replacement Of Voltage Monitor PCB WARNING: BEFORE ATTEMPTING ANY OF THE SERVICE PROCEDURES IN THIS SECTION BE SURE TO TURN OFF THE OVEN POWER VIA THE POWER SWITCH AND DISCONNECT THE OVEN FROM THE WALL POWER. -
Page 27: Sinterpro Wiring Diagram
SinterPro Furnace Operator’s Manual SinterPro Wiring Diagram... -
Page 28: Spare Parts List
For help with 96531 Shallow Sintering Tray operating or servicing your Whip Mix equipment, please call Whip Mix between 8:00 am and 5:00 pm Eastern time. 96535 Deep Sintering Tray Toll Free (800) 626–5651 96537 Sintering Tray Lid Local (502) 637–1451...
Need help?
Do you have a question about the SinterPro and is the answer not in the manual?
Questions and answers