
Related Manuals for Rainin Pipetman Ultra U-2


Summary of Contents for Rainin Pipetman Ultra U-2
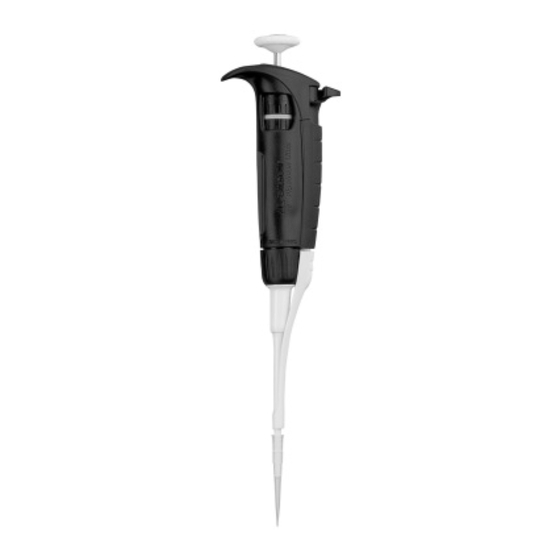
- Page 1 Pipetman Ultra ® continuously adjustable digital microliter pipettes 8 pipettes for volume ranges from 0.1 µL to 10 mL U-10 U-20 U-100 U-200 U-1000 U-5000 U-10ML Pipetman Ultra U-200 shown...
-
Page 2: Table Of Contents
If any item is missing, call 800-543-4030 Technical Assistance: 800-543-4030 Call this toll free number for technical consultation and product information for Pipetman, RAININ pipettes, and disposable tips. Or use e-mail: tech.support@rainin.com Pipetman and Microman are trademarks of Gilson Inc. U.S. and national patents pending. -
Page 3: Description
Description Push-button for switching on, setting the volume, aspirat- ing, and dispensing. (Button is color coded with the vol- ume range printed on the top.) Thumbwheel, to set and lock the volume. Tip-ejector button, can be positioned for left or right-handed operation. -
Page 4: Autoclaving
Autoclaving The upper and lower parts of the shaft, and the tip ejector (also the tip ejector extensions for Pipetman Ultra models U-2 & U-10), are autoclavable: 121°C, 1 bar, 15–20 minutes. Operating Ranges Model Range Color Code 0.1 - 2 µL Orange U-10 0.5 - 10 µL... -
Page 5: Setting The Volume
6) Cycle counters: You will see the counters at the right-hand side of an otherwise blank screen. a) Since the last volume setting - holding down the push- button for 7 seconds displays this information (maximum 199); for example 126 cycles. b) Since the pipette was made - holding down the push- button for 10 seconds displays this information (maximum... -
Page 6: Tip Selection
Use RAININ aerosol-resistant tips to avoid any sample-to-sam- ple, sample-to-pipette, or sample-to-operator contamination. Pipetting 1) Mount a tip: Push the shaft into a new RAININ tip using a slight twisting motion to ensure a firm and airtight seal. 2) Pre-rinse the tip: Some liquids (e.g. protein-containing solutions and organic solvents) can leave a film of liquid on the inside wall of the tip;... -
Page 7: Tip Immersion Depth
3) Aspirate. Press the push-button to the first stop (this corre- sponds to the set volume of liquid). Hold the pipette vertically and immerse the tip in the liquid (see table for immersion depth). TOP POSITION Release the push-button slowly and smoothly (to top position) to aspirate the set volume of liquid. -
Page 8: Pipetting Guidelines & Precautions
Prevent liquids from being drawn into the Pipetman Ultra shaft by taking the following precautions: - Use RAININ aerosol-resistant tips, with an internal filter which acts as a barrier to aerosols and liquids. - Never invert or lay Pipetman Ultra down if liquid is in the tip. -
Page 9: Pipetting Liquids Of Varying Density
6. Remove the tip from the receiving vessel without blowing out the remaining liquid. 7. Return excess sample in the tip to the original sample con- tainer, if desired. Discard the used tip. Pipetting Liquids of Varying Density Pipetman Ultra lets you compensate for solutions of density much different from water, by setting the volume slightly higher or lower than that required. -
Page 10: Personalizing Your Pipette
Personalizing your Pipette Tip ejector Before you start to pipette you can adjust the tip-ejector button according to your preferences. 1) Position the tip-ejector button. Simply rotate the tip-ejector button to the most comfortable position: left, right, or middle. TIP EJECTOR BUTTON TIP EJECTOR BUTTON (set for right-handed user) The tip ejector is adjustable in height to... -
Page 11: Tip-Ejector Extension
Tip-ejector Extension For use with Pipetman Ultra U-2 and U-10 In order to eject micro-volume tips, tip-ejector extensions are sup- plied with U-2 and U-10 pipettes. They may be already fitted to the shaft on your U-2 or U-10 model, but if they are not fitted, fol- low the instructions below. -
Page 12: Troubleshooting
Troubleshooting You may be able to identify and to correct the problem by referring to the following table. Symptom Possible Cause Refer to page Pipette is leaking sample Worn O-ring Pipette won’t aspirate Worn O-ring Unscrewed lower part of shaft Damaged or corroded piston 13-15 Damaged shaft... -
Page 13: Error Messages
Error Messages Contact RAININ at 800-543-4030 if you see any of these error messages on the display: Message Cause ERR1 Battery changed when the pipette was in the UNLOCKED position. Volume not set to the correct calibration volume when the calibration tool was plugged in (see "Recalibration"). - Page 14 2) Gently rotate the tip ejector counterclockwise and separate its connector from the activating rod. 3) Pull the tip ejector away from the body of the pipette. 4) Clean or autoclave the tip ejector and refit it (or a new one) by reversing the procedure.
- Page 15 Changing the o-ring The o-ring is contained by the two halves of the shaft; it must not be autoclaved, if worn or damaged in any way, it must be replaced. To access the o-ring, remove the tip ejector and unscrew the lower part of the shaft - if the o-ring is not immediately visible on the piston, set the pipette to its maximum volume, then press the push-button to the second stop.
- Page 16 SHAFT (LOWER) SHAFT (UPPER) SHAFT COUPLING PISTON PISTON SPRING (TAPERED) SPRING HOLDER GUIDE For U-5000 and U-10ML the shaft coupling and the upper part of the shaft are combined (see "Spare Parts"). 5) Clean and autoclave (if required) the piston and holder, together with any other parts that may need to be treated in the same way (see "Cleaning and Decontamination").
- Page 17 How to Lubricate the Piston (except U-2 and U-10) Use the proper lubricant (Cat. No. 70902, supplied). Squeeze a small quantity from the tube onto a clean, nonabrasive cloth. Use the cloth to transfer the lubricant to the piston. Ensure that the pis- ton is evenly lubricated, and that you wipe away any excess - only a fine film of lubricant is required (over the entire piston).
-
Page 18: Cleaning And Decontamination
Cleaning and Decontamination Pipetman Ultra is designed so that the parts normally in contact with liquid contaminants can easily be cleaned and decontami- nated. Liquid must not enter the body (handle) of the pipette. If you use chemical solutions for decontamination or detergents for cleaning, other than specified below, you should check with your supplier that the solution or detergent used does not attack any of the following materials: stainless steel, POM (Poly-... - Page 19 Decontamination Autoclaving The body (handle) of the pipette is not autoclavable. Only the following parts may be autoclaved: tip ejector, shaft (both parts), shaft coupling, piston (including holder), return spring and spring guide. The O-ring is not autoclavable; it should be replaced as specified in "Spare Parts".
-
Page 20: Leak Test
Precision of Gilson Pipettes”. For a downloadable copy of AB-15 see RAININ’s website: www.rainin.com/pdf/ab15.pdf. For more details call RAININ Technical Support at 800-543- 4030. The Tech. Support group can help you to implement these pipette checking procedures or to build up your own procedures. - Page 21 Call 800-543-4030 for a free copy, or download from the web: www.rainin.com/pdf/ab15.pdf Note: If you do not wish to perform your own calibration, RAININ has a variety of service programs available, including Calibration PM (Preventive Maintenance). Call 800-543-4030 or visit the...
-
Page 22: Service, Calibration And Repair
RAININ Service Center 7500 Edgewater Drive, Oakland, CA 94621 Tel: 800-662-7027 Replacement parts are manufactured by Gilson and Rainin. It is recommended to use only these replacement parts, which are are available in the U.S. only from Rainin. It is NOT necessary to recalibrate the pipette after changing the seal or shaft. -
Page 23: Specifications
Con- sult the free RAININ publication “Procedure for Evaluating Pipette Accuracy and Precision” (AB-15) for further information. You can also download a copy of this publication from the RAININ web- site: www.rainin.com/pdf/ab15.pdf These manufacturer’s specifications should be used as guide- lines when establishing your own performance specification. -
Page 24: Replacement Parts
Replacement Parts (Manufactured by Gilson.) U-2 and U-10 Description U-10 Push-button 70152 70252 Spring-guide 70103 70103 Shaft coupling 70111 70111 Seal 61901 61902 Piston assembly 70160 70260 Return spring 70113 70113 Shaft (upper) 70117 70117 Shaft(lower) 70118 70218 Tip ejector 70159 70159 Battery Holder... - Page 25 U-20 and U-100 Description U-20 U-100 Push-button 70352 70452 Spring-guide 70103 70103 Shaft coupling 70111 70111 O-ring 61903 70401 Piston assembly 70360 70460 Return spring 70113 70113 Shaft (upper) 70117 70417 Shaft (lower) 70318 70418 Tip ejector 70359 70459 H1 Battery Holder 70158 70158 H2 Battery...
- Page 26 U-200 and U-1000 Description U-200 U-1000 Push-button 70552 70652 Spring-guide 70103 70103 Shaft coupling 70111 70111 O-ring 70501 70601 Piston assembly 70560 70660 Return spring 70113 70113 Shaft (upper) 70517 70617 Shaft (lower) 70518 70618 Tip ejector 70559 70659 H1 Battery Holder 70158 70158 H2 Battery...
- Page 27 U-5000 and U-10ML Description U-5000 U-10ML Push-button 70752 70852 O-ring 70701 70801 Piston assembly 70760 70860 Shaft 70718 70818 Tip ejector 70759 70859 H1 Battery Holder 70158 70158 H2 Battery 20710 20710 Recalibration Tool 20751 20751 Lubricant 70902 70902 Cover battery compartment 70107 70107 Plastic Window...
- Page 28 800-662-7027 Fax: 781-935-7631 Email: service@rainin.com Direct Order Line: Phone: 800-4-RAININ (800-472-4646) Fax: 781-938-1152 Email: pipets@rainin.com Web: http://www.rainin.com Rainin Instrument, LLC Rainin Road, Woburn, MA 01888-4026 7500 Edgewater Drive, Oakland, CA 94621 • 800-472-4646 e-mail: pipets@rainin.com web: www.rainin.com 9920-280 Rev B...
Need help?
Do you have a question about the Pipetman Ultra U-2 and is the answer not in the manual?
Questions and answers