Advertisement
Table of Contents
- 1 Table of Contents
- 2 Warnings
- 3 Setup Requirements
- 4 Charging the Parent Unit (10 Hours)
- 5 Setting up the Nursery Unit
- 6 Turning on Your Monitor
- 7 Testing and Getting to Know Your Monitor
- 8 Activating and Deactivating Additional Functions
- 9 Troubleshooting
- 10 Limited Warranty
- 11 Technical Specifications
- Download this manual
OWNER'S MANUAL
Model AC110
Baby Sound Monitor
WARNINGS
KEEP USER'S GUIDE FOR FUTURE REFERENCE. PLEASE READ THE WARNINGS AND SAFETY INSTRUCTIONS
CAREFULLY BEFORE ASSEMBLING & USING THE PRODUCT. FAILURE TO FOLLOW THE WARNINGS AND THE
INSTRUCTIONS COULD RESULT IN SERIOUS INJURY OR DEATH OR DAMAGE TO THE PRODUCT.
TABLE OF CONTENTS
.........................................................................................................................................................................................................2
SETUP REQUIREMENTS ............................................................................................................................................................................................................... 3
Charging the Parent Unit (10 hours) .................................................................................................................................................................................... 4
Setting up the nursery unit ..................................................................................................................................................................................................... 5
Turning on your monitor ........................................................................................................................................................................................................... 6
Testing and getting to know your monitor ...........................................................................................................................................................................7
Activating and deactivating additional functions ...........................................................................................................................................................10
Troubleshooting ........................................................................................................................................................................................................................12
Limited warranty.......................................................................................................................................................................................................................15
Technical specifications ........................................................................................................................................................................................................15
Advertisement
Table of Contents

Related Manuals for Angelcare AC110


Summary of Contents for Angelcare AC110
-
Page 1: Table Of Contents
OWNER’S MANUAL Model AC110 Baby Sound Monitor WARNINGS KEEP USER’S GUIDE FOR FUTURE REFERENCE. PLEASE READ THE WARNINGS AND SAFETY INSTRUCTIONS CAREFULLY BEFORE ASSEMBLING & USING THE PRODUCT. FAILURE TO FOLLOW THE WARNINGS AND THE INSTRUCTIONS COULD RESULT IN SERIOUS INJURY OR DEATH OR DAMAGE TO THE PRODUCT. -
Page 2: Warnings
• NEVER use extension cords with adaptors. ONLY use adaptors provided. • This product is NOT a Toy. NEVER allow children to play with it. 1. ALWAYS be sure to immediately check on baby 13. Only use the Angelcare recommended replacement whenever an alarm sounds. batteries (see Technical specification). -
Page 3: Setup Requirements
• Use ONLY with a cart, stand, tripod, bracket or table recommended by the manufacturer or sold with the product. • Be sure replacement parts are supplied by Angelcare and have the same characteristics as original part. SETUP REQUIREMENTS... -
Page 4: Charging The Parent Unit (10 Hours)
STEP 1 - CHARGING THE PARENT UNIT (10 HOURS) 1) Remove the battery cover on the rear. Insert the provided rechargeable batteries into the Battery compartment and replace cover. compartment 2) Connect the USB plug to the Parent Unit and connect the power adapter to an electrical outlet. -
Page 5: Setting Up The Nursery Unit
STEP 2 - SETTING UP THE NURSERY UNIT 2.1 - SELECT A LOCATION FOR THE NURSERY UNIT IMPORTANT Place the cot near a supporting wall and far from air currents. Install the Nursery Unit on a flat, stable surface facing the cot at a distance of at least 1 meter. Make sure to plug the adapter to the socket outlet nearest to the equipment and that is easily accessible. -
Page 6: Turning On Your Monitor
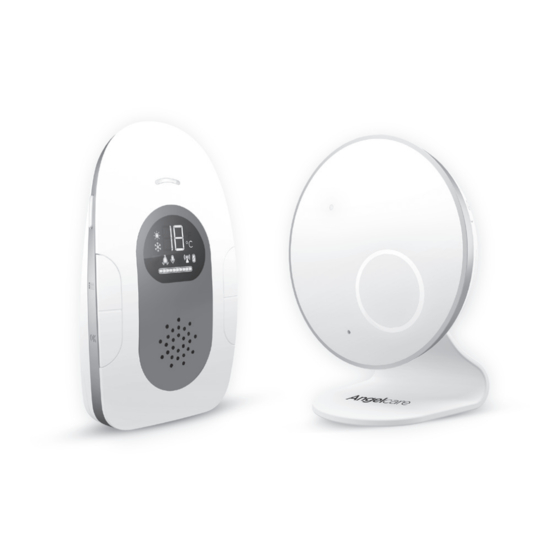
Temperature Indicator Port STEP 3 - TURNING ON YOUR MONITOR YOU ARE NOW READY TO USE YOUR MONITOR The Angelcare monitor can be used with the pre-program factory settings or you can also customize your ® settings to your preference. -
Page 7: Testing And Getting To Know Your Monitor
Sound Sensitivity Indicator Empty Charging STEP 4 - TESTING AND GETTING TO KNOW YOUR MONITOR The Angelcare monitor can be used with the pre-program factory settings or you can customize your settings to ® your preference. All changes and adjustments... - Page 8 4.2 - SOUND IF YOU HEAR NO SOUND: TO TEST SOUND: Ask someone to speak into the Nursery Unit or place • Check that both units are powered ON. the unit near a radio to ensure that sound is being •...
- Page 9 TO ADJUST SOUND SENSITIVITY (VOX) The sensitivity of the microphone is adjustable. This means that sound will only transmit based on the level that you set. 1) When the Sound Transmission is ON (VOX ON) press and hold the MENU button then press OK button until VOX ON icon blinks.
-
Page 10: Activating And Deactivating Additional Functions
TO SET TEMPERATURE RANGE NOTE: Make sure to turn ON Temperature alarm to be able to set Temperature range. 1) The Low Temperature will blink. Use the UP and DOWN arrows to set the LOW temperature alarm (5° to 19° Celsius). 2) Press the OK button to confirm your choice and set the High temperature. - Page 11 ON/OFF Temperature light Red - Room temperature is too hot Blue - Room temperature is too cold White - Room temperature is within your preferred parameters 5.2 - OUT OF RANGE SETTINGS Your monitor has an Out-of-Range alarm that advises you when your two units are not communicating. Out-of-Range situations can be caused by distance or by physical interferences.
-
Page 12: Troubleshooting
5.3 - PAGER Allows you to locate the Parent Unit. TO LOCATE THE PARENT UNIT Press and hold the Temperature Light Press and hold the Temperature Light button on button the side of the Nursery Unit. The Parent Unit will emit a paging sound. - Page 13 LOSS OF CONNECTIVITY BETWEEN THE PARENT UNIT AND THE NURSERY UNIT • In the case of loss of connectivity, the first step is to bring the Parent Unit and Nursery Unit closer together and make sure that both units are ON to restore the connection. If there is still no connection and no out-of- range warning after the above has been done, then and only then should the re-connection procedure below be done.
-
Page 14: Limited Warranty
Angelcare is not liable ® We, at Angelcare®, stand behind all of our products. If you for any incidental or consequential damages with regard are not completely satisfied or have any questions, please to this product. The warranty also excludes any liability contact your distributor before returning this product: other than what is stated above. -
Page 15: Technical Specifications
TECHNICAL SPECIFICATIONS Range: Hereby, Angelcare Monitors Inc., declares that this Baby Monitor Open field (Open area without obstructions): is in compliance with Directive 2014/53/EU. The full text of • Between the Nursery Unit and the Parent Unit: up to 250 meters. - Page 16 www.angelcarebaby.com...
Need help?
Do you have a question about the AC110 and is the answer not in the manual?
Questions and answers