
Related Manuals for RAKwireless RAK72x Series


Summary of Contents for RAKwireless RAK72x Series
- Page 1 Installation Guide for DIY Enterprise LoRa Gateway WisDevice RAK72x Series RAK7249 Version V1.0 | January 2019 www.RAKwireless.com Visit our website for more documents. 11 PAGES...
-
Page 2: Table Of Contents
7249 Table of Contents 1 Building Blocks............................3 2 Interfaces of the Enclosure........................4 3 Assembly..............................5 4 Installation..............................8 5 Optional Accessories..........................10 6 Contact Information..........................11 7 Revision History............................. 12 8 Document Summary..........................12 RAK7249 Installation Guide V1.0... -
Page 3: Building Blocks
7249 Building Blocks Create your own Enterprise Gateway using the supplied building Blocks: Main Board Enclosure Backup Battery Accessories The MainBoard supports multiple variants for meeting different requirement. Please refer to the DIY configuration for supported function. The Enclosure includes 5 RF cables and 1 Ethernet cable for connecting to the MainBoard. -
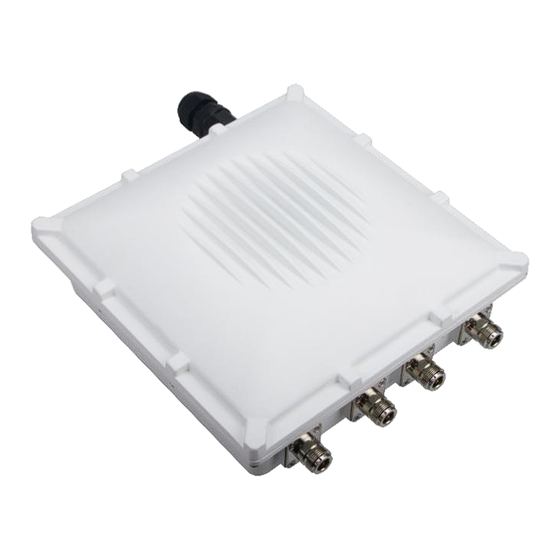
Page 4: Interfaces Of The Enclosure
7249 Interfaces of the Enclosure The enclosure’s interfaces and connectors of the DIY Gateway are shown as below. RAK7249 Installation Guide V1.0... -
Page 5: Assembly
7249 Assembly Step 1: Fix the support plate on the base with three M3*6 screws. Step 2: Install the Mainboard with four M3*6 screws. Step 3: Install the LoRa card (for example RAK833), the motherboard supports two LoRa cards, the first slot is for LoRa card of SPI type, the second slot is for LoRa card of USB type;... - Page 6 7249 Step 4: If your board supports the cellular funtion, you can install your SIM card into the motherboard’s SIM card slot. Step 5: Installation of RF cables, Ethernet cable and reserved hole plugs. Ethernet Cable Plug RF Cable(4x) RF Cable Step 6: Connect the cable to the motherboard.
- Page 7 7249 Step 7: If you have a Backup Battery Kit, connect with the Backup Battery to the motherboard. Step 8: Close the top cover with 12PCS M4*12 screws. RAK7249 Installation Guide V1.0...
-
Page 8: Installation
7249 Installation Step 1: Fix the device bracket on the bottom of the enclosure with four M6*12 screws. Step 2: Tighten the pole clamp bar with hexagonal bolts M6*110, washer and nuts. RAK7249 Installation Guide V1.0... - Page 9 7249 Step 3: Connect the clamp bar and the device with hexagonal bolts M6*30, washer and nuts. RAK7249 Installation Guide V1.0...
-
Page 10: Optional Accessories
7249 Optional Accessories LoRa Antenna 4G Antenna □ □ CMCC □ □ CUCC □ □ 2.4G Antenna GPS Antenna □ □ 2.4000 – 2.4835 1575.42 Mounting Lightning Cable Arrester Radio Water-proof Frequency Rubber Cloth Cable Insulating Tape RAK7249 Installation Guide V1.0... -
Page 11: Contact Information
7249 Contact Information Shenzhen Business ken.yu@rakwireless.com Room 506, Bldg B, New Compark, Pingshan First Road, Taoyuan Street, Nan shan District, Shenzhen Shenzhen Technical steven.tang@rakwireless.com 0755-86108311 Room 506, Bldg B, New Compark, Pingshan First Road, Taoyuan Street, Nan Shan District, Shenzhen... -
Page 12: Revision History
Zenglei & Penn Zenglei About RAKwireless: RAKwireless is the pioneer in providing innovative and diverse cellular and LoRa connectivity solutions for IoT edge devices. It's easy and modular design can be used in different IoT applications and accelerate time-to-market. For more information, please visit RAKwireless website at www.rakwireless.com.
Need help?
Do you have a question about the RAK72x Series and is the answer not in the manual?
Questions and answers