Beurer BM 40 Instructions For Use Manual
Hide thumbs
Also See for BM 40:
- User manual ,
- Instructions for use manual (112 pages) ,
- Instructions for use manual (92 pages)
Table of Contents
Advertisement
Available languages
Available languages
DE Blutdruckmessgerät
Gebrauchsanweisung ....................................... 2
EN Blood pressure monitor
Instructions for use ......................................... 16
FR Tensiométre
Mode d'emploi ................................................ 29
ES Tensiómetro
Manual de instrucciones ................................. 43
IT
Misuratore di pressione
Istruzioni per l'uso ........................................... 57
TR Tansiyon ölçme cihazı
Kullanım kılavuzu ............................................ 71
RU Прибор для измерения кровяного
давления в
Инструкция по применению ......................... 84
PL Ciśnieniomierz
Instrukcja obsługi ............................................ 98
BM 40
Advertisement
Chapters
Table of Contents

Subscribe to Our Youtube Channel
Related Manuals for Beurer BM 40


Summary of Contents for Beurer BM 40
- Page 1 BM 40 DE Blutdruckmessgerät Gebrauchsanweisung ........2 EN Blood pressure monitor Instructions for use ......... 16 FR Tensiométre Mode d’emploi ..........29 ES Tensiómetro Manual de instrucciones ......... 43 Misuratore di pressione Istruzioni per l’uso ........... 57 TR Tansiyon ölçme cihazı...
-
Page 2: Table Of Contents
3. Gerätebeschreibung ............6 4. Messung vorbereiten ............7 Mit freundlicher Empfehlung 5. Blutdruck messen ............... 9 Ihr Beurer-Team 6. Ergebnisse beurteilen ............10 1. Kennenlernen 7. Messwerte speichern, abrufen und löschen ....11 8. Gerät und Manschette reinigen und aufbewahren ... 12 Überprüfen Sie das Gerät auf äußere Unversehrtheit der... -
Page 3: Wichtige Hinweise
2. Wichtige Hinweise Zulässige Lagerungs- und Transporttempera- Storage / Transport tur und -luftfeuchtigkeit Zeichenerklärung In der Gebrauchsanweisung, auf der Verpackung und auf dem Zulässige Betriebstemperatur und Operating Typschild des Geräts und des Zubehörs werden folgende Sym- -luftfeuchtigkeit. bole verwendet: Vorsicht Vor Nässe schützen Hinweis Seriennummer... - Page 4 • Wiederholen Sie die Messung im Falle zweifelhaft gemesse- • Die Blutzirkulation darf durch die Blutdruckmessung nicht ner Werte. unnötig lange unterbunden werden. Bei einer Fehlfunktion • Die von Ihnen selbst ermittelten Messwerte können nur zu des Gerätes nehmen Sie die Manschette vom Arm ab. Ihrer Information dienen –...
- Page 5 • Explosionsgefahr! Keine Batterien ins Feuer werfen. Hinweise zur Aufbewahrung und Pflege • Batterien dürfen nicht geladen oder kurzgeschlossen wer- • Das Blutdruckmessgerät besteht aus Präzisions- und Elek- den. tronik-Bauteilen. Die Genauigkeit der Messwerte und Lebens- • Bei längerer Nichtbenutzung des Geräts die Batterien aus dauer des Gerätes hängt ab vom sorgfältigen Umgang: dem Batteriefach nehmen.
-
Page 6: Gerätebeschreibung
3. Gerätebeschreibung and Electronic Equipment). Bei Rückfragen wenden Sie sich an die für die Entsorgung zuständige kommunale Behörde. Hinweise zu Elektromagnetischer Verträglichkeit • Das Gerät ist für den Betrieb in allen Umgebungen geeignet, die in dieser Gebrauchsanweisung aufgeführt sind, ein- schließlich der häuslichen Umgebung. -
Page 7: Messung Vorbereiten
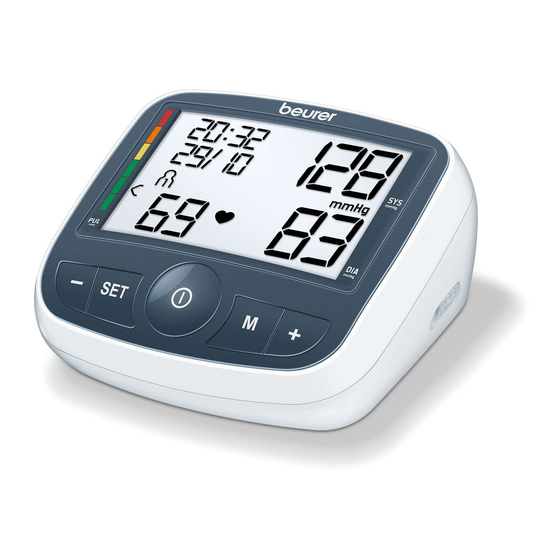
4. Messung vorbereiten Anzeigen auf dem Display: 1. Datum Batterie einlegen 2. Uhrzeit • Entfernen Sie den Deckel des Bat- 3. Aufpumpen , Luft ablassen teriefaches auf der Rück seite des 4. Systolischer Druck Gerätes. 5. Speicheranzeige Durchschnittswert • Legen Sie vier Batterien vom 6. - Page 8 Benutzerspeicher, Datum und Uhrzeit einstellen Im Display blinkt die Jahreszahl. In diesem Menü haben Sie die Möglichkeit folgende • Stellen Sie mit den Funktionstasten -/+ das Jahr ein Funktionen nacheinander einzustellen. und bestätigen Sie mit der Taste SET. Benutzerspeicher Datum Uhrzeit •...
-
Page 9: Blutdruck Messen
5. Blutdruck messen Diese Manschette ist für Sie geeignet, wenn nach Anlegen der Manschette die Bitte bringen Sie das Gerät vor der Messung auf Raum- Index-Markierung ( ) innerhalb des tempera tur. Sie können die Messung am linken oder rechten OK-Bereichs liegt. -
Page 10: Ergebnisse Beurteilen
• Ruhen Sie sich vor jeder Messung ca. 5 Minuten aus! Bei einer bereits zu erkennenden Tendenz zu hohem Ansonsten kann es zu Abweichungen kommen. Blutdruck wird nochmals nachgepumpt und der Man- • Sie können die Messung im Sitzen oder im Liegen durch- schettendruck nochmals erhöht. -
Page 11: Messwerte Speichern, Abrufen Und Löschen
Übermaß, Stress oder Mangel an Schlaf herrühren. Arrhythmie Bereich der Systole Diastole Maßnahme kann nur durch eine Untersuchung bei Ihrem Arzt festgestellt Blutdruckwerte (in mmHg) (in mmHg) werden. Stufe 3: einen Arzt aufsu- Wiederholen Sie die Messung, wenn das Symbol nach starke ≥... -
Page 12: Gerät Und Manschette Reinigen Und Aufbewahren
• Drücken Sie die Speichertaste M. Zunächst wird der • Um den Speicher des jeweiligen Benutzerspeichers zu Durchschnittswert aller gespeicherten Messwerte löschen, wählen Sie zunächst einen Benutzerspeicher dieses Benutzerspeichers angezeigt AL. aus. Starten Sie entweder die Abfrage der Durch- schnittswerte oder der Einzelmesswerte und halten •... -
Page 13: Fehlermeldung/Fehlerbehebung
Blutdrucks bzw. Aufpumpdruck 10. Technische Angaben Klassifikation Interne Versorgung, Dauerbetrieb, Anwendungsteil Typ BF, IP22, kein AP Modell-Nr. BM 40 oder APG Messmethode Oszillometrisch, nicht invasive Blut- druckmessung am Oberarm Die Seriennummer befindet sich auf dem Gerät oder im Bat- Messbereich Manschettendruck 0 –... -
Page 14: Netzteil
100 – 240 V, 50 – 60 Hz, 0.5 A max Bestellnummer Ausgang 6 V DC, 600 mA, nur in Verbindung mit Standardmanschette (22-35 cm): 162.972 Beurer Blutdruckmessgeräten XL-Manschette (30-42 cm): 162.973 Hersteller Shenzhen Iongxc power supply co., ltd Netzteil (EU): 071.95... - Page 15 Nachweis des Kaufes zu führen. Die Garantie ist innerhalb eines Zeitraumes von 5 Jahren ab Kaufdatum gegenüber der Beurer GmbH, Ulm (Germany) geltend zu machen. Bitte wenden Sie sich im Falle von Reklamationen an un- seren Service unter folgendem Kontakt: Service Hotline: Tel.: +49 (0) 731 / 39 89-144...
-
Page 16: Getting To Know Your Instrument
2. Important information ............17 3. Unit description ............... 20 Best regards, 4. Prepare measurement ............21 Your Beurer Team 5. Measuring blood pressure ..........22 1. Getting to know your instrument 6. Evaluating results ............. 24 7. Saving, displaying and deleting measured values ... 25 Check that the device packaging has not been tampered with 8. -
Page 17: Important Information
2. Important information Permissible storage and transport tempera- Storage / Transport ture and humidity Signs and symbols The following symbols are used in these instructions for use, Permissible operating temperature and hu- Operating on the packaging and on the type plate for the device and ac- midity. - Page 18 • The measurements taken by you are for your information • Do not allow sustained pressure in the cuff or frequent meas- only – they are not a substitute for a medical examination! urements. The resulting restriction of the blood flow may Discuss the measurements with your doctor, and never base cause injury.
- Page 19 – Do not use near strong electromagnetic fields, i.e. keep it Repair and disposal away from any radio systems and mobile phones. • Batteries do not belong in domestic refuse. Used batteries – Only ever use the cuffs provided with the monitor or origi- should be disposed of at the collection points provided.
-
Page 20: Unit Description
• The use of accessories other than those specified or pro- Icons in the display: vided by the manufacturer of this device can lead to an 1. Date increase in electromagnetic emissions or a decrease in the 2. Time device’s electromagnetic immunity; this can result in faulty 3. -
Page 21: Prepare Measurement
4. Prepare measurement Setting the user memory, date and time This menu allows you to set the following functions, one after Inserting battery another. • Remove the battery cover from the back of the monitor. User memory Date Time ➔ ➔... -
Page 22: Measuring Blood Pressure
5. Measuring blood pressure The year flashes on the display. Please ensure the device is at room temperature before meas- • Set the year with the function buttons -/+ and con- uring. The measurement can be performed on the left or right firm with the SET button. - Page 23 This cuff is suitable for you if the • Rest for approx. 5 minutes before each measurement. Other- index mark ( ) is within the OK wise there may be divergences. range after fitting the cuff on the • You can perform the measurement either sitting or lying down. upper arm.
-
Page 24: Evaluating Results
5 minutes between measurements and not talk or move dur- Measuring can be cancelled at any time by pressing ing the measurement. If the icon appears often, please the START/STOP button contact your doctor. Any self-diagnosis and treatment based • Systolic pressure, diastolic pressure and pulse read- on the test results may be dangerous. -
Page 25: Saving, Displaying And Deleting Measured Values
Blood pressure Systole Diastole • Press the memory button M. The average value of all Action value category (in mmHg) (in mmHg) saved measured values in this user memory is dis- Setting 3: played first AL. seek medical at- severe ≥... -
Page 26: Cleaning And Storing The Device And Cuff
• You have the option to delete individual measured val- 10. Specifications ues by pressing the SET button when the measured Model no. BM 40 values are displayed after the measurement. Measurement Oscillometric, non-invasive blood pressure • To switch off, press the START/STOP button... -
Page 27: Mains Part
Technical information is subject to change without notification Output 6 V DC, 600 mA, only in connection with to allow for updates. beurer blood pressure monitor. • This unit is in line with European Standard EN 60601-1-2 (In Supplier Shenzhen Iongxc power supply co., ltd... -
Page 28: Replacement Parts And Wearing Parts
1. The warranty period for BEURER products is either 5 years Enclosures and Equipment enclosed to protect against or- if longer- the country specific warranty period from date Protective Covers contact with live parts, and with parts of Purchase. which can become live (finger, pin, hook In case of a warranty claim, the date of purchase has to be test). -
Page 29: Premières Expériences
5. Mesure de la tension artérielle .......... 36 Avec nos sentiments dévoués 6. Evaluation des résultats............ 38 Beurer et son équipe 7. Enregistrer, consulter et supprimer les valeurs mesurées 39 1. Premières expériences 8. Nettoyage et rangement de l’appareil et de la manchette 39 9. -
Page 30: Remarques Importantes
2. Remarques importantes Storage/Transport Température et taux d’humidité de stockage et de transport admissibles Symboles utilisés Les symboles suivants sont utilisés dans le mode d’emploi, sur Operating Température et taux d’humidité d’utilisation l’emballage et sur la plaque signalétique de l’appareil et des admissibles accessoires : Protéger contre l’humidité... - Page 31 • Effectuez une nouvelle mesure si vous avez un doute sur les • Il ne faut pas bloquer la circulation sanguine plus longtemps valeurs mesurées. que nécessaire au cours de la prise de tension. Si l’appareil • Les mesures que vous avez établies servent juste à vous ne fonctionne pas bien, retirez le brassard du bras.
- Page 32 • Protégez les piles d’une chaleur excessive. Remarques relatives à la conservation et à l’entretien • Risque d‘explosion ! Ne jetez pas les piles dans le feu. • L’appareil de mesure de la tension artérielle est constitué de • Les piles ne doivent être ni rechargées, ni court-circuitées. pièces électroniques, de grande précision.
-
Page 33: Description De L'appareil
3. Description de l’appareil électroniques usagés. Pour toute question, adressez-vous aux collectivités locales responsables de l’élimination et du recyclage de ces produits. Informations sur la compatibilité électromagnétique • L’appareil est prévu pour fonctionner dans tous les envi- ronnements indiqués dans ce mode d’emploi, y compris dans un environnement domestique. -
Page 34: Préparation À La Mesure
4. Préparation à la mesure Affichages à l’écran : 1. Date Mise en place des piles 2. Heure • Otez le couvercle du compartiment 3. Gonflage , dégonflage des piles situé à l’arrière de l’appareil. 4. Pression systolique • Introduisez 4 piles alcalines AA 1,5 V. 5. - Page 35 Régler l’utilisateur, la date et l’heure L’année clignote à l’écran. Dans ce menu, vous avez la possibilité de régler successive- • Réglez l’année à l’aide des touches de fonction -/+ et ment les fonctions suivantes. confirmez votre choix avec la touche SET. •...
-
Page 36: Mesure De La Tension Artérielle
5. Mesure de la tension artérielle Cette manchette vous convient si le marquage de l’index ( ) se trouve Veuillez amener l’appareil à température ambiante avant la dans la zone OK après la pose de la mesure. Vous pouvez effectuer la mesure sur le bras gauche manchette sur le bras. - Page 37 • Vous pouvez effectuer la mesure en position assise ou cou- Mesurer la tension artérielle chée. Quelque soit la position, veillez à ce que le brassard se • Positionnez la manchette tel que décrit plus haut et trouve à la hauteur du coeur. Pour ne pas fausser le résultat, installez-vous dans la position de votre choix pour il est important de rester tranquille durant la mesure et de ne effectuer la mesure.
-
Page 38: Evaluation Des Résultats
6. Evaluation des résultats et la valeur à laquelle la pression sanguine est considérée comme dangereuse. Arythmies cardiaques : Si la valeur de systole et de diastole figure dans deux plages Pendant la mesure, cet appareil peut identifier une arythmie différentes (par exemple systole dans la plage «... -
Page 39: Enregistrer, Consulter Et Supprimer Les Valeurs Mesurées
7. Enregistrer, consulter et supprimer les • En appuyant sur les touches de fonction -/+ , les valeurs mesurées dernières valeurs de mesure individuelles s’affichent avec la date et l’heure. Lorsque vous confirmez avec Le résultat de chaque mesure réussie est enregistré la touche de fonction +, le dernier résultat mesuré... -
Page 40: Message D'erreur/Résolution Des Erreurs
Durée de vie des Environ 250 mesures, selon le niveau de 10. Fiche technique piles tension artérielle ainsi que la pression de N° du modèle BM 40 gonflage Mode de mesure Mesure de la tension artérielle au bras, Classement Alimentation interne, utilisation continue, oscillométrique et non invasive... -
Page 41: Adaptateur Électrique
EN60601-1-2 (en conformité avec CISPR 11, IEC61000-3-2, Sortie 6 V DC, 600 mA, uniquement en association IEC61000-3-3, IEC61000-4-2, IEC61000-4-3, IEC61000-4-4, avec les lecteurs de tension artérielle Beurer. IEC61000-4-5, IEC61000-4-6, IEC61000-4-8, IEC61000-4- Fabricant Shenzhen Iongxc power supply co., ltd 11) et répond aux exigences de sécurité spéciales relatives à... -
Page 42: Garantie / Maintenance
Les conditions de garantie suivantes s’appliquent : 1. La période de garantie des produits BEURER est de 5 ans ou, si elle est plus longue, elle est applicable dans le pays concerné à compter de la date d’achat. -
Page 43: Introducción
4. Preparación de la medición ..........48 5. Medición de la presión sanguínea ........50 Atentamente, 6. Evaluación de los resultados ..........52 El equipo de Beurer 7. Almacenamiento, consulta y borrado de los valores medi- 1. Introducción dos ................... 53 8. -
Page 44: Indicaciones Importantes
2. Indicaciones importantes Storage/Transport Temperatura y humedad de almacenamiento y transporte admisibles Explicación de los símbolos En las presentes instrucciones de uso, en el embalaje y en la Operating Temperatura y humedad relativa de placa de características del aparato y de los accesorios se funcionamiento admisibles utilizan los siguientes símbolos: Proteger de la humedad... - Page 45 • Las mediciones realizadas por usted solo tienen carácter • Evite apretar, estrangular o doblar el tubo flexible del braza- informativo, en ningún caso pueden reemplazar un examen lete mediante medios mecánicos. médico. Hable de los valores que obtenga con su médico. •...
- Page 46 • Si se derrama el líquido de una pila, póngase guantes pro- Indicaciones de conservación y cuidado tectores y limpie el compartimento de las pilas con un paño • El tensiómetro está compuesto por elementos electrónicos seco. y de precisión. La precisión de los valores de medición, así •...
-
Page 47: Descripción Del Aparato
3. Descripción del aparato aparato según la Directiva europea sobre residuos de aparatos eléctricos y electrónicos (RAEE). Para más información, póngase en contacto con la autoridad municipal competente en materia de eliminación de residuos. Indicaciones relativas a la compatibilidad electromagnética •... -
Page 48: Preparación De La Medición
4. Preparación de la medición Indicaciones en la pantalla: 1. Fecha Colocación de las pilas 2. Hora • Retire la tapa del compartimento de 3. Inflar , desinflar las pilas situado en la parte posterior 4. Presión sistólica del aparato. 5. - Page 49 Registro de usuario, ajuste de fecha y hora El indicador del año parpadea en pantalla. Desde este menú podrá ajustar las funciones que se mencio- • Ajuste el año con las teclas de función -/+ y confírme- nan a continuación. lo con la tecla SET.
-
Page 50: Medición De La Presión Sanguínea
5. Medición de la presión sanguínea Este brazalete será apropiado para usted si tras colocarlo la marca de Espere a que el aparato esté a temperatura ambiente para índice ( ) se encuentra en el área OK. realizar la medición. Puede realizar la medición en el brazo derecho o en el izquierdo. - Page 51 Adopción de una postura correcta Medición de la presión sanguínea • Póngase el brazalete como se ha descrito anteriormen- te y colóquese en la postura en la que desea realizar la medición. • Encienda el aparato con la tecla de INICIO/PARADA Después de comprobar la pantalla iluminando todas las cifras, se infla automáticamente el brazalete.
-
Page 52: Evaluación De Los Resultados
6. Evaluación de los resultados normal, así como del valor a partir del cual puede considerarse peligroso un incremento de la presión sanguínea. Alteraciones del ritmo cardiaco: El gráfico de barras de la pantalla y la escala en el aparato indi- Este aparato es capaz de reconocer eventuales alteraciones can en qué... -
Page 53: Almacenamiento, Consulta Y Borrado De Los Valores Medidos
Rango de los valores Sístole Diástole • Pulse la tecla de memorización M. En primer lugar Medida de la presión arterial (en mmHg) (en mmHg) aparecerá el valor promedio de todas las mediciones Haga un guardadas de este registro de usuario AL. seguimien- Normal 120 –... -
Page 54: Limpiar Y Guardar La Unidad Y El Brazalete
• Tiene la opción de borrar valores de medición indi- 10. Datos técnicos viduales pulsando, después de la medición, la tecla N.º de modelo BM 40 SET mientras se muestran los valores de medición. Método de Oscilométrico, medición no invasiva de la •... -
Page 55: Fuente De Alimentación
• Este aparato cumple con la norma europea EN60601-1-2 Salida 6 V DC, 600 mA, solamente en combinación (Conformidad con CISPR 11, IEC61000-3-2, IEC61000-3-3, con los tensiómetros Beurer IEC61000-4-2, IEC61000-4-3, IEC61000-4-4, IEC61000- 4-5, IEC61000-4-6, IEC61000-4-8, IEC61000-4-11) y está Fabricante Shenzhen Iongxc power supply co., ltd sujeto a las medidas especiales de precaución relativas a la... -
Page 56: Piezas De Repuesto Y De Desgaste
Se aplican las siguientes condiciones de garantía: Polaridad de la conexión de tensión continua 1. El periodo de garantía para productos de BEURER es de Aislamiento de protección / Clase de protec- 5 años o, si es superior, se aplica el periodo de garantía ción 2... -
Page 57: Note Introduttive
4. Preparazione della misurazione ........62 5. Misurazione della pressione sanguigna ......64 Cordiali saluti 6. Valutare i risultati .............. 65 Il Suo team Beurer 7. Memorizzazione, ricerca e cancellazione dei valori 1. Note introduttive misurati ................66 Controllare l’integrità esterna della confezione e del contenuto. -
Page 58: Avvertenze Importanti
2. Avvertenze importanti Storage/Transport Temperatura e umidità di trasporto e stoccaggio consentite Spiegazione dei simboli I seguenti simboli sono utilizzati nelle istruzioni per l’uso, Operating Temperatura e umidità di esercizio consentite sull’imballo e sulla targhetta dell’apparecchio e degli accessori: Attenzione Protéger contre l’humidité... - Page 59 • I valori misurati autonomamente hanno solo scopo infor- • Evitare di schiacciare, comprimere o piegare meccanicamen- mativo, non sostituiscono i controlli medici. Comunicare al te il tubo del manicotto. medico i propri valori, non intraprendere in alcun caso terapie •...
- Page 60 – Proteggere l’apparecchio da urti, umidità, polvere e sporci- • Non utilizzare batterie ricaricabili! zia, forti variazioni della temperatura e raggi diretti del sole. • Non smontare, aprire o frantumare le batterie. – Non far cadere l’apparecchio. Indicazioni sulla riparazione e sullo smaltimento –...
-
Page 61: Descrizione Dell'apparecchio
3. Descrizione dell’apparecchio • Evitare di utilizzare il presente apparecchio nelle immediate vicinanze di altri apparecchi o con apparecchi in posizione impilata, poiché ciò potrebbe determinare un funzionamento non corretto. Qualora fosse comunque necessario un utilizzo nel modo prescritto, è opportuno tenere sotto controllo que- sto apparecchio e gli altri apparecchi in modo da assicurarsi che funzionino correttamente. -
Page 62: Preparazione Della Misurazione
4. Preparazione della misurazione Indicazioni sul display: 1. Data Inserimento delle batterie 2. Ora • Togliere il coperchio lato posteriore 3. Gonfiaggio , scarico aria dell’apparecchio. 4. Pressione sistolica • Inserire 4 batterie del tipo alcaline AA 5. Indicazione memoria valore medio 1,5 V. - Page 63 Memoria utente, impostazione di data e ora Sul display lampeggia il numero dell’anno. In questo menu è possibile impostare in sequenza le seguenti • Impostare l’anno con i pulsanti funzione -/+ e confer- funzioni. mare l’immissione con il pulsante SET. Memoria utente Data •...
-
Page 64: Misurazione Della Pressione Sanguigna
5. Misurazione della pressione sanguigna Questo manicotto è da considerarsi idoneo se il contrassegno indicatore Prima della misurazione portare l’apparecchio a temperatu- ) dopo l’applicazione del ra ambiente. La misurazione può essere eseguita sul braccio manicotto sul braccio si trova entro destro o sinistro. -
Page 65: Valutare I Risultati
• Riposare per circa 5 minuti prima di ogni misurazione! • Il manicotto viene gonfiato fino a 190 mmHg, quindi In caso contrario l’apparecchio può fornire misure inesatte. la pressione viene rilasciata lentamente. In caso di • La misurazione può essere eseguita da seduti o sdraiati. Ad tendenza all’ipertensione il manicotto viene gonfiato ogni modo controllare che il bracciale si trovi all’altezza del ulteriormente, aumentando la relativa pressione. -
Page 66: Memorizzazione, Ricerca E Cancellazione Dei Valori Misurati
frequenza lenta o accelerata dei battiti) possono essere causati Intervallo dei va- Sistole Diastole Misura da adot- tra l’altro da malattie cardiache, età, predisposizione genetica, lori di pressione (in mmHg) (in mmHg) tare ingerimento spropositato di dolciumi, stress o sonno insuffi- Livello 3: Rivolgersi a un ciente. -
Page 67: Pulizia E Conservazione Dell'apparecchio E Del Manicotto
• Premere il pulsante per la memorizzazione M. Innanzi • Per cancellare una posizione di memoria di una de- tutto viene visualizzato il valore medio di tutti i valori terminata memoria utente è necessario innanzi tutto misurati nella memoria utente AL. selezionare la memoria utente. -
Page 68: Messaggi Di Errore/Soluzioni
Ca. 250 misurazioni, in base alla pres- sione sanguigna e di pompaggio 10. Dati tecnici Classificazione Alimentazione interna, funzionamento Codice BM 40 continuo, parte applicativa tipo BF, Metodo di misura- Oscillometrico, misurazione non invasi- IP22, non fa parte della categoria AP/ zione va della pressione dal braccio Range di misurazione Pressione del manicotto 0 –... -
Page 69: Alimentatore Di Rete
I pezzi di ricambio e le parti soggette a usura possono essere Uscita 6 V DC, 600 mA, solo in abbinamento ordinati presso l‘Assistenza clienti indicando il codice prodotto. con sfigmomanometri Beurer. Denominazione Cod. articolo o cod. Produttore Shenzhen Iongxc power supply co., ltd... -
Page 70: Garanzia / Assistenza
Si applicano le seguenti condizioni di garanzia: 1. La garanzia dei prodotti BEURER dura 5 anni oppure, se più lunga, fa fede la durata di garanzia valida dalla data di acquisto di ciascun paese. -
Page 71: Içindekiler 1. Ürün Özellikleri
3. Cihaz açıklaması ............... 75 4. Ölçüme hazırlık ..............76 Yeni cihazınızı iyi günlerde kullanmanızı dileriz 5. Tansiyon ölçme ..............77 Beurer Ekibiniz 6. Sonuçları değerlendirme ..........78 1. Ürün özellikleri 7. Ölçüm değerlerini kaydetme, çağırma ve silme ....80 8. -
Page 72: Önemli Yönergeler
2. Önemli yönergeler Storage/Transport İzin verilen depolama ve taşıma sıcaklığı ve hava nemi İşaretlerin açıklaması Cihazın ve aksesuarların kullanım kılavuzunda, ambalajında ve Operating İzin verilen çalışma sıcaklığı ve nem model etiketinde aşağıdaki semboller kullanılır: Dikkat Nemden koruyun Önemli bilgilere yönelik notlar Seri numarası... - Page 73 yerini tutamaz! Ölçüm değerlerinizi doktorunuza bildirin ve • Manşeti, atardamarları veya toplardamarları tıbbi tedavi gö- hiçbir zaman ölçüm sonuçlarından yola çıkarak kendi tıbbi ren bir kola takmamaya dikkat edin, örn. intravasküler giriş, kararlarınızı vermeyin (örneğin ilaçlar ve dozları)! intravasküler tedavi veya arteriovenöz (A-V-) bypass. •...
- Page 74 – Sadece ürünle birlikte verilen veya orijinal yedek manşetler • Cihazı kendiniz onarmayın veya ayarlamayın. Aksi halde ciha- kullanın. Aksi takdirde yanlış ölçüm sonuçları elde edilir. zın kusursuz çalışması garanti edilemez. • Cihaz uzun süre kullanılmayacaksa pilleri çıkarmanız önerilir. • Onarım işlemleri yalnızca müşteri servisi veya yetkili satıcılar tarafından yapılabilir.
-
Page 75: Cihaz Açıklaması
• Bunun dikkate alınmaması cihaz performansının olumsuz Ekrandaki göstergeler: etkilenmesine neden olabilir. 1. Tarih 2. Saat 3. Havayla şişirme , havayı tahliye etme 3. Cihaz açıklaması 4. Sistolik basınç 5. Hafıza göstergesi ortalama değer 6. Birim mmHg 7. Diyastolik basınç 8. -
Page 76: Ölçüme Hazırlık
4. Ölçüme hazırlık Kullanıcı hafızası Tarih Saat ➔ ➔ Pilleri yerleştirme Tarihi ve saati mutlaka ayarlamalısınız. Yalnızca ayarı yaptığınız- • Ölçüm cihazının arka tarafındaki pil da ölçüm değerlerinizi tarih ve saat ile hafızaya alabilir ve daha bölmesinin kapağını çıkarın. sonra tekrar bakabilirsiniz. •... -
Page 77: Tansiyon Ölçme
Elektrik adaptörü ile çalıştırma Manşet üst kola, alt kenarı dirseğin iç kısmının 2 – 3 cm üzerinde ve Bu cihazı bir elektrik adaptörüyle de çalıştırabilirsiniz. Bunun atardamarın üstünde duracak şekilde için pil yuvasında pil olmamalıdır. Elektrik adaptörünü sipariş yerleştirilmelidir. Hortum, avuç içinin numarası... -
Page 78: Sonuçları Değerlendirme
Dikkat: Cihaz sadece orijinal manşetle kullanılabilir. Manşet Tansiyon ölçümünü gerçekleştirme sadece 22 ile 35 cm arası kol çevresi için uygundur. • Manşeti yukarıda açıklandığı gibi takın ve ölçümü Sipariş numarası 162.973 ile 30 ile 42 cm arası üst kol çevreleri gerçekleştirmek istediğiniz duruşa geçin. - Page 79 Bu, ritm bozukluğu (aritmi) göstergesi olabilir. Ritm bozukluğu cihazdaki grafiksel dağılımı her zaman daha yüksek olan aralığı (aritmi), kalp atışına kumanda eden biyoelektrik sistemde gösterir; verilen örnekte “Yüksek normal” aralığı. hatalar nedeniyle kalp ritminin anormal olduğu bir hastalıktır. Semptomların (atlayan veya erken kalp atışları, yavaş veya çok Tansiyon Sistol Diyastol...
-
Page 80: Ölçüm Değerlerini Kaydetme, Çağırma Ve Silme
7. Ölçüm değerlerini kaydetme, çağırma ve • İlgili kullanıcı hafızasındaki kayıtları silmek için önce silme bir kullanıcı hafızası seçin. Ortalama değerleri ya da ölçüm değerlerini görüntüleyerek işleme başlayın ve Başarılı her ölçümün sonuçları, tarih ve saat ile birlikte şimdi SET düğmesini yaklaşık 3 saniye basılı tutun. kaydedilir. -
Page 81: Teknik Veriler
Dahili besleme, devamlı kullanım, uygula- 10. Teknik veriler ma parçası tip BF, IP22, AP veya APG yok Model no. BM 40 Seri numarası, cihazın üzerinde veya pil bölmesindedir. Ölçüm yöntemi Üst koldan, osilometrik, invazif olmayan Güncelleme sebebiyle önceden haber verilmeksizin teknik bil- tansiyon ölçümü... -
Page 82: Elektrik Adaptörü
önce, pillerin pil gözünden çıkarılmış olmasını sağlayınız. Aşağıdaki garanti koşulları geçerlidir: 1. BEURER ürünlerinin garanti süresi 5 yıldır veya – daha uzun Doğru akım bağlantısının kutupları ise – ilgili ülkede geçerli olan satın alma tarihinden itibaren Koruyucu izolasyon / Koruma sınıfı 2 garanti süresi kabul edilir. - Page 83 3. Garanti aşağıdakiler sonucu oluşan hasarlar için geçerli değildir: a. Usulüne uygun olmayan kullanım, örn. kullanım talimatlarına uyulmaması. b. Müşteri veya yetkisiz kişiler tarafından yapılan onarımlar. c. Üreticiden müşteriye nakliye veya servis merkezine nakli- ye sırasında oluşan hasarlar. d. Normal yıpranmaya uğrayan aksesuarlar (manşet, piller vb.) için garanti geçerli değildir.
-
Page 84: Cодержание 1. Ознакомление
ее прочитать и другим пользователям и строго следуйте 9. Сообщение об ошибке/устранение ошибок ....95 приведенным в ней указаниям. 10. Технические данные ............95 С дружескими пожеланиями сотрудники компании Beurer 11. Блок питания ..............97 1. Ознакомление 12. Запасные части и детали, подверженные быстрому... -
Page 85: Важные Указания
Вы будете предупреждены при возможно имеющихся на- Прибор следует утилизировать согласно рушениях ритма сердца. Директиве ЕС по отходам электрического и Полученные результаты измерений классифицируются электронного оборудования — WEEE (Waste и отображаются в графическом виде. Electrical and Electronic Equipment). Сохраняйте данную инструкцию по применению для В... - Page 86 • Не используйте прибор для измерения артериального Сертификационный знак для изделий, экс- давления у новорожденных детей и у женщин, страдаю- портируемых в Российскую Федерацию и щих преэклампсией. Перед использованием прибора для страны СНГ измерения артериального давления во время беремен- ности рекомендуется проконсультироваться с врачом. Указания...
- Page 87 • Во избежание дальнейших повреждений не кладите ман- • Если Вы длительное время не пользуетесь прибором, жету поверх ран. рекомендуется вынуть батарейки. • Питание прибора производится от батареек или от блока питания. Помните, что перенос данных и их сохранение Обращение с элементами питания возможны...
- Page 88 Указания по электромагнитной совместимости Указания по ремонту и утилизации • Прибор предназначен для работы в условиях, • Батарейки запрещается выбрасывать в бытовой мусор. перечисленных в настоящей инструкции по применению, Утилизируйте использованные батарейки через соответ- в том числе в домашних условиях. ствующий...
-
Page 89: Описание Прибора
3. Описание прибора Индикация на дисплее: 1. Дата 2. Время 3. Накачивание , выпускание воздуха 4. Систолическое давление 5. Индикация среднего значения из сохраненных в памяти 6. Единица «мм ртутного столба» 7. Диастолическое давление 8. Символ необходимости замены батареек 9. Символ «Пульс» 10. -
Page 90: Подготовка К Измерению
4. Подготовка к измерению Ячейка памяти пользователя, настройка времени и даты В этом меню можно последовательно настроить следую- Установка батарейки щие функции. • Снимите крышку с батарейного отсека на задней стенке аппарата. Ячейка памяти пользователя Дата Время ➔ ➔ • Установите 4 алкалиновых бата- Обязательно... -
Page 91: Измерение Кровяного Давления
артериального давления удаляются, но сохраненные На дисплее замигает год результаты измерения остаются. • При помощи функциональных кнопок -/+ настрой- 5. Измерение кровяного давления те год и подтвердите нажатием кнопки SET. Пожалуйста, перед измерением храните прибор при ком- • Установите месяц, день, час и минуту, каждый раз натной... - Page 92 Наденьте теперь соединительную Принять правильное положение трубку манжеты на штуцер манжеты. Манжета Вам подходит, если после ее наложения отметка индекса ( • Перед каждым измерением расслабляйтесь в течение находится в пределах диапазона около 5 минут! В противном случае возникают неточно- сти измерения. Если...
-
Page 93: Оценка Результатов
ляет сердечными сокращениями. Симптомы (пропущенные • Манжета накачивается до 190 мм рт. ст. Давление или преждевременные сердечные сокращения, медленный воздуха в манжете медленно снижается. При рас- или слишком быстрый пульс) могут вызываться, среди познавании склонности к высокому давлению ман- прочего, заболеваниями сердца, возрастом, физиологиче- жета... -
Page 94: Сохранение, Просмотр И Удаление Результатов Измерения
артериального давления, а также значения, которые могут Источник: WHO, 1999 (World Health Organization) быть для Вас опасными. 7. Сохранение, просмотр и удаление Пиктограмма на дисплее и шкала на аппарате указыва- результатов измерения ют, в каком диапазоне находится измеренное кровяное давление. Результаты... -
Page 95: Очистка И Хранение Прибора И Манжеты
• Для выключения нажмите кнопку ВКЛ./ВЫКЛ 10. Технические данные • Если Вы забудете выключить прибор, он отключит- Модель № BM 40 ся автоматически через 3 минуты. Метод измерения Осциллометрическое, неинвазивное из- 8. Очистка и хранение прибора и манжеты мерение кровяного давления на плече... - Page 96 Серийный номер находится на приборе или в отделении Точность ± 3 мм рт. ст. для систолического, для батареек. индикации ± 3 мм рт. ст. для диастолического, В связи с развитием продукта компания оставляет за со- пульс ± 5 % от определяемого значения бой...
-
Page 97: Блок Питания
переменного/постоянного тока. Выход 6 В пост. тока, 600 мА, только в комбинации с приборами для измерения артериального 12. Запасные части и детали, подверженные давления Beurer быстрому износу Защита Прибор имеет двойную защитную изоляцию Запасные части и детали, подверженные быстрому износу, и оборудован предохранителем с первичной... -
Page 98: Zaznajomienie Się Z Urządzeniem
Szanowna Klientko, szanowny Kliencie! graficznej. Dziękujemy, że wybrali Państwo produkt z naszego asor- Niniejszą instrukcję obsługi należy zachować w celu tymentu. Firma Beurer oferuje dokładnie przetestowane, późniejszego użycia i przechowywać w miejscu dostępnym dla wysokiej jakości produkty przeznaczone do pomiaru ciepła, innych użytkowników. -
Page 99: Ważne Wskazówki
2. Ważne wskazówki Operating Dopuszczalna temperatura i wilgotność powietrza podczas pracy Objaśnienie symboli W instrukcji obsługi, na opakowaniu i tabliczce znamionowej Chronić przed wilgocią urządzenia oraz akcesoriów znajdują się następujące symbole: Uwaga Numer seryjny Wskazówka Oznakowanie CE potwierdza zgodność z za- Ważne informacje sadniczymi wymogami dyrektywy 93/42/EEC w sprawie wyrobów medycznych. - Page 100 wać decyzji medycznych na własną rękę (np. dotyczących • Mankietu nie należy zakładać na ramię, w którym leczone są stosowania leków i ich dawkowania)! tętnice i żyły, np. angioplastyka/terapia naczyń krwionośnych • Stosowanie ciśnieniomierza poza domem lub w ruchu (np. czy przetoka tętniczo-żylna (AV).
- Page 101 – Nie używać ciśnieniomierza w pobliżu silnych pól elektro- • Nie wolno rozmontowywać, otwierać ani rozdrabniać baterii. magnetycznych, a także urządzeń radiowych i telefonów Wskazówki dotyczące naprawy i utylizacji komórkowych. – Stosować wyłącznie mankiet dołączony do ciśnieniomierza • Baterii nie wolno wyrzucać do zwykłego pojemnika na śmie- lub oryginalne mankiety zamienne.
-
Page 102: Opis Urządzenia
3. Opis urządzenia Wskazówki dot. kompatybilności elektromagnetycznej • Urządzenie jest przeznaczone do użytkowania w każdym otoczeniu wymienionym w niniejszej instrukcji obsługi, włącznie z domem. • Przy zakłóceniach elektromagnetycznych w pewnych warunkach urządzenie może być użytkowane tylko w ograni- czonym zakresie. Wskutek tego mogą wystąpić np. komuni- katy o błędach lub awaria wyświetlacza/urządzenia. -
Page 103: Przygotowanie Do Pomiaru
4. Przygotowanie do pomiaru Informacje na wyświetlaczu: 1. Data Wkładanie baterii 2. Godzina • Zdejmij pokrywę komory baterii z 3. Pompowanie , wypuszczanie powietrza tyłu urządzenia. 4. Ciśnienie skurczowe • Włóż 4 baterie 1,5 V AA (alkaliczne, 5. Wskaźnik pamięci wartości średniej typ LR 06). -
Page 104: Pomiar Ciśnienia Tętniczego
Ustawienie pamięci użytkownika, daty i godziny Eksploatacja urządzenia z zasilaczem W tym menu można po kolei ustawić następujące funkcje. Urządzenie można również używać z zasilaczem. W takim wy- padku w urządzeniu nie mogą się znajdować baterie. Zasilacz Pamięć użytkownika Data Godzina ➔... - Page 105 Mankiet należy założyć na ramieniu w Uwaga: Urządzenie może być używane wyłącznie z oryginal- taki sposób, aby dolna krawędź nym mankietem. Mankiet jest przeznaczony dla osób o obwo- mankietu znajdowała się 2 – 3 cm dzie ramienia 22–35 cm. powyżej zgięcia łokcia i tętnicy. Wężyk Podając numer zamówienia 162.973 w sklepach specjalistycz- musi być...
-
Page 106: Interpretacja Wyników
6. Interpretacja wyników Pomiar ciśnienia tętniczego krwi Zaburzenia pracy serca: • Załóż mankiet zgodnie z powyższym opisem i przyjmij Podczas pomiaru urządzenie może rozpoznać ewentualne pozycję, w której ma być dokonany pomiar. zaburzenia rytmu serca. Użytkownik jest informowany o tym po •... -
Page 107: Zapis, Odczyt I Usuwanie Wyników Pomiaru
Ważne jest więc regularne korzystanie z konsultacji lekarskich. Zakres wartości Ciśnienie skur- Ciśnienie rozkur- Rozwiązanie Podczas konsultacji lekarz określi normalne wartości ciśnienia ciśnienia czowe (w mmHg) czoe (w mmHg) oraz wartości, które należy uznać za niebezpieczne. Samodzielna Wykres słupkowy na wyświetlaczu i skala na urządzeniu infor- Optymalne <... -
Page 108: Czyszczenie I Dbałość O Urządzenie Oraz Mankiet
8. Czyszczenie i dbałość o urządzenie oraz • Po naciśnięciu przycisków funkcyjnych -/+ zostaną mankiet wyświetlone ostatnie pojedyncze wyniki pomiaru z • Urządzenie i mankiet należy czyścić ostrożnie, wyłącznie za datą i godziną. Po naciśnięciu przycisku funkcyjnego pomocą lekko zwilżonej szmatki. + wyświetlone zostaną... -
Page 109: Dane Techniczne
10. Dane techniczne Trwałość baterii Na ok. 250 pomiarów, w zależności od wysokości ciśnienia krwi lub ciśnienia Nr modelu BM 40 pompowania Metoda pomiaru Oscylometryczny, nieinwazyjny pomiar Klasyfikacja Zasilanie wewnętrzne, praca ciągła, część ciśnienia na ramieniu aplikacyjna typu BF, IP22, nie jest to urzą- Zakres pomiaru Ciśnienie w mankiecie 0 –... -
Page 110: Zasilacz
Przy odsyłce urządzenia należy załączyć kopię dowodu zakupu i krótki opis usterki. Posiada izolację ochronną / Klasa ochron- na 2 Obowiązują następujące warunki gwarancji: 1. Okres gwarancji na produkty firmy BEURER wynosi 5 lat lub, jeśli jest dłuższy, obowiązuje w danym kraju od daty zakupu. - Page 111 W przypadku roszczeń z tytułu gwarancji konieczne jest potwierdzenie daty zakupu przez okazanie dowodu zakupu lub faktury. 2. Naprawy (całego urządzenia lub jego części) nie przedłużają okresu gwarancyjnego. 3. Gwarancja nie obowiązuje w przypadku uszkodzeń powsta- łych w następujących okolicznościach: a.
- Page 112 Beurer GmbH • Söflinger Straße 218 • 89077 Ulm, Germany • www.beurer.com www.beurer-blutdruck.com • www.beurer-gesundheitsratgeber.com • www.beurer-healthguide.com...
Need help?
Do you have a question about the BM 40 and is the answer not in the manual?
Questions and answers