Walchem W900 Series Instruction Manual
Water treatment controller
Hide thumbs
Also See for W900 Series:
- Quick programming manual (3 pages) ,
- Instruction manual (76 pages) ,
- Troubleshooting manual (10 pages)

Related Manuals for Walchem W900 Series


Summary of Contents for Walchem W900 Series
- Page 1 W900 Series Water Treatment Controller Instruction Manual Five Boynton Road Hopping Brook Park Holliston, MA 01746 USA TEL: 508-429-1110 WEB: www.walchem.com...
- Page 2 WALCHEM and for the purposes disclosed in writing at the time of purchase, if any. WALCHEM’s liability under this warranty shall be limited to replacement or repair, F.O.B. Holliston, MA U.S.A.
-
Page 3: Table Of Contents
Contents INTRODUCTION ............................1 SPECIFICATIONS ............................2 2.1 Measurement Performance ........................2 2.2 Electrical: Input/Output ..........................3 2.3 Mechanical ...............................5 2.4 Variables and their Limits ..........................6 UNPACKING & INSTALLATION ......................9 3.1 Unpacking the unit .............................9 3.2 Mounting the electronic enclosure ......................9 3.3 Sensor Installation ...........................10 3.4 Icon Definitions ............................13 3.5 Electrical installation ..........................14 FUNCTION OVERVIEW .........................32... - Page 4 5.3.5 Relay, Bleed then Feed Control Mode ....................63 5.3.6 Relay, Percent Timer Control Mode .....................64 5.3.7 Relay, Biocide Timer Control Mode ......................64 5.3.8 Relay, Alarm Output Mode ........................65 5.3.9 Relay, Time Proportional Control Mode ....................66 5.3.10 Relay, Intermittent Sampling Control Mode ..................66 5.3.11 Relay, Manual Mode ..........................67 5.3.12 Relay, Pulse Proportional Control Mode ....................67 5.3.13 Relay, PID Control Mode ........................68...
- Page 5 TROUBLESHOOTING ........................... 101 8.1 Calibration Failure ..........................101 8.1.1 Contacting Conductivity Sensors ....................101 8.1.2 Electrodeless Conductivity Sensors ....................101 8.1.3 pH Sensors ............................ 102 8.1.4 ORP Sensors ..........................102 8.1.5 Disinfection Sensors ........................102 8.1.6 Analog Inputs ..........................102 8.1.7 Temperature Sensors ........................
-
Page 6: 1.0 Introduction
The standard Ethernet feature provides remote access to the controller’s programming via a PC connected directly, via a local area network, or via Walchem’s VTouch account management server. It also allows emailing of datalog files... -
Page 7: 2.0 Specifications
(in CSV format, compatible with spreadsheets like Excel) and alarms, to up to eight email addresses. The Modbus TCP and BACnet remote communications options allow communication with PC-based applications, HMI/SCADA programs, Building Energy Management systems, Distributed Control Systems (DCS), as well as stand-alone HMI devices. -
Page 8: Electrical: Input/Output
Sensor Input Signals (0 to 8 depending on model code): Contacting Conductivity 0.01, 0.1, 1.0, or 10.0 cell constant OR Electrodeless Conductivity Disinfection Amplified pH, ORP or ISE Requires a preamplified signal. Walchem WEL or WDS series recommended. ±5VDC power available for external preamps. - Page 9 Each sensor input card contains a temperature input Temperature 100 or 1000 ohm RTD, 10K or 100K Thermistor Analog (4-20 mA) Sensor Input (0 to 2-wire loop powered or self-powered transmitters supported 24 depending on model code): 3 or 4 –wire transmitters supported Two to Six channels per board, depending on model Channel 1, 130 ohm input resistance Channel 2-6, 280 ohm input resistance...
-
Page 10: Mechanical
Wi-Fi Radio Protocol: IEEE 802.11 b/g/n Security Protocols (Ad-Hoc Mode): WPA2-Personal Security Protocols (Infrastructure Mode): WPA/WPA2-Personal, WEP Certifications and Compliance: FCC, IC TELEC, CE/ETSI, RoHS, Wi-Fi Certified NOTE on Wi-Fi: This equipment has been tested and found to comply with the limits for a Class A digital device, pursuant to part 15 of the FCC Rules. -
Page 11: Variables And Their Limits
Glass, Polymer, PTFE, pH (High Pressure) 0-300 psi (0-21 bar)* 32-275°F (0-135°C)* 1/2” NPTM gland 316SS, FKM Platinum, Polymer, PTFE, ORP (High Pressure) 0-300 psi (0-21 bar)* 32-275°F (0-135°C)* 1/2” NPTM gland 316SS, FKM Free Chlorine/Bromine 0-14.7 psi (0-1 bar) 32-113°F (0-45°C) Extended pH Range Free 0-14.7 psi (0-1 bar) - Page 12 Low Range (Generic sensor, Virtual Input) -1,000,000 1,000,000 High Range (Generic sensor, Virtual Input) -1,000,000 1,000,000 Constant (Virtual Input only) 10% below Low Range setting 10% above High Range setting Deviation Alarm (Virtual Input) 10% below Low Range setting 10% above High Range setting 4 mA value (Transmitter, AI Monitor analog input only) 20 mA value (Transmitter, AI Monitor analog input only) Max Sensor Range (Fluorometer analog input only)
- Page 13 Onset Time (Spike mode) 0 seconds 23:59:59 HH:MM:SS Duty Cycle Period (On/Off, Spike, Dual Setpoint modes) 0:00 minutes 59:59 minutes Duty Cycle (On/Off, Spike, Dual Setpoint modes) 100% On Delay Time (Manual, On/Off, Dual Setpoint modes) 0 seconds 23:59:59 HH:MM:SS Off Delay Time (Manual, On/Off, Dual Setpoint modes) 0 seconds 23:59:59 HH:MM:SS...
-
Page 14: 3.0 Unpacking & Installation
Inspect the contents of the carton. Please notify the carrier immediately if there are any signs of damage to the controller or its parts. Contact your distributor if any of the parts are missing. The carton should contain a W900 series controller and an instruction manual. -
Page 15: Sensor Installation
level, on a vibration-free surface, utilizing all four mounting holes for maximum stability. Use M6 (1/4” diameter) fasteners that are appropriate for the substrate material of the wall. The enclosure is NEMA 4X (IP65) rated. The maximum operating ambient temperature is 122°F (50°C); this should be considered if installation is in a high tem- perature location. - Page 16 electrodes also must be installed with the measuring surfaces pointing down; that is 5 degrees above the horizontal, at a minimum. The disinfection sensor should be placed as close to the controller as possible, to a maximum distance of 100 feet (30 m) from the controller.
- Page 17 Guide to Sizing Blowdown Valves and Orifice Plates 1. Determine the Rate of Steam Production in Pounds per Hour: Either read off the boiler name plate (water-tube boilers) or Calculate from horsepower rating (fire-tube boilers): HP x 34.5 = lbs/hr. Example: 100 HP = 3450 lbs/hr. 2.
-
Page 18: Icon Definitions
Flow Control Valve Maximum Flow Rates in Lbs/hr 25000 20000 15000 1/2" 150 PSI 1/2" 300 PSI 3/4" 150 PSI 3/4" 300 PSI 10000 5000 Pressure PSI 3.4 Icon Definitions Symbol Publication Description IEC 417, No.5019 Protective Conductor Terminal IEC 417, No. 5007 On (Supply) IEC 417, No. -
Page 19: Electrical Installation
Proper grounding of this product is required. Any attempt to bypass the grounding will compromise the safety of persons and property. Operating this product in a manner not specified by Walchem may impair the protection provided by the equip- ment. - Page 20 COOLING TOWER METERING PUMPS HEAT EXCHANGER Figure 2 Typical Installation – Cooling Tower...
- Page 21 AC POWER FLOW IN FLOW OUT SUBMERSION ELECTRODE BASE ACID PROBE Figure 3 Typical Installation – Submersion...
- Page 22 RECOMMENDED INSTALLATION Skimmer Blowdown Line INTERMITTENT SAMPLING 3/4" Min. up to Electrode 10 ft. max. with minimal valves, elbows & unions CONDUCTIVITY ELECTRODE Flow Motorized Full Port Block Control Ball Valve Valve or or Solenoid ¾" TEE Orifice Union Valve 2 ft.
- Page 23 SAMPLE RETURN 1 ATMOSPHERE MAXIMUM ROTAMETER 30-100 LPH SENSOR FLOW CELL ISOLATION FLOW VALVE SWITCH (NORMALLY FLOW OPEN) CONTROL VALVE SAMPLE VALVE RECIRCULATION PUMP PROCESS WATER Figure 5 Typical Installation – Disinfection Sensor...
- Page 24 Figure 6 Parts Identification...
- Page 25 I/O Boards 1 through 4 I/O Board P/N Identification Labels I/O Board wiring labels I/O Board Part Number I/O Board 1-4 Terminal Blocks P/N 191910 SENSOR INPUT(2) TBxA - SENSOR 1 TBxB - SENSOR 2 Channel 1 Contacting Conductivity (CCOND) Contacting Conductivity (CCOND) ECOND CCOND...
- Page 26 I/O Boards 1 through 4 I/O Board P/N Identification Labels I/O Board wiring labels I/O Board 1-4 Terminal Blocks I/O Board Part Number P/N 191910 SENSOR INPUT(2) TBxA - SENSOR 1 TBxB - SENSOR 2 ECOND CCOND pH/ORP DIS RCV+ RCV–...
- Page 27 I/O Boards 1 through 4 I/O Board P/N Identification Labels I/O Board wiring labels I/O Board 1-4 Terminal Blocks I/O Board Part Number P/N 191910 SENSOR INPUT(2) TBxA - SENSOR 1 TBxB - SENSOR 2 ECOND CCOND pH/ORP DIS RCV+ RCV–...
- Page 28 I/O Boards 1 through 4 I/O Board P/N Identification Labels I/O Board wiring labels I/O Board Part Number I/O Board 1-4 P/N 191912 4-20 mA INPUT (2) Terminal Blocks TBxA - INPUTS 1-2 TBxB - NOT USED UNPOWERED 2 Wire 2 Wire 3 Wire 4 Wire...
- Page 29 I/O Boards 1 through 4 I/O Board P/N Identification Labels I/O Board wiring labels I/O Board 1-4 Terminal Blocks I/O Board Part Number P/N 191913 4-20 mA INPUT (4) TBxA - INPUTS 1-3 TBxB - INPUT 4 2 Wire 2 Wire UNPOWERED 3 Wire 4 Wire...
- Page 30 I/O Board P/N I/O Boards 1 through 4 Identification Labels I/O Board wiring labels I/O Board 1-4 I/O Board Part Number Terminal Blocks P/N 191914 4-20 mA INPUT (6) TBxA - INPUTS 1-3 TBxB - INPUTS 4-6 UNPOWERED 2 Wire 2 Wire 3 Wire 4 Wire...
- Page 31 I/O Boards 1 through 4 I/O Board P/N Identification Labels I/O Board wiring labels I/O Board 1-4 Terminal Blocks I/O Board Part Number P/N 191915 4-20 mA OUTPUT (2) TBxA - OUTPUTS 1-2 TBxB - NOT USED 4-20 mA Output –...
- Page 32 I/O Boards 1 through 4 I/O Board P/N Identification Labels I/O Board wiring labels I/O Board 1-4 I/O Board Part Number Terminal Blocks P/N 191916 4-20 mA OUTPUT (4) TBxA - OUTPUTS 1-2 TBxB - OUTPUTS 3-4 4-20 mA Output –...
- Page 33 I/O Boards 1 through 4 I/O Board P/N Identification Labels I/O Board wiring labels I/O Board Part Number I/O Board 1-4 Terminal Blocks P/N 191918 4-20 mA INPUT (2)/OUTPUT (4) TBxA - INPUT 1, OUTPUTS 1-2 TBxB - INPUT 2, OUTPUTS 3-4 2 Wire 2 Wire 4-20 mA...
- Page 34 I/O Board P/N I/O Boards 1 through 4 Identification Labels I/O Board wiring labels I/O Board 1-4 Terminal Blocks I/O Board Part Number P/N 191920 CORROSION INPUT(2) TBxA - SENSOR 1 TBxB - SENSOR 2 Channel 1 CORROSION XMT RED XMT (Red) RCV GRN RCV (Green)
- Page 35 D1– SIGNAL IN – D2– POWER +12V D3– FLOW SWITCH D4– Hall Effect Contact Closure: FLOW METER Polarity not critical Reed Switch D5– FLOW METER Polarity not Critical D6– D7– D8– D9– D10+ D10– D11+ D11– D12+ D12– TBDI Figure 17 Digital Input Wiring...
- Page 36 Relay Model Code Powered Powered Powered Powered Powered Powered Powered Powered Powered Powered Powered Powered Powered Powered Powered Pulse Pulse Powered Powered Powered Powered Pulse Pulse Pulse Pulse Powered Powered Pulse Pulse Powered Powered Pulse Pulse Powered Powered Powered Powered Powered Powered Pulse...
-
Page 37: 4.0 Function Overview
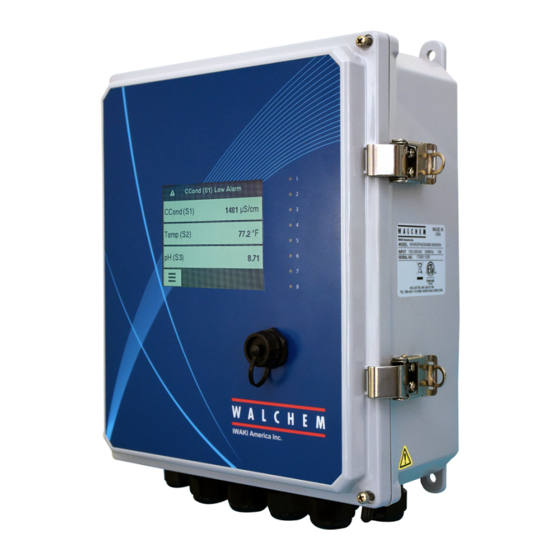
4.0 FUNCTION OVERVIEW Front Panel Figure 19 Front Panel Touchscreen A Home screen is displayed while the controller is on. This display shows a user-defined list of input readings or status of outputs. Touching any of the items on the Home Screen will bring up the item’s Details Screen, where you can access calibration and setting menus. - Page 38 Outputs Menu Configuration Menu HOA Menu Graph Menu Home Page Other icons may appear in the menu screens. Calibration icon appears in sensor input menus and brings up the calibration menu Cancel icon aborts a calibration or setting change The Page Down icon scrolls down to a new page in a list of options. The Page Up icon scrolls up to a new page in a list of options.
-
Page 39: Startup
Overview of the use of icons Changing Numeric Values To change a number, use the Character Delete icon to the digit to be changed. If the new number will be neg- ative, start with touching the minus sign, then use the numeric touchpad and decimal point to type the number (some entries must be integers and the decimal will be ignored and the setting rounded to the nearest integer). - Page 40 Set global units of measure Touch the Scroll Up or Down icon until Global Units is displayed and then touch it. Touch the desired units. Touch the Confirm icon to accept the change. Set temperature units of measure Touch the Scroll Up or Down icon until Temp Units is displayed and then touch it. Touch the desired units. Touch the Confirm icon to accept the change.
- Page 41 MAIN MENU/HOME SCREEN OVERVIEW Inputs Sensor (S11) 3038 µS/cm Temp (S12) 77.1°F Generic AI (S21) 30.5% Generic AI (S22) 37.9% HOME SCREEN (example) List of possible Inputs: Contacting Conductivity Flowswitch (D1) No Flow Electrodeless Conductivity Temperature Config SENSOR (S1) CCond (S11) 3041 µS/cm Global Settings Temp (S12)
- Page 42 Inputs Main Menu 09:19:01 14-Mar-2017 Sensor (S11) Config 3038 µS/cm Inputs Temp (S12) 77.1°F Outputs Generic AI (S21) 30.5% Alarms Graph Generic AI (S22) 37.9% > Calibration Inputs>Sensor (S11) SENSOR (S1) One Point Process Calibration Details Screen One Point Buffer Calibration Content varies with Two Point Buffer Calibration sensor type...
- Page 43 SENSOR (S1) INPUTS Additional Settings for DI State: DI State (D1-D12) Total Time Open Message Reset Time Total Closed Message Name Interlock Type Alarm Contactor Type Flowmeter (D1-D12) Additional Settings for Contactor, Flowmeter: Volume/Contact Totalizer Alarm Flow Units Reset Flow Total Name Set Flow Total Type...
- Page 44 RELAY OUTPUTS (R1-R8) and VIRTUAL OUTPUTS (C1-C8) Outputs Main Menu 09:19:01 14-Mar-2017 (CONTINUED ON NEXT PAGE) Config On/Off (R1) Inputs Inhibitor (R2) Only if HVAC mode is enabled Outputs Additional Settings for Intermittent Sampling Mode: Flow Timer (R3) Int. Sampling (R1-R8) Sample Time Min Relay Cycle Alarms...
- Page 45 Outputs Main Menu 09:19:01 14-Mar-2017 Config On/Off (R1) Inputs Inhibitor (R2) Outputs RELAY OUTPUTS (R1-R8) and VIRTUAL OUTPUTS (C1-C8) Flow Timer (R3) Alarms Continued Graph Manual (R4) Outputs>On/Off (R1) Details Screen Content varies with output type Additional Settings for Target PPM Control Mode: Additional Settings for On/O Dis: On/Off Dis (R1-R8) Target PPM (R1-R8)
- Page 46 ANALOG OUTPUTS (A11-A44) and VIRTUAL OUTPUTS (C1-C8) Additional settings for Retransmit Mode: Additional Settings for Manual Control Mode: Retransmit (A11-A44) Manual Control (A11-A44) Error Output Hand Time Limit HOA Setting Reset Time Total HOA Setting Reset Time Total 4 mA Value Input Name Interlock Channels...
- Page 47 CONFIG MENU HOME SCREEN (example) Config Flowswitch (D1) No Flow Main Menu 09:19:01 14-Mar-2017 Global Settings SENSOR (S1) CCond (S11) 3041 µS/cm Inputs Config Security Settings Ethernet Settings Temp (S12) 77.0°F Outputs Ethernet Details Flowswitch (D1) No Flow Alarms Graph Additional Config Settings: WiFi Settings WiFi Details...
-
Page 48: Shut Down
Outputs (see section 5.3) Program the settings for each output The R1 relay output will be displayed. Touch the relay field to get to the Details screen. Touch the Settings icon. If the name of the relay does not describe the control mode desired, touch the Scroll Down icon until Mode field is displayed. -
Page 49: Inputs Menu
Inputs Menu Touch the Inputs icon to view a list of all sensor and digital inputs. The Page Down icon pages down the list of inputs, the Page Up icon pages up the list of inputs, the Main Menu icon brings back the previous screen. Touch the input to access that input’s details, calibration (if applicable) and settings. - Page 50 First Buffer Value (does not appear if automatic buffer recognition is used) Enter the value of the buffer being used Rinse Sensor Remove the sensor from the process, rinse it off, and place it in the buffer solution. Touch Confirm when ready. Stabilization When the temperature (if applicable) and signal from the sensor is stable, the controller will automatically move to the next step.
- Page 51 Stabilization When the temperature (if applicable) and signal from the sensor is stable, the controller will automatically move to the next step. If they don’t stabilize you may manually go to the next step by touching Confirm. Third Buffer Temperature (only appears if no temperature sensor is detected) Enter the temperature of the buffer and touch Confirm.
-
Page 52: Contacting Conductivity
Cal Successful or Failed If successful, touch Confirm to save calibration results. The calculated offset and gain will be displayed. If failed, you may retry the calibration or cancel. You may also restore calibration to the factory defaults. The calibration will fail if the offset is more than 2 mA or the gain is not between 0.5 and 2.0. Please restore input signal to process value Put the transmitter back into normal measurement mode if necessary and touch Confirm when ready to resume control. -
Page 53: Temperature
Gauge The cable length compensation depends upon the gauge of wire used to extend the cable Cell Constant Do not change unless instructed by the factory. The Walchem sensor is 6.286. Sensors made by others are not supported. Range Select the range of conductivity that best matches the conditions the sensor will see. -
Page 54: Orp
Smoothing Factor Increase the smoothing factor percentage to dampen the response to changes. For example, with a 10% smoothing factor, the next reading shown will consist of an average of 10% of the previous value and 90% of the current value. Reset Calibration Values Enter this menu to reset the sensor calibration back to factory defaults. -
Page 55: Generic Sensor
Cal Required Alarm To get an alarm message as a reminder to calibrate the sensor on a regular schedule, enter the number of days between calibrations. Set it to 0 if no reminders are necessary. Alarm Suppression If any of the relays or digital inputs are selected, any alarms related to this input will be suppressed if the selected relay or digital input is active. -
Page 56: Corrosion Input
5.2.8 Corrosion Input ONLY AVAILABLE IF A CORROSION INPUT BOARD IS INSTALLED Input Details The details for this type of input include the current corrosion rate, alarms, status, current stage in the measurement cycle, the elapsed time in the current cycle, the raw (uncalibrated) corrosion rate, the number of days in service of the electrodes, the calibration offset, the date of last calibration, and the type of input. -
Page 57: Corrosion Imbalance Input
Aluminum Brass 1.62 C68700 Copper/Nickel 90/10 1.80 C70610 Copper/Nickel 70/30 1.50 C71500 AISI 4130 Alloy Steel 1.00 G41300 Lead 2.57 L50045 Monel 400 Nickel 1.13 N04400 Monel K500 Nickel 1.04 N05500 Hastelloy C22 0.85 N06022 Inconel 600 Nickel 0.95 N06600 Incoloy Alloy 20 0.98 N08020... -
Page 58: Transmitter Input And Ai Monitor Input
5.2.10 Transmitter Input and AI Monitor Input Select AI monitor if the device connected can be calibrated on its own and the W900 calibration will only be in units of mA. Select Transmitter if the device connected cannot be calibrated on its own and the W900 will be used to calibrate in engineering units of measure. -
Page 59: Analog Flowmeter Input
Dye/Product Ratio Enter the value for the ratio of ppb of dye to ppm of inhibitor that is in the inhibitor product being fed. Name The name used to identify the transmitter may be changed. Type Select the type of sensor to be connected. The choice of Analog Input is only avail- able if that type of sensor card is installed. -
Page 60: Flow Meter, Contactor Type
Closed Message The words used to describe the switch state may be customized. Interlock Choose whether the input should be in the interlocked state when the switch is either open or closed. Alarm Choose if an alarm should be generated when the switch is open, or closed, or if no alarm should ever be generated. -
Page 61: Feed Monitor
Scheduled Reset Choose to automatically reset the flow total, and if so, Daily, Monthly or Annually. K Factor Enter the pulses generated by the paddlewheel per unit volume of water. Flow Units Select the units of measure for the water volume. Rate Units Select the units of measure for the flow rate time base. - Page 62 Disabled Flow Verify alarms are not monitored, no change in output control. Interlock The output will be forced OFF while the alarm is active.(except during the reprime event) Maintain The alarm condition has no effect on output control. (except during the reprime event) If a Flow Verify alarm is active and Interlock is selected, the output to the pump will be turned off after the specified Reprime Time and only operator actions can restore normal control operations.
-
Page 63: Di Counter Input
Smoothing Factor Increase the smoothing factor percentage to dampen the response to changes in the flowrate. For example, with a 10% smoothing factor, the next reading shown will con- sist of an average of 10% of the previous value and 90% of the current value. Output Select the relay or analog (4-20 mA) output channel controlling the pump which will be monitored by this feed monitor input. -
Page 64: Virtual Input - Redundant
Settings Touch the Settings icon to view or change the settings related to the virtual input. Alarms Low-Low, Low, High and High-High Alarms limits may be set. Deadband This is the Alarm Deadband. For example, if the High Alarm is 7.00, and the deadband is 0.1, the alarm will activate at 7.01 and deactivate at 6.90. -
Page 65: Virtual Input - Raw Value
Settings Touch the Settings icon to view or change the settings related to the virtual input. Deviation Alarm Enter the value for the difference between the two input readings above which the deviation alarm will trigger. Deadband This is the Alarm Deadband. For example, if the Deviation Alarm is 1.00, and the deadband is 0.1, the alarm will activate if the sensor readings are 1.01 units apart, and deactivate at 0.89 units apart. -
Page 66: Virtual Input - Disturbance
5.2.21 Virtual Input - Disturbance A Disturbance type Virtual Input is not a physical input. The value of the virtual input is calculated from a real sensor input plus an equation that defines the real sensor’s impact on a control output that is using a different real sensor. -
Page 67: Outputs Menu
Smoothing Factor Increase the smoothing factor percentage to dampen the response to changes. For ex- ample, with a 10% smoothing factor, the next reading shown will consist of an average of 10% of the previous value and 90% of the current value. Disable Disturbance If any of the relays or digital inputs are selected, the multiplier value of the disturbance Channels... -
Page 68: Relay, Flow Timer Control Mode
Settings Touch the Settings icon to view or change the settings related to the relay. Set point Enter the sensor process value at which the relay will activate. Deadband Enter the sensor process value away from the set point at which the relay will deactivate. Duty Cycle Period Using a duty cycle helps to prevent overshooting the set point in applications where the response of the sensor to chemical additions is slow. -
Page 69: Relay, Percent Timer Control Mode
The details for this type of output include the relay on/off state, HOA mode or Interlock status, accumulated on-time, remaining feed time, the accumulated bleed time, alarms related to this output, current cycle on time, relay type and the current control mode setting. Settings Touch the Settings icon to view or change the settings related to the relay. -
Page 70: Relay, Alarm Output Mode
“Activate With” Conditions “Activate with channels” settings override the relay control, but do not change the operation of the timers or related bleed control. The biocide timer continues counting biocide add time when the biocide relay is forced on, and ends at the expected time (biocide event start time plus duration). If the “activate with” condition continues after the end of the biocide feed time, the relay remains activated. -
Page 71: Relay, Time Proportional Control Mode
Touch the Settings icon to view or change the settings related to the relay. Alarm Mode Select the alarm conditions that will put the relay into the alarm state: All Alarms Selected Alarms Select Alarms Scroll through the list of all inputs and outputs, as well as System Alarms and Network (Ethernet) alarms. -
Page 72: Relay, Manual Mode
input; the previous relay set up will change to Off mode. Output Details The details for this type of output include the relay on/off state, relay status (HOA mode, Interlock status, Intermittent Sampling cycle step, etc.), time remaining for the active Intermittent Sampling cycle step, alarms related to this output, current cycle on time, relay type, the live reading of the conductivity, and the current control mode setting. -
Page 73: Relay, Pid Control Mode
Touch the Settings icon to view or change the settings related to the relay. Set point Enter the sensor process value at which the output will pulse at the Minimum Output % set below. Proportional Band Enter the distance that the sensor process value is away from the set point beyond which the output will be pulsing at the Maximum Output % set below. - Page 74 Parallel The parallel form allows the user to enter all parameters as Gains. In all cases, larger gain values result in faster output response. Parameter Description Units Proportional Gain unitless Integral Gain 1/seconds Derivative Gain seconds de(t) Output (%) = K e(t) + K e(t)dt + K Integral Value Management...
-
Page 75: Relay, Dual Set Point Mode
Set Point Numeric entry of a process value used as a target for PID control. The default value, units and display format (number of decimal places) used during data entry are defined based on the Input channel setting selected. Gain When the Gain Form setting is Standard, this unitless value is multiplied by the total of the proportional, integral, and derivative terms to determine the calculated output percent. -
Page 76: Relay, Timer Control Mode
Duty Cycle Period Using a duty cycle helps to prevent overshooting the set point in applications where the response of the sensor to chemical additions is slow. Specify the amount of time for the cycle, and the percentage of that cycle time that the relay will be active. The relay will be off for the rest of the cycle, even if the set point has not been satisfied. -
Page 77: Relay, Probe Wash Control Mode
Repetition Select the time cycle to repeat the event: Hourly, Daily, 1 Week, 2 Week, 4 Week, or None. An event means that the output is turned on at the same time of day, for the same amount of time, and except for the Daily cycle, on the same day of the week. Week Only appears if Repetition is longer than 1 Week. -
Page 78: Relay, Spike Control Mode
Event 1 (through 10) Enter these menus to program timer events via the menus below: Repetition Select the time cycle to repeat the event: Hourly, Daily, 1 Week, 2 Week, 4 Week, or None. An event means that the output is turned on at the same time of day, for the same amount of time, and except for the Daily cycle, on the same day of the week. -
Page 79: Relay Or Analog Output, Lag Control Mode
An Event Skipped alarm is also set when the timer relay never turns on during an event because of an interlock condition. The alarm is cleared when the relay is next activated for any reason (the next timer event or HAND mode or “acti- vate with”... - Page 80 of configurations. The control mode support backup pumps operation, alternate pump with wear leveling, and the activation of additional outputs after a time delay, or based on alternate set points, or based on digital state changes. A Lead Lag group consists of a single Lead output and one or more Lag outputs. The Lead output can be set to any control mode.
- Page 81 Disabled The Flow Verify alarm is never activated and the Lead Lag group is not affected by the status of the PosiFlow input. Interlock When a Flow Verify alarm is activated, the related output is immediately turned off; if available, other outputs in the Lead Lag group are activated instead. Maintain When a Flow Verify alarm is activated, other outputs in the Lead Lag group are ac- tivated instead if they are available;...
- Page 82 12.3% 11.4% 10.8% 7.6% 7.2% 4.8% Output Activation Modes Depending on the current control mode selection for the Lead output, additional settings may be available within the settings list of the last output in the group to provide additional option(s) to optimize the behavior of the Lead Lag functionality.
- Page 83 porating backup pump controls and optional time based activation. If the pH rises above 8.50 when pump R1 has an active Flow Verify alarm or is in HOA Off mode, pump R2 immediately energizes. R3 energizes when the pH goes above 9.00. Although no third pump is available to activate if the pH continues to rise above 9.50, this control system is more fault tolerant than the currently available options.
- Page 84 The link between the output and the sensor input(s) cannot be easily transferred to other outputs, so these types of control modes cannot be designated as Lead output for a Lead Lag group. Outputs configured with these types of control modes are not included on the selection list presented for Lead output. Also, the control mode of an output that is the Lead output for a Lead Lag group cannot be changed to one of these types.
- Page 85 Output Time Limit Enter the maximum amount of time that the relay can be continuously activated. Once the time limit is reached, the relay will deactivate until the Reset Output Timeout menu is entered. Reset Output Timeout Enter this menu to clear an Output Timeout alarm and allow the relay to control the process again.
-
Page 86: Relay, Target Ppm Control Mode
operate independently of the On or Off Delay Time setting(s) and will energize and de-energize without delay when needed. 5.3.19 Relay, Target PPM Control Mode ONLY AVAILABLE IF HVAC MODE IS ENABLED Overview In Target PPM control mode, the controller monitors the total volume of flow through up to two analog or digital flow meters, and after a programmable volume has been accumulated, the relay activates for a calculated time to achieve a target PPM level. -
Page 87: Relay, Ppm By Volume Control Mode
5.3.20 Relay, PPM by Volume Control Mode ONLY AVAILABLE IF HVAC MODE IS ENABLED. NOT AVAILABLE FOR VIRTUAL OUTPUTS. Overview In PPM by Volume control mode, the controller monitors the total volume of flow through up to two analog or digital flow meters, and after a programmable volume has been accumulated, the relay activates until the calculated number of pulses from a flow monitoring device to achieve a target PPM level are received. -
Page 88: Relay, Counter Timer Control Mode
The user enters the target PPM and the data necessary to calculate the proportional band (the water flow rate at which the maximum pulse rate will occur) required to maintain the target PPM with that flow rate of water. % output = Target PPM x Water Flow Rate (liter/min or gal/min) Cycles x Pump Capacity (liter or gal/hr) x Pump Setting (%) x Speci c Gravity x 166.67 % output =... -
Page 89: Relay Output, On/Off Disturbance Control Mode
5.3.23 Relay Output, On/Off Disturbance Control Mode On/Off control mode is enhanced to add a disturbance input that is multiplied by the user-entered setpoint. An ex- ample of this might be the control of a corrosion inhibitor containing PTSA based upon a fluorometer sensor input, with the setpoint modified based upon a corrosion sensor Disturbance Input, so a higher corrosion reading results in more corrosion inhibitor being fed. -
Page 90: Relay Output, Flow Meter Ratio Control Mode
Accumulator Volume Enter the volume through the flow meter with the relay deactivated. Blend Volume Enter the volume through the flow meter with the relay activated. Flow Input Select the flowmeter input to be used to control this output. Disturbance Input Select the virtual input or analog output to be used to multiplied by the control setpoint (Blend Volume). -
Page 91: Analog Output, Proportional Control Mode
Alternate Control During Upset Condition Some disturbance applications require switching from one control mode to a different control mode (or a similar mode with different control settings) during an upset condition. The Primary Output could be set to Proportional control of pH, with the Disturbance Input selected as a Flow Proportional control algorithm. A Trigger Input could be selected as a relay output that activates if the flow rate is either too high or too low. -
Page 92: Analog Output, Flow Proportional Mode
Set point Enter the sensor process value at which the output % will be the programmed minimum %. Proportional Band Enter the sensor process value away from the set point at which the output % will be the programmed maximum %. Minimum Output Enter the lowest output %. -
Page 93: Analog Output, Pid Control Mode
Flow Input Select the flow meter to be used as an input for this control relay. Cycles Input Select the virtual input that is programmed as a Ratio calculation of the system conductivity/makeup conductivity, or select None. Low Cycles Limit Enter the lower limit for cycles of concentration, if used. - Page 94 Integral Gain 1/ seconds Derivative Gain seconds de(t) Output (%) = K e(t) + K e(t)dt + K Integral Value Management To determine the integral component of the PID calculation, the controller software must maintain a running total of the accumulated area under the error curve (Current Integral). The sign of the value added to the accumulated Current Integral during each cycle may be positive or negative based on the current Direction setting as well as the relative values of the current process reading and the set point.
-
Page 95: Analog Output, Manual Mode
Integral Time When the Gain Form setting is Standard, this value is divided into the integral of the normalized error (area under the error curve), then multiplied by the Gain to determine the integral component of the calculated output percent. Integral Gain When the Gain Form setting is Parallel, this value is multiplied by the integral of the normalized error (area under the error curve) to determine the integral component of... -
Page 96: Configuration Menu
Touch the Settings icon to view or change the settings related to the relay. 4 mA Value Enter the process value to correspond to a 4 mA output signal. 20 mA Value Enter the process value to correspond to a 20 mA output signal. Hand Output Enter the output % desired when the output is in Hand mode. -
Page 97: Ethernet Details
TCP Timeout Do not change from the default of 1 second unless directed to by techical service. The TCP Timeout should only be increased if the VTouch live connection is being Reset due to slow cellular connection speed. VTouch Status Select Enabled to activate a connection to VTouch, or Disabled to stop sending data and alarms to VTouch. -
Page 98: Wifi Details
Gateway Connection Infrastructure Mode. Only appears if a Dual WiFi/Ethernet type WiFi card is installed. Select which connection, Ethernet or WiFi, will provide the Gateway function. This means that all external Internet connections such as VTouch or emails will default to using this connection. -
Page 99: Remote Communications (Modbus And Bacnet)
RSSI Displays the Relative Signal Strength In percent (0% = -100 dBm and 100% is greater than -49 dBm). WiFi Channel Displays the WiFi channel that the controller is currently using. Alarms Displays any active WiFi-related alarms. DHCP Status Displays if the connection to the device using DHCP was successful or not. Controller IP Address Displays the IP address that the controller is currently using. -
Page 100: Display Settings
Report #1 (through 4) Enter this menu to activate and set up a report to email, via the menus below: Report Type Select the type of report to email: None, Alarm, Datalog, Graph, or Summary (the Home webpage showing a Summary of current conditions). Email Recipients Select up to 8 email addresses that reports may be sent to by touching the check box. -
Page 101: File Utilities
Home 5 Select the input or output to display on the 5 line of the display Home screen. Home 6 Select the input or output to display on the 6 line of the display Home screen. Home 7 Select the input or output to display on the 7 line of the display Home screen. -
Page 102: Hoa Menu
Power Board Displays the part number and revision of the power/relay board Sensor Board #1 - #4 Displays the part number and revision of the I/O boards (One entry for each board installed, up to 4) Software Version Displays the software version on each I/O board (One entry for each board installed, up to 4) Last Data Log Displays the date and time of the last data log download... -
Page 103: 6.0 Operation Using Ethernet
Touching the or the icons will redraw the graph forward or backwards in time, in increments of one time range. It can only go back in time to the point where the data log file used to generate the graph starts. Changing the time frame while in the graph view, after moving back in time, shows data from that past time. -
Page 104: Connecting Directly To A Computer
Inputs, Outputs, Graphs, and Config. Click each menu to see the submenus, and click on the submenu to access all of the details and settings associated with it. Below the Main Menu links are links to the instruction manual, Walchem website, and VTouch website, that may be used if the controller is connected to the Internet. -
Page 105: 7.0 Maintenance
In order to see what the report settings are, click the Load Report Settings button. The graph email will contain an html attachment showing the graphs. The Export Graph button can be used to save the graphs as an image that can be copied to a document. The same button is also available directly from the Graphs webpage. The graphs will display the parameter’s data in 360 data points, equally spread over the time range, in a blue line. -
Page 106: 7.2 Replacing The Fuse Protecting Powered Relays
Warning: Use of non-approved fuses can affect product safety approvals. Specifications are shown below. To insure product safety certifications are maintained, it is recommended that a Walchem fuse be used. Fuse 5 x 20 mm, 6A, 250V Walchem P/N 102834 8.0 TROUBLESHOOTING... -
Page 107: Ph Sensors
8.1.3 pH Sensors The calibration will fail if the adjustment to the gain is outside of 0.2 to 1.2, or if the calculated offset is outside of -140 to 140. Possible Cause Corrective Action Dirty electrode Clean electrode Improper wiring of sensor to controller Correct wiring Incorrect temperature reading or setting Ensure that the temperature is accurate... -
Page 108: Temperature Sensors
8.1.7 Temperature Sensors The calibration will fail if the calculated offset is outside of -10 to 10. Possible Cause Corrective Action Improper wiring of sensor to controller Correct wiring Temperature input is set to the incorrect element Reprogram to match the connected temperature element Faulty sensor Replace sensor 8.1.8... - Page 109 One or both of the sensors may need cleaning and calibration Clean and calibrate One of the sensors may be faulty Replace sensor DI STATE CUSTOM MESSAGE A digital input that is a DI State type can be set such that either the open or closed state generates an alarm. The alarm message may be customized.
- Page 110 EVENT SKIPPED ALARM An event skipped alarm is set when a second biocide or timer event occurs while one event is still running (either in prebleed, biocide-add or post-biocide add lockout in the case of the biocide timer mode). An event skipped alarm is also set when the timer relay never turns on during an event because of an interlock condition.
- Page 111 VTouch DATA COMM ERROR This alarm occurs if the controller attempts to send data to VTouch and VTouch fails to acknowledge receipt of the data Possible Cause Correction Action No connection to LAN Connect Ethernet cable to LAN Wrong IP, subnet and/or gateway address Program valid settings for LAN in the controller or use DHCP if supported by the LAN LAN is blocking outside access...
- Page 112 INVALID CONTROL MODE This alarm occurs if the programmed control mode is not possible for the installed power relay board Possible Cause Correction Action The power relay board has been removed and replaced with an Reinstall the correct board or reprogram the output to a valid type for the board installed incorrect model VTouch LIVE CONNECT ERROR...
-
Page 113: Procedure For Evaluation Of Conductivity Electrode
Procedure for Evaluation of Conductivity Electrode Try cleaning the electrode first (refer to Sect. 7.1). To check the electrode, check the electrode connections to the terminal strip (refer to Figure 7). Make sure that the correct colors go to the correct terminals, and that the connections are tight. - Page 114 Faulty power supply Replace power supply CONTROLLER BOARD D10 LED Indicates the status of the 3.3VDC power supply. Normal operation is ON. If not on: Possible Cause Correction Action Faulty ribbon cable Replace ribbon cable Faulty power supply Replace power supply I/O BOARD LEDs Indicates the status of the sensor board.
-
Page 115: 9.0 Spare Parts Identification
9.0 Spare Parts Identification 192612, W900 WiFi PCBA, WiFi Only, Ethernet Disabled, 20 Pin 191944, W900 WiFi PCBA, WiFi + Ethernet, 20 Pin 191945, W900 WiFi PCBA, WiFi Only, Ethernet Disabled, 10 Pin (s/n 180812xxxx or earlier) 191946, W900 WiFi PCBA, WiFi + Ethernet, 10 Pin (s/n 180812xxxx or earlier) 191931 Safety Cover 191921-WA-CT-N Cooling Tower 191921-WA-BL-N Boiler... - Page 116 WCT900 Sensor Options PAFMNN, PBFMNN, PAHMNN, PBHMNN, PAIMNN, PBIMNN PAFMNN: Graphite contacting conductivity + Flow Switch manifold on panel + WEL-PHF no ATC + LD2 PAHMNN: + WEL-MVR + LD2 PAIMNN: + WEL-MVF + LD2 PBFMNN: 316SS contacting conductivity + Flow Switch manifold on panel + WEL-PHF no ATC + LD2 PBHMNN: + WEL-MVR + LD2 PBIMNN: + WEL-MVF + LD2...
- Page 117 WCT900 Sensor Options PAEFMN, PBEFMN, PAEHMN, PBEHMN, PAEIMN, PBEIMN PAEFMN: Graphite contacting conductivity + Flow Switch manifold on panel + Makeup Conductivity + WEL-PHF no ATC + LD2 PAEHMN: + WEL-MVR + LD2 PAEIMN: + WEL-MVF + LD2 PBEFMN: 316SS contacting conductivity + Flow Switch manifold on panel + Makeup Conductivity + WEL-PHF no ATC + LD2 PBEHMN: + WEL-MVR + LD2 PBEIMN: + WEL-MVF + LD2...
- Page 118 WCT900 Sensor Options PAFNNN, PBFNNN, PAHNNN, PBHNNN, PAINNN, PBINNN PAFNNN: Graphite contacting conductivity + Flow Switch manifold on panel + WEL-PHF no ATC PAHNNN: + WEL-MVR PAINNN: + WEL-MVF PBFNNN: 316SS contacting conductivity + Flow Switch manifold on panel + WEL-PHF no ATC PBHNNN: + WEL-MVR PBINNN: + WEL-MVF...
- Page 119 WCT900 Sensor Options PAEFNN, PBEFNN, PAEHNN, PBEHNN, PAEINN, PBEINN PAEFNN: Graphite contacting conductivity + Flow Switch manifold on panel + Makeup Conductivity+ WEL-PHF no ATC PAEHNN: + WEL-MVR PAEINN: + WEL-MVF PBEFNN: 316SS contacting conductivity + Flow Switch manifold on panel + Makeup Conductivity + WEL-PHF no ATC PBEHNN: + WEL-MVR PBEINN: + WEL-MVF...
- Page 120 WCT900 Sensor Options PAMNNN, PBMNNN PAMNNN: Graphite contacting conductivity + Flow Switch manifold on panel + LD2 PBMNNN: 316SS contacting conductivity + Flow Switch manifold on panel + LD2...
- Page 121 WCT900 Sensor Options PAEMNN, PBEMNN PAEMNN: Graphite contacting conductivity + Flow Switch manifold on panel+ makeup sensor + LD2 PBMNNN: 316SS contacting conductivity + Flow Switch manifold on panel + makeup sensor + LD2...
- Page 122 WCT900 Sensor Options PANNNN, PBNNNN PANNNN: Graphite contacting conductivity + Flow Switch manifold on panel PBNNNN: 316SS contacting conductivity + Flow Switch manifold on panel...
- Page 123 WCT900 Sensor Options PAENNN, PBENNN PAENNN: Graphite contacting conductivity + Flow Switch manifold on panel + makeup sensor PBENNN: 316SS contacting conductivity + Flow Switch manifold on panel + makeup sensor...
- Page 124 WCT900 Sensor Options PAPNNN, PBPNNN PAPNNN: Graphite contacting conductivity + Flow Switch manifold on panel + Pyxis PBPNNN: 316SS contacting conductivity + Flow Switch manifold on panel + Pyxis...
- Page 125 WCT900 Sensor Options PAEPNN, PBEPNN PAEPNN: Graphite contacting conductivity + Flow Switch manifold on panel + Pyxis + makeup sensor PBEPNN: 316SS contacting conductivity + Flow Switch manifold on panel + Pyxis + makeup sensor...
-
Page 126: 10.0 Service Policy
10.0 Service Policy Walchem controllers have a 2-year warranty on electronic components and a 1-year warranty on mechanical parts and electrodes. See Statement of Limited Warranty in front of manual for details. Walchem controllers are supported by a worldwide network of authorized master distributors. Contact your autho- rized Walchem distributor for troubleshooting support, replacement parts, and service.
Need help?
Do you have a question about the W900 Series and is the answer not in the manual?
Questions and answers