
Subscribe to Our Youtube Channel
Related Manuals for Paragon GZ3DS


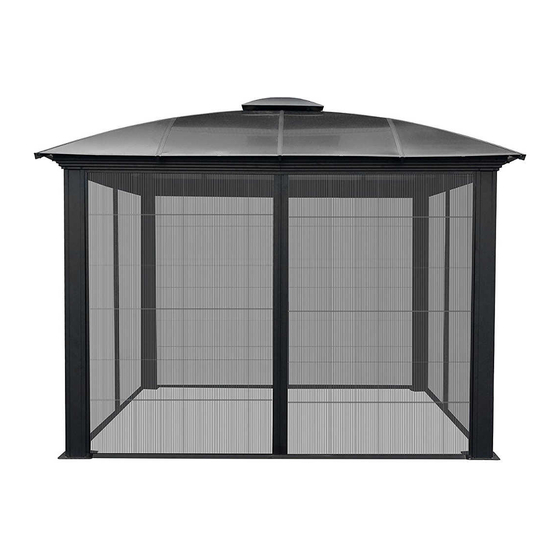
Summary of Contents for Paragon GZ3DS
- Page 1 Gazebo GZ3DS Aluminium Composite Roof Panels Assembly Instructions Paragon Group USA Customer Service:(877) 782 4482 Email:cs-outdoors@paragongroupusa.com...
- Page 2 List of Parts five contact customer service before bedinning assembly: Customer Service:(877) 782 4482 Email:cs-outdoors@paragongroupusa.com Qty Step Qty Step Profile Profile Washer Screen M4*12 Upper frame A Screen handle Upper frame B Handle seal Lower frame A We included some extra screws and bolts for your convenience. Lower frame B Lower frame C M4*9...
- Page 3 STEP 1 Assembling the Screen Frames Place all the parts on a level surface . Make sure the pieces are in the correct positions before assembling. Carefully follow the order of assembly to ensure an easy installation. Wear proper safety gear including work shoes, gloves and goggles. NOTE: You may skip step 1.A if support plates is not assembled.
- Page 4 ATTENTION: Do not use sharp tools to remove packaging material. You may simply remove it by hands. Do not cut the string of screen frame(1) during unpacking. Components Screw(7) Upper frame B(3) Lower frame A(4) Lower frame B(5) Screen(1) Upper frame A(2) x 48 ATTENTION:...
- Page 5 STEP 2 Assembling the Screen Handles Components Place screen handle(13) to a desire position then click into screen(1). Attach handle seal(14) on both side of screen handle(13) to secure its positions. Screen Handle handle(13) Repeat to fix all screen handles on both sides. seal(14) x 16 x 32...
- Page 6 STEP 3 Assembling the Screen Base NOTE: Do not attent to assemble alone. Components Plastic anchor(10) Screw(9) Lower frame C(6) Washer(11) x 24 x 24 x 24 Place lower frame C(6) next to the support plates, align the middle gap of lower frame C(6) paralled to the posts corner shape on both ends, then mark all holes on the floor.
- Page 7 Remove lower frames C(6) and drill holes you have just marked on the floor. VIEW FROM THE TOP Insert part(10) into the hole by a hamer. Place lower frame C(6) to the same positionof step 3.A, and fix it with screws(9), washer(11) into the pre-drilling holes.
- Page 8 Components Remove lower four screws from the middle of rails, and save the removed screws for later use. Attach the pre-assembled screen frame(1) to lower Screw (12) Screw (8) x 40 x 40 frame C(6) from inside. Upper side Lower side VIEW FROM INSIDE Attach upper side of screen(1) to the rail,using the screws you have just removed from the middle of the rails to the same position to secure screen(1).
- Page 9 Slightly pull the screen to left and right to make sure the screen is properly functional, or check back on step 1.B to make sure all string of the screen(1) are unrestanined. Secure the pre-assembled screen frame with screws(12) on the horizontal direction, and screw(8) in the parallel directionas.
- Page 10 ATTENTION: Pull all the screens to the side (to posts direction) when not using. Leave the screen open may cause irregular breaking from wild aniaml or shorten the life time use of the screens. of 12...
- Page 11 of 12...
-
Page 12: Warranty
Gazebo GZ3DS Aluminium Composite Roof Panels Assembly Instructions WARRANTY: Warranty covers damage due to manufacturing defects only. Warranty damages caused by not following assembly instructions and adhering to warnings in manual. properly during assembly to minimize any possibility of leaking.
Need help?
Do you have a question about the GZ3DS and is the answer not in the manual?
Questions and answers