Table of Contents
Advertisement
Advertisement
Table of Contents

Related Manuals for Durabook U11


Summary of Contents for Durabook U11
- Page 1 EN-1...
-
Page 2: Table Of Contents
Table of Contents ..................4 EFORE TART ..................4 ACKAGE ONTENTS ..................6 RODUCT VERVIEW Front View ......................6 Back View ......................8 Top View ....................... 9 Bottom View ......................9 Left View ......................10 Right View ......................10 ................... 11 TATUS NDICATORS GETTING STARTED .............. - Page 3 Recording Videos ....................28 Adjusting Brightness ..................... 29 Setting Photo Timer ....................30 Configuring Camera Settings .................. 30 Viewing Photos/Videos ..................31 MAKING CONNECTIONS ............32 ..............32 NSTALLING THE EMORY SIM C ................33 NSTALLING THE ................ 34 NSTALLING THE MART ..............
-
Page 4: Before You Start
Before You Start Before You Start Congratulations on your purchase of this tablet PC. This fully-rugged tablet PC is portable and provides users with maximum mobile computing experience in a wide range of working environments. Before you begin using your tablet PC, read this chapter to familiarize yourself with the main components installed in the system. - Page 5 Before You Start 2-bay battery charger Folio case (optional) Rotate strap (optional) (optional) Soft handle (optional) Shoulder strap (optional) NOTE The pictures are for reference only, actual items may slightly differ. EN-5...
-
Page 6: Product Overview
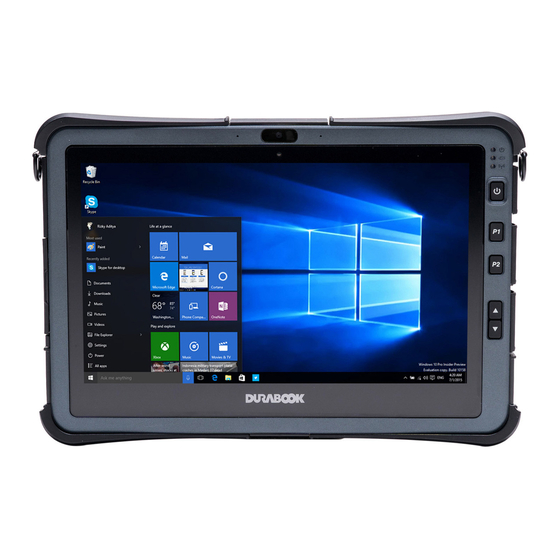
Before You Start Product Overview Front View Item Description Microphones Record the surrounding sound. Ambient light sensor Use to detect the current level of visible light in the surrounding environment. Front camera Use for video conference. Status indicators Indicate the corresponding function status. Power button Press to turn your tablet PC on or off. - Page 7 Before You Start Item Description - Touch screen mode selection. - Shortcut key for launching the specific application. - Disable (no function). Up/Down buttons : Press to activate the assigned function. - Increase the LCD panel brightness level (by default). - Increase the volume level.
-
Page 8: Back View
Before You Start Back View Item Description Speakers Emit sound. SSD kit latch Lock the SSD kit in place. SSD kit compartment Contain the SSD module. Camera LED flash Provide additional lighting when taking pictures under low light environment. Rear camera Use to take pictures. -
Page 9: Top View
Before You Start Top View Item Description RS232 port Connect a serial peripheral device. (for selected model) USB port Connect a USB peripheral device. (for selected model) Barcode scanner Scan barcodes. (for selected model) Bottom View Item Description RF Pass-thru Use for the external WLAN antenna. -
Page 10: Left View
Before You Start Left View Item Description Strap holes Attach the strap for the stylus pen. Kensington lock slot Connect a Kensington-compatible tablet PC security lock. Smart card reader Use to insert smart cards. (for selected model) Right View Item Description DC-in jack Connect the power adapter. -
Page 11: Status Indicators
Before You Start Status Indicators The status indicators of the tablet PC light up when a particular function of the tablet PC is active. Icon Item Description Power The LED always lights on (green) when the system is running. When the system is in sleep mode, the LED blinks. -
Page 12: Getting Started
Getting Started Getting Started This chapter will help you get started using the device. Installing the Battery To install the battery, follow the steps below: 1. Align and insert the battery to the battery compartment. 2. Push completely until the battery locks into place. -
Page 13: When To Replace The Battery Pack
Getting Started When to replace the Battery Pack The battery performance gradually decreases over time and usage. We recommend you to replace your battery pack after 18 to 24 months of usage. Removing the Battery To remove the battery, follow the steps below: 1. -
Page 14: Removing The Ssd Kit
Getting Started Removing the SSD Kit To remove the SSD kit, follow the steps below: 1. Slide the SSD kit latch to the unlock position. 2. Remove the SSD kit out of its compartment. EN-14... -
Page 15: Replacing The Ssd Module
Getting Started Replacing the SSD Module To remove the SSD module, follow the steps below: 1. Remove the four screws securing the SSD module cover. 2. Remove the SSD module cover. 3. Detach the conductive tape to access the SSD module. EN-15... - Page 16 Getting Started 4. Remove the three screws securing the SSD module and the memory adapter board. 5. Remove the SSD module assembly. 6. Pull to disconnect the SSD module from the memory adapter board connector. NOTE To install a new SSD module, reverse procedures step 1 through 6 above. EN-16...
-
Page 17: Installing The Ssd Kit
Getting Started Installing the SSD Kit To install the SSD kit, follow the steps below: 1. Align and insert the SSD kit to its compartment. 2. Slide the SSD kit latch to the lock position to secure the SSD kit. EN-17... -
Page 18: Connecting The Power
Getting Started Connecting the Power Your tablet PC can be powered up using the AC adapter or the Lithium-ion battery. Connecting the AC Adapter The AC adapter powers up your tablet PC and charges the battery. 1. Connect the AC adapter to the DC-in jack of your tablet PC. 2. -
Page 19: Starting Your Tablet Pc
Getting Started Starting Your Tablet PC Turning On Your Device Press the button until the Power LED lights up. Turning Off Your Device It is important to properly shut down your tablet PC to avoid the loss of unsaved data. To shut down your tablet PC, do the following: >... -
Page 20: Operating Your Tablet Pc
Operating Your Tablet PC Operating Your Tablet PC This chapter will guide you on how to use your Tablet PC. Using the Quick Menu To enter the Quick menu, tap the arrow on the task bar to display hidden icons. Then tap the Quick Menu icon ( You can also access the Quick menu in the All apps list. -
Page 21: Viewing The Version Information
Operating Your Tablet PC Viewing the Version Information On the Version section, you can view the Bios version, EC version, and Quick Menu version. Viewing the Battery Charge Cycles On the Battery Charge Cycles section, you can view the battery charge cycle and battery status. -
Page 22: Configuring The Programmable Button (P2)
Operating Your Tablet PC Configuring the Programmable Button (P2) On the P2 Button Setting section, you can assign the function for the P2 button. There are four available options: Touch Screen Mode: Toggle the touch screen mode. Launch Application: Shortcut key for launching the specific application. To assign the application, refer to the “Assigning an Application the P2 Button”... -
Page 23: Configuring The Up/Down Keys ()
Operating Your Tablet PC Configuring the Up/Down Keys () On the Up/Down Button Setting section, you can assign the function for the and buttons. There are three available options: Brightness adjustment: Adjust the LCD panel brightness level. ... -
Page 24: Configuring The Touchscreen Settings
Operating Your Tablet PC Configuring the Touchscreen Settings Your tablet PC is equipped with a touchscreen. Using the touchscreen, you can navigating the screen by using touch gestures (any input from your finger, a glove, or a stylus). CAUTION! Do not use any sharp object on the touchscreen to prevent scratches. NOTE ... -
Page 25: Configuring External Antenna Switching Mode
Operating Your Tablet PC Configuring External Antenna Switching Mode Select the respective external antenna tab to configure the setting. Tap the Wi-Fi Antenna tab to enable/disable the device to automatically switch to the external WLAN antenna when it is affixed on a docking station. ... -
Page 26: Using The Camera
Operating Your Tablet PC Using the Camera Using the Camera application, you can use this tablet PC to take photos or videos. Opening Camera App To access the Camera application, do one the following: a. Tap > Camera. b. In Cortana search box, enter ‘camera’. Then tap Camera. EN-26... -
Page 27: Taking Photos
Operating Your Tablet PC Taking Photos to capture a photo. NOTE To switch between front and rear cameras, tap EN-27... -
Page 28: Recording Videos
Operating Your Tablet PC Recording Videos to switch to Video mode. Press to start recording a video. The recording time appears on the bottom on the screen. To stop recording the video, tap EN-28... -
Page 29: Adjusting Brightness
Operating Your Tablet PC Adjusting Brightness › to switch to Pro mode. to display the brightness control slider. Do the following: Tap and drag upwards to brighten your photo or video. Tap and drag downwards to darken your photo or video. EN-29... -
Page 30: Setting Photo Timer
Operating Your Tablet PC Setting Photo Timer to toggle the desired time delay. : Self-timer is off : 2-second self-timer : 5-second self-timer : 10-second self-timer Configuring Camera Settings to enter the Settings menu. Select the desired menu option and setting. Menu Option Description Press and hold... -
Page 31: Viewing Photos/Videos
Operating Your Tablet PC video. Photo burst – Tap and hold the Camera button to take photos continuously. Disabled – Disable the function. Aspect ratio Select the aspect ratio of the photos. Framing grid Show or hide the framing grid lines. Time lapse Set the setting is set to On, the system will keep taking photos until the Camera button is pressed. -
Page 32: Making Connections
Making Connections Making Connections This chapter will guide you on installing peripheral devices to maximize the use of your tablet PC. Installing the Memory Card Your Tablet PC supports different types of memory cards to provide faster data transfer. Supported types: Micro SDHC, Micro SDXC 1. -
Page 33: Installing The Sim Card
Making Connections Installing the SIM Card You can use a SIM card for wireless internet access. NOTE Check the availability of service and plan rates of data connection with your network service provider. It is recommended turn off the tablet PC before you insert the SIM card. 1. -
Page 34: Installing The Smart Card
Making Connections Installing the Smart Card Your tablet PC is equipped with a built-in smart car make secure purchases, store security information, and provide identification and information using a smart card. 1. Pull to open the smart card cover. 2. Insert a smart card into the smart card slot. 3. -
Page 35: Connecting The Microphone/Headset
Making Connections Connecting the Microphone/Headset Your tablet PC is equipped with audio combo jack that enables you to use the headset or microphone. To connect to a headset, open the memory/SIM card cover and plug the stereo headphone cable into the audio combo jack of your device. ... -
Page 36: Connecting Usb Devices
Making Connections Connecting USB Devices You can connect your tablet PC to other USB devices, such as a mouse, keyboard, digital camera, printer, or an external hard disk drive. 1. Slide to the right to open the I/O port cover. 2. -
Page 37: Connecting To External Display
Making Connections Connecting to External Display You can connect an additional display to your tablet PC using the mini DisplayPort cable. 1. Slide to right to open the I/O port cover. 2. Connect one end of the mini DisplayPort cable to the mini DisplayPort of your device. -
Page 38: Connecting To Wireless Connections
Making Connections Connecting to Wireless Connections Your tablet PC can connect and communicate with other Bluetooth-enabled devices. NOTE Do not disassemble the bumper. Otherwise, the antenna may be damaged, resulting in poor reception. Connecting to a Bluetooth Device Your tablet PC can connect and communicate with other Bluetooth-enabled devices. - Page 39 Making Connections 4. Tap + and select the kind of device you want to add. 5. Select the device you want to connect. Verify the pairing code on the screen of your device and pairing device match, then tap Connect to start pairing. NOTE ...
- Page 40 Making Connections 6. Tap Done to complete the pairing connection. NOTE Most Bluetooth-enabled devices need to be paired with your tablet PC. The PIN you enter on the tablet PC must be the same PIN to be entered on the other Bluetooth device.
- Page 41 Making Connections Connecting to a Wireless Local Area Network Your tablet PC comes with a WLAN module. A wireless network can be added either when the network is detected or by manually entering the settings information. To connect, follow the steps below: 1.
- Page 42 Making Connections 3. Tap Connect. Some networks require a network security key or a password. Check Connect automatically box to automatically connect to this network when it is available. 4. Enter the network security key. 7. Tap Next. After the connection is established, you can see the wireless icon ) in the Notification area.
- Page 43 Making Connections Connecting to a Wireless Wide Area Network (WWAN) With WWAN function, it allows your tablet PC to connect to the Internet using mobile or cellular data networks. To connect, follow the steps below: 1. Insert a valid SIM card into the SIM card slot (refer to page 33). 2.
- Page 44 Making Connections 3. Select the mobile network carrier and tap Connect to establish the connection. Check Let Windows manage this connection box to allow the system to automatically connect to this mobile data network. EN-44...
-
Page 45: Using The Bios Setup Utility
Press the P1 key. Tap Setup (on the upper right corner of the screen) when the DURABOOK logo appears. Press the Delete button on the keyboard. - Page 46 Using the BIOS Setup Utility Navigating and Entering Information in BIOS Use the following keys to move between fields and to enter information: Keyboard Description Select screen / Click Select item Enter / Select Double-click + / - Change Opt.
-
Page 47: Main Menu
Using the BIOS Setup Utility Main Menu The Main menu displays the system overview information about the device, including the system date and time. Item Description BIOS Information Display the BIOS version detected during boot up. Display the CPU type and speed, total memory, mainboard System Information version, PCH SKU, ME FW version, and ME Firmware SKU. -
Page 48: Advanced Menu
Using the BIOS Setup Utility Advanced Menu The Advanced menu allows you to configure specific system settings. Item Description CPU Configurations Configure the CPU parameters. Key Definitions Configure the Key Definition settings under Windows. Configure the device settings including USB3.0 port, LAN, SD card reader, TPM device, HD audio, finger print scanner, Device Configurations touch screen, PCMCIA/ExpressCard, front camera, rear... -
Page 49: Boot Menu
Using the BIOS Setup Utility Boot Menu The Boot menu allows you to configure the boot settings and boot sequence. Item Description Bootup NumLock Select the keyboard NumLock state. State Launch CSM Enable/Disable CSM support. Launch Network PXE Control the execution of UEFI and Legacy PXE OpROM. OpRom Option ROM Set the display mode for Option ROM... -
Page 50: Security Menu
Using the BIOS Setup Utility Security Menu The Security menu allows you to set or change the Administrator and User passwords. Item Description Administrator Set the Administrator password. Password Secure Boot Customize the Secure Boot settings. EN-50... -
Page 51: Save & Exit Menu
Using the BIOS Setup Utility Save & Exit Menu The Save & Exit menu allows you to save/discard the changes and restore the default values for all setup options before leaving the BIOS Setup Menu. Item Description Save Changes and Reset the system after saving the changes. -
Page 52: Appendix
Appendix Appendix Copyright Copyright © 2018. All rights reserved. No part of this user manual may be transmitted, stored in a retrieval system, or translated into any language or computer language, in any form or by any means, without the prior written permission of the manufacturer. Information is subject to change without prior notice. -
Page 53: Declaration Of Conformity
Appendix Declaration of Conformity This device complies with part 15 of the FCC rules. Operation is subject to the following conditions: This device may not cause harmful interference This device must accept any interference received, including interference that may cause undesired operation. RF exposure warning This equipment must be installed and operated in accordance with provided instructions and must not be co-located or operating in conjunction with any... -
Page 54: Class 1 Laser Product
Appendix CLASS 1 LASER PRODUCT LASERSCHUTZKLASSE 1 PRODUKT TO EN60825 CAUTION THIS APPLIANCE CONTAINS A LASER SYSTEM AND IS CLASSIFIED AS A "CLASS 1 LASER PRODUCT.” TO USE THIS MODEL PROPERLY, READ THE INSTRUCTION MANUAL CAREFULLY AND KEEP THIS MANUAL FOR FUTURE REFERENCE. - Page 55 Appendix CAUTION FOR ADAPTER THE TABLET PC IS FOR USE WITH DEDICATED AC ADAPTER. AVERTISSEMENT CONCERNANT L’ADAPTATEUR LA TABLETTE DOIT ÊTRE UTILISÉE AVEC UN ADAPTATEUR SECTEUR CA DÉDIÉ. BATTERY SAFETY DANGER OF EXPLOSION IF BATTERY IS INCORRECTLY REPLACED. REPLACE ONLY WITH THE SAME OR EQUIVALENT TYPE RECOMMENDED BY THE MANUFACTURER.
-
Page 56: Safety Instructions
Appendix Safety Instructions These safety instructions should always be observed to ensure safe operation when handling the device. Do not place this device on an unstable table or surface. The device may fall, causing serious damage to its housing and components. ... - Page 57 Appendix Instructions de sécurité Ces instructions de sécurité doivent toujours être suivies pour assurer le fonctionnement sûr de l’appareil lors de sa manipulation. Ne placez pas cet appareil sur une table ou surface instable. L’appareil pourrait tomber et causer des dégâts sérieux à son boîtier et ses composants. ...
Need help?
Do you have a question about the U11 and is the answer not in the manual?
Questions and answers