Table of Contents
Advertisement
Quick Links
In s t ru ct io n Man ua l
V 2.0
3-Axis Gimbal for Mirrorless Camera
Note
1. Please do not remove the holder screws fully to avoid wrong installation.
2. For detachable camera lens, please intall it with the thumb screw for fixing lens to avoid vibiration.
1. Product Overview
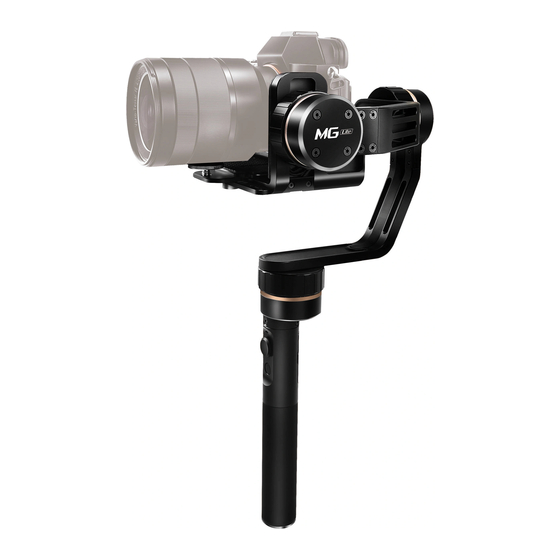
MG is one kind of 3-axis handheld gimbal especially for mirroless cameras. Simple and clean design
integrated strong operation function, easy to switch among more using ways. The easiest operation
experience. Pan/Tilt/Roll 3-axis 360 degrees coverage, Giving you ultimate experience while using the
MG for shooting.
[1]
[4]
[2]
[4]
[5]
Rolling
Tilting 360°
360°
[6]
[7]
[9]
[8]
[10]
[11]
Panning 360°
[12]
[1] Tilting axis
[18] USB cable(mini port)
[2] Rolling axis
[19] USB cable(micro port)
[3] Panning axis
[20] USB connector
[13]
[4] Cross arm
[21] Mini allen key
[5] Vertical arm
[22] Wireless remote control
[6] Joystick
[23] Wireless remote control receiver
[7] Function button
[8] Socket connector
[9] Thumb screw for fixing lens
[10] Adjusting clamping plate
[11] Adapter(Clamping plate)
[12] Function interface
[13] Handle
[14] Thumb screw
[15] Connector
[16] Corss bar
[17] Hand grip
[22]
[23]
* This product does not contain cameras
and camera equipment category
The showing camera only for reference.
2. Installation
1
Insert the batteries
Remove the handle, insert
2 pcs 18650 batteries and
tighten the screw.
Please install the camera close
to the tilting.
5
Installation of handle
MG combined with the connector and handle can be used to achieve a variety of ways, choose the
installation method according to your need.
* The default use
way is handheld
[2]
[3]
[1]
Portable
Installation
[3]
[12]
6
Starting and shutdown
[9]
[14]
[15]
[16]
micro port
mini port
[18]
[19]
[17]
[21]
[10]
[20]
Power on / off
Attention: Please complete the installation before power on the gimbal
Adjusting clamping plate
Thumb screw
for fixing lens
Adapter
2
Installation of adjusting clamping plate
Adjusting clamping plate light slip along the slideway to the
suitable position. If use a long lens, please install the thumb
screw for fixing lens[9] after installing the adjusting clamping.
Installation of the camera
4
Camera balance
3
adjustment
Correctly place the camera to the
In order to achieve the desired
adjusting clamping, fixing it by the
effect of the MG gimbal, the
thumb screw [14] trough the screw
first use or replace the
holes on the bottom of the adjusting
camera / lens, or change the
clamping.
Adjust the adjusting
camera position, weight, size,
clamping to make the camera close
appearance, need to adjust
to the tilting
motor, fixing the adjusting
the balance.
clamping by the thumb screw [14].
Tilting
Balance adjustment
Warm tip:
if the first time to use or
procedures, please refer to the
Thumb
replace the camera / lens, or change
"Balance Adjustment" section.
screw
the camera position, weight, size,
appearance, it is only fixed, without
tightening the middle screw too tight,
in order to facilitate the balance after
adjustment.
Handheld
Disassembly
Connector
Corss bar
Handle
Hand grip
Dual Handheld
Installation
!
Please locked hand
grip after installation
Start: Press the bottom switch, power on the gimbal,
and then single tap on the function button to
start it.
Off:
Press the bottom switch again to turn off.
!
If the power is too low, the gimbal will turn off.
After replacing the batteries, click the function
Start the gimbal
button to restart the gimbal.
3. Balance Adjustment
In order to achieve the desired effect of the MG gimbal, the first use or replace the camera / lens,
or change the camera position, weight, size, appearance, need to adjust the balance.
Warm tip
1. Please mount the adjusting clamping plate, camera lens, memory card, etc. and then remove the
lens cover before the balance adjustment.
2. In order to prevent the gimbal damage from improper mounting. Please don't fully unscrew the
screws that secure the motor while adjust the balance. Unscrew till loose is advisable.
3. To help you remember the position after adjustment, we remain a 20mm scale.
STEP 1
Balance adjustment of the tilting axis
(1) Adjust center of gravity of the
camera vertical position in tilting axis.
a.
Mount the camera on the adjusting
clamping plate, fix the tilting, rolling
position, and keep it at the horizon
level, and turn the lens down.
Observe the camera status.
b.
If camera leans to front or back, then
loosen 4 screws on the adapter, and
adjust the camera to the opposite
position, until the camera can mount
properly.
As shown, if the camera is tilted toward A, the
fixed plate live A direction, if tilted toward B, the
fixed plate should be live B direction.
c.
Make sure to tighten the screws after the fixing plate is adjusted.
(2) Adjust center of gravity of the camera horizon position
in tilting axis.
Adjust center of gravity of the camera horizon
position in tilting axis, after the adjustment of the
center of gravity in vertical position.
a.
The screws on the bottom of the adjusting clamping、
in a relaxed state.
Fix the tilting, rolling position, and keep it at the
horizon level. Make the camera lens forward. And
observe the camera status.
Lock
b.
If camera leans to front or back, then move the camera
catch
to the opposite position , until the camera can mount
properly.
As shown, if the camera is tilted toward A, the camera
live A direction, if tilted toward B, the camera should be
live B direction.
c.
After the adjustment tighten the screws on the MG plate
and the lens retaining ring .
STEP 2
Balance adjustment of the rolling axis
Adjust center of gravity of the camera horizon position in rolling
axis, after the adjustment of the center of gravity in tilting axis.
a.
Fix rolling position manually and keep the camera at the horizon level, leave hold of it and observe the
camera status.
b.
If camera leans to left or rihgt, then loosen 4 screws on the scale, and adjust the cross arm to the
opposite position of the cross arm, until the camera keep the current position after adjustment.
As shown, if the camera is tilted toward A, move the cross arm to A direction, if tilted toward B, move
the cross arm to B direction.
c.
After the adjustment tighten the screws on cross arm.
A
Tips:
Please don't fully unscrew
the screws that secure the motor
while adjust the balance.
Unscrew till loose is advisable.
Tips:
Please don't fully unscrew
B
the screws that secure the motor
while adjust the balance.
Unscrew till loose is advisable.
Screw
A
Adapter
Adapter
(Clamping plate)
(Clamping plate)
A
A
B
B
A
A
B
Thumb screw
The bottom
of adapter
(Clamping plate)
Thumb screw
Thumb screw
B
A
B
Advertisement
Table of Contents

Subscribe to Our Youtube Channel
Related Manuals for FeiYu Tech MG


Summary of Contents for FeiYu Tech MG
-
Page 1: Product Overview
2. Installation Attention: Please complete the installation before power on the gimbal In order to achieve the desired effect of the MG gimbal, the first use or replace the camera / lens, Adjusting clamping plate or change the camera position, weight, size, appearance, need to adjust the balance. -
Page 2: Firmware Upgrade
4. Used Method Other Functions Panning Increments 3°/s ~ 150°/s MG gimbal supports the pitch axis left or right installed, please select one of the methods Reset Usage Time 6 Hours according to the convenience of device operations.
Need help?
Do you have a question about the MG and is the answer not in the manual?
Questions and answers