Sony BC-TRX Operating Instructions
Hide thumbs
Also See for BC-TRX:
- Operating instructions (2 pages) ,
- Operating instructions manual (14 pages)
Advertisement
Quick Links
When attaching a type X or K battery pack, insert it along the left
4-442-237-23(1)
side of the attachment part of this unit as shown by the arrow in
illustration -2.
3 Connect the power cord (mains lead) to this unit and then
Battery Charger
to a wall outlet (wall socket) (See Illustration ).
The CHARGE lamp (orange) lights up and charging begins.
Chargeur de Batterie
The CHARGE lamp goes out when the battery pack is about 90 %
charged.
The charging status indicator lamp goes out when charging is
電池充電器
completed. (Full charge)
You can check the approximate charging status with the charging
status indicator lamp.
Operating Instructions
Mode d'emploi
Immediately after
Οδηγίες λειτουργίας
attaching the battery
pack - 30 %
Instrukcja obsługi
30 % - 60 %
60 % - 90 %
90 % - Full charge
Full charge
completed
The charge level shown by the charging status indicator lamp and the
percentages in the above table are rough guides.
The actual status may differ depending on the ambient temperature or
the condition of the battery pack.
To remove the battery pack
Lift the battery pack up and remove it.
BC-TRX
Charging time
The following table shows the charging time for a battery pack that is
completely discharged.
© 2012 Sony Corporation Printed in China
Battery
pack
Full
charge
time
ˎ
ˎ
Approximate number of minutes to charge an empty battery pack.
1
2
ˎ
ˎ
For more about the battery life, see the instruction manual of your
digital still camera.
ˎ
ˎ
The charging time may differ depending on the condition of the battery
pack or the ambient temperature.
ˎ
ˎ
The times shown are for charging an empty battery pack which has
been run down with a digital still camera, using this unit at an ambient
temperature of 25 °C (77 °F).
Charging temperature
The temperature range for charging is 0 °C to 40 °C (32 °F to 104 °F).
1
2
For maximum battery efficiency, the recommended temperature
range when charging is 10 °C to 30 °C (50 °F to 86 °F).
To use the battery pack quickly
You can remove the battery pack from this unit and use it even if charging
is not completed. However, the charging time affects the time that the
battery pack can be used.
Notes
ˎ
ˎ
If the CHARGE lamp does not light up, check if the battery pack is
firmly attached to this unit.
3
ˎ
ˎ
When a fully charged battery pack is installed, the CHARGE lamp
lights up once and then goes out.
ˎ
ˎ
A battery pack that has not been used for a long time may take longer
than usual to charge.
Use this unit with the USB cable (See
illustration )
1 Set the output switch of this unit to "USB POWER 5V
1500mA".
2 Connect your device to this unit.
3 Connect the power cord (mains lead) to this unit and then
to a wall outlet (wall socket).
4 After the device is completely recharged, unplug this unit
and disconnect the device from this unit.
This unit supports worldwide voltages 100 V to 240 V.
Do not use an electronic voltage transformer, as this may cause a
malfunction.
Troubleshooting
When the CHARGE lamp blinks, check through the following chart.
3
The CHARGE lamp blinks in two ways.
Blinks slowly: Turns on and off repeatedly every 1.5 seconds
Blinks quickly: Turns on and off repeatedly every 0.15 seconds
The action to be taken depends on the way the CHARGE lamp blinks.
When the CHARGE lamp keeps blinking slowly
Charging is pausing. This unit is in the standby state.
If the room temperature is out of the appropriate temperature range,
charging stops automatically.
When the room temperature returns to the appropriate range, the
CHARGE lamp lights up and charging restarts.
We recommend charging the battery pack at 10 °C to 30 °C (50 °F to
86 °F).
2
When the CHARGE lamp keeps blinking quickly
When charging the battery pack for the first time in one of the
following situations, the CHARGE lamp may blink quickly.
If this happens, remove the battery pack from this unit, reattach it and
charge it again.
When the battery pack is left for a long time
When the battery pack is left installed in the camera for a long time
Thank you for purchasing the Sony Battery charger.
Immediately after purchase
Before operating this Battery charger, please read this manual thoroughly
and retain it for future reference.
If the CHARGE lamp keeps blinking quickly, check through the following
chart.
ˎ
ˎ
The BC-TRX battery charger can only be used to charge lithium
ion type battery packs (type X/type N/type G/type D/type K) and
Remove the battery pack that is being charged and then rmly attach the same
"InfoLITHIUM" battery packs (type G/type D/type T/type R).
battery pack again.
ˎ
ˎ
Designed for use with compatible Sony battery packs.
ˎ
ˎ
This unit cannot be used to charge a nickel cadmium type or nickel
The CHARGE lamp blinks again:
metal hydride type battery pack.
Install another battery pack.
ˎ
ˎ
"InfoLITHIUM" is a trademark of Sony Corporation.
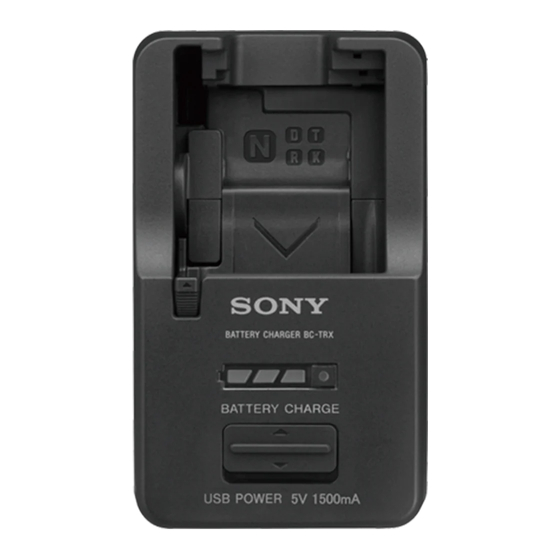
Identifying the parts
Switching lever
Charging status indicator lamp
ˎ
ˎ
The CHARGE lamp blinks again:
ˎ
Output switch
ˎ
to wall outlet (wall socket)
e problem is with this unit.
ˎ mark
Power cord (Mains lead)
ˎ
ˎ
ˎ
Battery type mark
ˎ
to wall outlet (wall socket)
ˎ
AC input terminal
ˎ
USB rechargeable device (Digital
ˎ
Battery mark
camera, etc.)
ˎ
Battery pack
ˎ
Supplied Micro USB cable or
ˎ
CHARGE lamp
other USB cable compatible with
Please contact your nearest Sony dealer in connection with the product that may
have a problem.
your device
The battery pack cannot be charged.
To Charge the Battery Pack
ˎ
ˎ
This unit is not connected to the wall outlet (wall socket).
‚
ˎ
Connect the power cord (mains lead) to this unit and the wall outlet
The battery pack is charged by attaching it to this unit.
(wall socket) properly.
1 Set the output switch of this unit to "BATTERY CHARGE".
ˎ
ˎ
The output switch of this unit is set to "USB POWER 5V 1500mA".
‚
ˎ
Set the output switch of this unit to "BATTERY CHARGE".
2 Attach the battery pack.
ˎ
ˎ
Battery pack is attached at an angle or upside down.
Before attaching
‚
ˎ
Attach the battery pack to this unit correctly.
When using a type N, D, T, R or K battery pack, do the following steps
before attaching it to this unit.
The device connected by the USB cable does not work.
* If you use a type X or type G battery pack, you do not need the
ˎ
ˎ
This unit is not connected to the wall outlet (wall socket).
following procedure.
‚
ˎ
Connect the power cord (mains lead) to this unit and the wall outlet
Lift the switching lever up. (See illustration -1)
(wall socket) properly.
Press the switching lever to the point marked on the illustration
ˎ
ˎ
The output switch of this unit is set to "BATTERY CHARGE".
until it clicks. (See illustration -2)
‚
ˎ
Set the output switch of this unit to "USB POWER 5V 1500mA".
ˎ
ˎ
The device connected to this unit may need to be operated.
How to attach the battery pack
‚
ˎ
Refer to the instruction manual of the connected device.
Align the mark on the battery pack in the direction of the
mark
on the charger and insert it. (See illustration -1)
(The battery pack illustrated is type X.)
ˎ
ˎ
Attach the battery pack with its
mark facing up.
Specifications
Input rating
Output rating
Operating temperature 0 °C to 40 °C
Storage temperature
Dimensions (Approx.) 54 mm × 45 mm × 90 mm (w/h/d)
Mass
,
... Off,
,
... Lit up
Included items
Charging status
CHARGE lamp
indicator lamp
Design and specifications are subject to change without notice.
Precautions on Use
ˎ
ˎ
Unplug this unit from the wall outlet (wall socket) after use. To
disconnect the power cord (mains lead), pull it out by the plug. Never
pull the power cord (mains lead) itself.
The USB connector of this unit is for output only. Do not connect it to
ˎ
ˎ
the USB port of a computer, etc. Doing so may cause a malfunction.
ˎ
ˎ
Some USB rechargeable devices cannot be used with this unit. Also,
some devices may not be operable while recharging. Check the charging
specifications in the instruction manual of your device.
ˎ
ˎ
When you use the USB connector of this unit, attach a battery pack to
the connected device. Not doing so may cause data loss from the device
or damage due to the device crashing.
ˎ
ˎ
Be warned that some devices may suddenly lose their input memory
regardless of whether they are used with the USB connector of this unit.
(For details, refer to the instruction manual supplied with your device.)
Always back up the input memory beforehand. Sony is not liable for
any loss of input memory when using this unit.
ˎ
ˎ
Make sure before using this unit that its current and voltage match
NP-BD1/
NP-BG1/
NP-BX1 NP-BN1 NP-BN
NP-FD1/
NP-FR1 NP-BK1
those of the outlet.
NP-FG1
ˎ
ˎ
Depending on the conditions of use of this unit's USB connector, this
NP-FT1
unit may automatically shut down for safety reasons if the input current
is too high.
135
90
110
125
130
190
180
ˎ
ˎ
Sony does not guarantee operation of this unit if you use it with a USB
hub or USB extension cable. Always follow the designated connecting
method of the USB cable supplied with your device.
When not using this unit, disconnect the USB cable from its USB
ˎ
ˎ
connector and store it.
Merci pour l'achat de ce chargeur de batterie Sony.
Avant d'utiliser ce chargeur de batterie, veuillez lire attentivement ce
manuel et le conserver pour toute référence future.
ˎ
ˎ
Le chargeur de batterie BC-TRX ne peut être utilisé que pour charger
des batteries rechargeables au lithium-ion (type X/type N/type G/type
D/type K) et des batteries rechargeables « InfoLITHIUM » (type G/
type D/type T/type R).
ˎ
ˎ
Il est conçu pour les batteries rechargeables Sony compatibles.
ˎ
ˎ
Cet appareil ne peut pas être utilisé pour charger une batterie
rechargeable nickel-cadmium ou nickel-hydrure métallique.
ˎ
ˎ
« InfoLITHIUM » est une marque commerciale de Sony Corporation.
Identification des
éléments
ˎ
Levier de commutation
ˎ
Sélecteur de sortie
ˎ
Repère
ˎ
ˎ
Repère de type de batterie
ˎ
Borne d' e ntrée CA
ˎ
Repère de la batterie
ˎ
Batterie rechargeable
ˎ
Témoin CHARGE
Pour charger la batterie
La batterie rechargeable se charge lorsqu' e lle est insérée dans cet appareil.
1 Réglez le sélecteur de sortie de cet appareil sur « BATTERY
CHARGE ».
2 Insérez la batterie rechargeable.
Avant de l'insérer
Si vous utilisez une batterie rechargeable de type N, D, T, R ou K
procédez de la façon suivante avant de la mettre sur cet appareil.
* Si vous utilisez une batterie rechargeable de type X ou de type G, la
procédure suivante est inutile.
Levez le levier de commutation. (Voir l'illustration -1)
Basculez le levier de commutation sur le point comme indiqué sur
l'illustration jusqu'à ce qu'il s' e ncliquette. (Voir l'illustration -2)
Comment insérer la batterie rechargeable
Alignez le repère sur la batterie rechargeable dans le sens du repère
sur le chargeur et insérez la batterie. (Voir l'illustration -1)
(La batterie rechargeable illustrée est de type X.)
ˎ
ˎ
Insérez la batterie rechargeable avec son repère
haut.
Une batterie rechargeable de type X ou K doit être insérée le long du
côté gauche de la pièce de fixation de cet appareil, comme indiqué par
la flèche sur l'illustration -2.
3 Raccordez le cordon d'alimentation à cet appareil puis à
une prise murale (Voir l'illustration ).
Le témoin CHARGE (orange) s'allume et la recharge commence.
Le témoin CHARGE s' é teint lorsque la batterie est chargée à environ
90 %.
Le témoin d' é tat de charge s' é teint quand la charge est terminée.
(Charge complète)
Le témoin d' é tat de la charge vous donne une idée approximative de
l' é tat de charge de la batterie.
Immédiatement
après l'installation
de la batterie
rechargeable - 30%
30 % - 60 %
60 % - 90 %
The CHARGE lamp lights up and
90 % -
does not blink again:
Charge complète
If the CHARGE lamp goes out
because the charging time has
Charge complète
passed, there is no problem.
terminée
Le niveau de charge indiqué par le témoin d' é tat de charge et les
The CHARGE lamp lights up and
pourcentages dans le tableau ci-dessus sont approximatifs.
does not blink again:
L' é tat de charge réel peut être différent selon la température ambiante et
If the CHARGE lamp goes out
l' é tat de la batterie rechargeable.
because the charging time has
passed, the problem is with the
Pour retirer la batterie rechargeable
battery pack rst installed.
Relevez la batterie rechargeable et retirez-la.
Temps de charge
Le tableau suivant montre le temps de charge pour une batterie
rechargeable complètement déchargée.
Batterie
rechargeable NP-BX1 NP-BN1 NP-BN
Temps de
charge
135
complète
ˎ
ˎ
Nombre approximatif de minutes pour charger une batterie
rechargeable vide.
ˎ
ˎ
Pour de plus amples informations sur l'autonomie de la batterie,
reportez-vous au mode d' e mploi de votre appareil photo numérique.
ˎ
ˎ
Le temps de charge peut être différent selon l' é tat de la batterie
rechargeable ou la température ambiante.
ˎ
ˎ
Les temps indiqués correspondent à la charge d'une batterie
rechargeable vide, usée sur un appareil photo numérique, avec cet
appareil à une température ambiante de 25 °C.
Température de charge
La température doit se situer entre 0 °C et 40 °C pour la charge. Pour
100 V - 240 V AC 50 Hz/60 Hz
une efficacité maximale de la batterie, la température conseillée pour
la charge est de 10 °C à 30 °C.
11 W
Battery charge terminal:
Pour utiliser rapidement la batterie rechargeable
4.2 V DC 860 mA (BATTERY CHARGE)
5.0 V DC 1,500 mA (USB POWER 5V 1500mA)
Vous pouvez retirer la batterie rechargeable de cet appareil et l'utiliser
même si la charge n' e st pas terminée. Cependant, le temps de charge a une
influence sur l'autonomie de la batterie rechargeable.
–20 °C to +60 °C
Remarques
Approx. 100 g
ˎ
ˎ
Si le témoin CHARGE ne s'allume pas, vérifiez si la batterie rechargeable
est bien insérée dans cet appareil.
Battery Charger (BC-TRX) (1)
ˎ
ˎ
Lorsqu'une batterie chargée est installée, le témoin CHARGE s'allume
AC Power cord (1)
une fois puis s' é teint.
Micro USB cable (1)
ˎ
ˎ
Une batterie rechargeable qui n'a pas été utilisée pendant longtemps
Set of printed documentation
peut être plus longue à charger que la normale.
Utilisez cet appareil avec un câble
USB (Voir l'illustration )
1 Réglez le sélecteur de sortie de cet appareil sur « USB
POWER 5V 1500mA ».
2 Raccordez votre appareil à cet appareil.
3 Raccordez le cordon d'alimentation à cet appareil puis à
une prise murale.
4 Lorsque l'appareil est complètement chargé, débranchez
cet appareil ainsi que votre appareil de celui-ci.
Cet appareil supporte les tensions du monde entier, de 100 V à 240 V.
N'utilisez pas un transformateur électronique de tension car ceci
pourrait provoquer un dysfonctionnement.
En cas de problème
Lorsque le témoin CHARGE clignote, vérifiez les points du tableau
suivant.
Le témoin CHARGE clignote de deux façons.
Clignotement lent :
S'allume et s' é teint toutes les 1,5 secondes de façon
répétée.
Clignotement rapide : S'allume et s' é teint toutes les 0,15 secondes de façon
répétée.
La mesure à prendre dépend de la façon dont le témoin CHARGE
clignote.
Lorsque le témoin CHARGE continue de clignoter lentement
La charge est en pause. Cet appareil est en attente.
Si la température de la pièce est hors de la plage de températures
appropriée, la charge s'arrête automatiquement.
Lorsque la température de la pièce revient dans la plage appropriée, le
témoin CHARGE s'allume et la charge redémarre.
Il est conseillé de charger la batterie rechargeable entre 10 °C et 30 °C.
Lorsque le témoin CHARGE continue de clignoter rapidement
La première fois que vous chargez la batterie dans une des situations
suivantes, le témoin CHARGE peut clignoter rapidement.
Dans ce cas, retirez la batterie de cet appareil puis réinsérez-la et
chargez-la de nouveau.
Si la batterie est restée longtemps inutilisée
Si la batterie est restée longtemps dans l'appareil photo
Immédiatement après l'achat
Si le témoin CHARGE continue de clignoter rapidement, vérifiez les
points du tableau suivant.
ˎ
Témoin d' é tat de la charge
Retirez la batterie rechargeable qui a été chargée et insérez-la de nouveau
ˎ
À une prise murale
fermement dans le chargeur.
ˎ
Cordon d'alimentation
ˎ
À une prise murale
ˎ
Appareil rechargeable par l'USB
Le témoin CHARGE clignote de
(Appareil photo numérique, etc.)
nouveau :
ˎ
Câble micro-USB fourni ou autre
Installez une autre batterie.
câble USB compatible avec votre
appareil
Le témoin CHARGE clignote de
nouveau :
Le problème vient de cet appareil.
Veuillez contacter le revendeur Sony le plus proche du produit présentant
éventuellement un problème.
La batterie ne peut pas être chargée.
ˎ
ˎ
Cet appareil n' e st pas raccordé à une prise murale.
‚
ˎ
Raccordez correctement le cordon d'alimentation à cet appareil et à
une prise murale.
ˎ
ˎ
Le sélecteur de sortie de cet appareil est réglé sur « USB POWER 5V
1500mA ».
‚
ˎ
Réglez le sélecteur de sortie de cet appareil sur « BATTERY
CHARGE ».
ˎ
ˎ
La batterie rechargeable est insérée de manière inclinée ou pas du bon
côté.
orienté vers le
‚
ˎ
Insérez la batterie rechargeable correctement à cet appareil.
L'appareil raccordé par le câble USB ne fonctionne pas.
ˎ
ˎ
Cet appareil n' e st pas raccordé à une prise murale.
‚
ˎ
Raccordez correctement le cordon d'alimentation à cet appareil et à
une prise murale.
ˎ
ˎ
Le sélecteur de sortie de cet appareil est réglé sur « BATTERY
CHARGE ».
Réglez le sélecteur de sortie de cet appareil sur « USB POWER 5V
‚
ˎ
1500mA ».
ˎ
ˎ
L'appareil raccordé à cet appareil doit peut-être être activé.
‚
ˎ
Reportez-vous au mode d' e mploi de l'appareil raccordé.
Spécifications
,
... Éteint,
,
... Allumé
Puissance nominale d' e ntrée 100 V - 240 V CA 50 Hz/60 Hz
11 W
Témoin d' é tat de la
Témoin CHARGE
charge
Puissance nominale de
Borne de charge de la batterie :
sortie
4,2 V CC 860 mA (BATTERY CHARGE)
5,0 V CC 1 500 mA
(USB POWER 5V 1500mA)
Température de
0 °C à 40 °C
fonctionnement
Température d' e ntreposage –20 °C à +60 °C
Dimensions (environ)
54 mm × 45 mm × 90 mm (l/h/p)
Poids
environ 100 g
Articles inclus
Chargeur de batterie (BC-TRX) (1)
Cordon d'alimentation secteur (1)
Câble micro-USB (1)
Jeu de documents imprimés
La conception et les spécifications peuvent être modifiées sans préavis.
Précautions d'emploi
ˎ
ˎ
Débranchez cet appareil de la prise murale après utilisation. Pour
débrancher le cordon d'alimentation, tirez sur la fiche. Ne tirez jamais
sur le cordon d'alimentation proprement dit.
ˎ
ˎ
Le connecteur USB de cet appareil ne peut être utilisé que comme
sortie. N'y raccordez pas le port USB d'un ordinateur, etc. Ceci peut
causer un dysfonctionnement.
ˎ
ˎ
Certains appareils rechargeables par l'USB ne peuvent pas être utilisés
NP-BD1/
NP-BG1/
avec cet appareil. De plus, certains appareils ne peuvent pas être utilisés
NP-FD1/
NP-FR1 NP-BK1
NP-FG1
pendant la charge. Vérifiez les caractéristiques concernant la charge
NP-FT1
dans le mode d' e mploi de votre appareil.
ˎ
ˎ
Lorsque vous utilisez le connecteur USB de cet appareil, insérez
90
110
125
130
190
180
une batterie sur l'appareil raccordé. Sinon les données de l'appareil
pourraient être perdues ou une défaillance de l'appareil pourrait causer
d'autres dommages.
Il faut savoir que la mémoire d' e ntrée de certains appareils peut être
ˎ
ˎ
perdue même s'ils sont utilisés avec le connecteur USB de cet appareil.
(Pour plus d'informations, reportez-vous au mode d' e mploi fourni avec
votre appareil.) Faites toujours une sauvegarde de la mémoire d' e ntrée
au préalable. Sony décline toute responsabilité en cas de perte de la
mémoire d' e ntrée suite à l'utilisation de cet appareil.
ˎ
ˎ
Avant d'utiliser cet appareil, assurez-vous que son courant et sa tension
correspondent à ceux de la prise.
ˎ
ˎ
Selon les conditions d'utilisation du connecteur USB de cet appareil, cet
appareil peut s'arrêter automatiquement pour des raisons de sécurité si
le courant entrant est trop élevé.
ˎ
ˎ
Sony ne garantit pas le fonctionnement de cet appareil s'il est utilisé
avec un concentrateur USB ou un câble-rallonge USB. Raccordez
toujours le câble USB fourni avec votre appareil de la façon indiquée.
ˎ
ˎ
Lorsque vous n'utilisez pas cet appareil, débranchez le câble USB du
connecteur USB et rangez-le.
Σας ευχαριστούμε που αγοράσατε αυτό το φορτιστή μπαταρίας της Sony.
Πριν θέσετε σε λειτουργία αυτόν τον φορτιστή μπαταρίας, διαβάστε
προσεκτικά το παρόν εγχειρίδιο και κρατήστε το για μελλοντική
αναφορά.
ˎ
ˎ
Ο φορτιστής μπαταρίας BC-TRX μπορεί να χρησιμοποιηθεί μόνο για
τη φόρτιση μπαταριών ιόντων λιθίου (τύπου X/τύπου N/τύπου G/
τύπου D/τύπου K) και μπαταριών "InfoLITHIUM" (τύπου G/τύπου
D/τύπου T/τύπου R).
ˎ
ˎ
Σχεδιασμένο για χρήση με συμβατές μπαταρίες Sony.
ˎ
ˎ
Η μονάδα αυτή δεν μπορεί να χρησιμοποιηθεί για τη φόρτιση
μπαταριών τύπου νικελίου καδμίου ή νικελίου-υδριδίου μετάλλου.
ˎ
ˎ
Η επωνυμία "InfoLITHIUM" αποτελεί εμπορικό σήμα της Sony
Corporation.
Προσδιορισμός των
μερών
ˎ
Μοχλός εναλλαγής
ˎ
Ενδεικτική λυχνία κατάστασης
ˎ
Διακόπτης εξόδου
φόρτισης
ˎ
Ένδειξη
ˎ
προς πρίζα τοίχου
ˎ
Ένδειξη τύπου μπαταρίας
ˎ
Καλώδιο τροφοδοσίας
ˎ
Ακροδέκτης εισόδου AC
ˎ
προς πρίζα τοίχου
ˎ
Ένδειξη μπαταρίας
ˎ
Επαναφορτιζόμενη συσκευή USB
ˎ
Μπαταρία
(Ψηφιακή φωτογραφική μηχανή, κ.λπ.)
Λυχνία CHARGE
Παρεχόμενο καλώδιο micro USB ή
ˎ
ˎ
άλλο καλώδιο USB συμβατό με τη
συσκευή σας
Για τη φόρτιση της μπαταρίας
Η μπαταρία φορτίζεται με την τοποθέτησή της σε αυτήν τη μονάδα.
1 Θέστε το διακόπτη εξόδου αυτής της μονάδας στη θέση
"BATTERY CHARGE".
2 Τοποθετήστε την μπαταρία.
Πριν την τοποθέτηση
Όταν χρησιμοποιείτε μπαταρία τύπου N, D, T, R ή K, ακολουθήστε τα
παρακάτω βήματα πριν την τοποθετήσετε στη μονάδα.
* Αν χρησιμοποιείτε μπαταρία τύπου X ή τύπου G, δεν χρειάζεται να
ακολουθήσετε την παρακάτω διαδικασία.
Σηκώστε το μοχλό εναλλαγής προς τα επάνω. (Βλ. εικόνα -1)
Πιέστε το μοχλό εναλλαγής στο σημείο με την ένδειξη στην εικόνα
έως ότου ασφαλίσει με ένα κλικ. (Βλ. εικόνα -2)
Τρόπος τοποθέτησης της μπαταρίας
Ευθυγραμμίστε την ένδειξη στην μπαταρία με την κατεύθυνση της
ένδειξης
στο φορτιστή και τοποθετήστε την. (Βλ. εικόνα -1)
(Η μπαταρία που απεικονίζεται είναι τύπου Χ.)
ˎ
ˎ
Τοποθετήστε την μπαταρία με την ένδειξη
στραμμένη προς τα
επάνω.
Κατά την τοποθέτηση μιας μπαταρίας τύπου Χ ή Κ, εισαγάγετέ την
κατά μήκος της αριστερής πλευράς του μέρους σύνδεσης αυτής της
μονάδας όπως φαίνεται από το βέλος στην εικόνα -2.
3 Συνδέστε το καλώδιο τροφοδοσίας στη μονάδα και, στη
συνέχεια, στην πρίζα τοίχου (Βλ. εικόνα ).
Η λυχνία CHARGE (πορτοκαλί) ανάβει και αρχίζει η φόρτιση.
Η λυχνία CHARGE σβήνει όταν η μπαταρία είναι κατά 90 % περίπου
φορτισμένη.
Η ενδεικτική λυχνία κατάστασης φόρτισης σβήνει όταν η φόρτιση έχει
ολοκληρωθεί. (Πλήρης φόρτιση)
Μπορείτε να ελέγξετε την κατ' εκτίμηση κατάσταση φόρτισης από
Le témoin CHARGE s'allume et ne
την ενδεικτική λυχνία κατάστασης φόρτισης.
clignote plus :
,
... Σβηστή,
Si le témoin CHARGE s' é teint parce
Ενδεικτική λυχνία
que le temps de charge est dépassé, il
n'y a aucun problème.
κατάστασης φόρτισης
Αμέσως μετά από
την τοποθέτηση της
Le témoin CHARGE s'allume et ne
μπαταρίας - 30 %
clignote plus :
30 % - 60 %
Si le témoin CHARGE s' é teint parce
que le temps de charge est dépassé, le
60 % - 90 %
problème vient de la première
90 % -
batterie installée.
Πλήρης φόρτιση
Η πλήρης φόρτιση
ολοκληρώθηκε
Το επίπεδο φόρτισης που εμφανίζεται από την ενδεικτική λυχνία
κατάστασης φόρτισης και τα ποσοστά στον παραπάνω πίνακα
αποτελούν μια εκτίμηση.
Η πραγματική κατάσταση ενδέχεται να διαφέρει ανάλογα με τη
θερμοκρασία του περιβάλλοντος ή την κατάσταση της μπαταρίας.
Για την αφαίρεση της μπαταρίας
Ανασηκώστε την μπαταρία και αφαιρέστε την.
Χρόνος φόρτισης
Στον παρακάτω πίνακα εμφανίζεται ο χρόνος φόρτισης για μια μπαταρία
που είναι πλήρως αποφορτισμένη.
NP-BD1/
NP-BG1/
Μπαταρία NP-BX1 NP-BN1 NP-BN
NP-FD1/
NP-FG1
NP-FT1
Χρόνος
πλήρους
135
90
110
125
130
φόρτισης
ˎ
ˎ
Εκτιμώμενος αριθμός λεπτών για τη φόρτιση μιας άδειας μπαταρίας.
ˎ
ˎ
Για περισσότερες λεπτομέρειες σχετικά με τη διάρκεια ζωής
της μπαταρίας, ανατρέξτε στις οδηγίες χρήσης της ψηφιακής
φωτογραφικής μηχανής σας.
ˎ
ˎ
Ο χρόνος φόρτισης ενδέχεται να διαφέρει ανάλογα με την κατάσταση
της μπαταρίας ή τη θερμοκρασία του περιβάλλοντος.
ˎ
ˎ
Οι χρόνοι που αναφέρονται είναι για τη φόρτιση μιας άδειας
μπαταρίας, η οποία έχει εξαντληθεί με μια ψηφιακή φωτογραφική
μηχανή, χρησιμοποιώντας αυτήν τη μονάδα σε θερμοκρασία
περιβάλλοντος 25 °C.
Θερμοκρασία φόρτισης
Το εύρος θερμοκρασίας για τη φόρτιση είναι 0 °C έως 40 °C. Για
τη μέγιστη αποδοτικότητα της μπαταρίας, το συνιστώμενο εύρος
θερμοκρασίας κατά τη φόρτιση είναι 10 °C έως 30 °C.
Για γρήγορη χρήση της μπαταρίας
Μπορείτε να αφαιρέσετε την μπαταρία από τη μονάδα και να τη
χρησιμοποιήσετε ακόμα και αν δεν έχει ολοκληρωθεί η φόρτιση. Ωστόσο,
ο χρόνος φόρτισης επηρεάζει το χρόνο χρήσης της μπαταρίας.
Σημειώσεις
ˎ
ˎ
Αν η λυχνία CHARGE δεν ανάψει, ελέγξτε αν η μπαταρία έχει
τοποθετηθεί καλά στη μονάδα.
ˎ
ˎ
Όταν τοποθετείται μια πλήρως φορτισμένη μπαταρία, η λυχνία
CHARGE ανάβει μία φορά και σβήνει.
ˎ
ˎ
Μια μπαταρία που δεν έχει χρησιμοποιηθεί για μεγάλο χρονικό
διάστημα ενδέχεται να χρειαστεί περισσότερο χρόνο από το
συνηθισμένο για να φορτιστεί.
Χρήση της μονάδας με το καλώδιο
USB (Βλ. εικόνα )
1 Θέστε το διακόπτη εξόδου αυτής της μονάδας στη θέση
"USB POWER 5V 1500mA".
2 Συνδέστε τη συσκευή σας σε αυτή τη μονάδα.
3 Συνδέστε το καλώδιο τροφοδοσίας στη μονάδα και, στη
συνέχεια, στην πρίζα τοίχου.
4 Μετά από την πλήρη επαναφόρτιση της συσκευής,
αποσυνδέστε αυτήν τη μονάδα από την πρίζα τοίχου και
αποσυνδέστε τη συσκευή από τη μονάδα.
Η μονάδα αυτή υποστηρίζει τάσεις από 100 V έως 240 V για
παγκόσμια χρήση.
Μη χρησιμοποιήσετε ηλεκτρικό μετασχηματιστή τάσης, καθώς μπορεί
να προκληθεί δυσλειτουργία.
Αντιμετώπιση προβλημάτων
Όταν η λυχνία CHARGE αναβοσβήνει, ανατρέξτε στον παρακάτω
πίνακα.
Η λυχνία CHARGE αναβοσβήνει με δύο τρόπους.
Αναβοσβήνει αργά:
Ανάβει και σβήνει επανειλημμένα κάθε 1,5
δευτερόλεπτο
Αναβοσβήνει γρήγορα: Ανάβει και σβήνει επανειλημμένα κάθε 0,15
δευτερόλεπτα
Η ενέργεια στην οποία πρέπει να προβείτε εξαρτάται από τον τρόπο που
αναβοσβήνει η λυχνία CHARGE.
Όταν η λυχνία CHARGE αναβοσβήνει συνεχώς αργά
Η φόρτιση έχει διακοπεί. Η μονάδα βρίσκεται σε κατάσταση αναμονής.
Αν η θερμοκρασία δωματίου είναι εκτός του κατάλληλου εύρους
θερμοκρασίας, η φόρτιση σταματάει αυτόματα.
Όταν η θερμοκρασία δωματίου επανέλθει στο κατάλληλο εύρος, η λυχνία
CHARGE ανάβει και η φόρτιση συνεχίζεται.
Συνιστάται η φόρτιση της μπαταρίας στους 10 °C έως 30 °C.
Όταν η λυχνία CHARGE αναβοσβήνει συνεχώς γρήγορα
Κατά τη φόρτιση της μπαταρίας για πρώτη φορά σε μια από τις
παρακάτω περιπτώσεις, η λυχνία CHARGE μπορεί να αναβοσβήνει
γρήγορα.
Αν συμβεί αυτό, αφαιρέστε την μπαταρία από τη μονάδα, τοποθετήστε
την πάλι και φορτίστε την ξανά.
Όταν η μπαταρία έχει μείνει για μεγάλο χρονικό διάστημα
Όταν η μπαταρία έχει μείνει μέσα στη μηχανή για μεγάλο χρονικό
διάστημα
Αμέσως μετά από την αγορά
Αν η λυχνία CHARGE συνεχίζει να αναβοσβήνει γρήγορα, ανατρέξτε
στον παρακάτω πίνακα.
Αφαιρέστε την μπαταρία που φορτίζεται και, στη συνέχεια, τοποθετήστε καλά πάλι
την ίδια μπαταρία.
Η λυχνία CHARGE αναβοσβήνει
Η λυχνία CHARGE ανάβει και δεν
ξανά:
αναβοσβήνει ξανά:
Τοποθετήστε μια άλλη μπαταρία.
Αν η λυχνία CHARGE σβήσει γιατί έχει
ολοκληρωθεί ο χρόνος φόρτισης, δεν
υπάρχει πρόβλημα.
Η λυχνία CHARGE αναβοσβήνει
Η λυχνία CHARGE ανάβει και δεν
ξανά:
αναβοσβήνει ξανά:
Υπάρχει πρόβλημα με αυτήν τη
Αν η λυχνία CHARGE σβήσει γιατί
μονάδα.
έχει ολοκληρωθεί ο χρόνος φόρτισης,
υπάρχει πρόβλημα με την μπαταρία που
τοποθετήσατε αρχικά.
Επικοινωνήστε με τον πλησιέστερο αντιπρόσωπο της Sony σχετικά με το προϊόν
που μπορεί να έχει πρόβλημα.
Δεν είναι εφικτή η φόρτιση της μπαταρίας.
ˎ
ˎ
Η μονάδα δεν είναι συνδεδεμένη στην πρίζα τοίχου.
‚
ˎ
Συνδέστε σωστά το καλώδιο τροφοδοσίας στη μονάδα και στην
πρίζα τοίχου.
ˎ
ˎ
Ο διακόπτης εξόδου αυτής της μονάδας βρίσκεται στη θέση "USB
POWER 5V 1500mA".
‚
ˎ
Θέστε το διακόπτη εξόδου αυτής της μονάδας στη θέση "BATTERY
CHARGE".
ˎ
ˎ
Η μπαταρία είναι τοποθετημένη υπό γωνία ή ανάποδα.
‚
ˎ
Τοποθετήστε σωστά την μπαταρία στη μονάδα.
Η συσκευή που είναι συνδεδεμένη με το καλώδιο USB δεν
λειτουργεί.
ˎ
ˎ
Η μονάδα δεν είναι συνδεδεμένη στην πρίζα τοίχου.
‚
ˎ
Συνδέστε σωστά το καλώδιο τροφοδοσίας στη μονάδα και στην
πρίζα τοίχου.
ˎ
ˎ
Ο διακόπτης εξόδου αυτής της μονάδας βρίσκεται στη θέση
"BATTERY CHARGE".
‚
ˎ
Θέστε το διακόπτη εξόδου αυτής της μονάδας στη θέση "USB
POWER 5V 1500mA".
,
... Αναμμένη
ˎ
ˎ
Ενδέχεται να πρέπει να λειτουργήσει η συσκευή που είναι συνδεδεμένη
Λυχνία CHARGE
σε αυτήν τη μονάδα.
‚
ˎ
Ανατρέξτε στις οδηγίες χρήσης της συνδεδεμένης συσκευής.
Προδιαγραφές
Ονομαστική τιμή εισόδου
100 V - 240 V AC 50 Hz/60 Hz
11 W
Ονομαστική τιμή εξόδου
Ακροδέκτης φόρτισης μπαταρίας:
4,2 V DC 860 mA (BATTERY CHARGE)
5,0 V DC 1.500 mA
(USB POWER 5V 1500mA)
Θερμοκρασία λειτουργίας
0 °C έως 40 °C
Θερμοκρασία αποθήκευσης –20 °C έως +60 °C
Διαστάσεις (Περίπου)
54 mm × 45 mm × 90 mm (π/υ/β)
Μάζα
Περίπου 100 g
Περιεχόμενα αντικείμενα
Φορτιστής μπαταρίας (BC-TRX) (1)
Καλώδιο τροφοδοσίας AC (1)
Καλώδιο micro USB (1)
Σύνολο έντυπης τεκμηρίωσης
Ο σχεδιασμός και οι προδιαγραφές υπόκεινται σε αλλαγή χωρίς
προειδοποίηση.
Προφυλάξεις για τη χρήση
NP-FR1 NP-BK1
ˎ
ˎ
Αποσυνδέετε τη μονάδα από την πρίζα τοίχου μετά από τη χρήση. Για
να αποσυνδέσετε το καλώδιο τροφοδοσίας, τραβήξτε το από το βύσμα.
Ποτέ μην τραβάτε το ίδιο το καλώδιο τροφοδοσίας.
ˎ
ˎ
Το βύσμα USB αυτής της μονάδας είναι μόνο για έξοδο. Μην το
190
180
συνδέσετε στη θύρα USB ενός υπολογιστή, κ.λπ. Μπορεί να προκληθεί
δυσλειτουργία.
ˎ
ˎ
Ορισμένες επαναφορτιζόμενες συσκευές USB δεν μπορούν να
χρησιμοποιηθούν με αυτήν τη μονάδα. Επίσης, ορισμένες συσκευές
ενδέχεται να μη λειτουργούν κατά τη διάρκεια της επαναφόρτισης.
Ελέγξτε τις προδιαγραφές φόρτισης στις οδηγίες χρήσης της συσκευής
σας.
ˎ
ˎ
Όταν χρησιμοποιείτε το βύσμα USB αυτής της μονάδας, τοποθετήστε
μια μπαταρία στη συνδεδεμένη συσκευή. Διαφορετικά μπορεί να
προκληθεί απώλεια δεδομένων από τη συσκευή ή βλάβη λόγω της
παρουσίασης σφάλματος της συσκευής.
ˎ
ˎ
Λάβετε υπόψη σας ότι ορισμένες συσκευές ενδέχεται να
χάσουν ξαφνικά τη μνήμη εισόδου τους ανεξάρτητα από το αν
χρησιμοποιούνται με το βύσμα USB αυτής της μονάδας. (Για
λεπτομέρειες, ανατρέξτε στις οδηγίες χρήσης που συνοδεύουν τη
συσκευή σας.) Δημιουργείτε πάντα αντίγραφα ασφαλείας της μνήμης
εισόδου εκ των προτέρων. Η Sony δεν φέρει καμία ευθύνη για τυχόν
απώλεια μνήμης εισόδου κατά τη χρήση αυτής της μονάδας.
ˎ
ˎ
Ελέγξτε πριν από τη χρήση αυτής της μονάδας ότι το ρεύμα και η τάση
αντιστοιχούν σε αυτά της πρίζας.
ˎ
ˎ
Ανάλογα με τις συνθήκες χρήσης του βύσματος USB αυτής της
μονάδας, η μονάδα ενδέχεται να απενεργοποιηθεί αυτόματα για
λόγους ασφαλείας αν το ρεύμα εισόδου είναι πολύ υψηλό.
ˎ
ˎ
Η Sony δεν εγγυάται τη λειτουργία αυτής της μονάδας αν τη
χρησιμοποιήσετε με διανομέα USB ή καλώδιο επέκτασης USB.
Ακολουθείτε πάντα την καθορισμένη μέθοδο σύνδεσης του καλωδίου
USB που παρέχεται με τη συσκευή σας.
ˎ
ˎ
Όταν δεν χρησιμοποιείτε αυτήν τη μονάδα, αποσυνδέστε το καλώδιο
USB από το βύσμα USB και αποθηκεύστε την.
Advertisement

Related Manuals for Sony BC-TRX


Summary of Contents for Sony BC-TRX
-
Page 1: Battery Charger
1 Θέστε το διακόπτη εξόδου αυτής της μονάδας στη θέση ˎ ˎ Sony does not guarantee operation of this unit if you use it with a USB Clignotement lent : S’allume et s’ é teint toutes les 1,5 secondes de façon time hub or USB extension cable. - Page 2 اﻟﺨﺎص ﺑﻬﺬه اﻟﻮﺣﺪة أم ﻻ. )ﻟﻠﺘﻔﺎﺻﻴﻞ، راﺟﻊ دﻟﻴﻞ اﻟﺘﻌﻠﻴ�تUSB اﺳﺘﺨﺪاﻣﻬﺎ ﻣﻊ ﻣﻮﺻﻞ to spowodować usterkę. NP-FG1 NP-BD1/ 當 CHARGE 指示燈閃爍時,請按照下表進行檢查。 Sony اﳌﺮﻓﻖ ﻣﻊ اﻟﺠﻬﺎز.( ﻗﻢ دا� ﺎ ً ﺑﺤﻔﻆ ﻧﺴﺨﺔ اﺣﺘﻴﺎﻃﻴﺔ ﻣﻦ اﻟﺬاﻛﺮة اﳌﺪﺧﻠﺔ ﻣﺴﺒﻘ ﺎ ً . ﺳﻮين NP-FT1 NP-BG1/ ˎ ˎ...
Need help?
Do you have a question about the BC-TRX and is the answer not in the manual?
Questions and answers