Advertisement
Available languages
Available languages
Quick Links
IMPORT NT S FEGU RDS
S VE
ND RE D THESE INSTRUCTIONS
When using electrical appliances, basic safety precautions should always be followed including
the following:
• RE D LL INSTRUCTIONS, PRODUCT L BELS ND W RNINGS
BEFORE USING THE TO STER OVEN.
• Do not touch hot surfaces. lways use oven mitts when handling hot materials and allow
metal parts to cool before cleaning. llow the unit to cool thoroughly before putting in or taking
off parts. lways use the oven handles when moving the unit.
• When the unit is not in use and before cleaning, unplug the toaster oven from the wall outlet.
Note: Make sure the oven is turned off before unplugging.
• To protect against risk of electrical shock, do not immerse the appliance in water or any other liquids.
• Close supervision is always necessary when this or any appliance is used near children. This
appliance is not for use by children.
• Do not operate this or any appliance with a frayed or damaged cord or plug or after the appliance
malfunctions or is dropped or has been damaged in any manner. Return appliance to the nearest
authorized service facility for examination, repair or adjustment.
• Do not use attachments not recommended by the manufacturer; they may cause fire,
electric shock or personal injury.
• Do not use outdoors or for commercial purposes.
• Do not use this appliance for other than its intended use.
• Do not let the cord dangle over the edge of a tabletop or countertop or touch hot surfaces.
• Do not place the appliance near a hot gas or electric burner or in a heated oven.
• Extreme caution should be used when using containers constructed of material other than metal or glass.
•
fire may occur if the toaster oven is covered or touching flammable materials, including cur-
tains, draperies, walls, etc., when in operation. Do not store any items on top of the appliance
when in operation.
• When using toaster oven, pull the unit out a minimum of 6 inches away from walls on all sides.
Remove cords from other products from behind toaster oven.
• Do not store any materials, other than manufacturer's recommended accessories, in this unit when
not in use.
• Do not place any flammable materials in oven, such as paper, cardboard, plastic or any materials
that may catch fire or melt.
• Do not cover the crumb tray or any part of the oven with metal foil. This will cause overheating
of the appliance.
• Oversized foods or metal utensils must not be inserted in the appliance as they may create a fire
or risk of electrical shock.
• Do not clean with metal scouring pads. Pieces can break off the pad and touch electrical parts
involving a risk of electrical shock.
• Use extreme caution when removing tray or disposing of hot grease.
• To turn this appliance off, press Stop/Cancel button twice.
• To disconnect, press Stop/Cancel button twice to turn unit off, then remove plug from wall outlet.
• Extreme caution must be used when moving an appliance containing hot oil or other hot liquid.
• To disconnect rotates or return all controls to the "OFF" position, then remove the plug
from wall outlet
T
U
I
H
U
HIS
NIT
S FOR
OUSEHOLD
SE
S
P
S
C
I
HORT
OWER
UPPLY
ORD
NSTRUCTIONS
short power-supply cord is provided to reduce the risk resulting from becoming entangled
in or tripping over a longer cord. n extension cord may be used if care is exercised in its use.
If an extension cord is used, the electrical rating of the cord must be at least as great as the
electrical rating of the appliance. The extension cord should be arranged so that it will not
drape over the countertop or tabletop where it can be pulled on by children or tripped over
unintentionally.
English-1
6-Slice Toaster Oven
User Manual
Horno Tostador para 6 Rebanadas
Manual de Instrucciones
TSSTTVXLDG
MODEL/ MODELO
Visit us at www.oster.com
For Products Purchased in the United States and Canada Only
To reduce the risk of electrical shock, this appliance has a polarized plug (one blade is wider than
the other). This plug fits a polarized outlet only one way; if the plug does not fit fully into the
outlet, reverse the plug. If it still does not fit, contact a qualified electrician. Do not attempt to
modify the plug in any way.
S VE THESE INSTRUCTIONS
Welcome
ongratulations on your purchase of an OSTER
®
Toaster Oven!
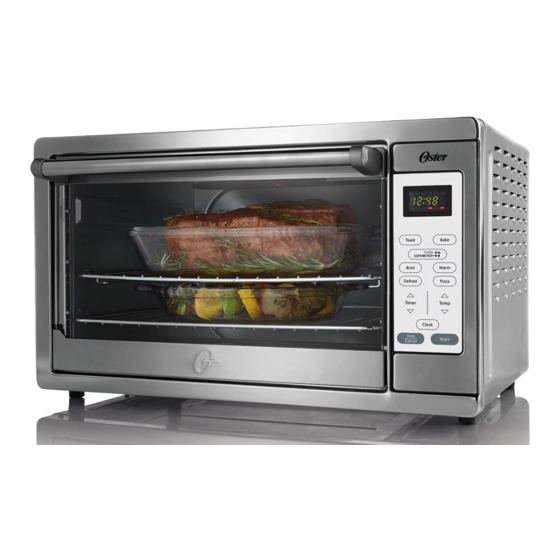
Features of Your Toaster Oven
(See Figure 1)
8
1. Removable Wire Rack
2. Time Display
3. Control Buttons
4. Two Rack Positions
5. Easy Clean Interior Walls
6. Glass Door
7. Internal Removable Crumb Tray
8. Baking Pan and Broiling Rack
Control Buttons
1. Function Buttons – (See Figure 2)
Bake – Convection (Fan Bake), Broil.
Toast – Select to toast bread, bagels, etc.
Pizza – Select to bake up to 16" pizza.
Defrost – Select to defrost foods.
Timer
– djusts time, temperature
or toast shade.
Temp
– djusts temperature.
Clock – Sets the Oven Clock.
Stop/Cancel – Stops heating or cancels function.
O
NLY
Start – Starts baking/cooking process.
English-2
Cleaning Your Toaster Oven
Before cleaning your OSTER
®
Toaster Oven, unplug it and allow it to cool. To clean, wipe with
damp cloth. DO NOT IMMERSE IN W TER! Make sure to use only mild, soapy water.
brasive cleaners, scrubbing brushes and chemical cleaners will damage the coating on this unit.
Empty crumb tray frequently to avoid accumulation of crumbs.
dishwasher safe (top of dishwasher only).
Storing Your Toaster Oven
llow the appliance to cool completely before storing. If storing the toaster oven for long periods
of time make certain that the toaster oven is clean and free of food particles. Store the toaster oven
in a dry location such as on a table or countertop or cupboard shelf. Other than the recommended
cleaning, no further user maintenance should be necessary.
H
T
/ T
ELPFUL
IPS
ROUBLESHOOTING
P
P
C
ROBLEM
OTENTIAL
AUSE
• Overcooked / Un-
• Incorrect temperature or
• You may have to adjust the time and tem-
dercooked Foods
time setting
perature to desired taste.
• Because your toaster oven is smaller than
your regular oven, it will heat up faster and
generally cook in shorter periods of time.
• Rack placement
• Refer to "Positioning Rack" Section,
Page English-4. Rack may need to be ad-
justed to accommodate food type.
• Burnt Smell
• Food build-up inside
• Refer to "Cleaning Your Toaster Oven"
Section, Page English-5.
oven, on heating elements
or in crumb tray.
• Oven does not
• Unit is unplugged
• Plug the toaster oven into a 120-volt C
turn ON
electrical outlet.
• Set timer knob and temperature knob to
desired setting. Both must be turned on
to operate the toaster oven.
• Did not press Start.
• Press Start.
• Only one heating
• Function setting selec-
• When toasting, make sure the oven is
element is heating
tion determines which
not set to broil setting.
up
heating element will op-
erate.
• Heating elements
• Heating elements will
• Be certain that function is as desired.
do not stay ON
cycle ON and OFF to
• Heating elements may not glow.
maintain proper heat.
• Cannot change
• Need to cancel function.
• Press cancel.
function button
P.N. 137150
English-5
Preparing To Use Your Toaster Oven for the First Time
If you are using your toaster oven for the first time, please be sure to:
Remove any stickers from the surface of the oven.
Open oven door and remove all printed documents and paper from inside the toaster oven.
Clean the rack, tray, and pan with hot water, a small amount of dishwashing liquid
and a non-abrasive sponge or cleaning pad.
DO NOT IMMERSE THE BODY OF THE UNIT IN W TER.
Dry the unit thoroughly before using.
Select a location for the toaster oven. The location should be in an open area on a flat
counter where the plug will reach an outlet.
Plug the toaster oven into a 120 Volt C electrical outlet.
Using Your Toaster Oven
Setting the Clock
Push the Clock button. The clock will flash.
Use the arrow keys to set the hour. Push the Clock button again.
1
Use the arrow keys to set the minutes.
2
Push the Clock button once more or the start button and the time will be set.
3
Preheating the Oven
Place oven rack into the desired position before heating the oven.
(See "Positioning Rack" Section)
Push the Bake button.
Use arrows to set desired temperature.
Push Timer
down button until seven (7) minutes is displayed.
4
5
Push the Start button.
6
7
To Use the Bake Function
F
1
igure
Place oven rack into the desired position before heating the oven.
(See "Positioning Rack" Section)
rrange food on the wire rack or in the baking pan.
Push the Bake button. Use the Temperature arrow keys to select desired temperature.
Use the Time arrow keys to select desired time.
Push the Start button.
NOTE – Upper and lower heating elements will cycle ON and OFF to maintain the desired
temperature, and may not glow.
When baking is completed, open door fully and remove food carefully.
Toast
Bake
Convection Bake
To Use the Convection Fan Bake Function
Broil
Warm
When you select the Convection Bake the convection fan will turn on and circulate air
allowing the food to cook evenly and faster.
Defrost
Pizza
Place oven rack into the desired position before heating the oven.
(See "Positioning Rack" Section)
Timer
Temp
rrange food on the wire rack or in the baking pan.
Push the Convection Bake button until "Convection Bake" lights up on display. Use the Temp
Clock
arrow keys to select desired temperature.
Stop
Start
Cancel
Push Timer arrow keys to select desired time.
Push the Start button.
F
2
igure
NOTE – Both heating elements will cycle ON and OFF to maintain the desired temperature, and
may not glow.
When baking is completed, open door fully and remove food carefully.
One-Year Limited Warranty
Sunbeam Products, Inc. doing business as Jarden Consumer Solutions or if in Canada, Sunbeam
Corporation (Canada) Limited doing business as Jarden Consumer Solutions (collectively "JCS")
warrants that for a period of one year from the date of purchase, this product will be free from
defects in material and workmanship. JCS, at its option, will repair or replace this product or any
Toaster oven racks are
component of the product found to be defective during the warranty period. Replacement will be
made with a new or remanufactured product or component. If the product is no longer available,
replacement may be made with a similar product of equal or greater value. This is your exclusive
warranty. Do NOT attempt to repair or adjust any electrical or mechanical functions on this product.
Doing so will void this warranty.
This warranty is valid for the original retail purchaser from the date of initial retail purchase and is
not transferable. Keep the original sales receipt. Proof of purchase is required to obtain warranty
performance. JCS dealers, service centers, or retail stores selling JCS products do not have the right
to alter, modify or any way change the terms and conditions of this warranty.
This warranty does not cover normal wear of parts or damage resulting from any of the following:
negligent use or misuse of the product, use on improper voltage or current, use contrary to the
operating instructions, disassembly, repair or alteration by anyone other than JCS or an authorized
JCS service center. Further, the warranty does not cover: cts of God, such as fire, flood, hurricanes
S
OLUTION
and tornadoes.
What are the limits on JCS's Liability?
JCS shall not be liable for any incidental or consequential damages caused by the breach of any
express, implied or statutory warranty or condition.
Except to the extent prohibited by applicable law, any implied warranty or condition of mer-
chantability or fitness for a particular purpose is limited in duration to the duration of the above
warranty.
JCS disclaims all other warranties, conditions or representations, express, implied, statutory
or otherwise.
JCS shall not be liable for any damages of any kind resulting from the purchase, use or misuse of, or
inability to use the product including incidental, special, consequential or similar damages or loss of
profits, or for any breach of contract, fundamental or otherwise, or for any claim brought against
purchaser by any other party.
Some provinces, states or jurisdictions do not allow the exclusion or limitation of incidental or
consequential damages or limitations on how long an implied warranty lasts, so the above
limitations or exclusion may not apply to you.
This warranty gives you specific legal rights, and you may also have other rights that vary from
province to province, state to state or jurisdiction to jurisdiction.
How To Obtain Warranty Service
In the U.S. .
If you have any question regarding this warranty or would like to obtain warranty service, please
call 1.800.334.0759 and a convenient service center address will be provided to you.
In Canada
If you have any question regarding this warranty or would like to obtain warranty service, please
call 1.800.667.8623 and a convenient service center address will be provided to you.
In the U.S. ., this warranty is offered by Sunbeam Products, Inc. doing business as Jarden Consumer
Solutions located in Boca Raton, Florida 33431. In Canada, this warranty is offered by Sunbeam
Corporation (Canada) Limited doing business as Jarden Consumer Solutions, located at 20 B
Hereford Street, Brampton, Ontario L6Y 0M1. If you have any other problem or claim in connection
with this product, please write our Consumer Service Department.
PLE SE DO NOT RETURN THIS PRODUCT TO NY OF THESE
DDRESSES OR TO THE PL CE OF PURCH SE.
To Use the Broil Function
Place oven rack into the desired position before heating the oven.
(See "Positioning Rack" Section)
Place broil rack in oven pan to make broiler pan.
rrange food on broiler pan.
Place broiler pan on oven rack.
Push Broil button until the word "Broil" lights up on display.
Push Timer arrows to select the desired time.
Push the Start button.
NOTE – The top heating element will cycle ON and OFF to maintain desired temperature,
and may not glow.
When broiling is completed, open door fully and remove food carefully.
W RNING: DO NOT LE VE TO STER OVEN UN TTENDED.
To Use the Toast Function
Place oven rack into the desired position before heating the oven.
(See "Positioning Rack" Section)
NOTE – Different types of bread require different settings. Lighter breads and waffles
require a lighter setting. Darker breads, muffins, and English muffins require a darker setting.
rrange food on the wire rack.
Push the Toast button. Use arrows to select Toast Shade.
Press the Start button.
When toasting is completed, open door fully and remove food carefully.
To Use the Pizza Function
Place oven rack into the desired position before heating the oven.
(See "Positioning Rack" Section)
rrange pizza on the wire rack.
Push the Pizza button and 20:00 default time will appear. Use arrow keys to adjust
the time as desired. Push the Start button.
NOTE – The Pizza function temperature is set at 400°F and cannot be adjusted.
If different temperature is desired, cancel Pizza function and use Bake function.
Defrosting Function
When defrosting do not preheat oven. Temperature Control is already set to 150°F.
Push the defrost button. Use arrow keys to adjust time. llow 15 to 20 minutes per
side for meats or fish to defrost. lways cook food promptly after thawing.
Push the Start button.
Positioning Rack
To accommodate a wide variety of foods, the
oven has two (2) rack positions. (See Figure 3)
Positioning of the rack will depend on the size
of the food and desired browning.
Before removing the rack, allow the unit to cool.
PLE SE NOTE – For best toast and pizza re-
sults, position the rack in the up position on
the top rack position.
English-3
© 2010 Sunbeam Products, Inc. doing business as Jarden Consumer Solutions.
ll rights reserved. Distributed by Sunbeam Products, Inc. doing business as
Jarden Consumer Solutions, Boca Raton, Florida 33431.
© 2010 Sunbeam Products, Inc. operando bajo el nombre de Jarden Consumer Solutions.
Todos los derechos reservados. Distribuido por Sunbeam Products, Inc.
operando bajo el nombre de Jarden Consumer Solutions, Boca Raton, Florida 33431.
Printed in China
English-6
F
3
igure
English-4
For product questions contact:
Sunbeam Consumer Service
US : 1.800.334.0759
Canada : 1.800.667.8623
www.oster.com
SPR-121409
Para preguntas sobre los productos, llamar a:
Sunbeam Consumer Service
EE.UU.: 1.800.334.0759
Canadá: 1.800.667.8623
www.oster.com
Impreso en China
Advertisement

Related Manuals for Oster TSSTTVXLDG


Summary of Contents for Oster TSSTTVXLDG
- Page 1 Plug the toaster oven into a 120 Volt C electrical outlet. and may not glow. Note: Make sure the oven is turned off before unplugging. ongratulations on your purchase of an OSTER ® Toaster Oven! When broiling is completed, open door fully and remove food carefully.
- Page 2 • No coloque el aparato cerca de un quemador eléctrico o de gas caliente ni en un horno ¡Felicitaciones por su compra de un Horno Tostador OSTER ®...
Need help?
Do you have a question about the TSSTTVXLDG and is the answer not in the manual?
Questions and answers