Advertisement
Available languages
Available languages
Quick Links
PART# 5-3094, Grev. 2, 08/11
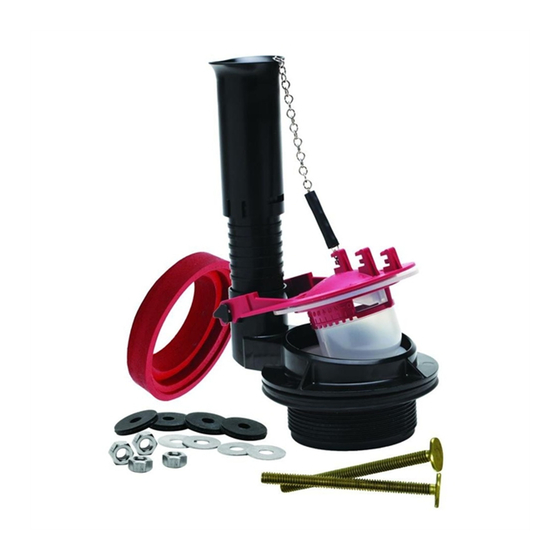
FLUIDMASTER
540AKR
®
COMPLETE 3 INCH FLUSH VALVE & FLAPPER
REPAIR KIT INSTALLATION INSTRUCTIONS
WARNING
DO NOT USE IN-TANK DROP-IN TOILET BOWL CLEANERS CONTAINING BLEACH OR
DO NOT USE IN-TANK DROP-IN TOILET BOWL CLEANERS CONTAINING BLEACH OR
CHLORINE. Use of such products will: (1) RESULT IN DAMAGE to tank components and MAY CAUSE
CHLORINE. Use of such products will: (1) RESULT IN DAMAGE to tank components and MAY CAUSE
FLOODING and PROPERTY DAMAGE and (2) VOID FLUIDMASTER WARRANTY. Fluidmaster
FLOODING and PROPERTY DAMAGE and (2) VOID FLUIDMASTER WARRANTY. Fluidmaster
Flush 'n Sparkle Toilet Bowl Cleaning System is recommended for those choosing to use in-tank bowl cleaners
Flush 'n Sparkle Toilet Bowl Cleaning System is recommended for those choosing to use in-tank bowl cleaners
and WILL NOT VOID the FLUIDMASTER WARRANTY because it will not damage the components. DO
and WILL NOT VOID the FLUIDMASTER WARRANTY because it will not damage the components. DO
NOT overtighten nuts or tank/bowl may crack. Always use quality Fluidmaster parts when installing or
NOT overtighten nuts or tank/bowl may crack. Always use quality Fluidmaster parts when installing or
repairing. Fluidmaster will not be responsible or liable for use of non-Fluidmaster parts during installation or
repairing. Fluidmaster will not be responsible or liable for use of non-Fluidmaster parts during installation or
repair.
repair.
Remove tank to bowl
1
gasket and nut from
bottom of threads of
new flush valve before
installing flush valve
in tank. Position the
overflow pipe toward
the back of the tank
but not over the bolt
holes. Thread large nut
onto the threads. Hand
tighten only. DO NOT
OVERTIGHTEN or tank
may crack.
The refill clip must be attached
6
to the top of the overflow pipe.
Place metal piece of refill clip
against the outside edge of the
pipe then press against the
METAL
PIECE
overflow pipe. When the inside
prong clears the top edge of the
pipe, push the clip down. Attach
refill hose to nipple of refill clip
and other end to nipple of the
fill valve. You many need to trim
the rubber hose.
MY FLAPPER CLOSES QUICKLY & I DON'T GET A COMPLETE FLUSH
• Check the flapper chain. If it looks loose, tighten it; if it looks straight, loosen it a bit and try flush again. Chain should have 1/2" of slack.
• Adjust the flapper setting to a higher number (See "Installation" step 8).
MY FLAPPER STAYS OPEN TOO LONG & I GET A DOUBLE-FLUSH
• Adjust the flapper setting to a lower number (See "Installation" step 8).
*NOTES:
Installation Instruction #3: This Is Optional
•
D) Metal Washer*
E) Metal Hex Nut*
Not all toilets will fit together when metal washer and metal hex nut are used
TANK
LEVER
FLOAT
CUP
FILL
DO NOT USE
VALVE
BODY
LOCK
RING
SHANK
FLAPPER
Slide new tank to
2
3
bowl gasket over
nut with narrow side
facing down. Gasket
should cover the
nut completely.
A
B
C
D
E
F
B
D
E
Connect the
7
8
flapper chain
to the tank
lever. Allow for
1/2" of slack
in the chain
when flapper
is closed.
ROLLER CLAMP
REFILL TUBE
1
REFILL
CLIP
OVERFLOW
PIPE
TANK SHOULD
LOOK LIKE THIS
WHEN SETUP
IS COMPLETE
FLUSH
VALVE
Correct order of bolts,
4
washers and nuts:
A) Bolt Head
B) Rubber Washer
C) Toilet Tank
D) Metal Washer*
E) Metal Hex Nut*
F) Toilet Bowl
G
G) Tank to Bowl Gasket
NOTE: Place metal
washers and hex nuts
onto brass bolts before
installing tank on bowl.
Remove flapper from flush valve
by pulling up frame of flapper one
side at a time.
The flapper is adjustable from 0
to 10. 0 is a quick flush, 10 is a
long flush, allowing you to adjust
the flush performance to match
your toilet's original setting.
The tab on the white plastic
dome can be set to any of the
numbered notches. Pull on the
dome slightly and turn until the
tab is in the desired setting.
Unbolt tank
Turn off water
2
supply (1).
from bowl,
then lift the
Flush toilet and
tank. Remove
remove excess
2
water from tank
washers, nuts
and bolts.
with sponge. (2)
Remove water
supply line from
bottom of toilet
1
fill valve.
Optional: Before replacing the
5
tank on the bowl, place metal
washer and hex nut onto bolt
"C.L."
under tank and hand tighten until
MARK
snug hex nut.
Then place tank back on the
TANK
bowl so that tank to bowl gasket
HANDLE
fits evenly. Level tank. Under
the bowl attach rubber washer,
metal washer and metal hex
nut. Tighten the hex nuts under
the bowl evenly until the tank
is stable and doesn't rock. DO
NOT OVERTIGHTEN or the tank
or bowl could break.
Reconnect water supply
9
line to the bottom of the
fill valve. Hand tighten
plastic nut of supply line
1
to fill valve shank. DO
NOT OVER TIGHTEN.
(1). Turn on the water
supply and check for
any leaking (2). If no
2
leaks appear perform
test flush. If leak appears
tighten nut just enough
to stop leak.
Remove
3
rubber
washer and
locknut
from flush
valve
threads.
Remove old
flush valve.
When installed the top of the
overflow pipe of the flush valve
must be at least 1" below the
REFILL
C.L. mark of the fill valve.
PORT
NOTE: Top of the overflow
pipe should be below the
1"
handle/lever hole of the toilet
tank and above the water level
of the tank when filled.
To adjust the height of the
overflow pipe, pull up or
push down.
Contact Fluidmaster for troubleshooting
help or Ask Bob on www.fluidmaster.com
30800 Rancho Viejo Road
San Juan Capistrano, CA 92675
www.fluidmaster.com
800-631-2011
Advertisement

Subscribe to Our Youtube Channel
Related Manuals for Fluidmaster 540AKR


Summary of Contents for Fluidmaster 540AKR
- Page 1 NOT overtighten nuts or tank/bowl may crack. Always use quality Fluidmaster parts when installing or FLUSH repairing. Fluidmaster will not be responsible or liable for use of non-Fluidmaster parts during installation or repairing. Fluidmaster will not be responsible or liable for use of non-Fluidmaster parts during installation or VALVE repair.
- Page 2 Siempre utilice piezas de repuesto de calidad de Fluidmaster durante la que el tanque o la taza podrían agrietarse. Siempre utilice piezas de repuesto de calidad de Fluidmaster durante la válvula de llenado...
Need help?
Do you have a question about the 540AKR and is the answer not in the manual?
Questions and answers