Table of Contents

Related Manuals for Fluidmaster PerforMAX


Summary of Contents for Fluidmaster PerforMAX
- Page 1 QUICK Install Guide 400H PerforMAX FILL VALVE ® VIDEO HOW-TO VIDEO VISIT: FLUIDMASTER.COM 400H PRODUCT PAGE *See page 23 for important legal information. Français - Page 16 INSTALL WITH CONFIDENCE...
-
Page 2: Getting Started
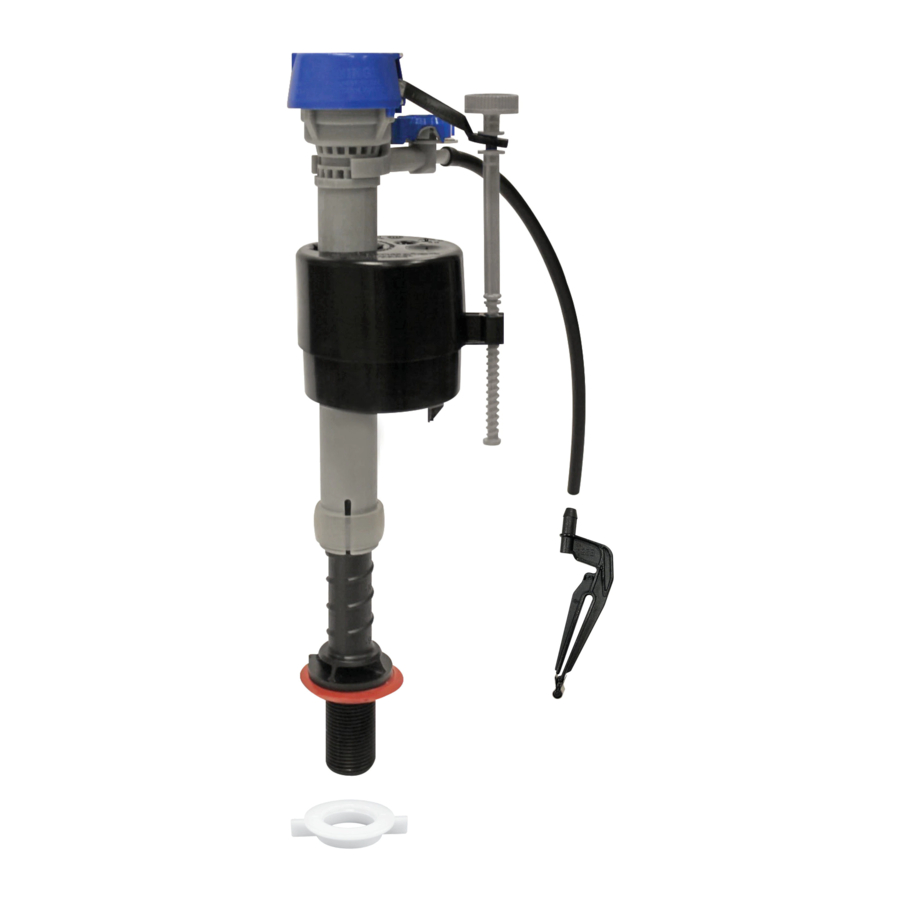
GETTING STARTED TOOLS NEEDED PARTS OVERVIEW Bowl Water Level Dial Bucket Sponge Tank Water Level Adjustment Screw Towel Scissors (Optional) Refill Tube Refill Clip TOP DOWN VIEW Bowl Water Level Dial Shank Washer Locknut Tank Water Level Adjustment Screw... - Page 3 STEP 1: PREPARE TANK A: TURN OFF WATER TURN CLOCKWISE B: DRAIN WATER Flush toilet to drain most of the water from the tank. FLUSH C: USE SPONGE OR TOWEL TO SOAK UP EXCESS WATER IN TANK Sponge Towel...
- Page 4 STEP 2: REMOVE OLD FILL VALVE A: REMOVE CONNECTOR Remove water supply connector from bottom of fill valve by twisting connector nut to the left LEFT (clockwise). NOTE: Inspect water supply connector. Replace it if it is worn, or you don’t know how old it is, to Towel prevent flooding and property damage.
- Page 5 STEP 3: ADJUST HEIGHT OF NEW FILL VALVE A: TWIST FILL VALVE TO ADJUST HEIGHT Top of fill valve cap should measure roughly 3" above top of overflow pipe when installed. NOTE: Increasing height allows more water to fill in the tank. HOLD Do Not Move Lock Ring TWIST...
- Page 6 STEP 4: INSTALL NEW FILL VALVE ATTACH REFILL CLIP TO OTHER END OF REFILL TUBE INSERT FILL VALVE Position refill tube to face flush valve making sure fill valve parts do not interfere with lever arm. Fill Valve Refill Tube Overflow Pipe DOWN...
-
Page 7: Step 5: Finishing Steps
Twist to the right (counterclockwise) RIGHT *Hand-tighten only. DO NOT OVER TIGHTEN. TURN ON WATER Check for leaks. (Go to www.Fluidmaster.com/support for leak solutions.) TURN COUNTER- CLOCKWISE C: WATER LEVEL After the tank stops filling, water level should fill the tank to roughly ½... - Page 8 STEP 6: FINE-TUNE TANK WATER LEVEL A: FLUSH THE TOILET TO CHECK THE TANK WATER LEVEL After the water stops filling the 1/2" tank, the water level should be roughly ½ inch below the top of overflow pipe to ensure a Overflow Pipe proper flush.
- Page 9 STEP 7: FINE-TUNE BOWL WATER LEVEL NOTE: The PerforMAX Fill Valve is pre-set to fill the proper bowl water level in most toilets straight out of the box. Setting for Most Toilets FILL BOWL WITH A GALLON OF WATER Wait 1 minute until the bowl water level recedes down and stops.
- Page 10 STEP 7: FINE-TUNE BOWL WATER LEVEL ADJUST THE BOWL WATER LEVEL IF TOO HIGH: Turn the dial clockwise. LESS WATER IF TOO LOW: Turn the dial counter-clockwise. MORE WATER FLUSH TOILET, CHECK BOWL WATER LEVEL Repeat Steps 7D and 7E until water level in bowl matches the line when the fill valve shuts off.
- Page 11 A: FLUSH THE TOILET If you’re satisfied with the flush, YOU’RE DONE! YOU DID IT! We knew you could! Share your success story with friends and family! #FixedMyToilet #Fluidmaster Still not working exactly right? See the next page for Troubleshooting.
-
Page 12: Troubleshooting
TROUBLESHOOTING IF THE FILL VALVE: • DOES NOT TURN ON • WON’T TURN OFF • WON’T REFILL TANK REMOVE CAP AND CHECK FOR DEBRIS Turn off water supply. TURN Flush toilet. COUNTER- CLOCKWISE With right hand push float up, grip and hold shaft under float. - Page 13 & arm clockwise to locked position. Always use genuine Fluidmaster parts when installing or repairing. Fluidmaster will not be responsible or liable for use of non-Fluidmaster parts during installation or repair. WATER LEVEL IN BOWL IS TOO LOW...
- Page 14 TROUBLESHOOTING FOR CANISTER FLUSH VALVES The Fluidmaster refill clip is not required for installation. If you’ve already installed the refill clip onto the refill tube, simply pull it or cut it off. FOR MANSFIELD ® Push refill tube into refill hole at the top of the flush valve cap.
- Page 15 ADDITIONAL QUESTIONS? For installation assistance, contact our technical services department. EMAIL, CHAT CALL our toll-free number. www.fluidmaster.com/support 1-800-631-2011 Hours Available: Monday – Friday 5:30 AM - 5:00 PM PST...
-
Page 16: Guide D'installation Rapide
Serviette Ciseaux (Facultatifs) Tuyau de recharge VIDEO VIDÉO EXPLICATIVE VISITEZ LE SITE: FLUIDMASTER.COM PAGE DU PRODUIT 400H Pince de recharge VUE DU DESSUS Dial de réglage du niveau d’eau à cuvette Rondelle de raccord Contre-écrou Vis de réglage du niveau... - Page 17 GUIDE D’INSTALLATION RAPIDE ÉTAPE 1: PRÉPAREZ LE RÉSERVOIR (PAGE 3) COUPER L’EAU. PURGER L’EAU. Tirer la chasse d’eau pour drainer la plus grande partie de l’eau du réservoir. CHASSE D’EAU. UTILISER UNE ÉPONGE OU UNE SERVIETTE POUR ABSORBER L’EXCÉDENT D’EAU DANS LE RÉSERVOIR. ÉTAPE 2: RETIRER L’ANCIEN ROBINET DE REMPLISSAGE (PAGE 4) RETIRER LE RACCORD.
- Page 18 NE PAS SERRER EXCESSIVEMENT. OUVRIR L’EAU. Vérifier l’absence de fuites.. (Aller à www.Fluidmaster.com/support pour connaître les solutions en cas de fuite). NIVEAU D’EAU. Une fois le remplissage complété, le niveau d’eau dans le réser- voir devrait se trouver à environ ½ pouce sous le haut du tuyau de trop-plein pour assurer une chasse d’eau adéquate (il n’est pas nécessaire d’être exact).
- Page 19 Nous savions que vous pourriez le faire! Partagez votre histoire! #FixedMyToilet #Fluidmaster IVOS TOILETTES NE FONCTIONNENT TOUJOURS PAS CORRECTEMENT? RÉFÉREZ VOUS À LA PAGE SUIVANTE POUR TOUT DÉPANNAGE. Un serrage excessif peut fissurer le robinet de remplissage ou le réservoir et provoquer une inondation.
-
Page 20: Dépannage
DÉPANNAGE SI LE ROBINET DE REMPLISSAGE : (PAGE 12) • NE S’OUVRE PAS • NE SE FERME PAS • NE REMPLIT PAS LE RÉSERVOIR ENLEVER LE CAPUCHON ET VÉRIFIER POUR LA PRÉSENCE DE DÉBRIS. Couper l’alimentation en eau. Tirer la chasse d’eau. Avec la main droite, pousser le flotteur vers le haut puis saisir et maintenir la tige sous le flotteur. - Page 21 Toujours utiliser des pièces d’origine Fluidmaster lors de l’installation ou de la réparation. Fluid- master ne sera pas responsable de l’utilisation de pièces de marques autres que Fluidmaster lors de l’installation ou de la réparation.
- Page 22 Pour toute assistance avec l’installation, con - ENCORE DES tacter notre service technique par QUESTIONS: MAIL, MESSAGERIE INSTANTANÉE OU NUMÉRO GRATUIT: www.fluidmaster.com/support 1-800-631-2011 Ouvert du Lundi au Vendredi 5:30 à 17:00 (heure du Pacifique).
- Page 23 LIMITED FIVE-YEAR EXPRESS WARRANTY Subject to the “Exclusions” set forth below, Fluidmaster Inc. promises to the consumer to repair, or at the option of Fluidmaster Inc. to replace any part of this plumbing product which proves to be defective in workmanship or materials under normal use for five years from the date of purchase.
- Page 24 INSTALL WITH CONFIDENCE 30800 Rancho Viejo Road, San Juan Capistrano, CA 92675 www.Fluidmaster.com • 800-631-2011 Contact Fluidmaster for troubleshooting help or visit www.Fluidmaster.com M-F 5:30 am - 5:00 pm PST. 4-2988 Grev. 1, 01/19...
Need help?
Do you have a question about the PerforMAX and is the answer not in the manual?
Questions and answers
Installed new flow master but tank won’t fill back up when I flush