
Related Manuals for Fluidmaster EVERYTHING


Summary of Contents for Fluidmaster EVERYTHING
- Page 1 K-400H-038 ‘THE EVERYTHING’ 3˝ TOILET TANK REPAIR KIT HELPFUL TOOLS INCLUDED! VIDEO HOW-TO VIDEO VISIT: FLUIDMASTER.COM K-400H-038 PRODUCT PAGE *See back page for important product warnings and warranty information. FRENCH - Page 23...
-
Page 2: Getting Started
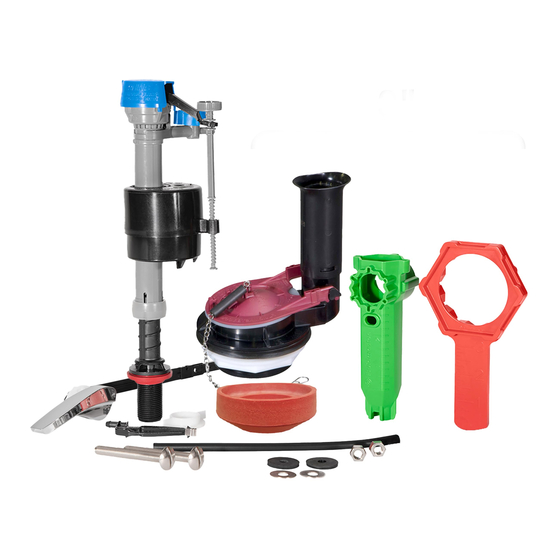
GETTING STARTED PARTS OVERVIEW PERFORMAX FILL VALVE FLUSH VALVE ® Bowl Water Level Dial Overflow Pipe Tank Water Level Adjustment Screw Refill Tube 3” Universal Flapper Refill Clip Locknut Shank Washer Locknut Red Tank-to-Bowl Gasket Rubber Washer (x2) TOOLS Stainless Steel Washer (x2) Green Tool Red Wrench Large Hex Nut (x2) - Page 3 STEP 1: PREPARE TANK SEE INSTRUCTION VIDEO ON WEBSITE FOR REFERENCE. HOW-TO VIDEO VISIT: FLUIDMASTER.COM K-400H-038 PRODUCT PAGE A: TURN OFF WATER B: DRAIN WATER Flush toilet to drain most of the water from tank. FLUSH...
- Page 4 STEP 2: REMOVE OLD PARTS A: REMOVE CONNECTOR Remove water supply connector from bottom of fill valve by twisting con- nector nut to the left. NOTE: Inspect water supply connector. Replace it if it is worn, or you don’t know how old it is, to prevent flooding Towel and property damage.
- Page 5 E: REMOVE TANK FROM BOWL green tool to twist large hex nut to the left and remove bolts from tank. NOTE: Bolts can be loosened from inside tank. Green Tool Screwdriver (Optional) F: LAY TANK ON ITS SIDE Place on a safe and secure surface. G: REMOVE GASKET Remove tank-to-bowl gasket from below the tank.
- Page 6 STEP 3: INSTALL FLUSH VALVE A: INSERT FLUSH VALVE INTO TANK HOLE Position overflow pipe toward back of tank. NOTE: Do not cover tank bolt holes with flush valve. If flush valve covers a bolt hole, turn flush valve slightly to the right (overflow tube to the right) to clear the bolt hole.
- Page 7 STEP 3: INSTALL FLUSH VALVE (CONTINUED) B: USE RULER ON THE RED WRENCH TO MEASURE AND ADJUST NEW FLUSH VALVE Mark the flush valve 1” below bottom of tank lever hole. NOTE: The top of the overflow pipe must be at minimum of 1” below the tank lever hole.
- Page 8 STEP 4: INSTALL TANK-TO-BOWL GASKET A: INSTALL LOCKNUT Holding flush valve in place, turn right to screw locknut onto bottom of flush valve and hand-tighten to secure. Use red wrench to go ½ turn beyond hand-tight. Do not overtighten. Red Wrench Apply red tank-to-bowl gasket to bottom of flush valve locknut, fully covering locknut.
- Page 9 STEP 5: SECURE TANK TO BOWL A: INSTALL RUBBER WASHERS Rubber Place one rubber washer on each washer tank bolt. B: INSERT BOLTS INTO TANK Rubber Place tank bolts through bottom washer Tank holes of tank. Bowl Metal washer Large hex nut C: SECURE TANK ONTO BOWL Set tank onto bowl.
- Page 10 STEP 6: ADJUST FLAPPER A: REMOVE FLAPPER Remove flapper from flush valve by pulling the frame of the flapper up one side at a time. B: ADJUST FOR MOST EFFICIENT FLUSH Adjust from 0 to 10 to find the perfect flush for your setup. Note: Flapper dial is pre-set to maximum setting (10).
- Page 11 STEP 7: ADJUST HEIGHT OF NEW FILL VALVE A: TWIST FILL VALVE TO ADJUST HEIGHT Top of fill valve cap should measure roughly 3” above top of overflow pipe when installed. NOTE: Increasing height allows more water to fill in the tank. HOLD TWIST LEFT...
- Page 12 STEP 8: INSTALL NEW FILL VALVE PUSH REFILL TUBE ONTO REFILL PORT ATTACH REFILL CLIP Refill Clip TO OTHER END OF Refill Tube REFILL TUBE INSERT FILL VALVE Position refill tube to face flush valve making sure fill valve parts do not interfere with lever arm.
- Page 13 STEP 8: INSTALL NEW FILL VALVE (CONTINUED) INSTALL LOCKNUT green tool, twist right to Using screw locknut onto fill valve shank (below tank). Tighten 1/4” beyond hand-tight. Do Not Overtighten*. Green Tool ATTACH REFILL CLIP TO OVERFLOW PIPE Note: If refill tube is too long to fit inside tank with lid closed, remove refill tube from fill valve refill port, cut tube and reattach to port.
- Page 14 STEP 9: INSTALL LEVER & FLAPPER CHAIN If the removed tank lever is bent, proceed to Step A1 below. If the lever is not bent then proceed to Step A2 below. A1: FOR SIDE OR ANGLE MOUNT: ONLY BEND BEND NEW LEVER ARM LEVER HERE To bend lever, start bend 2”...
- Page 15 STEP 10: FINISHING STEPS A: ATTACH WATER SUPPLY CONNECTOR TO FILL VALVE *Hand-tighten only. Do not overtighten. TURN ON WATER Check for leaks. C: WATER LEVEL After the tank stops filling, water level should fill the tank to roughly ½” below top of overflow pipe to ensure a proper flush. (Does not need to be exact.) Top of Overflow Tube...
- Page 16 STEP 11: FINE-TUNE TANK WATER LEVEL A: FLUSH THE TOILET TO CHECK THE TANK WATER LEVEL 1/2" After the water stops filling the tank, the water level should be roughly ½ inch below the top Overflow of overflow pipe to ensure a Pipe proper flush.
- Page 17 STEP 12: FINE-TUNE FLUSH A: TEST FLUSH Drop 3 squares of toilet paper in bowl then flush. B: ADJUST FOR MOST EFFICIENT FLUSH Continue to adjust dial down one setting and flush until toilet is unable to flush paper properly. Note: Turn off water.
- Page 18 STEP 13: FINE-TUNE BOWL WATER LEVEL FILL BOWL WITH A GALLON OF WATER Wait 1 minute until the bowl water level recedes down and stops. MARK THE WATER LEVEL IN THE BOWL With a pencil, draw a line at the top of the water level in bowl.
- Page 19 A: FLUSH THE TOILET If you’re satisfied with the flush, YOU’RE DONE! YOU DID IT! We knew you could! Share your success story with friends and family! #FixedMyToilet #Fluidmaster Still not working exactly right? See the next page for Troubleshooting.
-
Page 20: Troubleshooting
• Press down on top cap while rotating top & arm clockwise to locked position. Always use genuine Fluidmaster parts when installing or repairing. Fluidmaster will not be responsible or liable for use of non-Fluidmaster parts during installation or repair. - Page 21 WATER LEVEL IN BOWL IS TOO LOW WATER FROM REFILL TUBE MUST FLOW THROUGH OVERFLOW PIPE Refill Tube Make sure the refill tube is supplying water down Overflow overflow pipe. (Metal side out for refill clip) Pipe WATER LEVEL IN TANK MAY BE TOO LOW 1/2”...
- Page 22 NOTES...
-
Page 23: Pour Commencer
POUR COMMENCER APERÇU DES PIÈCES PERFORMAX ® ROBINET DE CHASSE ROBINET DE REMPLISSAGE Cadran de Niveau d’eau Tuyau de Trop-plein de la Cuvette Vis de Réglage du Niveau d’eau du Réservoir Clapet Universel 3” Tuyau de Remplissage Contre-Écrou Pince de Remplissage Rondelle de Tige... -
Page 24: Guide D'installation Rapide
GUIDE D’INSTALLATION RAPIDE ÉTAPE 1: PRÉPARER LE RÉSERVOIR (P.3) COUPER L’EAU. PURGER L’EAU. Tirer la chasse d’eau pour purger la plus grande partie de l’eau du réservoir. CHASSE D’EAU. ÉTAPE 2: ENLEVER LES ANCIENNES PIÈCES (P.4) RETIRER LE RACCORD. Retirer le raccord d’alimentation en eau du fond du robinet de remplissage en tournant l’écrou du raccord vers la gauche (dans le sens horaire). - Page 25 GUIDE D’INSTALLATION RAPIDE ÉTAPE 3: INSTALLER LE ROBINET DE CHASSE (P.6) INSÉRER LE ROBINET DE CHASSE DANS LE TROU DU RÉSERVOIR. Positionner le tuyau de trop-plein vers l’arrière du réservoir. REMARQUE: Ne pas couvrir les trous des boulons de réservoir avec le robinet de chasse. Si le robinet de chasse couvre un trou de boulon, tourner le robinet de chasse légèrement vers la droite (tuyau de trop-plein vers la droite) pour dégager le trou du boulon.
- Page 26 GUIDE D’INSTALLATION RAPIDE ÉTAPE 4: INSTALLER JOINT RÉSERVOIR-CUVETTE (P.8) INSTALLER LE CONTRE-ÉCROU. Tout en maintenant le robinet de chasse en place, placer la rondelle de friction en bas du robinet de chasse puis serrer à la main le contre-écrou. clé rouge pour effectuer ½...
- Page 27 GUIDE D’INSTALLATION RAPIDE ÉTAPE 7: RÉGLER LA HAUTEUR DU NOUVEAU ROBINET DE REMPLISSAGE (P.11) TOURNER LE ROBINET DE REMPLISSAGE POUR RÉGLER LA HAUTEUR Le dessus du capuchon du robinet de remplissage devrait être situé à environ 3 po au-dessus du tuyau de trop-plein lorsqu’il est installé. REMARQUE: Augmenter la hauteur pour pouvoir mettre plus d’eau dans le réservoir.
- Page 28 GUIDE D’INSTALLATION RAPIDE ÉTAPE 9: INSTALLER LE LEVIER ET LA CHAÎNE DU CLAPET (P.14) POUR MONTAGE LATÉRAL OU EN ANGLE : PLIER LE NOUVEAU BRAS DE LEVIER - Pour plier le levier, commencer par plier 2 po après un coude de 90 degrés jusqu’à...
- Page 29 GUIDE D’INSTALLATION RAPIDE ÉTAPE 11: RÉGLAGE PRÉCIS DU NIVEAU D’EAU DU RÉSERVOIR (P.16) TIRER LA CHASSE D’EAU POUR VÉRIFIER LE NIVEAU D’EAU DU RÉSERVOIR. Lorsque le remplissage est terminé, le niveau d’eau devrait se situer à environ ½ po sous le dessus du tuyau de trop-plein pour assurer une chasse adéquate. LE NIVEAU D’EAU EST TROP BAS: Tourner la vis de réglage du niveau d’eau du réservoir dans le sens...
- Page 30 VOUS AVEZ RÉUSSI! Nous savions que vous en étiez capable! Racontez votre histoire à vos amis et votre famille! Cela ne fonctionne toujours pas très bien? Allez à la #FixedMyToilet page suivante pour en savoir plus sur le dépannage. #Fluidmaster...
- Page 31 REMARQUE...
- Page 32 All costs of removal, transportation and reinstallation to obtain warranty ser- vice shall be paid by the consumer. During this “Limited Seven Year Express Warranty,” Fluidmaster Inc. will provide, subject to the “Exclu- sions”...
Need help?
Do you have a question about the EVERYTHING and is the answer not in the manual?
Questions and answers