
Subscribe to Our Youtube Channel
Related Manuals for Aspire ACTIVE AIR 8


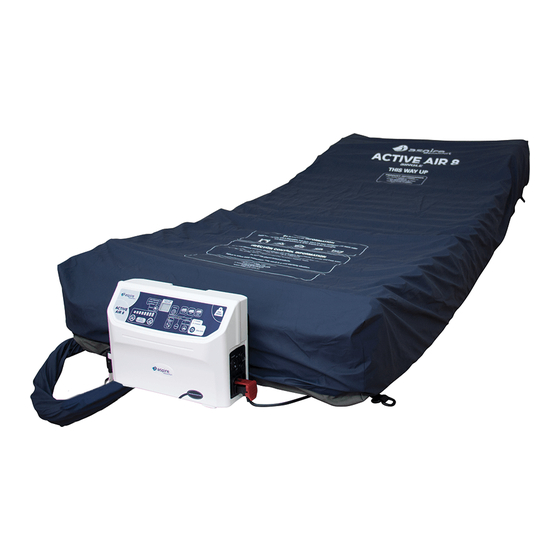
Summary of Contents for Aspire ACTIVE AIR 8
- Page 1 ACTIVE AIR 8 ALTERNATING MATTRESS REPLACEMENT USER MANUAL PTM639300 Active Air 8 Alternating Mattress Replacement - Single PTM639310 Active Air 8 Alternating Mattress Replacement - King Single...
-
Page 2: Table Of Contents
TABLE OF CONTENTS Introduction 2. Safety Precautions 3. Product Safeguards 4. Product Overview Thank you for choosing this Aspire Active Air 8 5. Assembly & Setup Alternating Mattress Replacement. 6. Operation This mattress replacement has been specifically 7. Product Specifications designed to offer safety, comfort and support. -
Page 3: Introduction
• Hassle Free Pump Maintenance – Modular pump design ensures pumps can be fixed and returned to incidence of pressure ulcers while optimising patient comfort. The Active Air 8 may be used in a variety of service quickly with minimal downtime environments included, but not limited to in home care, aged care and hospital. -
Page 4: Safety Precautions
16. Connect this product to a properly grounded outlet only. • The maximum safe working load of the Active Air 8 is 200kg with a safe patient range of 30-200kg 17. Avoid the risk of electrocution by grounding the ground pin with grounding power outlet. -
Page 5: Product Overview
5. ASSEMBLY & SETUP Box Contains: The Aspire Active Air 8 Alternating Mattress Replacement has been designed for the aged care and 1. Digital Mattress Pump hospital environment. Please take the time to familiarise yourself with the key components shown below: When opening the carton, ensure it is done in a 2. - Page 6 3. Ensure the CPR valve is at CLOSE position 6. Firmly push the hose connector into the side of the pump until a notable ‘click’ sound is heard CLOSE OPEN 4. Position the pump on the FOOT END of the bed end. The spring hanger bracket assembly will 7.
-
Page 7: Operation
WARNING! DO NOT place the pump unit in an area where the power cord can become pinched or stuck Power On/Ready for Use Auto Firm WARNING! The digital pump is only to be used with the Aspire Active Air 8 and not any Pressure Mode Adjustment other system Automatic Pressure Adjustment For Specific Patient... - Page 8 Power On/Ready For Use Pressure Mode Adjustment - Static, Alternating & Constant Low Pressure The power switch for the pump is located on the side of the pump. 1. Press the power switch up on the side of the pump and press the ON/OFF button on the Static Mode control panel 1.
- Page 9 Auto Adjust ecomfort lifecomfort Comfort (Pressure) Adjustment Correct pressure levels are automatically set (dependent on patient weight) when activating the Auto 1. Press the FIRM button to increase pressure Adjust feature. 2. Press the SOFT button to decrease pressure CYCLE TIME CYCLE TIME MINUTES MINUTES...
- Page 10 1. If the control pump senses low pressure, the ‘LOW PRESSURE’ LED light will illuminate and alarm 2. Refer to the troubleshooting sticker on the base of the pump to identify if there is a quick lifecomfort lifecomfort and easy solution, if not please contact your Aspire dealer immediately lifecomfort lifecomfort...
-
Page 11: Product Specifications
7. PRODUCT SPECIFICATIONS General Operation PUMP UNIT Dimensions (mm) 320mm W x 230mm D x 130mm H Weight (kg) 3.5kg 1. Locate the CPR switch which is located at the HEAD end of the bed Cycle Times 10/15/20/25/30 minutes 2. Open the CPR valve by twisting the cylinder to the RIGHT to the OPEN position Static Time 20 minutes 3. -
Page 12: Cleaning
To ensure all infection control protocols are strictly adhered to, it is extremely important to follow the To ensure longevity of your Aspire Lifecomfort Active Air 8 Alternating Mattress Replacements, it is very below steps to keep the Aspire Lifecomfort Active Air 8 clean at all times. -
Page 13: Troubleshooting
10. TROUBLESHOOTING 11. WARRANTY & SERVICE Aspire Active Air 8 Alternating Mattress Replacements carry a comprehensive warranty as detailed PROBLEM SOLUTION below. Please keep proof of purchase for proof of warranty commencement. • Check mattress and pump are compatible, only digital Aspire pumps are to... -
Page 14: Service Log Book
12. SERVICE LOG BOOK YEAR 1 YEAR 6 Date: Date: Service Type: Service Type: Condition Report: Condition Report: Action taken: Action taken: Inspected By: Inspected By: Signature: Signature: YEAR 2 YEAR 7 Date: Date: Service Type: Service Type: Condition Report: Condition Report: Action taken: Action taken:... -
Page 15: Lifecomfort
lifecomfort lifecomfort Imported by: AIDACARE P/L | 4 Noonan Rd, Ingleburn NSW 2565 T – 1300 133 120 | W – www.aidacare.com.au...
Need help?
Do you have a question about the ACTIVE AIR 8 and is the answer not in the manual?
Questions and answers