Blodgett SN-3E Installation Operation & Maintenance
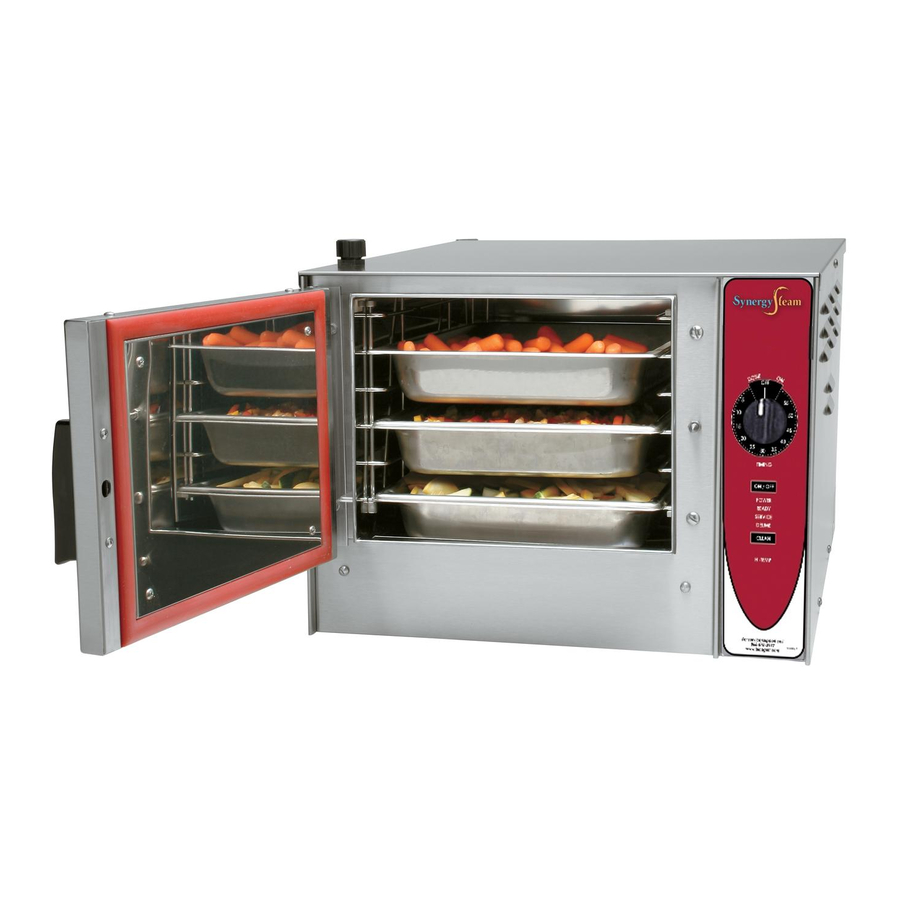
Electric counter convection steamer
Hide thumbs
Also See for SN-3E:
- Installation, operation and maintenance manual (18 pages) ,
- Specifications (2 pages) ,
- Parts list (7 pages)
Table of Contents
Advertisement
Advertisement
Table of Contents

Related Manuals for Blodgett SN-3E


Summary of Contents for Blodgett SN-3E
- Page 1 SN-3E & SN-5E ELECTRIC COUNTER CONVECTION STEAMER INSTALLATION - OPERATION - MAINTENANCE 42 Allen Martin Drive, Essex Junction, Vermont 05452 USA Telephone: (802) 658-6600 Fax: (802) 864-0183 www.blodgett PN S00059 Rev E (8/18) © 2018 - G.S. Blodgett Corporation...
- Page 2 Your Service Agency’s Address: Model Serial number Steamer installed by Installation checked by...
-
Page 3: Table Of Contents
TABLE OF CONTENTS IMPORTANT Service Connections ........... . . 2 WARNING: Improper installa- tion, adjustment, alternation, Installation Instructions . -
Page 4: Service Connections
1-1/8”” (29mm) hole for electrical connection 1 PH (amps per line) 3 PH (amps per line) MODEL 208V 220V 240V 208V 220V 240V 380V 415V 480V 600V 7.5 standard SN-3E 10 optional 12 standard SN-5E 15 optional Figure 1 INSTALLATION... -
Page 5: Installation Instructions
205EF. 2. Apply a bead of RTV or other equivalent sealant SN-3E is rated 7.5 kW as standard; 10 kW is optional. around bottom perimeter edge of the steamer. If an- SN-5E is rated 12 kW as standard; 15 kW choring the steamer, this bottom seal is necessary to meet NSF requirements. -
Page 6: Plumbing Connections
Installation Instructions PLUMBING CONNECTIONS WATER QUALITY The water supply connected to this steamer should con- WARNING tain no more than 2.0 grains of hardness per gallon with Plumbing connections must comply with ap- pH from 7.0 to 8.5. This degree of hardness and pH can plicable sanitary, safety and plumbing codes. -
Page 7: Venting
Installation Instructions VENTING TESTING PROCEDURES Some local codes may require the steamer to be located CAUTION under an exhaust hood. Information on the construction and installation of ventilating hoods may be obtained from Live steam and accumulated hot water in the compartment may be released when the door Vapor Removal from Cooking Equipment, NFPA standard is opened. -
Page 8: Operating Instructions
Operating Instructions OPERATION to OFF. When set to ON, your steamer has been factory set to SHUTDOWN maintain the generator standby temperature just below Turn the main power switch OFF – the boiler will auto- the boiling point, approximately 205 degrees Fahrenheit, matically blow down. -
Page 9: Steam Cooking
2.5” 4” 6” into smaller pieces to allow more efficient cooking. SN-3E Use a pan cover for precooked frozen dishes that cannot SN-5E be cooked in the covered containers in which they are packed if they require more than 15 minutes of cooking time. -
Page 10: Cooking Guidelines
Cooking Guidelines The steamer steam cooks vegetables, frankfurters, eggs in their shells, and certain other meats or food items at atmospher- ic pressure. These cooking guidelines are suggestions only. You should experiment with your food products to determine the cooking times that will give you the best results. Variables which affect cooking time include size, weight, thickness of foods, temperature, density, previous condition of the foods (fresh, pre-blanched or frozen) and degree of doneness desired. - Page 11 Cooking Guidelines PRODUCT TIME (MINUTES) WEIGHT PER PAN Corned Beef 40 - 75 6 - 8 lb. Hot Dogs or Wieners 80 - 100 Count VEGETABLES Asparagus Spears Frozen 10 - 12 3 Doz. Fresh 5 lb. Beans Green, 2” Cut, Frozen/Fresh 5 lb.
-
Page 12: Cleaning Instructions
Cleaning Instructions DRAINING THE GENERATOR 6. Wipe all solids away from drain opening in compart- ments to prevent clogging. Drain the steam generator after each day’s use to flush out minerals and minimize scale buildup. The boiler drains 7. Keep cooking compartment drain working freely. After automatically for about 4 to 6 minutes after the main pow- cooking grease producing foods, operate steam with er switch is turned off. -
Page 13: Maintenance
Maintenance 1. Drain steam generator by setting the main power WARNING switch to OFF. Set cooking timer to “0FF”. Disconnect the power supply to the appliance 2. Set the main power switch to DELIME. before cleaning or servicing. 3. Delime port (A) is located on left side at the rear of the CAUTION unit. -
Page 14: Adjustment For High Altitude Locations
Maintenance ADJUSTMENT FOR HIGH ALTITUDE LOCATIONS NOTICE Disconnect the power supply to the appliance before cleaning or servicing. The steamer has been factory set so that when it is ON and in the READY mode, it will maintain water tempera- ture in the steam generator tank at approximately 205 de- grees Fahrenheit (just below water boiling point). -
Page 15: Troubleshooting
Troubleshooting WATER FLOWS INTO DRAIN DURING SHUTDOWN HEATER ELEMENTS DO NOT COME ON When steamer is shut down and cold water is running When the steamer is turned ON and heater elements continuously into the open drain, either or both solenoid do not activate, and the READY light does not come on, valves did not close when steamer was turned off.
Need help?
Do you have a question about the SN-3E and is the answer not in the manual?
Questions and answers