Advertisement
Quick Links
EM SERIES
Digital Platform Scale
1. INTRODUCTION
This manual describes how the EM Series Digital Platform Scales work.
Please read this manual completely before using the scale.
1.1. Precautions
CAUTION
The scale is a precision instrument. When installing the scale, consider the
following conditions to get the most out of your scale.
Install the scale where it is not exposed to direct sunlight, where the temperature
and relative humidity is stable and where there is no dust and draft.
Install the scale on a solid and level surface which is free from vibration.
The scale is not waterproof. Do not use it where it will get wet.
Do not disassemble the scale. Do not open the case to repair or modify it. That
may cause a fire or damage to the scale. Damage caused under such conditions
will void the warranty.
If the scale malfunctions, stop using it immediately. Contact the local A&D dealer.
1.2. Features
Three weight display resolutions are available, normal (1/3000), high (1/6000 or
1/7500), and higher (1/12000 or 1/15000).
Two weighing platform sizes are available. The EM-KAM has a smaller pan and
the EM-KAL has a larger pan.
As a power source, either the AC adapter or internal rechargeable battery can be used.
The counting function easily counts the number of objects of the same weight.
The optional EM-03 serial interface can transmit the weight value to a personal
computer or a printer.
1.3. Unpacking
When unpacking, check whether all of the following items are included.
●The EM series scale ●screws and nut ●AC adapter ●Instruction manual
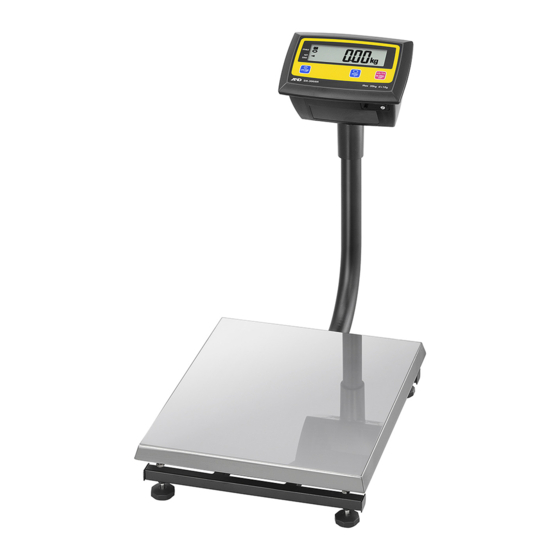
2. DESCRIPTION OF EACH PART
EM series (Common for all models)
Display
Pole
Spirit level
Weighing pan
Display and symbols
Battery indicator
STABLE indicator
NET indicator
ZERO indicator
ON/OFF key
UNITS / MODE key
STABLE
NET
ZERO
HOLD
Weighing units
→
→
Battery indicator
1WMPD4002222C
Note:
Confirm the AC adapter type
is correct for your local voltage
and receptacle type.
Calibration switch
AC adapter jack
EM-03 option
RS232C (D-sub 9 pin)
Leveling foot
Weighing units
HOLD indicator
/
RE-ZERO key
Turns on when the weight value is stable.
Turns on when the NET weight is displayed.
( The tare operation is in progress. )
Turns on when the scale shows zero.
Turns on when the scale hold the weight.
"kg":Basic weighing mode in kg.
"pcs" (pieces):Counting mode which determines
a unit weight (the weight of one piece) from the
known pieces of samples and calculates how
many pieces are on the weighing pan using the
unit weight.
Changes as the battery capacity decreases as
shown to the left.
3. INSTALLATION
3.1. Setting up the Scale
Step 1
Pass the cable B through the pole.
Step 2
While taking care not to pinch the cable, secure the pole to the weighing
platform, using two screws.
Step 3
Secure the bracket to the pole, using a nut and screw.
Step 4
Connect cable A to cable B.
Step 5
Bundle the excess cable and insert it into the pole.
Step 6
Attach the display to the bracket.
Step 6
Spirit level
Leveling foot
Step 1
The following options are available for the EM series:
EM-03
RS-232C serial interface
EM-12
Adjustable bracket
EM-13
Stabilizing foot ( for EM-30KAM , -60KAM )
EM-14
Desktop / Wall-mount stand
EM-15
Protective cover
EM-16/17
Extension cable ( 3m/5m )
3.2. Installing the Scale
Adjust the level of the scale, using the leveling feet. Confirm that the bubble of
the spirit level is in the center of the level.
The best installation conditions are: stable temperature (-10 ℃ to 40℃) and
relative humidity ( less than 85% ), solid and level surface, no drafts or vibration,
no direct sunlight.
Do not install the scale where there may be static electricity or sudden changes
in temperature.
4. BASIC WEIGHING OPERATION
Step 1 Press the 【ON/OFF】 key to turn the power ON.
The display shows " - - - - - " if there is something placed on the weighing
pan or the scale is unstable.
Step 2 Press the 【UNITS/MODE】 key to select "kg" ( kg mode ).
Step 3 When the display doesn't show zero, press the 【RE-ZERO】 key.
Step 4 When a tare ( container ) is used, place the container on the weighing pan
and press the 【RE-ZERO】 key to set the display to zero.
Scale weighing range = weighing capacity - tare weight
Step 5 Place the object to be weighed on the weighing pan or in the container. Wait
for the STABLE indicator to turn on and read the value.
Step 6 Remove the objects from the weighing pan.
Step 7 Press the 【ON/OFF】 key to turn the power OFF.
When the auto power-off function is enabled, the scale turns off automatically
after 5 minutes of stable condition and Error displayed.
5. COUNTING MODE
Step 1 Press the 【UNITS/MODE】 key to select "pcs".
Step 2 Press and hold the 【UNITS/MODE】 key to enter
the sample unit weight storing mode.
( The figure on the left is the number of samples. )
Step 3 To change the number of samples, press the
【ON/OFF】 key. It may be set to 5, 10, 20, 50 or 100.
Step 4 If necessary, place a container on the weighing
pan and press the 【RE-ZERO】 key. Confirm that
the right side of the number of samples shows zero.
Step 5 Place the correct number of samples on the
weighing pan or in the container. In this example,
place 20 pieces of samples.
Step 6 Confirm that the STABLE indicator is turned on.
Press the 【UNITS/MODE】 key to calculate and
store the unit weight.
The scale is set to count object with this unit weight.
The unit weight is stored in memory, even if the
power is turned off.
Note
The total weight of samples should be more than shown below, regardless of the
number of samples.
Weighing capacity of 30 kg :100g, capacity of 60 kg :200g, capacity of 150 kg:500g
If not, the display shows " lo ut " and returns to the display of step 5. Increase the
number of samples (step 3) and try again.
Display
Cable A
Step 4
Cable B
Step 5
Nut
Step 3
Bracket
Pole
Screw
Screws
Step 2
5 0
Number of samples
20 0
Confirm zero
20 -
Weighing pan
Container
20
pcs
0
pcs
pcs
pcs
pcs
Advertisement

Related Manuals for A&D EM SERIES


Summary of Contents for A&D EM SERIES
- Page 1 While taking care not to pinch the cable, secure the pole to the weighing platform, using two screws. This manual describes how the EM Series Digital Platform Scales work. Step 3 Secure the bracket to the pole, using a nut and screw.
- Page 2 “Hold” Hold enabled The display will not show Stable indicator. Initialization Restores the setting to the factory setting values. Read “7.1. Initialization” Reply to the command “init” Factory setting If the received command is not for the EM series scale.
Need help?
Do you have a question about the EM SERIES and is the answer not in the manual?
Questions and answers
what part number for internal rechargable battery 9V=500mA