Table of Contents
Advertisement
Quick Links
Advertisement
Table of Contents

Related Manuals for Grundig Digta CordEx


Summary of Contents for Grundig Digta CordEx
- Page 1 CordEx >> Operating manual English...
- Page 2 This operating manual contains important instructions for Unauthorized conversions or non-approved technical ■ modifications safe and efficient handling of the Grundig Digta CordEx (herein- after referred to as “device”). This operating manual is part of the Use of non-approved spare parts ■...
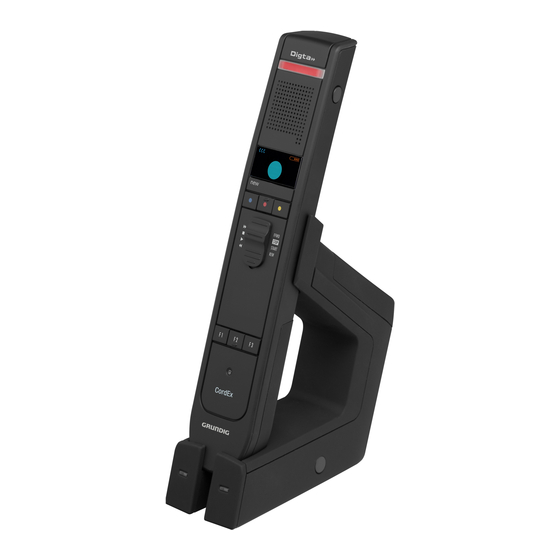
- Page 3 Fig. 1: Controls and connections of dictation microphone and docking station...
- Page 4 Explanation of controls and connections No. Designation Description No. Designation Description Dictation microphone Portable hand-held unit to record and 12 F2 button Configurable function button 2 playback dictations 13 F3 button Configurable function button 3 Docking station Wireless station with charging possibil- 14 Slide switch ity for dictation microphone and spare STOP...
-
Page 5: Table Of Contents
Table of contents Table of contents Registering at different docking General ............6 Operation ..........16 stations ........... 24 Explanation of signalwords and symbols ..6 Recording new dictation ......16 Permanent registration at a docking Interrupting dictation ........16 Safety information ........ -
Page 6: General
General General CAUTION CAUTION, used with the safety alert symbol indicates a haz- Explanation of signalwords and symbols ardous situation which, if not avoided, could result in minor Warnings or moderate injury. Warnings are indicated by symbols. In addition they are intro- duced with signal words that express the scope of the hazard. -
Page 7: Safety Information
Intended use safely. Disregarding these precautions means risking a fatal elec- The Digta CordEx is for exclusive use as a dictation microphone tric shock. to record and play back dictations. Any other use is considered improper and not permitted. -
Page 8: Rechargeable Batteries
Danger of explosion and burns! 32°F (0°C) to 104°F (40°C) for operation Do not throw rechargeable batteries into a fire. Do not ■ Grundig power supplies are only to be used with Grundig ■ short-circuit the contacts. office equipment. Do not keep rechargeable batteries loose in pockets, take ■... -
Page 9: Particular Groups Of Persons
Safety information Particular groups of persons Disregarding these precautions may lead to a stumbling hazard. CAUTION Electronic components Risk of injury! NOTICE Do not leave the device unattended and use it with ■ extreme caution if children or persons who cannot assess Risk of damage and void warranty! the dangers are nearby. -
Page 10: Cleaning
Safety information Cleaning NOTICE Loss of data! NOTICE Please check your recording to ensure that it is complete ■ Risk of damage! and repeat it if necessary. Clean the device only on the outside with a dry, soft cloth. ■ If you are electrostatically charged and touch a device which Do not use chemical cleaning agents. -
Page 11: Ce Note
However, there is no guarantee that interference will not Dictation microphone USB cable for docking station ■ ■ occur in a particular installation. If this equipment does cause Digta CordEx harmful interference to radio or television reception, which can Docking station Cover strip barcode/RFID reader ■ ■... -
Page 12: Accessories
Grundig. Product liability and warran- Windows 2000 SP4 (Rollup 1), Windows XP SP2, ■ ty service are provided only in this case. The use of non-Grundig Windows Vista accessories or those which are not recommended and approved USB 1.1 or USB 2.0... -
Page 13: Installing Software
The green LED [3] on docking station blinks as soon as dock- fied on the rating label. Otherwise there is a danger of fire, ing station of Digta CordEx is properly recognized by the PC. explosion and overheating. Installing software The orange LED [4] on docking station briefly illuminates when current supply is available. -
Page 14: Charging Battery
Start-up Charging battery WARNING Danger of explosion and burns! Recharge the batteries only with the docking station or in ■ the dictation microphone. Do not use damaged batteries. ■ Place dictation microphone [1] into docking station [2]. ► Disregarding these precautions means risking explosions and burns. -
Page 15: Setting Language
Start-up To conserve the battery, the device switches to sleep mode if no button is pressed on the dictation microphone for an extended time. By pressing any button, the device becomes operational again. The corresponding submenu appears. If device is not used for an extended time, it switches off completely. -
Page 16: Operation
Operation Move the slide switch to position and dictate into the micro- Operation ► phone [9]. Recording new dictation The recording symbol appears on display, and recording indi- cator illuminates permanently red. Switch on dictation microphone [1]. Start dictation software. Move slide switch [14] to position. -
Page 17: Continuing Dictation
Operation Move slide switch to position. Continuing dictation ► Move the slide switch to position and dictate the changes. ► Move the slide switch [14] on the dictation microphone [1] to ► position and continue dictating into the microphone [9]. The recording indicator [18] will be lit red. -
Page 18: Finishing Dictation
Operation Finishing dictation The function can vary, depending on applied dictation software. Stopping the recording: ► Move the slide switch [14] on the dictation microphone [1] Move slide switch to position. ► briefly to position (rewind) or press fast forward [16]. -
Page 19: Extended Operation
Extended operation As soon as the dictation microphone is in the reception area of the Extended operation docking station again and slide switch is moved to position, the How to deal with interrupted wireless connection content of the buffer is transferred to the docking station. A blue bar appears on the display, whose fill level corresponds to In case the wireless connection between dictation microphone and the buffer content to be transferred. -
Page 20: Connecting Dictation Microphone Directly To Pc
Extended operation Connecting dictation microphone directly to PC NOTICE! Lift the cover plate of the adapter careful- ► ly using the point of a ballpoint pen or screwdriver. Using The dictation microphone can be connected directly to PC by other tools may damage the cover plate. -
Page 21: Changing Battery
Extended operation The useful life of Digta CordEx can be expanded by means of a replacement battery, without causing longer pauses by battery charging times. A replacement battery is available as accessory and not included in the scope of delivery. -
Page 22: Setting Up Function Buttons
Extended operation Remove already existing battery or USB adapter from dock- ► Setting up function buttons ing station. Function buttons F1 to F3 [11-13] can be assigned with spe- cial functions. Set-up is performed via software AdapterServer. Depending on applied dictation software, assignment of function buttons can vary. -
Page 23: Using Foot Control
Extended operation Depending on applied dictation software, function of the foot control can vary. Right pedal ■ (STOP) ■ (PLAY) To start/pause recording and playback, press the pedal briefly. ► Connecting barcode/RFID reader The dictation microphone is designed for connection of a barcode Using foot control or RFID reader. -
Page 24: Operating Several Dictation Microphones/Docking Stations
Extended operation Remove existing cover strip [19] from dictation microphone [1]. ► Registering at different docking stations Presetting Switch on dictation microphone [1]. ► In system menu, set option Station allocation to Dynamic pair. ► (see section “Settings in system menu”). The setting Dynamic pair. -
Page 25: Permanent Registration At A Docking Station
Firmware updates include important changes by the manufactur- er to the functions of the Digta CordEx. New firmware is available Permanent registration at a docking station on the Internet site at: If several docking station are in close proximity (e.g. -
Page 26: Settings In System Menu
“Settings in system menu”). Briefly press On/Off button [8] on dictation microphone [1] until ► If a new firmware version for Digta CordEx is available online, ► the text Menu appears at bottom left of display text. download the corresponding file onto the PC. -
Page 27: Changing Settings
Extended operation Language ■ If no button is pressed for an extended time, system Selecting display language. menu is automatically exited. Station allocation ■ Static pair. Dynamic pair. Depending on setting, the dictation microphone always perma- nently connects to a docking station or searches for a nearby sta- tion in the reception area. -
Page 28: Troubleshooting
Troubleshooting Troubleshooting Electrical devices can experience malfunctions. This must not always concern a fault on the device. Thus, based on the following table, check if you can eliminate the malfunction yourself. Malfunction Possible cause Repair Device does not switch on. Battery empty. -
Page 29: Technical Data
Technical data Technical data Dictation microphone Radio transmission RF 2.4 GHz transceiver, ISM band Transmitting power max. 1 mW Radio range up to 26 ft (8 m) Frequency range 200 Hz – 7500 Hz ± 2 dB Power supply Rechargeable lithium polymer battery 950 mA, 3.7 V Operating time approx. - Page 34 Grundig Business Systems GmbH Weiherstraße 10 D-95448 Bayreuth Germany info@grundig-gbs.com www.grundig-gbs.com...
Need help?
Do you have a question about the Digta CordEx and is the answer not in the manual?
Questions and answers