
Related Manuals for ReliOn Premier VOICE


Summary of Contents for ReliOn Premier VOICE
- Page 1 User Manual For single user / home use only For use with ReliOn™ Premier Test Strips only. Test strips sold separately.
- Page 2 Welcome to the ReliOn™ Premier Voice Blood Glucose Monitoring System Thank you for choosing the ReliOn™ Premier Voice Blood Glucose Monitoring System. The system provides you with safe, fast and convenient blood glucose in vitro (i.e., outside the body) monitoring. The bilingual talking function of ReliOn™ Premier Voice Meter can be used as an aid for using the meter.
-
Page 3: Table Of Contents
Information Important Information: Read This First Important Health-related Information Specifications ReliOn™ Premier Voice Blood Glucose Monitoring System (BGMS) Inserting or Replacing the Batteries ReliOn™ Premier Blood Glucose Test Strip ReliOn™ Premier Voice Blood Glucose Meter ReliOn™ Premier Voice Blood Glucose Meter Display Preparation Setting Up the ReliOn™... -
Page 4: Important Information: Read This First
Intended Use • The ReliOn™ Premier Voice Blood Glucose Monitoring System is intended for the quantitative measurement of glucose in fresh capillary whole blood samples drawn from the fingertips and alternate sites such as the forearm, palm, thigh and calf. -
Page 5: Important Health-Related Information
• ReliOn™ Premier Blood Glucose Test Strips are for use with the ReliOn™ Premier Voice Blood Glucose Meter to quantitatively measure glucose in fresh capillary whole blood samples drawn from the fingertips and alternate sites. • ReliOn™ Premier Control Solutions are for use with the ReliOn™... - Page 6 • Inaccurate results may occur in severely hypotensive (having low blood pressure) individuals or patients in shock. • Inaccurate low results may occur for individuals experiencing a hyperglycemic-hyperosmolar state, with or without ketosis. • Inaccurate results may occur in patients undergoing oxygen therapy.
-
Page 7: Specifications
Specifications Product specifications Measurement range 20–600 mg/dL Sample size Minimum 0.5 μL Test time 5 seconds Sample type Fresh capillary whole blood Calibration Plasma-equivalent Assay method Electrochemical Battery life 1,000 tests Power Two alkaline AAA batteries Memory 500 test results Size 3.90 x 2.21 x 0.75 inches (100 x 56 x 19 mm) Weight... -
Page 8: Relion™ Premier Voice Blood Glucose Monitoring System (Bgms)
Premier Voice Blood Glucose Monitoring System package. • ReliOn™ Premier Control Solutions are necessary but not included. • ReliOn™ Premier Control Solutions and data cable for the diabetes management system can be ordered separately by contacting Customer Service: 1-855-776-0662, 7 a.m. to 7 p.m. -
Page 9: Inserting Or Replacing The Batteries
Inserting or Replacing the Batteries • The ReliOn™ Premier Voice Meter uses two AAA alkaline batteries. • Before using the meter, check the battery compartment and insert batteries if empty. • When the symbol appears on the display while the meter is in use, the batteries should be replaced as soon as possible. -
Page 10: Relion™ Premier Blood Glucose Test Strip
• Do not share the meter or lancing device with another person. • The ReliOn™ Premier Test Strips should be used only with fresh capillary whole blood samples. • Do not reuse test strips. - Page 11 • Do not use ReliOn™ Premier Test Strips beyond the expiration date. This may cause inaccurate results. • When test strips are used and stored according to correct storage and handling methods, both new, unopened vials and vials that have been opened can be used until the expiration date printed on the test strip box and vial label.
-
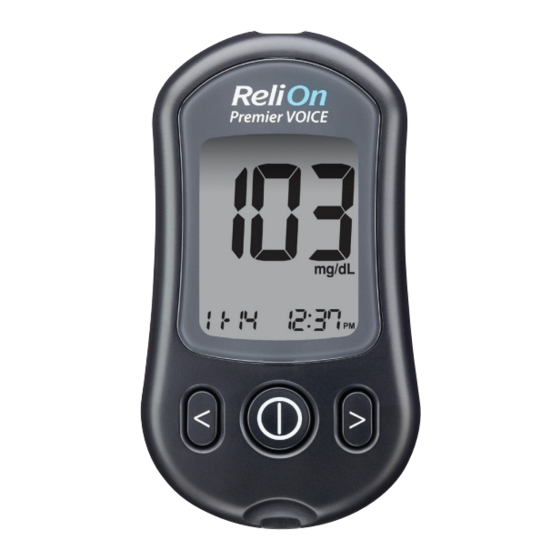
Page 12: Relion™ Premier Voice Blood Glucose Meter
ReliOn™ Premier Voice Blood Glucose Meter Data Port Used to transfer data from the meter to a computer with a data cable Speaker Announces each step < Button Display Selects or Shows results changes and messages information > Button Selects or... -
Page 13: Relion™ Premier Voice Blood Glucose Meter Display
ReliOn™ Premier Voice Blood Glucose Meter Display alarm: appears when the time alarm has been set mem: appears when test results stored in the memory are displayed ctl: appears when the control solution test results are displayed Test results 07 08 09 10... -
Page 14: Setting Up The Relion™ Premier Voice System
Setting Up the ReliOn™ Premier Voice System Meter settings, such as time and date, should be checked and updated before using the meter or after changing the meter batteries. Press and hold the button for 3 seconds to enter the ‘SET’ mode. - Page 15 Step 3 Setting the Year The meter will say “Set year” if the talking function is on. Press the < or > button until correct year appears. Press and hold the < or > button to scroll faster. After setting the year, press the button to confirm the selection and progress to the next step.
- Page 16 Step 6 Setting the Time Format The meter can be set in the 12-hour (AM/PM) or the 24-hour clock format. If the talking function is on, the meter will say “Set time 12-hour / 24-hour.” Press the < or > button to select a format.
-
Page 17: Setting The Hypoglycemia Indicator
Step 9 Turning the Sound On/Off A number showing the sound volume will blink and the meter will say “Set volume.” Press the < or > button to adjust the volume from 1 (lowest) to 3 (highest), or to turn the beep sound ‘OFF’... - Page 18 Step 10 Turning on the Hypoglycemia Indicator When entering the hypoglycemia indicator setting mode, symbol and ‘HYPo’ will blink. If the talking function is on, the meter will say “Set hypoglycemia indicator.” On pressing the < or > button, the screen will display ‘On’...
-
Page 19: Checking The System
ReliOn™ Premier Voice Meter and Test Strips should be checked using ReliOn™ Premier Control Solutions, available in two levels (Level 1 and 2). ReliOn™ Premier Control Solutions contain known amounts of glucose and are used to check that the meter and test strips are working properly. -
Page 20: Control Solution Testing
Use ReliOn™ Premier Control Solution when: • You want to practice the test procedure, instead of using blood • You use the meter for the first time • You begin using a new vial of test strips • You suspect that the meter or the strips are not working properly •... - Page 21 “Control solution test. Please apply control solution onto the test strip. ” Step 3 Shake the ReliOn™ Premier Control Solution bottle well before each test. Remove the cap and squeeze the bottle to discard the first 1 or 2 drops.
- Page 22 Slide the test strip ejector button to discard the used test strip safely in a disposable container. CAUTION • The ranges printed on the test strip vial are for ReliOn™ Premier Control Solutions only. • They do not have any connection to your blood glucose level.
-
Page 23: Comparing The Control Solution Test Results
Comparing the Control Solution Test Results The test result of each control solution should be within the range printed on the label of test strip vial. Repeat the control solution test if the test result falls outside of this range. Out of range results may occur due to the following factors. -
Page 24: Using The Lancing Device
If results continue to fall outside the range printed on the test strip vial, the ReliOn™ Premier Voice Meter and ReliOn™ Premier Test Strips may NOT be working properly. Do not use your system and contact Customer Service: 1-855-776-0662, 7 a.m. to 7 p.m. -
Page 25: Preparing The Lancing Device
CAUTION To reduce the chance of infection • All components that come into contact with blood samples should be considered to be biohazardous and capable of transmitting viral diseases, even after disinfection. • Do not use a lancet that has been used by another person and never share your meter and lancing device with anyone. - Page 26 Step 2 Pull the adjustable cap sideways to remove. Step 3 Insert a new disposable lancet firmly into the lancet holder. Twist off the protective cover of the lancet and set it aside, then replace the adjustable tip. Keep the protective cover to replace on top of the used lancet after testing.
-
Page 27: Preparing The Meter And Test Strip
NOTE • The skin depth to retrieve samples will vary for various people at different sample sites. • The lancing device’s adjustable tip allows the best depth of skin penetration for an adequate sample size. • A beginning setting of three (3) is recommended. Preparing the Meter and Test Strip Step 6 Insert a test strip with the contact bars facing up into the... -
Page 28: Flagging Post-Meal Test Results
Flagging Post-meal Test Results ReliOn™ Premier Voice Meter allows post-meal test to be flagged with symbol. The post-meal flag ( ) can be attached and deleted just before applying the blood sample or when the test result is displayed just after testing. -
Page 29: Applying The Blood Sample
Applying the Blood Sample Step 8 Obtain a blood sample using the lancing device. Place the device against the pad of the finger. The best puncture sites are on the middle or ring fingers. Press the release button. Remove the lancing device from the finger. - Page 30 NOTE • The meter may switch off if the blood sample is not applied within 2 minutes of the symbol appearing on the screen. • If the meter turns off, remove the strip, reinsert and start from step 7. Step 10 The test result will appear after the meter counts down from 5 to 1.
-
Page 31: Discarding Used Lancets
Discarding Used Lancets Step 1 Pull the adjustable cap sideways to remove. Step 2 Place the protective cover on the lancet. Remove lancet and dispose of the used lancet in a proper biohazard container. CAUTION • Check for damage before using the lancet. If it has been damaged, please discard it and use another lancet. -
Page 32: Alternate Site Testing
Alternate Site Testing What is AST (Alternate Site Testing)? When someone tests their glucose, they usually take the blood sample from the tip of the finger. However, since there are many nerve endings in the fingertip, it can be quite painful. When doing a glucose test, using different parts of the body, such as the forearms, palms, thighs and calves, can reduce the pain during testing. - Page 33 press the release button while continuing to apply pressure. Keep holding the lancing device against your skin until sufficient (at least 0.5 μL) blood is drawn. Carefully lift the lancing device away from your skin. CAUTION • AST results should never be used to calibrate Continuous Glucose Monitoring Systems nor entered into an insulin dosing calculator or pump for dosing recommendations.
- Page 34 Situations Requiring Fingertip Test • When the glucose levels are rapidly increasing, such as during two hours after a meal or exercise • When sick or when glucose levels seem quite lower than test value • When hypoglycemia is not well recognized •...
-
Page 35: Hi' And 'Lo' Messages
NOTE • Results from alternate site and fingertip samples may differ from each other, as there is a time lag for the glucose levels to reach the same value. • Use a fingertip sample if you suffer from hypoglycemia or have experienced hypoglycemic shock or symptoms. -
Page 36: Target Blood Glucose Ranges
‘Lo’ Message ‘Lo’ appears when a test result is less than 20 mg/dL and indicates severe hypoglycemia (very low glucose levels). If the talking function is on, the meter will say “Your blood glucose reading is below 20 mg/dL.” If ‘Lo’ is displayed again upon retesting, please contact your healthcare professional immediately. -
Page 37: Transferring Test Results
American Diabetes Association. Standards of Medical Care in Diabetes – 2016. Diabetes Care. January 2016; 39(1):S15, S100. Transferring Test Results Test results stored in ReliOn™ Premier Voice Meter can be transferred from the meter to a computer using the desktop version of ARK Care® Advance Real-Time Diabetes Management System via a data cable. -
Page 38: Meter Memory
Meter Memory The ReliOn™ Premier Voice Meter can save up to 500 test results with time, date and temperature. If the memory is full, the oldest test result will be deleted and the latest test result will be stored. The ReliOn™ Premier Voice Meter calculates and displays the averages of total test results, pre-meal test (Pr) results, and post- meal test ( ) results from the last 1, 7, 14, 30 and 90 days. - Page 39 Step 3 < button Continue to press the < button to view the Pre-meal 1-, 7-, 14-, 30- and 90-day average pre-meal average values (1, 7, 14, 30, and the number of tests 90 days) performed pre-meals > button for the test period. The pre-meal test averages appear with the ‘Pr’...
-
Page 40: Viewing Test Results
Viewing Test Results Step 1 Press the or < button to turn the meter on. The current date and time will be displayed on the bottom of the screen followed by the 1 day average value The number of and the number of the test results tests within the saved within the current day. -
Page 41: Setting The Alarm Function
Setting the Alarm Function Four types of alarms can be set in the ReliOn™ Premier Voice Meter. One post-meal alarm (PP2 alarm) and three time set alarms (alarm 1–3). • The ‘PP2’ alarm goes off 2 hours after setting the alarm •... -
Page 42: Setting The Time Alarms (Alarm 1-3)
Step 2 Setting the PP2 Alarm OFF To turn off the ‘PP2’ alarm, press and hold the < button for 3 seconds. ‘PP2,’ the symbol and ‘OFF’ will appear on the screen. If the talking function is on, the meter will say “Post-meal alarm is off.”... - Page 43 Step 3 Press the < button to adjust the time of alarm 1. A number indicating the time will blink on the screen. Press the > button to set the hour. Press the < button to set the minute. Step 4 On pressing the <...
-
Page 44: Caring For The Relion™ Premier Voice System
NOTE • The life span of a ReliOn™ Premier Voice Meter is 5 years. We recommend disinfecting both the meter and lancing device at least once per week. We have validated a total of 260 cleaning... - Page 45 • We have validated Clorox Germicidal Wipes with 0.55% sodium hypochlorite as the active ingredient for disinfecting the ReliOn™ Premier Voice Meter and lancing device. It has been shown to be safe for use with the meter and lancing device.
-
Page 46: Pre-Cleaning And Disinfection Procedures
Pre-cleaning and Disinfection Procedures Open the cap of the Clorox Germicidal Wipes container and pull out 1 towelette and close the cap. Wipe the entire surface of the meter 3 times horizontally and 3 times vertically using one towelette to pre-clean blood and other body fluids. - Page 47 • Control solution tests should be performed using ReliOn™ Premier Control Solutions. • Verify that the test results are within the range printed on the test strip vial.
- Page 48 Customer Service: 1-855-776-0662, 7 a.m. to 7 p.m. Central time, 7 days a week. • The inscriptions on the exterior of the ReliOn™ Premier Voice Meter or ReliOn™ Lancing Device have been removed • The color of the ReliOn™ Premier Voice Meter or ReliOn™...
-
Page 49: Caution: Storage And Handling
• Keep the meter away from strong electromagnetic field sources such as cell phones and microwave ovens • The ReliOn™ Premier Voice Meter should be used only with ReliOn™ Premier Test strips • Store all meter components in the carrying case to... -
Page 50: Understanding Error Messages
Understanding Error Messages Message What is said What it means What to do “Error 1. Used A used test strip Remove the strip test strip.” was inserted. and insert a new test strip. “Error 2. The The blood or Repeat the test sample has control solution with a new test... - Page 51 What is said What it means What to do Repeat the test “Error 5. Strip This error insertion error. message may with a ReliOn™ Please insert a appear when the Premier Test Strip. test strip wrong blood Insert the strip properly.”...
- Page 52 Message What is said What it means What to do “The room The temperature Move to an area temperature is during the test is where the too low.” below the temperature is operating range. within the operating range (50–104˚F) and repeat the test after the meter “The room...
-
Page 53: General Troubleshooting
General Troubleshooting Problem Troubleshooting • Check whether the test strip is inserted with the contact bars facing up. Check if the test strip has been inserted The display is completely into the test strip port. blank even after • Check if the appropriate test strip inserting a test was used. -
Page 54: Performance Characteristics
Performance Characteristics The performance of ReliOn™ Premier Voice Blood Glucose Monitoring System has been evaluated in laboratory and clinical tests. Accuracy: The ReliOn™ Premier Voice Blood Glucose Monitoring System is calibrated to yield results equivalent to plasma glucose concentrations. The accuracy of the ReliOn™ Premier Voice... - Page 55 Precision: Precision studies were performed in a laboratory using the ReliOn™ Premier Voice BGMS. Within Run Precision Blood avg. 38 mg/dL SD = 1.9 mg/dL Blood avg. 86 mg/dL SD = 3.2 mg/dL Blood avg. 125 mg/dL CV = 4.1% Blood avg.
- Page 56 • Alternate site test results for glucose concentration ≥ 75 mg/dL Within ± 5% Within ± 10% Within ± 15% Within ± 20% Fingertip 27/48 (56.3%) 46/48 (95.8%) 48/48 (100%) 48/48 (100%) Forearm 19/48 (39.6%) 42/48 (87.5%) 47/48 (97.9%) 48/48 (100%) Palm 28/48 (58.3%) 38/48 (79.2%)
-
Page 57: Warranty Information
Warranty Information Warranty The manufacturer warrants that the ReliOn™ Premier Voice Meter shall be free of defects in material and workmanship in normal use for a period of 5 years. The meter must have been subjected to normal use. The warranty does not cover improper handling, tampering, use or service of the meter. -
Page 58: Notes
Notes... - Page 59 Información importante relacionada con la salud _______________________________________ 5 Especificaciones __________________________________________________________________ 7 Sistema de monitoreo de glucosa en sangre de voz ReliOn™ Premier _______________________ 8 Insertar o cambiar las pilas __________________________________________________________ 9 Tira de prueba de glucosa en sangre ReliOn™ Premier __________________________________ 10 Medidor de glucosa en sangre de voz ReliOn™...
-
Page 60: Información
Uso previsto • El Sistema de monitoreo de glucosa en sangre de voz ReliOn™ Premier está previsto para la medición cuantitativa de la glucosa en las muestras de sangre entera capilar fresca extraídas de las yemas de los dedos y los lugares alternos como el antebrazo, la palma, el muslo y la pantorrilla. -
Page 61: Información Importante Relacionada Con La Salud
• Las tiras de prueba de glucosa en sangre ReliOn™ Premier se deben usar con el Medidor de glucosa en sangre de voz ReliOn™ Premier para medir cuantitativamente la glucosa en las muestras de sangre entera capilar fresca extraídas de las yemas de los dedos y los lugares alternos. - Page 62 • Un número de glóbulos rojos anormalmente alto o bajo (nivel de hematocrito superior al 60% o inferior al 20%) puede producir resultados inexactos. • Se pueden producir resultados inexactos en personas seriamente hipotensas (que tienen presión arterial baja) o en pacientes en estado de shock. •...
-
Page 63: Especificaciones
Especificaciones Especificaciones del producto Rango de medición 20–600 mg/dL Tamaño aproximado Mínimo 0.5 μL Duración de la prueba 5 segundos Tipo de muestra Sangre entera capilar fresca Calibración Equivalente a plasma Método de análisis Electroquímico Vida de la pila 1,000 pruebas Energía Dos pilas alcalinas AAA Memoria... -
Page 64: Sistema De Monitoreo De Glucosa En Sangre De Voz Relion™ Premier
ReliOn™ Premier. • Las soluciones de control ReliOn™ Premier son necesarias pero no se incluyen. • Las soluciones de control ReliOn™ Premier y el cable de datos para el manejo de la diabetes se pueden pedir por separado comunicándose con Servicio al cliente: 1-855-776-0662, de 7 a.m. -
Page 65: Insertar O Cambiar Las Pilas
Insertar o cambiar las pilas • El medidor de voz ReliOn™ Premier usa dos pilas alcalinas AAA. • Antes de usar el medidor, verifique el compartimento de las pilas e inserte las pilas si está vacío. • Cuando el símbolo aparece en la pantalla mientras el medidor está... -
Page 66: Tira De Prueba De Glucosa En Sangre Relion™ Premier
El Sistema de monitoreo de glucosa en sangre de voz (BGMS, por sus siglas en inglés) ReliOn™ Premier mide la glucosa en sangre de manera rápida y precisa. Absorbe automáticamente la pequeña muestra de sangre que se aplica en el extremo angosto de la tira. - Page 67 • No use las tiras de prueba ReliOn™ Premier después de la fecha de vencimiento. Esto puede causar resultados inexactos. • Cuando las tiras de prueba se usan y se almacenan de acuerdo a los métodos de almacenamiento y manipulación correctos, tanto los viales nuevos sin abrir como los que se han abierto se pueden usar hasta la fecha de vencimiento impresa en la caja de la tira de prueba y la etiqueta del vial.
-
Page 68: Medidor De Glucosa En Sangre De Voz Relion™ Premier
Medidor de glucosa en sangre de voz ReliOn™ Premier Puerto de datos Se usa para transferir datos desde el medidor a una computadora con un cable de datos Altavoz Anuncia cada paso Botón < Pantalla Selecciona o Muestra cambia información... -
Page 69: Pantalla Del Medidor De Glucosa En Sangre De Voz Relion™ Premier
Pantalla del medidor de glucosa en sangre de voz ReliOn™ Premier alarm: aparece cuando se ha configurado la alarma de tiempo mem: aparece cuando se muestran los resultados de las pruebas almacenados en la memoria ctl: aparece cuando se muestran los resultados de las pruebas con solución de control... -
Page 70: Configurar El Sistema De Voz Relion™ Premier
Configurar el sistema de voz ReliOn™ Premier La configuración del medidor, como la fecha y la hora, se debe revisar y actualizar antes de usar el medidor o después de cambiar las pilas del medidor. Presione y mantenga presionado el botón durante 3 segundos para ingresar al modo de ‘CONFIGURACIÓN’. - Page 71 Paso 3 Configurar el año Si la función de voz está activada, el medidor dirá “Set year” (Configure el año). Presione el botón < o > hasta que aparezca el año correcto. Presione y mantenga presionado el botón < o > para desplazarse más rápidamente. Después de ajustar el año, presione el botón para confirmar la selección y avanzar al paso siguiente.
- Page 72 Paso 6 Configurar el formato de tiempo El medidor se puede configurar en el formato de 12 horas (AM/PM) o en el formato de reloj de 24 horas. Si la función de voz está activada, el medidor dirá “Set time 12-hour / 24-hour”...
-
Page 73: Configurar El Indicador De Hipoglucemia
Paso 9 Activar/Desactivar el sonido Un número que muestra el volumen del sonido parpadeará y el medidor dirá “Set volume” (Ajuste el volumen). Presione el botón < o > para ajustar el volumen de 1 (más bajo) a 3 (más alto), o para activar o desactivar el pitido. Cuando ‘beep On’... - Page 74 Paso 10 Activar el indicador de hipoglucemia Cuando ingrese al modo de ajuste del indicador de hipoglucemia, el símbolo y el mensaje ‘HYPo’ parpadearán. Si la función de voz está activada, el medidor dirá “Set hypoglycemia indicator.” (Establezca el indicador de hipoglucemia). Al presionar el botón <...
-
Page 75: Revisar El Sistema
Revisar el sistema El medidor de voz ReliOn™ Premier y las tiras de prueba ReliOn™ Premier se deben revisar usando las soluciones de control ReliOn™ Premier, que están disponibles en dos niveles (Nivel 1 y 2). Las soluciones de control ReliOn™ Premier contienen las cantidades conocidas de glucosa y se usan para verificar que el medidor y las tiras de prueba funcionan correctamente. -
Page 76: Realizar Una Prueba Con Solución De Control
Use la solución de control ReliOn™ Premier cuando: • Desee practicar el procedimiento de prueba, en lugar de usar sangre • Use el medidor por primera vez • Empiece a usar un vial nuevo de tiras de prueba • Sospeche que el medidor o las tiras de prueba no funcionan correctamente •... - Page 77 Paso 3 Agite bien la botella de la solución de control ReliOn™ Premier antes de cada prueba. Retire la tapa y agite la botella para desechar las primeras 1 o 2 gotas. Luego limpie la punta con un pañuelo o un paño limpio.
- Page 78 PRECAUCIÓN • Los rangos impresos en el vial de la tira de prueba son para las soluciones de control ReliOn™ Premier únicamente. • No tienen ninguna relación con su nivel de glucosa en sangre.
-
Page 79: Comparar Los Resultados De La Prueba Con Solución De Control
Comparar los resultados de la prueba con solución de control El resultado de la prueba de cada solución de control debe situarse dentro del rango impreso en la etiqueta del vial de la tira de prueba. Si el resultado de la prueba se sitúa fuera de este rango, repita la prueba con solución de control. -
Page 80: Usar El Dispositivo De Punción
Si los resultados siguen situándose fuera del rango impreso en el vial de la tira de prueba, el medidor de voz ReliOn™ Premier y las tiras de prueba ReliOn™ Premier posiblemente NO están funcionando de manera adecuada. No use su sistema y póngase en contacto con Servicio al cliente: 1-855-776-0662, de 7 a.m. -
Page 81: Preparar El Dispositivo De Punción
PRECAUCIÓN Para reducir la posibilidad de infección: • Todos los componentes que entran en contacto con las muestras de sangre se deben considerar un peligro biológico que tienen el potencial de transmitir enfermedades virales, incluso después de la desinfección. • No use una lanceta que ha sido utilizada por otra persona y nunca comparta su medidor y su dispositivo de punción con ninguna otra persona. - Page 82 Paso 2 Jale la tapa ajustable hacia los lados para retirarla. Paso 3 Introduzca una nueva lanceta desechable en el sujetador de lanceta. Gire la cubierta protectora de la lanceta y déjela a un lado, luego reemplace la punta ajustable. Mantenga la cubierta protectora a reemplazar sobre la lanceta utilizada después de realizar la prueba.
-
Page 83: Preparar El Medidor Y La Tira De Prueba
NOTA • La profundidad de la piel para obtener muestras varía según las distintas personas y los distintos lugares de punción. • La punta ajustable del dispositivo de punción permite la mejor profundidad de penetración para un tamaño de muestra adecuado. •... -
Page 84: Marcar Los Resultados De La Prueba Después De La Comida
Marcar los resultados de la prueba después de la comida El medidor de voz ReliOn™ Premier permite marcar una prueba después de la comida con el símbolo La marca después de la comida ( ) se puede fijar y eliminar justo antes de aplicar la muestra de sangre o cuando se muestra el resultado de la prueba justo después de la prueba. -
Page 85: Aplicar La Muestra De Sangre
Aplicar la muestra de sangre Paso 8 Obtenga una muestra de sangre usando el dispositivo de punción. Coloque el dispositivo contra la yema del dedo. Los mejores lugares de punción son en los dedos medios o anulares. Presione el botón de liberación. Retire el dispositivo de punción del dedo. - Page 86 NOTA • El medidor puede apagarse si no aplica la muestra de sangre dentro de 2 minutos luego de aparecer el símbolo en la pantalla. • Si el medidor se apaga, retire la tira, vuelva a introducirla y comience desde el paso 7.
-
Page 87: Desechar Las Lancetas Usadas
Desechar las lancetas usadas Paso 1 Jale la tapa ajustable hacia los lados para retirarla. Paso 2 Coloque la cubierta protectora en la lanceta. Retire la lanceta y deseche la lanceta usada en un recipiente de riesgo biológico. PRECAUCIÓN • Verifique los posibles daños antes de usar la lanceta. Si tiene daños, deséchela y use otra lanceta. -
Page 88: Prueba En Un Lugar Alterno
Prueba en un lugar alterno ¿Qué es la Prueba en un lugar alterno (AST, por sus siglas en inglés)? Cuando alguien se hace una prueba de glucosa, generalmente toma la muestra de sangre de la yema del dedo. Sin embargo, puesto que en la yema de los dedos hay muchas terminaciones nerviosas, puede ser bastante doloroso. - Page 89 cambie de color. Luego, presione el botón de liberación mientras sigue aplicando presión. Sostenga el dispositivo de punción contra su piel hasta extraer una cantidad suficiente de sangre (por lo menos 0.5 μL). Levante cuidadosamente el dispositivo de punción de su piel. PRECAUCIÓN •...
- Page 90 Situaciones que requieren una prueba en la yema del dedo • Cuando los niveles de glucosa aumentan rápidamente, como sucede durante dos horas después de una comida o el ejercicio • Cuando usted está enfermo o sus niveles de glucosa parecen bastante inferiores al valor de la prueba •...
-
Page 91: Mensajes 'Hi' (Alto) Y 'Lo' (Bajo)
NOTA • Los resultados de las muestras obtenidas del lugar alterno y de la yema del dedo pueden diferir entre sí, dado que existe un retraso para que los niveles de glucosa alcancen el mismo valor. • Use la muestra de la yema del dedo si sufre hipoglucemia o ha experimentado un ataque hipoglucémico o sus síntomas. -
Page 92: Rangos De Glucosa En Sangre Objetivos
Mensaje ‘Lo’ (bajo) El mensaje ‘Lo’ aparece cuando el resultado de una prueba es inferior a 20 mg/dL e indica una hipoglucemia severa (niveles de glucosa muy bajos). Si la función de voz está activada, el medidor dirá “Your blood glucose reading is below 20 mg/dL” (Su lectura de glucosa en sangre está... -
Page 93: Transferir Los Resultados De La Prueba
Transferir los resultados de la prueba Los resultados de la prueba almacenados en el medidor de voz ReliOn™ Premier se pueden transferir del medidor a una computadora usando la versión de escritorio de ARK Care® Advance Real-Time Diabetes Management System mediante un cable de datos. -
Page 94: Memoria Del Medidor
El medidor de voz ReliOn™ Premier calcula y muestra los promedios de los resultados totales de las pruebas, los resultados de la prueba antes de la comida (Pr) y los resultados de la prueba después de la comida ( ) desde los... - Page 95 Paso 3 Botón < Continúe presionando el botón < para ver los valores Promedio promedio antes de la comida antes de la de 1, 7, 14, 30 y 90 días y el comida (1, 7, número de pruebas realizadas 14, 30, 90 días) antes de la comida durante el período de prueba.
-
Page 96: Ver Los Resultados De Las Pruebas
Ver los resultados de las pruebas Paso 1 Presione el botón o < para encender el medidor. Aparecerán la fecha y hora actuales en la parte inferior de la pantalla seguidas del valor promedio de 1 día y la cantidad de resultados de pruebas guardados en el día actual. -
Page 97: Configurar La Función De Alarma
Configurar la función de alarma En el medidor de voz ReliOn™ Premier se pueden configurar cuatro tipos de alarmas. Una alarma después de la comida (alarma PP2) y tres alarmas de tiempo (alarmas 1 a 3). • La alarma ‘PP2’ suena 2 horas después de configurar la alarma •... -
Page 98: Configurar Las Alarmas De Tiempo (Alarma 1-3)
Paso 2 Desactivar la alarma PP2 Para desactivar la alarma ‘PP2’, presione y mantenga presionado el botón < durante 3 segundos. Se visualizará ‘PP2’, el símbolo y ‘OFF’ en la pantalla. Si la función de voz está activada, el medidor dirá “Post-meal alarm is off” (La alarma después de la comida está... - Page 99 Paso 3 Presione el botón < para ajustar la hora de la alarma 1. Un número que indica la hora parpadeará en la pantalla. Presione el botón > para fijar la hora. Presione el botón < para fijar los minutos. Paso 4 Al presionar el botón <, el número que indica los minutos empezará...
-
Page 100: Cuidado Del Sistema De Voz Relion™ Premier
NOTA • La vida útil del medidor de voz ReliOn™ Premier es de 5 años. Recomendamos desinfectar el medidor y el dispositivo de punción por lo menos una vez por semana. Hemos validado un total de 260 ciclos de limpieza y desinfección (260 limpiezas previas y 260 ciclos de desinfección) - Page 101 • Hemos validado las Toallitas germicidas Clorox con 0.55% de hipoclorito de sodio como ingrediente activo para la desinfección del medidor de voz ReliOn™ Premier y el dispositivo de punción. Se ha demostrado que son seguras para el uso con el medidor y el dispositivo de punción.
-
Page 102: Procedimientos De Limpieza Previa Y Desinfección
Procedimientos de limpieza previa y desinfección Abra la tapa del recipiente de Clorox Germicidal Wipes saque 1 toallita y cierre la tapa. Limpie toda la superficie del medidor 3 veces de manera horizontal y 3 veces de manera vertical usando una toallita para hacer una limpieza previa de la sangre y otros fluidos corporales. - Page 103 • Las pruebas con solución de control se deben realizar usando soluciones de control ReliOn™ Premier. • Verifique que los resultados de la prueba se sitúan dentro del rango impreso en el vial de la tira de prueba.
- Page 104 Servicio al cliente: 1-855-776-0662, de 7 a.m. a 7 p.m., hora del centro, los 7 días de la semana. • Las inscripciones en el exterior del medidor de voz ReliOn™ Premier o en el dispositivo de punción ReliOn™ Premier se han borrado.
-
Page 105: Precaución: Almacenamiento Y Manipulación
• Mantenga el medidor alejado de fuentes de campos electromagnéticos fuertes tales como los celulares y los hornos de microondas • El medidor de voz ReliOn™ Premier solamente se debe usar con las tiras de prueba ReliOn™ Premier. • Guarde todos los componentes del medidor en el estuche para evitar la pérdida... -
Page 106: Entender Los Mensajes De Error
Entender los mensajes de error Mensaje Lo que dice Qué significa Qué hacer “Error 1. Used test Se introdujo una tira Retire la tira de strip.” (Tira de de prueba usada. prueba e introduzca prueba usada) una nueva. “Error 2. The La muestra de Repita la prueba con sample has been... - Page 107 Repita la prueba con insertion error. error puede una tira de prueba Please insert a aparecer cuando se ReliOn™ Premier. test strip usa la tira de prueba Introduzca la tira con properly” (Error de glucosa en las barras de contacto de inserción de la...
- Page 108 Mensaje Lo que dice Qué significa Qué hacer La temperatura “The room Trasládese a un área temperature is durante la prueba donde la too low” (La estaba por debajo temperatura esté temperatura del rango operativo. dentro del rango ambiente es operativo demasiado baja).
-
Page 109: Solución De Problemas En General
Solución de problemas en general Problema Solución • Verifique si la tira de prueba está introducida con las barras de contacto hacia arriba. Verifique si la tira de prueba se ha La pantalla está introducido por completo en el puerto de la en blanco incluso tira de prueba. -
Page 110: Características De Desempeño
Características de desempeño El desempeño del Sistema de monitoreo de glucosa en sangre de voz ReliOn™ Premier ha sido evaluado en laboratorios y en ensayos clínicos. Exactitud: El Sistema de monitoreo de glucosa en sangre de voz ReliOn™ Premier está calibrado para arrojar resultados equivalentes a las concentraciones de glucosa en plasma. - Page 111 Precisión: Los estudios de precisión se realizaron en un laboratorio usando el BGMS de voz ReliOn™ Premier. Precisión intradeterminación Promedio de sangre 38 mg/dL SD = 1.9 mg/dL Promedio de sangre 86 mg/dL SD = 3.2 mg/dL Promedio de sangre 125 mg/dL CV = 4.1%...
- Page 112 • Resultados de la prueba en un lugar alterno para una concentración de glucosa ≥ 75 mg/dL Dentro de ± 5% Dentro de ± 10% Dentro de ± 15% Dentro de ± 20% 27/48 (56.3%) 46/48 (95.8%) 48/48 (100%) 48/48 (100%) Yema del dedo 19/48 (39.6%) 42/48 (87.5%)
-
Page 113: Información De La Garantía
Información de la garantía Garantía El fabricante garantiza que el medidor de voz ReliOn™ Premier no tiene defectos en el material ni en la fabricación para el uso normal durante un período de 5 años. El medidor debe estar sujeto a un uso normal. La garantía no cubre la manipulación, la alteración, el uso o el mantenimiento inadecuados del... -
Page 114: Notas
Notas...
Need help?
Do you have a question about the Premier VOICE and is the answer not in the manual?
Questions and answers
Quiero tomar mi prueba y sale Er7
Error code Er7 on the ReliOn Premier VOICE meter indicates a problem with the meter. The manual advises not to use the meter and to contact customer service at 1-855-776-0662 for assistance.
This answer is automatically generated
Is there a way in settings to shut off the audio setting?