Table of Contents
Advertisement
Advertisement
Table of Contents

Related Manuals for Aqua To Go Fresco


Summary of Contents for Aqua To Go Fresco
- Page 1 Page 1 of 11...
-
Page 2: Table Of Contents
Lifting or carrying your water cooler Do not let your cooler run dry Fixing your water cooler to a wall Pre-rinse instructions Fitting the Aqua To Go Premium Spring Water Bottle Cold water control Hot water control Temperature control Electrical connection... -
Page 3: Quick Start Summary
If the water dispensed has a bad taste then please refer to cleaning section of this manual. 8. INSTALLING A BOTTLE Gently lower your AQUA TO GO water bottle onto the water intake spike. Please read any installation instructions found on the bottle. Store all spare bottles in a cool place, out of direct sunlight. -
Page 4: Water Cooler Componentry
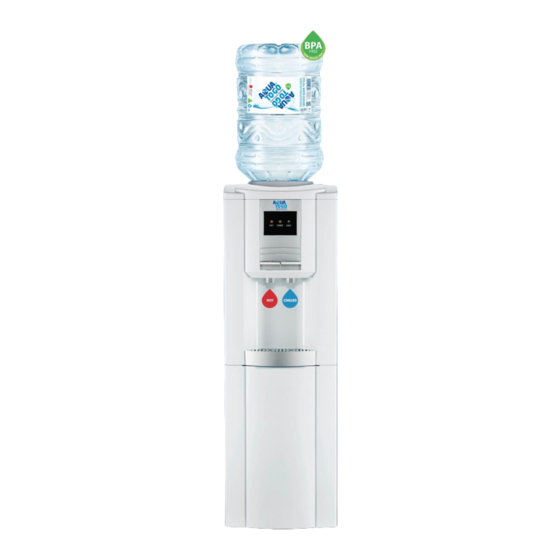
WATER COOLER COMPONENTRY 1 WATER INTAKE 7 FIXED FEET 2 COOL INDICATOR LIGHT (GREEN) 8 POWER COLD SWITCH 3 COLD INDICATOR LIGHT (GREEN) 9 POWER HOT SWITCH 4 COLD WATER TAP (BLUE) 10 VENTILATION GRILL 5 ROOM TEMP WATER TAP (WHITE) 11 POWER CORD 6 REMOVABLE DRIP TRAY WIRING DIAGRAM... -
Page 5: Specifications
This unit has been tested for electromagnetic interference. UPON RECEIVING YOUR COOLER Thank you for purchasing an AQUA TO GO water cooler. Your cooler has been inspected in accordance with our factory’s comprehensive Quality Assurance Checklist. Inspect your cooler and should you find any material defects or have any queries please contact our customer service centre promptly (see page 10). -
Page 6: Installation Guidelines
INSTALLATION GUIDELINES COOLER PLACEMENT Place your water cooler, in an area that is: ● Not too humid, with a room temperature less than 26C. ● Close to a power point. Do not, however, plug it in yet. ● Inside and out of significant direct sunlight and away from any heating appliance. ●... -
Page 7: Pre-Rinse Instructions
(above) pre rinse instructions. FITTING AN AQUA TO GO PREMIUM SPRING WATER BOTTLE ... -
Page 8: Electrical Connection
ELECTRICAL CONNECTION Plug the appliance into an exclusive, properly installed, grounded wall outlet. Do not under any circumstances alter this power plug. This appliance requires a standard 220-240-volt, 50Hz electrical outlet with three-prong ground. The cord should be secured behind the appliance and not left exposed or dangling as this might cause accidental injury. - Page 9 away. When you are ready use your water cooler again you must fill the tank and dispense a cup of water from the red hot tap before you turn the power back on. Note: Only transport and store your water cooler in an upright position. ATTENTION - This appliance is intended to be used in household and similar applications such as: staff kitchen areas in shops, offices and other working environments;...
-
Page 10: Trouble Shooting Guide
Water intake may be blocked. A water tube may have a kink. Please contact Aqua To Go service centre ph 1300 760 474. Water cooler is not cold enough. The water cooler does not have the correct clearances from the wall. - Page 11 Please contact the AQUA TO GO Service Center to discuss your concern or query prior to contacting Officeworks. AQUA TO GO CUSTOMER SERVICE CENTRE CONTACTS HAVE A QUESTION? For the most up to date information about this product and the rest of the AQUA TO GO product range please visit www.aquatogo.com.au Ph: 1300 760 474 Or email service@aquatogo.com.au...
- Page 12 Page 12 of 11...
- Page 13 Page 13 of 11...
Need help?
Do you have a question about the Fresco and is the answer not in the manual?
Questions and answers