Sony HT-RT3 Startup Manual
Hide thumbs
Also See for HT-RT3:
- Operating instructions manual (32 pages) ,
- Operating instructions manual (104 pages) ,
- Service manual (36 pages)
Advertisement
Quick Links
Home Theatre System
Startup Guide
Guide de démarrage
HT-RT3
1
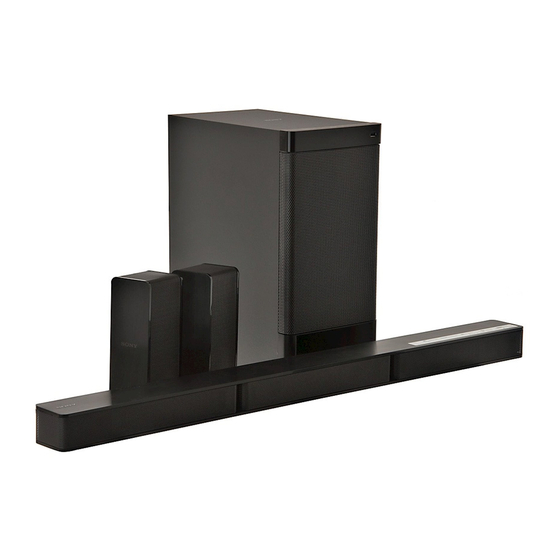
Connecting the speakers
Raccordement des enceintes
Connect the speaker cords to match the color of the SPEAKERS jacks on the rear panel of the Subwoofer.
Raccordez les cordons d'enceinte aux prises SPEAKERS de la même couleur, situées sur le panneau arrière du caisson de graves.
Rear panel of the Subwoofer
Panneau arrière du caisson de graves
Green
Vert
From Bar Speaker
Red
Sur l'enceinte-barre
Rouge
White
Blanc
Bar Speaker
Enceinte-barre
Subwoofer
Caisson de graves
Speaker layout: "STDRD" (Standard)
Configuration d'enceintes : « STDRD » (Standard)
2
Connecting with a TV
Raccordement à un téléviseur
Is the HDMI input jack on your TV labeled "ARC" ?
La prise d'entrée HDMI de votre téléviseur porte-t-elle l'étiquette « ARC » ?
NO/NON
High Speed HDMI
Optical digital cable (not supplied)
cable (supplied)
Câble optique numérique (non fourni)
Câble HDMI haute
vitesse (fourni)
Note
Make sure that the HDMI cable is firmly inserted.
Supplied accessories
Accessoires fournis
4-587-773-31(1)
GB
Remote control (1)
R03 (size AAA) batteries (2)
FR
Télécommande (1)
Piles R03 (format AAA) (2)
AR
Setting up the remote control
PR
Configuration de la télécommande
To mount the Bar Speaker and the
Surround Speakers (SUR L/SUR R) on a
wall
Refer to the supplied Operating
Instructions.
Montage de l'enceinte-barre et des
enceintes surround (SUR L/SUR R) au
mur
Reportez-vous au mode d'emploi fourni.
Blue (from SUR L)
Bleu (sur SUR L)
Gray (from SUR R)
Gris (sur SUR R)
Bar Speaker
Enceinte-barre
Subwoofer
Caisson de graves
Speaker layout: "FRONT" (All front)
Configuration d'enceintes : « FRONT » (Toutes à l'avant)
YES/OUI
High Speed HDMI cable (supplied)
Câble HDMI haute vitesse (fourni)
Remarque
Assurez-vous que le câble HDMI est fermement inséré.
3
Turning on the system
Mise sous tension du système
High Speed HDMI cable (1)
Câble HDMI haute vitesse (1)
Turn on the TV and then change the input of the TV to the input which the
Subwoofer is connected.
Connect the AC power cord (mains lead) of the Subwoofer.
Press (power).
The front panel display lights up.
4
Listening to the sound
Écoute du son
Press INPUT repeatedly until the device you want appears in the front panel
display. Then, press
press SW
+/– repeatedly to adjust the volume of the Subwoofer.
Setup completed! Enjoy!
Configuration terminée !
Profitez de votre système !
Listening to music from a BLUETOOTH device
Écoute de musique à partir d'un périphérique BLUETOOTH
When pairing a BLUETOOTH device
Par appairage d'un périphérique BLUETOOTH
To pair the system with a BLUETOOTH device (Pairing)
Place the BLUETOOTH device within 1 meter from the Subwoofer.
Press
PAIRING on the Subwoofer.
The blue LED indicator flashes quickly (
Turn on the BLUETOOTH function, and then select "HT-RT3" after searching for it on
the BLUETOOTH device.
Perform this step within 5 minutes, otherwise pairing mode will be canceled.
When the BLUETOOTH connection is established, the blue LED indicator lights up ( ).
If passkey is required on the BLUETOOTH device, enter "0000".
To listen to music from the paired device
Turn the BLUETOOTH function of the paired device to on.
Press INPUT repeatedly to select "BT".
The system automatically reconnects to the BLUETOOTH device it was most recently
connected to.
When the BLUETOOTH connection is established, the blue LED indicator lights up ( ).
Start playback on the BLUETOOTH device.
Adjust the volume.
When using One-touch connection (NFC)
Par connexion en une touche (NFC)
Hold the remote device near to the N-Mark on the Subwoofer until the remote
device vibrates.
When the BLUETOOTH connection is established, the blue LED indicator lights up ( ).
Start playback of audio source on the remote device.
• Compatible remote devices
Remote devices with a built-in NFC function
(OS: Android™ 2.3.3 or later, excluding Android 3.x)
SongPal
A dedicated App for this model is available on both Google Play™ and
App Store.
Search for "SongPal" and download the free App to find out more about the convenient
features.
Power
Alimentation
Input
Entrée
Allumez le téléviseur et changez l'entrée du téléviseur pour choisir celle à
laquelle le caisson de graves est connecté.
Raccordez le cordon d'alimentation secteur du caisson de graves.
Appuyez sur (alimentation).
L'afficheur du panneau avant s'allume.
Appuyez plusieurs fois sur INPUT jusqu'à ce que l'appareil de votre choix
+/– repeatedly to adjust the volume of the system and
apparaisse sur l'afficheur du panneau avant. Puis, appuyez plusieurs fois sur
+/– pour régler le volume du système et appuyez ensuite plusieurs fois sur
SW
+/– pour régler le volume du caisson de graves.
Please refer to the supplied Operating Instructions about the sound
mode, and other functions.
Veuillez consulter les instructions concernant le mode de son et
autres fonctions dans le mode d'emploi fourni.
Blue LED indicator
Indicateur LED bleu
Appairage de ce système avec un périphérique BLUETOOTH
Placez le périphérique BLUETOOTH à 1 mètre du caisson de graves.
Appuyez sur
) during BLUETOOTH pairing.
L'indicateur LED bleu clignote rapidement (
Activez la fonction BLUETOOTH, puis sélectionnez « HT-RT3 » après l'avoir
recherchée sur le périphérique BLUETOOTH.
Effectuez cette étape dans les 5 minutes qui suivent, sinon le mode d'appairage sera annulé.
Quand la connexion BLUETOOTH est établie, l'indicateur LED bleu s'allume ( ).
Si la clé d'accès est requise sur le périphérique BLUETOOTH, saisissez « 0000 ».
Écoute de musique depuis le périphérique appairé
Activez la fonction BLUETOOTH du périphérique appairé.
Appuyez plusieurs fois sur INPUT pour sélectionner « BT ».
Le système se reconnecte automatiquement au périphérique BLUETOOTH auquel il a été
connecté pour la dernière fois.
Quand la connexion BLUETOOTH est établie, l'indicateur LED bleu s'allume ( ).
Démarrez la lecture sur le périphérique BLUETOOTH.
Réglez le volume.
Blue LED indicator
Indicateur LED bleu
Maintenez le périphérique distant à proximité de la N-Mark sur le caisson de
graves jusqu'à ce que le périphérique distant vibre.
Quand la connexion BLUETOOTH est établie, l'indicateur LED bleu s'allume ( ).
Démarrez la lecture d'une source audio sur le périphérique distant.
• Périphériques distants compatibles
Périphériques distants intégrant une fonction NFC
(OS : Android™ 2.3.3 ou toute version ultérieure, à l'exception d'Android 3.x)
Une application dédiée pour ce modèle est disponible sur Google
Play™ et App Store.
Recherchez « SongPal » et téléchargez l'application gratuite pour en savoir plus sur les
fonctions pratiques.
INPUT
+/–
SW
+/–
Operating Instructions
Mode d'emploi
BLUETOOTH device
Périphérique BLUETOOTH
PAIRING
INPUT
PAIRING sur le caisson de graves.
) pendant l'appairage BLUETOOTH.
© 2016 Sony Corporation Printed in Malaysia
Advertisement

Related Manuals for Sony HT-RT3


Summary of Contents for Sony HT-RT3
- Page 1 ) during BLUETOOTH pairing. L’indicateur LED bleu clignote rapidement ( ) pendant l’appairage BLUETOOTH. Turn on the BLUETOOTH function, and then select “HT-RT3” after searching for it on Activez la fonction BLUETOOTH, puis sélectionnez « HT-RT3 » après l’avoir Connecting with a TV the BLUETOOTH device.
- Page 2 دخل تنظیم کنترل ر اه دور ورودی HT-RT3 .تلویزیون ر ا روشن کرده و سپس ورودی تلویزیون ر ا به ورودی سابووفری که متصل است تغییر دهید .قم بتشغيل التلفزيون ثم قم بتغيير دخل التلفزيون إلى الدخل المتصل به مضخم الصوت...
Need help?
Do you have a question about the HT-RT3 and is the answer not in the manual?
Questions and answers