Table of Contents
Advertisement
Operation
Single Acting and Double Acting Bead Spray Guns for
™
RoadLazer
RoadPak
- For the application of road marking reflective materials -
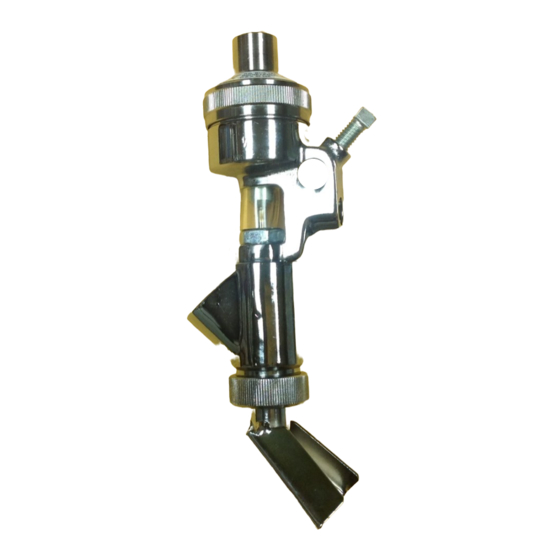
Model: 238338 - Single Acting Bead Spray Gun
Model: 24G979 - Double Acting Bead Spray Gun
200 psi (1.38 MPa, 13.8 bar) Maximum Working Pressure
Important Safety Instructions
Read all warnings and instructions in this
manual. Save these instructions.
Single Acting Bead Spray Gun
™
Line Striping System
- For professional use only -
Double Acting Bead Spray Gun
308612K
EN
T5
II 2 G
Advertisement
Table of Contents

Subscribe to Our Youtube Channel
Related Manuals for Graco 238338


Summary of Contents for Graco 238338
- Page 1 - For the application of road marking reflective materials - - For professional use only - Model: 238338 - Single Acting Bead Spray Gun Model: 24G979 - Double Acting Bead Spray Gun 200 psi (1.38 MPa, 13.8 bar) Maximum Working Pressure...
- Page 2 Warnings Warnings The following warnings are for the setup, use, grounding, maintenance, and repair of this equipment. The exclama- tion point symbol alerts you to a general warning and the hazard symbols refer to procedure-specific risks. When these symbols appear in the body of this manual, refer back to these Warnings. Product-specific hazard symbols and warnings not covered in this section may appear throughout the body of this manual where applicable.
-
Page 3: Installation
Installation Installation Connect Material Line Accessories are available from Graco. Be sure all accessories are properly sized to withstand the pres- sures in the system. Mount Valve Mount the valve on a 0.50 in. (12.7 mm) diameter rod on a mounting fixture or a dispensing machine. The bead gun has a clamping set screw for mounting. -
Page 4: Operation
Operation Operation Pressure Relief Procedure Application Data See RoadLazer System manual 3A1214. Nozzle Size Selection 1. Shut off air supply to the bead tank. Relieve pres- Use the Nozzle Size Selection and Bead Delivery sure from bead tank. Tables to select the size of nozzle for the travel speed and bead coverage to be used. - Page 5 Operation Bead Delivery lb/min (kg/min) Speed Bead Coverage in Pounds Per Gallon (kg/l) 4 (.48) 5 (.60) 6 (.72) 7 (.84) 8 (.96) 9 (1.08) 2.4 (1.09) 3.0 (1.36) 3.6 (1.63) 4.1 (1.86) 4.7 (2.13) 5.3 (2.40) 3.6 (1.63) 4.4 (2.0) 5.3 (2.40) 6.2 (2.81) 7.1 (3.22)
-
Page 6: Maintenance
Maintenance Maintenance 2. Remove valve housing: a. Remove cap and spring. Clean Dispensing Valve and System Daily Clean the outside of the valve by wiping with a soft cloth dampened with a compatible solvent. NOTICE ti16182a Never immerse the entire dispensing valve in solvent. b. - Page 7 Service 4. Remove valve seat and o-ring from valve housing 9. Install o-ring on valve seat and insert into valve and remove gun needle. housing. ti16191a ti16185a 10. Install retaining nut. ti16183a 5. Remove seal nut and o-ring. ti16190b ti16195a 6.
-
Page 8: Troubleshooting
Troubleshooting Troubleshooting NOTE: Check all possible solutions before disassembling the pump. Problem Cause Solution Uneven spray pattern Bead pressure too low Increase pressure to bead tank, or adjust bead pressure regulator Spray gun will not stop spraying Gun needle binding Clean, repair Obstructed or worn needle seat Clean or replace... -
Page 9: Replacement Parts And Kits (Single Acting Gun)
Replacement Parts and Kits (Single Acting Gun) Replacement Parts and Kits (Single Acting Gun) Model 238338 Parts List Ref. Part Description Qty. 191201 SEAT, valve, .234 191196 NUT, retaining 191206 HOUSING, valve 166847 HOUSING, valve 25D347 TOOLESS, handle, gun 191197... -
Page 10: Replacement Parts And Kits (Double Acting Gun)
Replacement Parts and Kits (Double Acting Gun) Replacement Parts and Kits (Double Acting Gun) Model 24G979 Parts List Ref. Part Description Qty. 191201 SEAT, valve 191196 NUT, retaining 191206 HOUSING, valve 166847 HOUSING, valve 25D347 TOOLESS, handle, gun 16G708 CAP, cylinder 16G763 SPRING, compression 16G169... -
Page 11: Technical Data
Adjustable Bead Deflector Kit - 24J173 Allows application of 12 in. wide beaded lines. Technical Data Single Acting Bead Spray Gun Double Acting Bead Spray Gun 238338 24G979 Maximum working pressure 200 psi (12 bar) Operating pressure of air actuated trigger... -
Page 12: Graco Standard Warranty
With the exception of any special, extended, or limited warranty published by Graco, Graco will, for a period of twelve months from the date of sale, repair or replace any part of the equipment determined by Graco to be defective.
Need help?
Do you have a question about the 238338 and is the answer not in the manual?
Questions and answers