Table of Contents
Advertisement
Available languages
Available languages
Quick Links
Advertisement
Table of Contents

Related Manuals for Sangean DT-220V


Summary of Contents for Sangean DT-220V
- Page 1 DT-220V Operating instruction Instruccions de manejo...
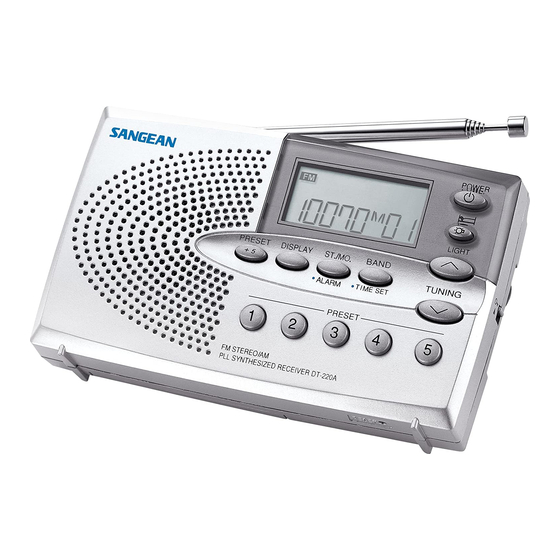
- Page 4 Controls Telescopic Aerial Display Preset 6-10 Display button Stereo/Mono/Alarm button Band/Time set button Power button Light button Tuning up/down button Preset 1-5 Lock switch Volume Control Loudspeaker/Headphone switch Headphone socket DC input socket Auto wind earphones Auto wind earphones switch Battery compartment RESET Display...
-
Page 5: Installing Batteries
Installing batteries 1. position the radio face down. 2. Press the catch and slide in the direction of the arrow. 3. Lift up the battery cover. 4. Insert 2xUM-3 (AA) size batteries. Make sure the batteries are positioned in accordance with the diagram indicated. -
Page 6: Setting The Alarm Time
Setting the alarm time 1. Ensure that the radio is switched off. 2. Press and hold down the Alarm button for more than 2 seconds until the hours digit and alarm symbol begin to flash in the display . 3. Whilst the hours digit is flashing, adjust the hours using the Tuning Up/Down buttons. - Page 7 Operating the radio-search tuning 1. Switch on your radio by pressing the Power Button. Note: The radio is originally set to be 90 minutes auto shut off after Power is switched on ( will appear on the display). If you don’t need this feature, press Power button for more than 2 seconds until symbol removed from the...
- Page 8 Operating the radio – manual tuning 1. Switch on your radio by pressing the Power button. 2. Select the desired waveband using the Band button. The waveband selected will appear in the display. On FM/TV bands, fully extend the Telescopic aerial. On AM (MW) band, rotate your radio for best reception.
-
Page 9: Presetting Stations
Presetting stations You may store up to 10 stations each on FM, AM (MW) and TV bands giving a total of 30 preset stations. 1. Tune into the required stations using one of the tuning methods previously described . 2. To store the station, press and hold down one of the PRESET button 1-5 for more than 2 seconds until display shows preset location. -
Page 10: Display Backlight
Display backlight Pressing the Light button will switch on the display backlight and illuminate the display for approximately 7 seconds. Lock switch The lock switch located on the right side of your radio is used to prevent unintentional operation. 1. Slide the Lock switch to the up ‘ locked ‘ position, symbol will appear in the display. -
Page 11: Headphone Socket
Headphone socket In addition to the built in earphones, your radio is provided with a headphone socket. This allows you to use different types of ear or headphones with your radio. 1. To use external headphones, slide the Loudspeaker/Headphone switch to the and plug the headphones into the headphone socket. -
Page 12: Troubleshooting/Reset Button
Troubleshooting/Reset button If your radio fails to operate correctly or some digits on the display are missing or incomplete, carry out the following procedures. 1. Switch off the radio and remove the batteries. 2. With the aid of a suitable implement (the end of a paper clip), press the RESET button located on the underside for at least 2 seconds, this will reset the microprocessor but still keep the clock... - Page 14 Controles Antena telescó pica Pantalla Presintoní as 6-10 Botó n Pantalla Botó n de esté reo/mono/alarma Botó n de selecció n de banda/hora Botó n de encendido Botó n de luz Botó n de sintonizació n ascendente/descendente Presintoní as 1-5 Interruptor de bloqueo Control de volumen Interruptor de altavoz/auriculares...
-
Page 15: Instalación De Las Pilas
Instalació n de las pilas 1. Coloque la radio hacia abajo. 2. Pulse el pestillo y deslí celo en la direcció n que marca la flecha. 3. Levante la tapa del compartimento de pilas. 4. Inserte 2 pilas tipo UM-3 (AA). Compruebe que las pilas están colocadas de acuerdo con el diagrama indicado. -
Page 16: Configuración De La Hora
Configuració n de la hora El reloj se pondrá en marcha al instalar las pilas. Cuando se instalen por primera vez, la pantalla mostrará 0:00. Nota: La hora só lo se puede configurar con la radio apagada. 1. Compruebe que la radio está apagada. 2. - Page 17 Configuració n de la hora de la alarma 1. Compruebe que la radio está apagada. 2. Pulse y mantenga pulsado el botó n Alarm durante más de 2 segundos hasta que el dí gito de las horas y el sí mbolo de la alarma empiecen a parpadear en la pantalla.
- Page 18 Funcionamiento de la radio: sintonizació n por bú squeda 1. Encienda la radio pulsando el botó n Power. Nota: La radio está configurada de fábrica para apagarse automáticamente a los 90 minutos despué s de encenderla (aparecerá el sí mbolo Si no quiere hacer uso de esta funció...
- Page 19 Funcionamiento de la radio: sintonizació n manual 1. Encienda la radio pulsando el botó n Power. 2. Seleccione la banda que desee pulsando el botó n Band. Se mostrará en la pantalla la banda seleccionada. En las bandas de FM y TV, extienda completamente la antena telescó...
- Page 20 Salto de sintonizació n de AM(MW) En Europa y otras partes del mundo, los saltos de sintonizació n de la banda de AM (MW) son de 9 kHz, en Amé rica, son de 10 kHz. Para cambiar el salto de sintonizació n de AM de 10 kHz a 9 kHz, haga lo siguiente: 1.
-
Page 21: Presintonizació N De Emisoras
Presintonizació n de emisoras Puede almacenar hasta 10 emisoras por cada banda: FM, AM (MW) y TV, lo que hace un total de 30 emisoras presintonizadas. 1. Sintonice las estaciones que desee utilizando uno de los mé todos descritos anteriormente. 2. -
Page 22: Luz De Fondo De La Pantalla
Modos de presentació n Con la radio encendida, pulse el botó n Display para cambiar entre frecuencia y hora normal. Luz de fondo de la pantalla Al pulsar el botó n Light se encenderá la luz de fondo de la pantalla y é sta se encenderá durante unos 7 segundos. - Page 23 Auriculares Los auriculares acoplados a la radio disponen de un sistema de rebobinado automático para facilitar su almacenamiento. 1. Tire suavemente de ellos desde el lado derecho de la radio. 2. Deslice el interruptor Loudspeaker/Headphone hasta la posició n ; se silenciará el altavoz. 3.
-
Page 24: Botó N Mono
Adaptador de CA (no incluido) El adaptador de CA para usar con esta radio debe suministrar 3 V de CC y 200 mA en la patilla central del negativo. Inserte el enchufe del adaptador en la toma de CC situada en el lado izquierdo de la radio. Enchufe el adaptador en la toma de electricidad. -
Page 25: Especificaciones
Solució n de problemas, botó n de reinicio Si la radio no funciona correctamente o faltan, o aparecen incompletes, algunos dí gitos en la pantalla, realice los siguientes procedimientos: 1. Apague la radio y saque las pilas. 2. Con la ayuda de un ú til adecuado (por ejemplo, la punta de un clip para papel), pulse el botó... - Page 26 381H512...