
Summary of Contents for I-novative 2-Port OABR Multi-Media-Switch
- Page 1 User Manual 2-Port OABR Multi-Media-Switch (EAN 4038816090041 - Art.-No. 94798) Gebrauchsanweisung Passives MHL/HDMI Kabel [1,5 Meter] Art.-Nr. 094794...
-
Page 2: Table Of Contents
Table of Contents page 1. Delivery 2. Commissioning and configuration 2.1. Commissioning and connection 2.2. Installation of the GUI software 2.3. Driver Installation (USB, LAN) 2.4. Network Configuration 2.5. Pinning Tyco MQS 2.6. Configuration (GUI) 2.6.1. Toolbar 2.6.2. Status Bar 2.6.3. -
Page 3: Delivery
You may not operate the OABR Multi-Media-Switch if something seems to be damaged. In any case of doubt, please contact our technical support. Package contents: • i-NOVATIVE OABR Multi-Media-Switch • 2 USB-cable • Network Cable RJ45 • Tyco MQS 18 Pol connection cable •... -
Page 4: Commissioning And Configuration
Connect your OABR Multi-Media-Switch to the existing test environment using the interface cable. If you do not have an i-NOVATIVE original cable, you can do your own cable wiring according to the description of pinning in chapter 2.5. Connect the two OABR ports of the OABR Multi-Media- Switch to the OABR ports of the devices to be connected. -
Page 5: Installation Of The Gui Software
To use the GUI of the OABR Multi-Media-Switch, you must first install the software on your PC. If necessary, download the latest OABR Multi-Media-Switch software on our website: http://www.i-novative.de/de/downloads Please note the location of the installation file Start the application with a double-click Select the desired language for the installation process - Press „Next“... - Page 6 - Select the desired installation directory. Preselection directory: „C:\Program Files\OABR Multi-Media-Switch“. You can also choose another installation directory if necessary. Please remind your installation directory for later usage. Press „Next“. - Here you can select whether a shortcut of the application program shell be created. Press „Install“.
-
Page 7: Driver Installation (Usb, Lan)
2.3. Driver Installation (USB, LAN) 1. Automatic driver installation The OABR Multi-Media-Switch driver can be installed on the following operating systems: Windows 2000, Windows XP 32/64Bit, Windows Vista 32/64Bit, Windows 7 32/64Bit and Windows 8 32/64Bit. During the installation of the OABR Multi-Media-Switch software, the required driver for USB and „USB 2.0 to Ethernet“... - Page 8 Proceed as follows: • Download the latest driver from our website. There is always the latest driver provided: http://www.i-novative.de/de/downloads Alternatively, the driver is in the follwoing folder after installing the GUI: \Driver\ • Unzip the downloaded driver with a double click in the default directory of your C drive.
-
Page 9: Network Configuration
2.4. Network Configuration In principle, the OABR Multi-Media-Switch acts as a standard switch in a network. This means: a) for the participation of the PC via the OABR switch on this network, the PC must have the same subnet mask as well as a valid IP address. b) Please make sure that no IP address is assigned twice. -
Page 10: Configuration (Gui)
Downloads: Opens the download page in the web browser. Here you will find the latest firmware, drivers and updates of the GUI as well as current instructions for use. Homepage: Opens the i-novative homepage in the web browser. Exit: Closes the application. -
Page 11: Vlan
OABR1 / OABR 2: Role: Indicates whether the OABR port is set to Master or Slave. The setting can be changed via the hardware switch <INSERT switch>. See chapter 2.7. - force: FC for RX and TX is activated Flow Control: FC is deactivated, because no Auto-Negotiation is made - auto: Speed: 100Mbps or 10Mbps... - Page 12 Configuration-Exemple 1: Two Port Groups In the above example, the OABR-Media-Switch is turned into two independent media converters by assigning two port groups - one containing USB and OABR1 and the other containing 100BTX and OABR2. Configuration-Exemple 2: Uni-Directional Traffic The above example shows the setup of a uni-directional connection.
- Page 13 Static MAC Table The switch forwards Ethernet frames primarily based on MAC addresses that are stored in the Dynamic MAC Table. Source MAC addresses of frames received at a certain port are learned together with the respective port number. Thus the switch knows which nodes can be reached by which ports.
- Page 14 Reading and writing of the Static MAC Table takes a bit of time thus it is not automatically synchronized with the switch. Instead, the Refresh and Apply buttons must be used. When storing the Static MAC Table only valid entries are made persistent. This way startup time is minimized since the table has to be populated at each power-on or reset.
- Page 15 a) Enable / disable 802.1Q VLAN functionality 802.1Q VLAN features are enabled and disabled through the checkbox in the upper left corner of the VLAN tab. The VLAN settings can only be changed if 802.1Q VLAN is enabled. The same applies to up- dating the tables.
- Page 16 c) VLAN Table The VLAN Table contains VLAN-specific settings for forwarding packets with VLAN tag. The entries in the VLAN table are applied only to the packets received on ports whose VTable Filter Flag is set. The VLAN table contains a maximum of 32 entries. Using the context menu (right mouse button), entries can be deleted, added or the whole table can be deleted.
- Page 17 d) VLAN exemples Tag Insertion/Removal: The insertion and removal of VLAN tags e.g. makes sense, if non VLAN-capable devices shell be integrated into a VLAN. As exemple,a PC and a server shell communicate with each other. The server is configured for VLAN 73, the PC does not support 802.1Q VLAN.
-
Page 18: Sniffing
2.6.5. Sniffing Sniff on Port: Specifies the port on which the traffic is output. Port Settings: • RX only: Only the incoming packets are forwarded to the sniffing port • TX only: Only the outgoing packets are forwarded to the sniffing port •... -
Page 19: Counter
2.6.6. Counter Displays a list of counters of the selected OABR switch. The lists can be updated via the Refresh button. The counters are reset to zero each time the switch is restarted.. RxLoPriorityByte Rx lo-priority (default) octet count including bad packets. RxHiPriorityByte Rx hi-priority octet count including bad packets. -
Page 20: Life Cycle Settings
2.6.7. Life Cycle Settings Displays a list of counters of the selected OABR switch. The lists can be updated via the Refresh button. The counters are reset to zero each time the switch is restarted. In the „Life Cycle Settings“ submenu, all configurations can be made to make the OABR Multi- Media-Switch operate in a life-cycle-dependent environment, such as in a test-car. - Page 21 In the section „Life Cycle Settings“ you can find further Life Cycle specific settings. The Life Cycle mode (4) of the OABR Multi-Media-Switch is set with the DIP switch 4. In the „Always On“ positi- on, the switch does not participate in the life cycle process. If „Customized“ is selected, the device behaves according to the specified Life Cycle parameters.
- Page 22 By using the button „Apply Settings“ (13), the settings are temporarily transferred to the OABR Multi-Media-Switch. In order to save the data permanently, you have to save with „STORE“ (14). Via the button „CAN Traces“ (15) a Trace window can be opened for checking the previously configured CAN settings.
-
Page 23: Firmware Flash
This panel is used to update the firmware of the OABR switch. The firmware will exclusively delivered by i-novative GmbH as i-nvoative firmware file (.iff). After Installing the GUI, the associated Flash software is also in the program folder: \ Firmware \. -
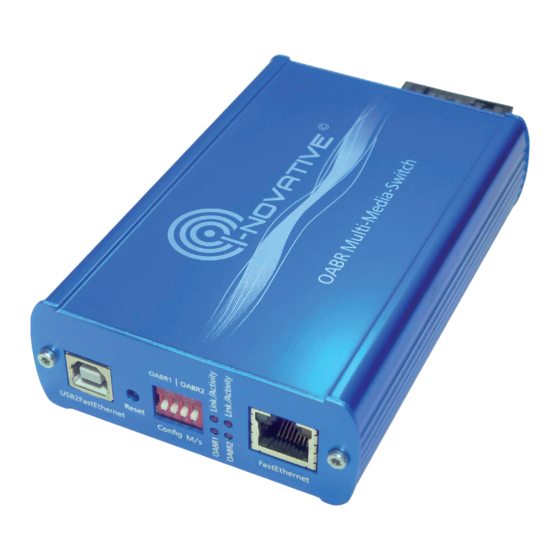
Page 24: Hardware-Configuration (Dip-Schalter)
2.7. Hardware-Configuration (DIP-Switch) The OABR Multi-Media-Switch can also be configured for basic functions without GUI via the front panel DIP selector switches: DIP1: off = OABR1-Slave; on = OABR1-Master DIP2: off = OABR2-Slave; on = OABR2-Master DIP3: not used DIP4: on = always on;... -
Page 25: Cleaning
- Port Mirroring - VLAN Tagging - CAN Settings - Ethernet WakeUp Settings • Power requirement: 8 to 16 Volt DC • Size: 120 x 80 x 35 mm • Robust aluminium case with EMC optimization • Manufacturer: i-NOVATIVE® GmbH page 25... -
Page 26: Important Instructions
BroadR-Reach® is a registered trademark of Broadcom Corporation, 5300 California Avenue Irvine, CA 92617 US 6. Manufacturer and Support ® i-novative is a registered trademark of i-novative® GmbH. If you have quaestions ans for any problems or product information please contact us directly Manufacturer: ® i-novative... - Page 27 page 27...
- Page 28 Gebrauchsanweisung Passives MHL/HDMI Kabel [1,5 Meter] Art.-Nr. 094794 INO_94798_OABR_Multi-Media-Switch Gebrauchsanweisung_V1.3_english...
Need help?
Do you have a question about the 2-Port OABR Multi-Media-Switch and is the answer not in the manual?
Questions and answers