Table of Contents
Advertisement
Quick Links
DRV-330
GPS Integrated Dashboard Camera
INSTRUCTION MANUAL
© 2018 JVC KENWOOD Corporation
B5A-2534-10(E)
Setting up the Device
<Be Sure to Do This Prior to Using It>
Step1: How to Install/How to Wire
Recommended installation position
Install the device in a position where it will not block the front view of the driver (position where
hidden by the rear-view mirror).
Install the device so that it is within the wiping range of the wiper.
Mounting the device to the center of the windshield behind the rear-view mirror will facilitate
optimal video recording.
CAUTION
When passing the power cord through the front pillar or another part, observe the following
points when performing the wiring work.
Wire the power cord farther forward or farther rearward than the airbag so that it does not interfere with
the airbag.
In the case of a vehicle in which the front pillar cover is fixed in place with special clips or the like, the clips
may need to be replaced after you remove the front pillar cover. For how to remove the front pillar cover,
the availability of replacement parts, and other information, contact the vehicle dealer.
Fix the power cord in place with commercially available soft tape or the like so that it does not interfere
with driving.
1
Confirm that your car is parked in a level area.
2
Use a commercially available cleaning cloth to wipe off any dirt
or grease from the location you are mounting the device.
3
Follow the procedure below to mount the device securely inside
the car.
Confirm the position in which to affix the device, and then affix it. To strengthen
the bond of the adhesive tape, let it set for over 24 hours before use.
Connecting via the provided car charger
1
Connect the provided car charger to the car's lighter socket,
connect the power cord to the device, and then arrange the cord.
2
Turn on the engine.
The power turns on and starts charging the device.
The lamp on the car charger lights green.
3
Let it charge like that for at least 3 minutes.
After it has charged for over 3 minutes, you can use it.
4
Adjust the mounted angle.
When you are actually using the device, make sure that the camera's field of
view is parallel to level ground and that the ground-to-sky ratio is about 6 to 4.
Variable angle
(perpendicularly)
6 : 4
80°
95°
5
Remove the protective sheet from the camera lens.
Protective sheet
6
Press and hold the power button until the power turns off. Once
again, press and hold the power button to turn it on again.
• Be sure to turn the power on again whenever you finish adjusting the angle.
In addition, turn the power back on whenever you leave the power on while removing
the device from the bracket or after the angle has changed and you readjust it while
the power is on.
The adjusted angle is recorded when the power is turned on.
Just in case ...
To prevent your recorded files from being overwritten, turn the power to the device off,
and then remove the memory card.
Camera lens
Formatting the memory card
As a rule of thumb, format the memory card before you use it and about once every two weeks.
We recommend that you save any necessary videos and still images to your computer.
1
Press the
button to display the menu.
2
Press the
/
buttons to select "Format", and press the
button.
Press the buttons associated with the icons that appear.
A confirmation message appears.
3
Press the
button.
Connecting via the CA-DR150
(optional accessory)
• Before connecting the device, be sure to read and understand the instruction manual that comes
with the CA-DR150 (optional accessory), and then mount it safely. Additionally, read about the
switch settings and wiring beforehand.
1
Do the settings for the "Voltage cut-off value settings" and "Off
timer settings".
Be sure to read the instruction manual that comes with the CA-DR150
(optional
accessory)
, and then do the settings.
2
Do the wiring.
The 5-V power supplied to the dashboard camera starts after a certain period (around 20 seconds),
even though the accessory's power is on, to allow the dashboard camera to assess the power
supply's voltage (12 V/24 V).
Connect the Dashboard camera and power cord.
Power cord (3.5 m)
Connect to the
mini USB port.
Switchbox
Power LED
Accessory cord (Red)
Ignition key switch
Connect to a power supply that
can be turned on and off with the
Accessory power
Fuse
switch.
supply
Fuse (2 A)
Battery cord (Yellow)
BATT
Connect to a power supply with a voltage always applied
Main fuse
regardless of whether or not the engine key is on or off at
a point after the power has passed through the main fuse.
Ground cord (Black)
Connect to a metal part of the vehicle (part of the chassis with an
Battery
GND
electrical connection to the negative side of the power supply).
3
Turn the engine key to on and let the device charge like that for at
least 3 minutes.
You can use it after it has charged for 3 minutes.
4
Adjust the mounted angle.
When you are actually using the device, make sure that the camera's field of view is
parallel to level ground and that the ground-to-sky ratio is about 6 to 4.
Refer to the illustration in step 4 of "Connecting via the provided car charger".
5
Remove the protective sheet from the camera lens.
Refer to the illustration in step 5 of "Connecting via the provided car charger".
6
Press and hold the power button until the power turns off. Once
again, press and hold the power button to turn it on again.
• Be sure to turn the power on again whenever you finish adjusting the angle. In addition,
turn the power back on whenever you leave the power on while removing the device
from the bracket or after the angle has changed and you readjust it while the power is
on. The adjusted angle is recorded when the power is turned on.
Step 2: Inserting and Formatting a Memory Card
1
Press and hold the power button until the power turns off.
2
Confirm that the power is off, and then insert your memory card into
the device.
Camera lens
To remove the memory card, press it so that it comes out a little, and then pull the
memory card out. After that, turn the power on again.
3
Press and hold the
button until the power turns on.
4
Format the memory card.
As a rule of thumb, format the memory card before you use it and about once every
two weeks. See "Formatting the memory card" for more about these operations.
If you do not use parking mode, the setup ends here for you.
If you plan on using parking mode, continue to Step 3.
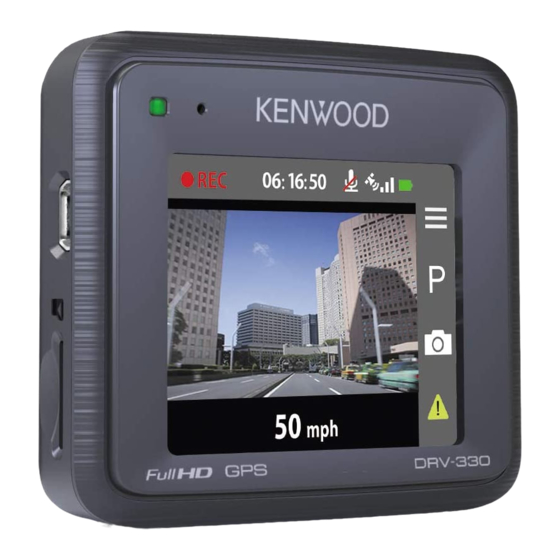
Names and Functions of Parts
The following explains how to do the device's basic operations and settings.
2
1
6
5
0
7
98
3
4
1 Insertion slot for the mounting bracket
2 Reset button
Resets the device.
3 Mini USB port (DC5V)
Connect the provided car charger cord or the separately-sold CA-DR150 on-board power cable for
dashboard cameras.
You can also connect a USB cable (commercially available) to connect to a computer.
4 microSD card slot
Insert an SD card for recording.
5
Camera lens
6
Speaker
7 LCD display
8 Microphone
Records audio.
Step 3: Turning on Parking Mode
1
Press the
button to display the menu.
2
Press the
/
buttons to select "Parking Mode", and press the
button.
Press the buttons associated with the icons that appear.
3
Press the
/
buttons to select "Detection", and press the
button.
4
Press the
/
buttons to select "On", and press the
button.
A confirmation message appears.
5
Press the
button.
6
Press the
/
buttons to select either 1/3 or 3/3 for "Storage
Allocation", and then press the
button.
2/3 is a setting for which there is no area for parked recordings.The initial value is set to
2/3.
• If you change the allocation, it erases the data in the memory card. Before changing
this setting, we recommend that you save any necessary videos and still images to
your computer.
Storage area
Memory card
Continuous
Event
Parked
Still images
allocation
capacity
(recording)
(recording)
(recording)
Approx. 32
Approx. 3
Approx. 3
Approx. 75
4 GB
minutes
minutes
minutes
images
Approx. 1 hour
Approx. 7
Approx. 7
Approx. 150
1/3
8 GB
and 5 minutes
minutes
minutes
images
of the allotted
Approx. 2 hours
Approx. 15
Approx. 15
Approx. 300
16 GB
capacity
and 10 minutes
minutes
minutes
images
Approx. 4 hours
Approx. 30
Approx. 30
Approx. 600
32 GB
and 20 minutes
minutes
minutes
images
Approx. 32
Approx. 6
Approx. 75
4 GB
minutes
minutes
images
Approx. 1 hour
Approx. 14
There is no
Approx. 150
2/3
8 GB
and 5 minutes
minutes
storage area for
images
of the allotted
Approx. 2 hours
Approx. 30
parked record-
Approx. 300
16 GB
capacity
and 10 minutes
minutes
images
ings.
Approx. 4 hours
Approx. 60
Approx. 600
32 GB
and 20 minutes
minutes
images
Approx. 32
3/3
4 GB
minutes
Allocated by
Approx. 1 hour
number of files
8 GB
and 5 minutes
(Continuous
Max. of 20 files
Max. of 10 files
Max. of 10 files
depends on the
Approx. 2 hours
16 GB
space remain-
and 10 minutes
ing for other
Approx. 4 hours
32 GB
files)
and 20 minutes
• The recording times and the numbers of still images are guidelines. The actual times may be shorter due to
the recording conditions.
• When the storage area starts to run out, the old recordings are deleted as new recordings are re-
corded.
A confirmation message appears.
7
Press the
button.
The parking mode setting turns on.
If you have connected the CA-DR150
, go to step 8.
(optional accessary)
8
Confirm that "Medium" is set as the selection for "Auto Entry" in the
third operation in procedures 1 and 2 of "Step 3: Turning on Parking
Mode".
• The setting at the time of purchase for the device's "LCD Standby" is "Always On". The
screen remains bright during the parked recording mode, as well. If you want to make the
screen display darker, refer to "Changing the Settings for the Screen Display Time during
Continuous Recording and Parking Monitoring" on the reverse side.
9 Indicator LED
Status
Charge
Recording status
Lit green
Charging
Not recording*
Not lit
Not charging
Not recording*
Flashing green and
Charging
Recording
orange alternately
ー
Lit red
Monitoring parking mode
ー
Flashing red
Recording
* "Not recording" indicates that the menu is displayed or a recorded file is playing.
0 Operation buttons
Operate the device using these.
The functions of the 4 buttons are indicated by the icons that appear on the screen.
The functions of the buttons differ depending on the screen that is displayed.
The screen's icons are associated with the operation buttons.
Enter the settings menu.
Press and hold to turn off the power.
Activate parked recording manually when turning
the parking mode on.
Take still images.
Press to start recording an event.
Recording Modes
Function 1
: Continuous recording
Always records video while you are driving.
Continuous recording
The device is always recording, from when it is turned on to
Go
when it is turned o .
Arrived
If you turn the key to ACC, the device's power turns on and, after a few seconds, starts to automatically
Event recording
do continuous recording (always recording). In continuous recording, files are separated and saved.
When the device detects an impact, it extracts only the le that detected the impact from
the continuous recording and saves it as a separate le.
Time elapses →
Go
Continuous
Arrived
Continuous recording
recording
Continuous recording
File
File
Event
ƒ The recording data is saved to the "Video" folder.
recording
ƒ Recorded files are automatically overwritten starting from the oldest file.
Continuous recording
ƒ You can set the recording time for 1 file in the settings menu's [Video Reording] — [Video
The device is always recording, from when it is turned on to
Clip Length]. (Reverse side) At the time of purchase, this is set to 3 minutes.
Go
when it is turned o .
Arrived
Parked recording
Function 2
: Event recording
Recording begins if the device detects impacts or movements for about 25 minutes after your car
Records when it detects an impact while you are driving.
is parked in a parking lot, or someplace, and you turn o the device.
Parked recording function:
Event recording
Parked recording begins
standby
When the device detects an impact, it extracts only the le that detected the impact from
Max. standby time of
about 25 minutes*
the continuous recording and saves it as a separate le.
Go
Arrived
Continuous recording
Continuous recording
* When the "LCD Standby" is set to "10 sec (at the time of
Event
purchase)" and the internal battery is fully charged.
recording
Parked recording
The device detects sudden impacts, rapid acceleration, abrupt turns, unexpected collisions, and such,
Recording begins if the device detects impacts or movements for about 25 minutes after your car
and records the event.
is parked in a parking lot, or someplace, and you turn o the device.
Continuous recording
If you want to manually start an event recording, press the event recording button. When an event has
Parked recording function:
been recorded, the device returns to continuous recording (always recording).
The device is always recording, from when it is turned on to
Parked recording begins
standby
Go
when it is turned o .
Arrived
Max. standby time of
Impact detected
about 25 minutes*
Time elapses →
Continuous recording
File
File
Saves le to "Event" folder
Event recording
* When the "LCD Standby" is set to "10 sec (at the time of
purchase)" and the internal battery is fully charged.
When the device detects an impact, it extracts only the le that detected the impact from
the continuous recording and saves it as a separate le.
ƒ The recording data is saved to the "Event" folder.
ƒ Recorded files are automatically overwritten starting from the oldest file.
Go
Arrived
Continuous recording
Continuous recording
ƒ You can set the recording time for 1 file in the settings menu's [Recording settings] —
[Recording time settings]. (Reverse side) At the time of purchase, this is set to 3 minutes.
Event
recording
Function 3:
Parking recording
Records when it detects impacts or movements while you are parked, as well.
Parked recording
Recording begins if the device detects impacts or movements for about 25 minutes after your car
is parked in a parking lot, or someplace, and you turn o the device.
Parked recording function:
Parked recording begins
standby
Max. standby time of
about 25 minutes*
* When the "LCD Standby" is set to "10 sec (at the time of
purchase)" and the internal battery is fully charged.
Impact or movement detected
Time elapses →
Impact and movement
monitoring
Saves le to "Parking" folder
File
(about 10 seconds)
ƒ To use the parked recording function, refer to "Step 3: Turning on Parking Mode"
ƒ Recorded files are automatically overwritten starting from the oldest file.
In parking mode, the device monitors for impacts with your vehicle and movements within the range
of the lens. If it detects movements or impacts with your vehicle while monitoring, it activates parked
recording.
ƒ The data for parked recording is saved in the "Parking" folder.
ƒ The parked recordings extend to a maximum of 60 seconds, depending on the detection of
impacts and movements.
ƒ Parked recordings start a few seconds after the device detects impacts or movements.
ƒ You can set the sensitivity for monitoring methods in the settings menu's [Parking Mode] —
[Detection Method].
■ If You Want to Use the Parked Recording Function Longer
Use the separately-sold CA-DR150 on-board power cable for dashboard cameras and turn
parking mode on.
ƒ To do continuous recording while parked, set the [Auto Entry] settings to [Manual]. While
overwriting older files without switching to parking mode, the device continues recording to
the "Video" folder until it reaches the off timer settings value.
The Device's Screens and Operations
Name of the
Screen
Button explanations
screen
: Displays the menu.
R
EC
0
6
1
6 0
5
:
:
: Appears when the parking mode is on.
Continuous
P
Press to enter parking mode.
0 0
recording
: Takes still images.
!
: Starts recording an event.
R
EC
0
:
6
1
6 0
:
5
: Takes still images.
Event record-
0 0
: Stops recording the event and returns to
ing
continuous recording.
Emergency Recording
: Press to show a message. Pressing
stops
R
EC
0
6
1
6 0
5
:
:
the parked recording mode and returns to
Parking mode
continuous recording.
While motion
A bar appears on the right side of the screen if you
detection is
select either "Both" or "Only Motion" in "Detection
engaged
**
Method". If motion is detected, the bar extends
km/h
upward.
R
EC
0
6
1
6 0
5
:
:
: Press to show a message. Pressing
stops
Parking mode
the parked recording mode and returns to
Impacts
continuous recording.
**
km/h
Function 4
: Still image recording
Takes a still image of the displayed video.
1
Press the
button.
ƒ The recording data is saved to the "Photo" folder.
ƒ Still image files are automatically overwritten starting from the oldest file.
ƒ You cannot take still images while doing parked recording, displaying menus, or
playing back recorded files.
Playing a Recording File
Use the device to play back files that are recorded on it.
1
Press the
button to display the menu.
2
Press the
/
buttons to select "File Playback", and press the
button.
Press the buttons associated with the icons that appear.
3
Press the
/
buttons to select a folder that you want to play
back, and then press the
button.
4
Press the
/
buttons to select a file that you want to play back,
and then press the
button.
The playback menu appears when you press the
button while playing back a file.
You can select the menu by pressing the
/
buttons.
Play/Pause:
Press the
button to play back a file you are viewing.
Move to Event:
Press the
button to move a file you a viewing to the "Event" folder.
Delete:
"Are you sure you want to delete it?" appears when you press the
button.
If you press it again, the file you are viewing is deleted.
Using the PC Application
KENWOOD ROUTE WATCHER II is a PC application for displaying video recorded with the device.
System Requirements for KENWOOD ROUTE WATCHER II
OS: Microsoft Windows 10, Windows 8.1, Windows 7*
(except for the Windows 10 Mobile, Windows RT)
* Windows 7 Service Pack 1 must be installed.
OS: Apple Mac OS X 10.11 (El Capitan) or later
Microsoft, and Windows are registered trademark or trademark of Microsoft Corporation in the US and other
countries.
Macintosh, Mac are trademarks of Apple Inc., registered in the U.S. and other countries.
Installing the Software
ƒ Install the software in a computer environment in which you have administrator's rights.
1
Download the installer from http://www.kenwood.com/cs/ce/.
2
Install according to the on-screen instructions.
Advertisement
Table of Contents

Related Manuals for Kenwood DRV-330


Summary of Contents for Kenwood DRV-330
- Page 1 10 minutes When you are actually using the device, make sure that the camera's field of KENWOOD ROUTE WATCHER II is a PC application for displaying video recorded with the device. ing for other Approx. 4 hours •...
- Page 2 Built-in JPEG (Max.1920 x 1080) deployment of airbags. Hereby, we declare that the radio equipment DRV-330 is in compliance with Directive 2014/53/EU. The full text of the EU declaration of Collision sensitivity Recording media • When installing the device in a vehicle equipped with a driving support system, check •...
Need help?
Do you have a question about the DRV-330 and is the answer not in the manual?
Questions and answers