Table of Contents
Advertisement
Quick Links
Advertisement
Table of Contents

Related Manuals for Street Guardian SG9665XS V2


Summary of Contents for Street Guardian SG9665XS V2
-
Page 1: User Manual
Digital video recorder Sg9665xs V2 User manual... -
Page 2: Product Safety & Precautions
Product safety & precautions Thank you for purchasing the Street Guardian SG9665XS V2 Digital Video Recorder (DVR), please read and follow this guide before installation and use. The camera is designed to operate at temperatures of between -10°c to +60°c, operating outside of these temperatures may produce unpredictable results. - Page 3 Introduction The Street Guardian SG9665XS V2 Digital Video Recorder is engineered to require minimal user intervention, it is pre-configured with logical default settings and is supplied ready to use once installed with a minimum of adjustment needed to personalise to your needs.
-
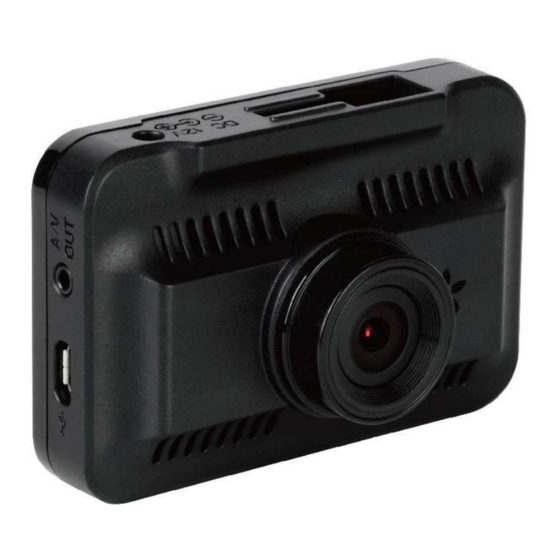
Page 4: Camera Layout & Overview
Camera layout & Overview 1. Power button 2. Menu button Playback button 4. Up/Mic On/Off button 5. OK button 6. Down/File save button 7. LED indicator light Mount bracket slot Memory card slot 10. USB service port 11. AV out port 12. - Page 5 Settings The DVR is pre-set with logical default settings and is ready to operate with minimal adjustment required, when powered on the internal capacitors will charge, the DVR will then power up and recording will commence. [Note] The DVR does not contain a battery and will need to be connected to a power source to configure settings, connecting to a computer USB port as a power source is not supported.
-
Page 6: Menu Options & Defaults
Menu options & defaults To access the menus any active recording must be stopped by pressing the key. Following is a list of the menu items, their default settings listed in BLUE and a brief description of each setting. Resolution – 1080FHD –... - Page 7 G-Sensor – LOW SENSITIVITY – 3 axis G-Sensor which will automatically lock the current recording if triggered. DATE/TIME – DD/MM/YYYY enter the date and time and choose the display format, press the key to advance to the next option. menu Boot delay –...
-
Page 8: Installation
Installation The DVR should preferably be mounted behind, or to either side of the rear view mirror and within the sweep area of the windscreen wipers. Before mounting the DVR ensure that there is enough room to access and remove the memory card, there is sufficient room for the cables, and adequate clearance for the mirror to be adjusted. - Page 9 1. Once a suitable mounting location is determined choose which mount will be used, if using the adhesive mount ensure that the window is clean prior to application, remove the backing tape and press and hold the bracket firmly against the glass for 2 minutes, then wait 20 minutes before attaching the camera.
-
Page 10: Description Of Button Functions
Description of Button Functions [Note] The buttons have different functions depending on the current state, recording, standby or playback. 1.<POWER> Button Function 1: Power on/off When powered off, press the <POWER> button to power on the DVR. The DVR begins to work automatically. When powered on, press and hold the <POWER>... - Page 11 buttons to navigate the menu options, press the <OK> button to confirm the selected option. After completing the setting press the <MENU> button to exit the menu setting function. Function 2: Playback mode Whilst in the playback menu press the < MENU> button to navigate between the Video and Event folders.
- Page 12 Function 2: Disable or enable audio-recording function In recording mode press the <UP> button to disable the audio recording function. Press the <UP> button again to enable the audio recording function. The status of the MIC will be indicated on the LCD display.
- Page 13 Function 2: Page down In the menu setting and playback modes press the <DOWN> button to navigate the menus and submenus for selection. [Note] When the LCD display is in the standby mode any key will wake the screen, the screen must be on before each button option as described is functional.
-
Page 14: Basic Operation Description
Basic operation description 1. Automatic Recording When you start your vehicle the DVR is automatically started and the recording commences. At power off the DVR will automatically save the current recording and will power down. The recordings are saved according to the setting chosen in the loop recording menu. - Page 15 If the CMOS sensor detects movement the DVR will commence recording. If no movement is detected the recording will pause, if further movement is detected recording will recommence. To exit the motion detection mode, enter the menu again, and set the state of the <MOTION DETECT>...
-
Page 16: Hints And Tips
hints & tips Example above shows side by side video where one camera has a single fingerprint on the lens, keeping the lens clean is imperative. -
Page 17: Frequently Asked Questions
Frequently asked questions Q. Can I connect the camera to my computer to access the recordings? A. Computer access is not explicitly supported, the power requirements of the camera can exceed the output level of most computers. Q. My vehicle has a USB port, can I connect the camera there? A. - Page 18 to return the card to a default state, then format the card in the camera before use. Q. How can I test my memory cards to make sure they are ok? A. You can download Windows memory card test software from the support page of our website https://streetguardian.info/support Q.
-
Page 19: Firmware Update Instructions
Firmware update instructions Any updated firmware will be made available on the support section of our website https://streetguardian.info/support To update the firmware the process is as follows • Extract the zipped firmware file downloaded from our website • Delete any files from the memory card •... -
Page 20: Technical Specifications
Technical Specifications Processor Novatek 96650 Image Sensor Sony Exmor IMX323 Lens f/2.0, 7 Element Glass Angle of View 112° Horizontal, 135° Diagonal Resolution Full HD 1920×1080 @15mbit/sec Frame Rate 30FPS Video Format H.264 MOV AV Output NTSC/PAL LCD display 2.0-inch Storage Temp -20°C to 70°C Operating Temp:... -
Page 21: Further Information
Information about the latest specification, any amendments, the availability of replacement parts and accessories, warranty information, detail of other sales region product specification and the respective user manuals will be listed on the support section of our website https://streetguardian.info/support/ www.streetguardian.info © Street Guardian 2018...
Need help?
Do you have a question about the SG9665XS V2 and is the answer not in the manual?
Questions and answers